Identity Resolution Assistant
Identity Resolution Assistant
Jun 25, 2026
10 min read. ~1 hour to complete
Amperity specializes in using AI to turn raw data into a growing library of robust, unified datasets and durable customer profiles that are available to support all of your brand’s use cases.
By the end of this guide you will know how to do the following:
Sync data from a data warehouse to Amperity.
Apply semantic tags to your data sources using AmpAI.
Build an identity graph that links disparate profile records together using a unique and persistent identifier.
Sign up for a free trial of Amperity.
Sign up for a free trial to see how you can use Amperity to build robust, unified datasets and durable customer profiles that support all of your brand’s use cases. You may use trial data provided by Amperity or you may upload samples of your own customer data.
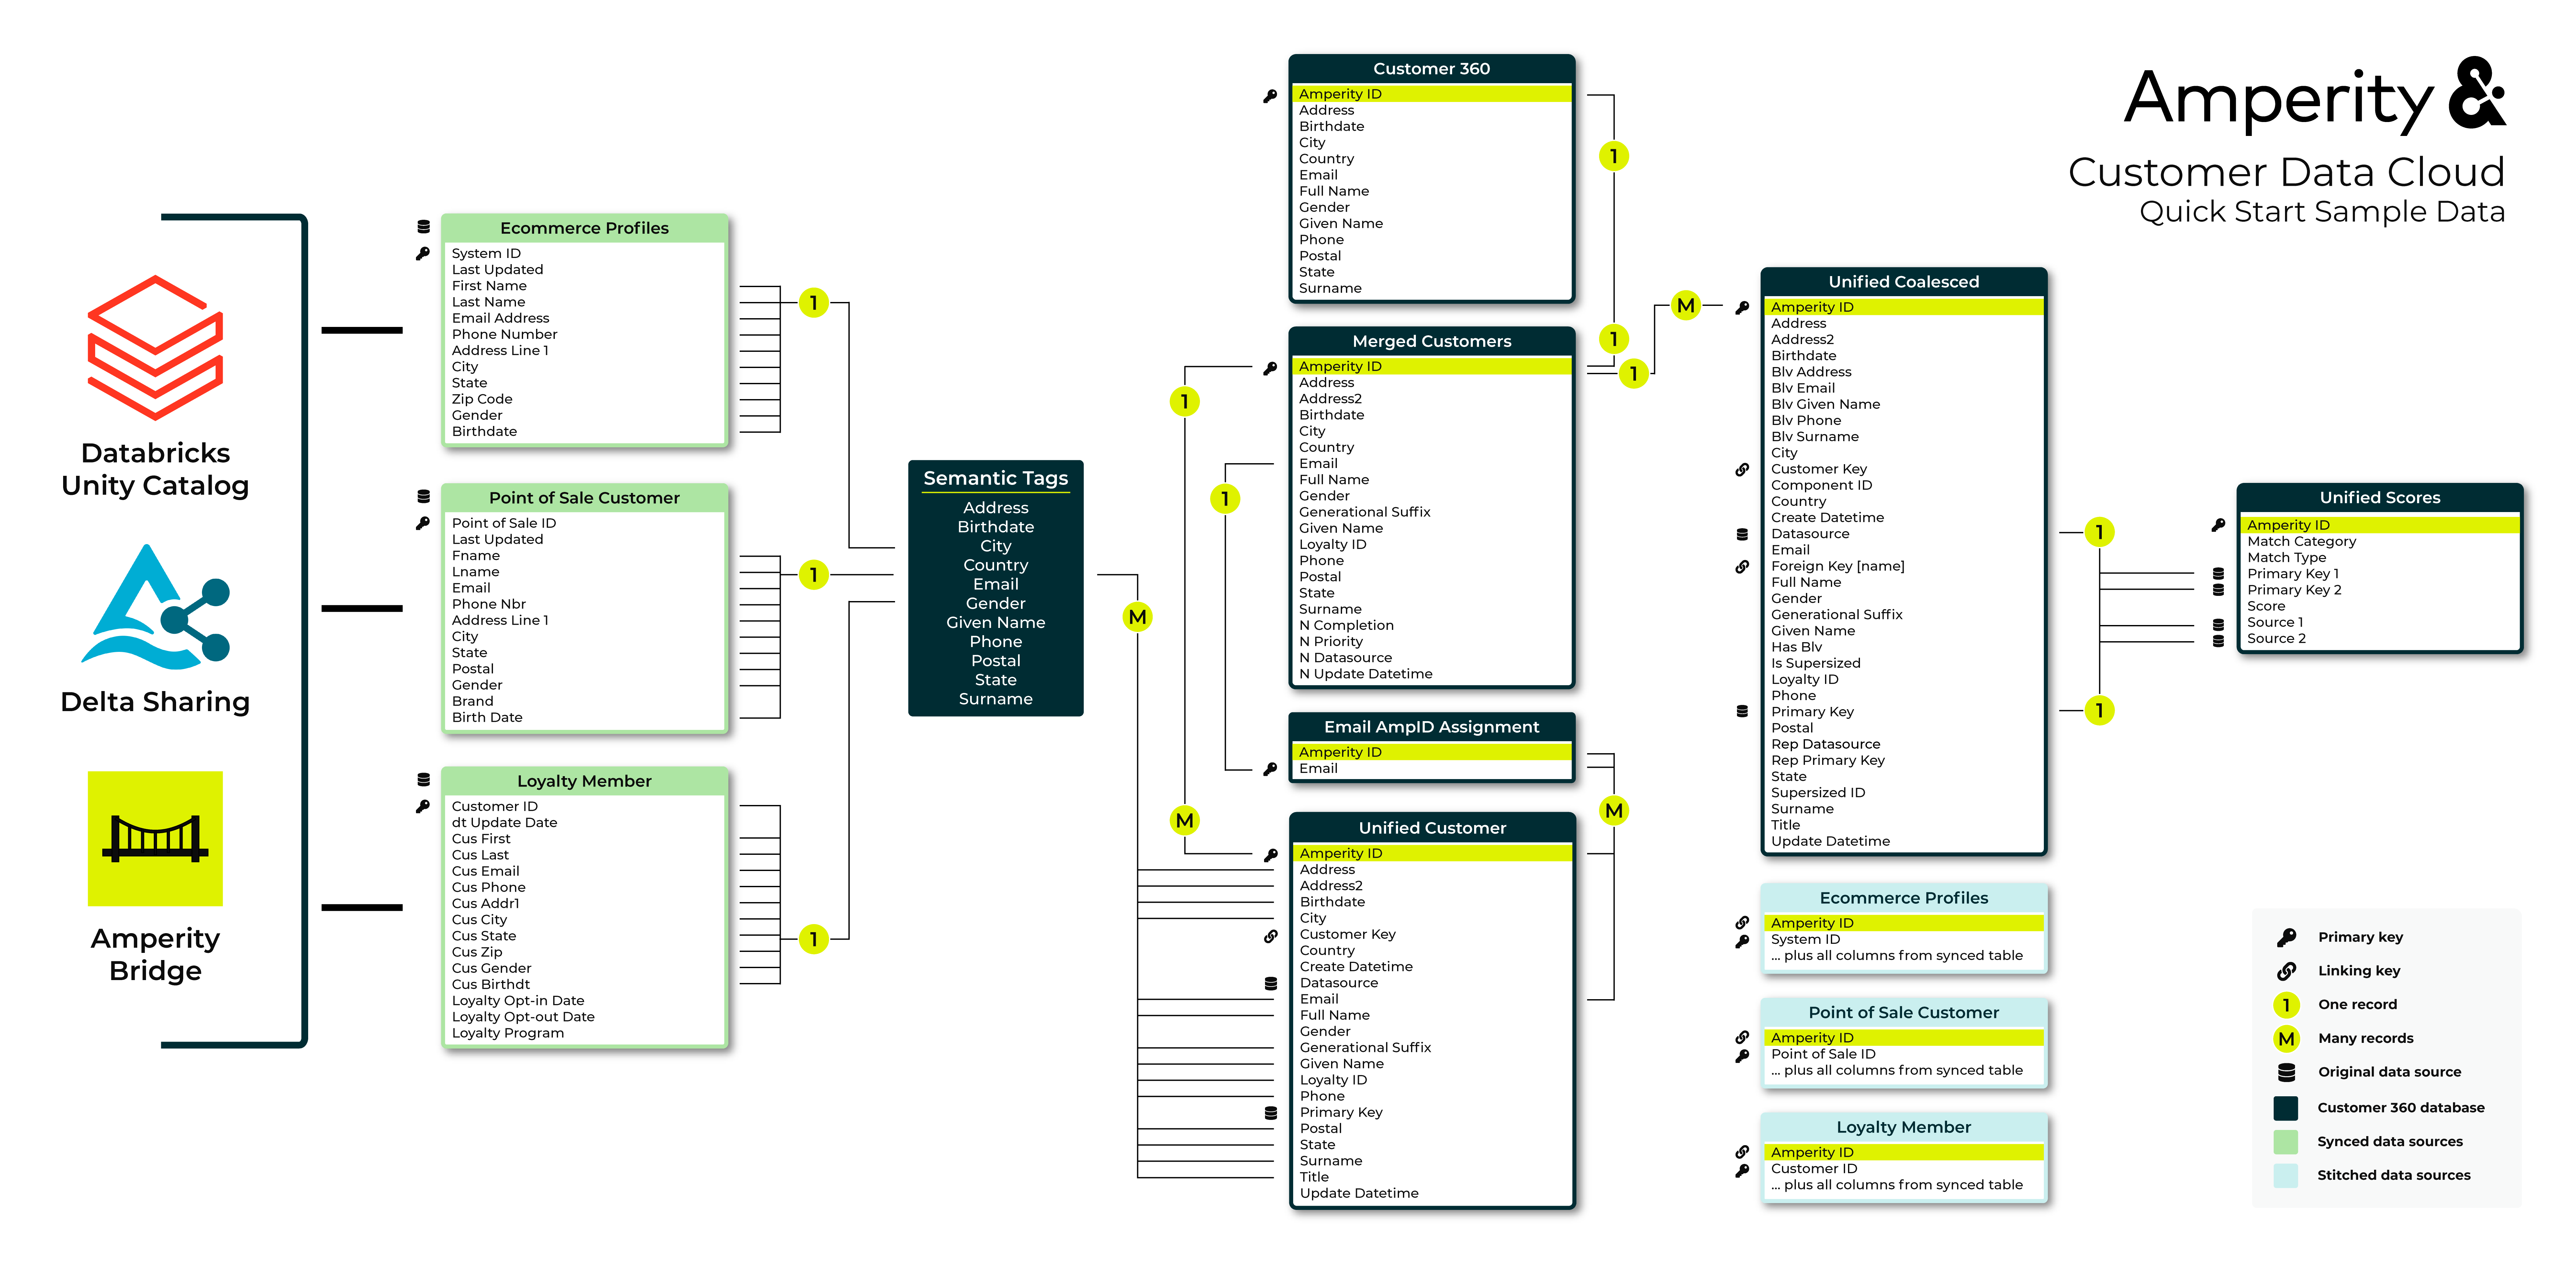
Identity Resolution Assistant data model
The following diagram shows the data model for the sample data that is part of the Identity Resolution Assistant. Color coded sections identify which groups of tables are associated with source customer profiles, stitched domain tables, and unified tables.
Note
Click this diagram to open it in your full browser window. Open this diagram in a new tab or right-click that link to save a copy to your computer.
Prerequisites
To follow along with this guide you need:
Access to an Amperity account.
Approximately ~1 hour of time to complete all of the steps within the guide.
Source data. Amperity has a set of sample data that can be used to complete the steps in this guide. You may provide your own data with customer profiles.
Note
Amperity sample data has ~10 million customer records.
Connect to data sources
To connect Amperity to data sources, do the following:
Log in to Amperity.
Open the Quick start page. This is located in the left-side menu at the top.
Under Identity resolution click Add datasource.
Select one of the following options: More sources, and then choose Sample data.
This opens a page that will walk you through steps for connecting to Amperity to sample customer profiles.
Example: Sample data
Use Amperity Bridge to connect to sample customer profile data using sample customer profiles provided by Amperity.
To connect to Amperity sample data

|
In Identity resolution, next to Inbound sharing data click Add bridge. 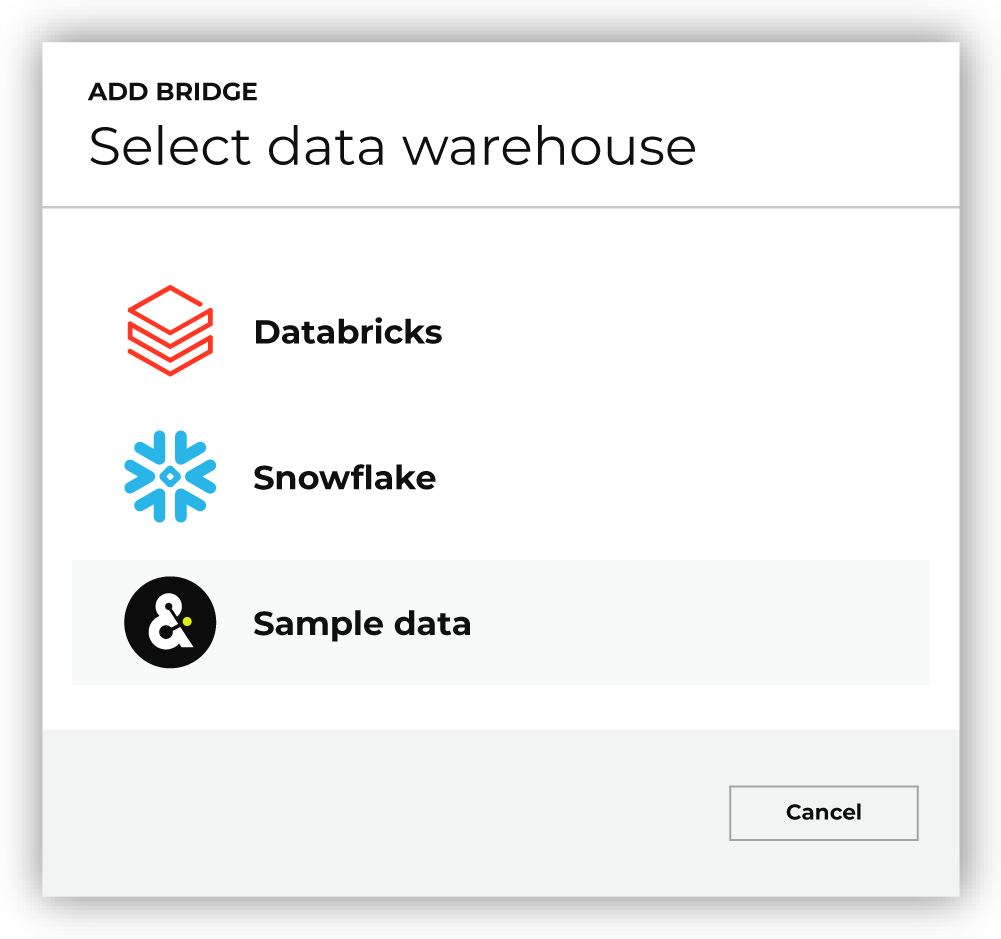
This opens the Add bridge dialog box. Choose Sample data. This opens the Select tables dialog box. |

|
Use the Select tables to share dialog box to select the sample data from “amperity-trial/trial-data”. 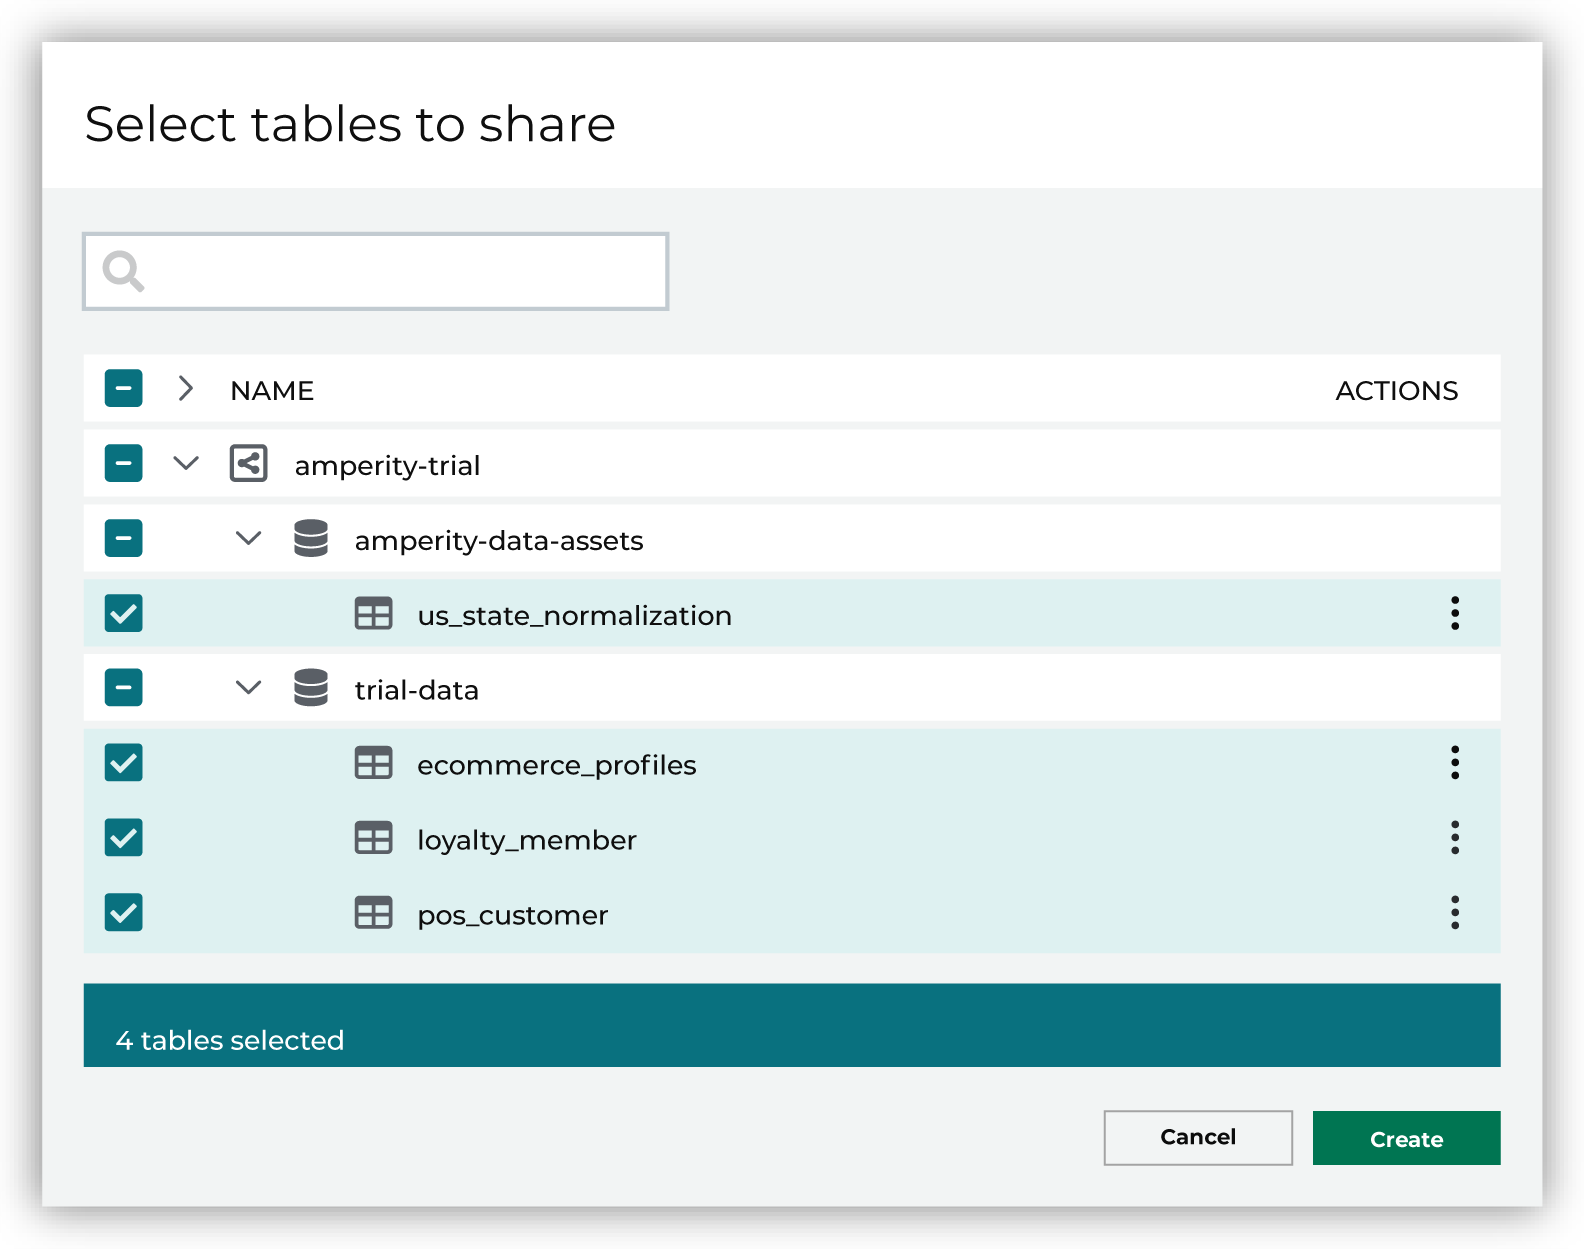
When finished, click Create. This opens the Domain table mapping dialog box. |

|
In the Sample data dialog, review the table names, and then click Save and sync. 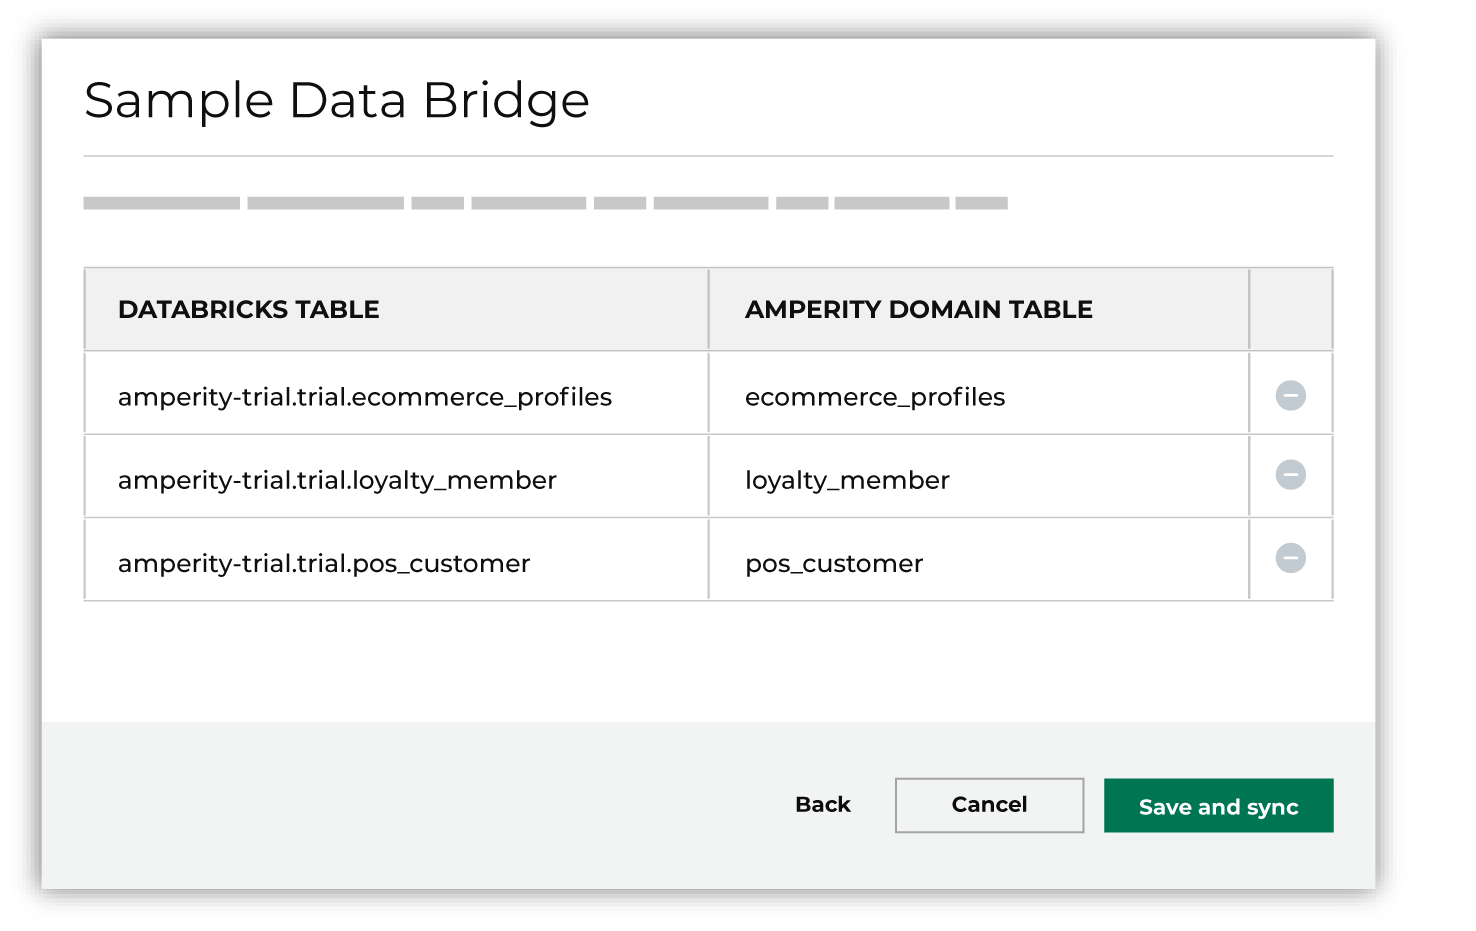
This will start the sync between Amperity and the sample data source. Wait for the sync to finish before continuing to the next step. Amperity sample data should sync in about three minutes. |
Add semantic tags
Semantic tags are applied to fields in incoming data sources to indicate the type of data that is contained within those fields.
The semantic tag tells Amperity how to treat the data, regardless of how the data is formatted, named, or originally stored.
For example, a field named evar_15 has email addresses. This field should have the email semantic tag applied to it. This tag tells Amperity that the contents of the evar_15 field are
Email addresses
Personally identifiable information (PII)
Email addresses are an important part of the identity resolution process. Using a semantic tag to tell Amperity which fields in your data sources contain email addresses saves you a lot of time because you do not have to do any data processing, ETLs, or data modeling before making that data source available to Amperity.
Connect the data, apply the semantic tag, and build customer profiles.
You have two options:
Let AmpAI apply semantic tags
To let AmpAI apply semantic tags
|
|
In Identity resolution, if you are using Amperity sample data, next to Identity tables, click AmpAI select. AmpAI will analyze the sample data and identify which tables contain PII, and then idenfity which semantic tags should be applied. You may change the tags AmpAI assigns to fields. Click Continue. Wait for the AmpAI to finish applying semantic tags before continuing to the next step. This process takes up to 5 minutes to complete. |
|
|
When AmpAI is finished applying semantic tags, next to Identify your fields, click Edit. This opens the Semantic tag editor. For each table that AmpAI applied semantic tags a list of fields, field types, and semantic tags are shown. AmpAI will correctly assign semantic tags to all of the sample data tables, so you can click the Save button in the top right. Important AmpAI will apply semantic tags for PII correctly most of the time, but it is good to double-check and be sure. If you think they are wrong, just remove the tag AmpAI applied and find the correct semantic tag. |
Run Stitch
After applying semantic tags to all source tables that require them, you are ready to run stitch
To build the identity graph
|
|
In Identity resolution, next to Generate Amperity IDs, click Run Stitch. Wait for the Stitch to finish running before continuing to the next step. This process will 20-30 minutes to complete for Amperity sample data. Note The amount of time it takes to complete against your own data depends on the volume of data that is made available to Stitch, the number of unique data sources with PII, and the complexity of matching individual records across data with unique customer profiles. |
|
|
The Identity Resolution Assistant will refresh to show high-level results of identity resolution similar to: 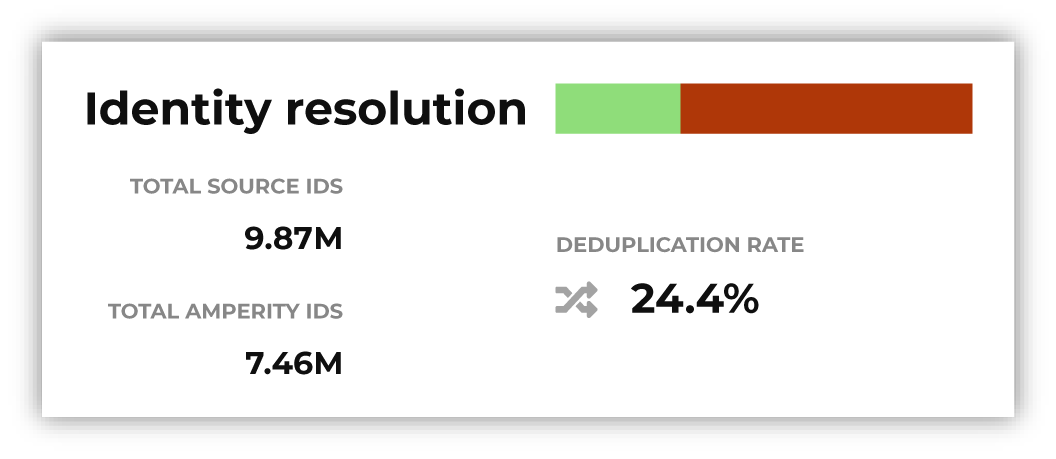
Click the box to open the Identity resolution page. This page shows a summary and a collection of benchmarks, along with access to the configuration that was used to get these results. |
|
|
The Summary tab shows a comparison of domain tables and the record pairs identified both within each data source and across all data sources. This is presented as an UpSet plot chart with links to the underlying data sources. |

|
The Benchmark tab shows the results of a series of tests that are run by Amperity, grouped by “Optimal” and “Abnormal”. Optimal benchmarks are shown when test results are within the typical range for most brands. 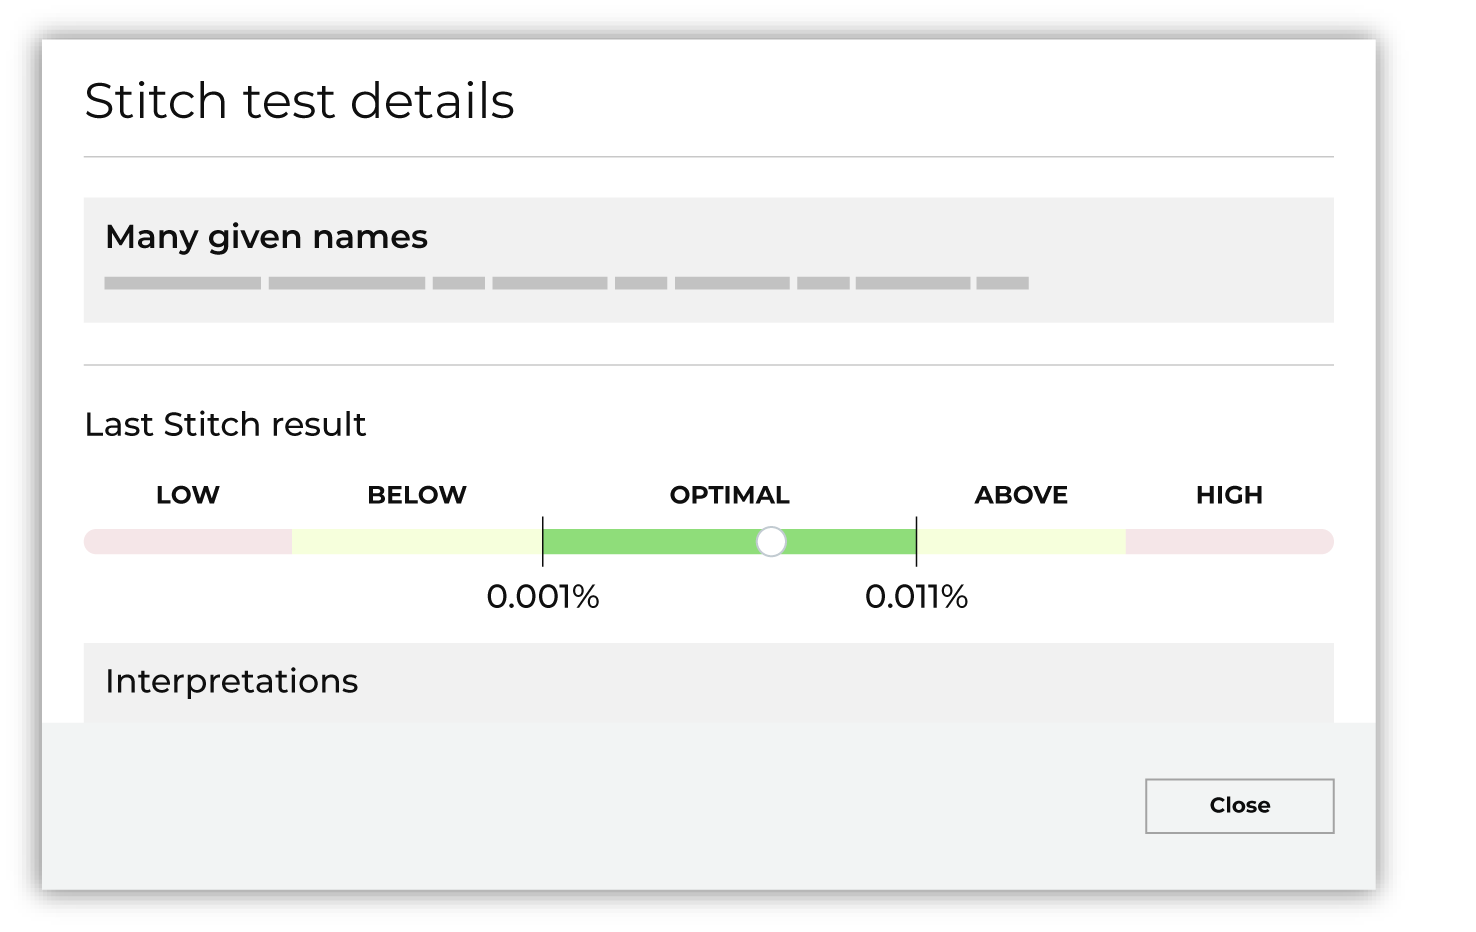
Abnormal benchmarks are shown when test results are above or below the typical range for most brands. 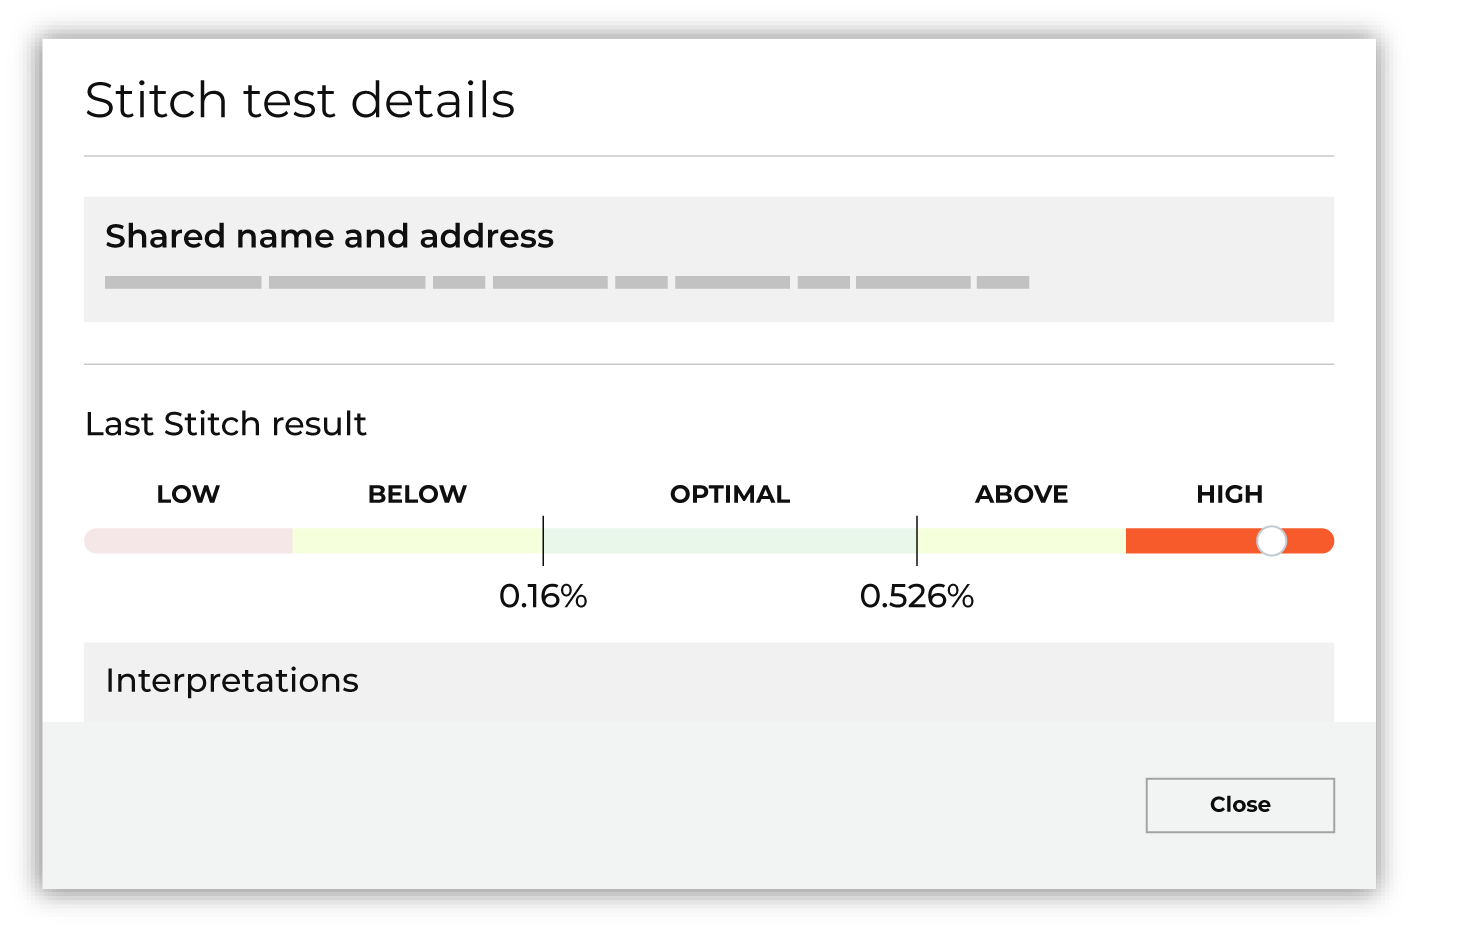
For each test with abnormal results:
Note Amperity sample data shows abnormal benchmarks. This is because the data is generated and does not represent real customer profile data. If you used your own customer profile data you should expect to see more optimal benchmarks and fewer abnormal benchmarks. |
Create database
A customer 360 database uses standard core tables generated by the Stitch process. These tables offer a unified view of your brand’s customer data, including customer profiles and interaction records, organized, merged, and linked together by the Amperity ID.
To create a Customer Profile database
|
|
Open the Customer 360 page, select the Databases tab, and then click Create Database. Give the database a name, set the value for Template to “Customer 360”. You can keep the default “Admin” permissions. Click Create. |
|
|
The Database Editor page opens. The following tables is in the customer profile database:
Click Activate. This will return you to the Customer 360 page. |
|
|
For the database you just created click Run. This will load records to each of the customer profile database tables. Wait for the data to finish loading before continuing to the next step. This process will 3-5 minutes to complete for Amperity sample data. |
Merge policy
Merge policy defines how the Merged Customers table is maintained by Amperity. The Merged Customers table collects PII data from all source datasets, and then collapses the best data into single row that is unique by Amperity ID. Each row in the Merged Customers table represents a single customer’s best set of profile data.
Use merge policy to tell Amperity which tables are the most reliable sources of customer profile data.
To define merge policy
|
|
Source priority can be defined for names, physical addresses, email addresses, phone numbers, birthdates, and gender. To configure source priority for profile attributes open the Profile Builder. For each profile attribute, use the icon to move the list of tables into the desired order, and then click Save. How source priority works Tables A, B, and C all contain a field with email addresses to which the email semantic tag is applied. They are ranked 1) table A, 2) table B, and 3) table C. If the value in table A is “justin@email.com” then the priority for email address is table A and the value “justin@email.com”. If the value in table A is NULL and the value in table B is “justinc@email.com” then the priority for email address is table B and the value “justinc@email.com”. If the values in tables A and B are NULL and the value in table C is “justin.c@email.com” then the priority for email address is table C and the value “justin.c@email.com”. |
|
|
Source table precedence can also be defined for data sources that contain semantic tags that are not grouped by profile attribute. Precedence determines which tables are more likely to contain high quality customer profile data, as determined by your brand. The list of domain tables under Source_Priority must contain at least one domain table that has been made available to Stitch and has fields to which profile semantic tags have been applied. To configure source table precedence, open the Profile Builder. Under Source table precedence, use the icon to move the list of tables into the desired order, and then click Save. |