Profile API
The Profile API enables your brand to access customer profiles using a collection of RESTful API endpoints to build and support real-time use cases:
Identify returning customers
Personalize welcome messages and emails
Extend customer profiles for campaigns managed from Braze, Movable Ink, Criteo, Salesforce Marketing Cloud, and other downstream marketing applications.
Amperity Learning Lab
Open Learning Lab to learn more about how your brand can use the Profile API . Registration is required.
How the Profile API works
Use the profile endpoints in the Amperity API to access customer profile indexes in your Amperity tenant. Any collection of customer profile attributes that can be included in a customer 360 table can be accessed from a Profile API endpoint.
Each endpoint is defined by a query that you build in the Queries page, after which it may be generated as an index within the Profile API. A query defines an index, which is set of fields that exists within your unified customer profiles.
Note
The maximum number of fields for an index is 30.
Use Profile API endoints to support use cases, such as:
Loyalty programs
Personalize the experience for omnichannel customers that log into your website
Using extended profile attributes with downstream systems, such as Braze, Cordial, and Salesforce Marketing Cloud
Most recent purchases, favorite products, or other aspects of your product catalog
Real-time personalization for websites
Product suggestions
Profile API endpoints
The Profile API has the following endpoints:
What policies users need?
The Profile API requires the following policies to be assigned to users within your tenant:
Allow Profile API administration This policy allows users to use the Destinations page to manage endpoints in your tenant’s Profile API.
Allow API key administration This policy allows users to use the Users and Activity page to manage API keys and tokens required by Amperity APIs.
These policies may be assigned to the same user.
GET /indexes
Use the GET /indexes endpoint to return a list of indexes.
Request URL
Direct all requests to the GET /indexes endpoint to the request URL. The request URL uses the base URL with the endpoint path appended.
Amazon AWS
https://app.amperity.com/api/indexes
Microsoft Azure
https://{tenant-id}.amperity.com/api/indexes
cURL example
A request to the GET /indexes endpoint is similar to:
curl --request GET \
       'https://app.amperity.com/api/indexes \
     --header 'amperity-tenant: {tenant-id}' \
     --header 'api-version: 2025-07-31' \
     --header 'Authorization: Bearer {token}'
This example is formatted for readability in a narrow page layout.
Request parameters
The following table describes the parameters that may be used with the GET /indexes endpoint.
Parameter |
Description |
|---|---|
limit |
Integer. Optional. The maximum number of records to include in a single page of results. Default value: |
next_token |
String. Optional. An opaque token that is used to paginate results. Omit the next_token property to return the first page. Use the cursor value for next_token that was returned in a response to view the next page of results. For example: ABCd1fghIJk2l3M Note The possible values for next_token are returned within the 200 response. Important The value for next_token cannot be NULL. |
with_total |
Boolean. Optional. Set this value to true to include a total count of all results. Default value: false. Note Obtaining the total count of all results can be an expensive operation when there is a high number of pages in the results set. |
Response
The 200 response returns a list of indexes.
 1{
 2  "data": [
 3    {
 4      "id": "{id}",
 5      "name": "{name of index}",
 6      "description": "{description of index}",
 7      "created_at": "{timestamp}",
 8      "updated_at": "{timestamp}"
 9    }
10  ],
11  "next_token": "string",
12  "total": 0
13}
For example:
 1{
 2  "data": [
 3    {
 4      "id": "idx-xyz789",
 5      "name": "loyalty_members",
 6      "description": "Profiles from the loyalty program",
 7      "created_at": "2025-07-30T22:16:04.409Z",
 8      "updated_at": "2025-07-30T22:16:04.409Z"
 9    }
10  ],
11  "next_token": "string",
12  "total": 0
13}
A 200 OK response has the following parameters.
Parameter |
Description |
|---|---|
data |
A JSON array of data for an index. For example: 1{
2 "data": [
3 {
4 "id": "idx-xyz789",
5 "name": "loyalty_members",
6 "description": "Profiles from the loyalty program",
7 "created_at": "2025-07-30T22:16:04.409Z",
8 "updated_at": "2025-07-30T22:16:04.409Z"
9 }
10 ],
11 "next_token": "string",
12 "total": 0
13}
|
next_token |
The cursor value to use in the next request to return the next page of results. Note When the value for next_token is empty, the last page in the results set has been returned. |
total |
The total number of returned indexes. |
GET /indexes/{id}
Use the GET /indexes/{id} endpoint to return the details for a specific index ID.
Request URL
Direct all requests to the GET /indexes/{id} endpoint to the request URL. The request URL uses the base URL with the endpoint path appended.
Amazon AWS
https://app.amperity.com/api/indexes/{id}
Microsoft Azure
https://{tenant-id}.amperity.com/api/indexes/{id}
cURL example
A request to the GET /indexes/{id} endpoint is similar to:
curl --request GET \
       'https://app.amperity.com/api/indexes/{id} \
     --header 'amperity-tenant: {tenant-id}' \
     --header 'api-version: 2025-07-31' \
     --header 'Authorization: Bearer {token}'
This example is formatted for readability in a narrow page layout.
Request parameters
The following table describes the parameters that may be used with the GET /indexes/{id} endpoint.
Parameter |
Description |
|---|---|
index-id |
String. Required. The unique identifier for the index. |
Response
The 200 response returns a specific index ID.
1{
2  "id": "{id}",
3  "name": "{name of index}",
4  "description": "{description of index}",
5  "created_at": "{timestamp}",
6  "updated_at": "{timestamp}"
7}
For example:
1{
2    "id": "idx-xyz789",
3    "name": "loyalty_members",
4    "description": "Profiles from the loyalty program",
5    "created_at": "2025-07-30T22:24:01.798Z",
6    "updated_at": "2025-07-30T22:24:01.798Z"
7}
A 200 OK response has the following parameters.
Parameter |
Description |
|---|---|
created_at |
The timestamp at which the index was created. |
description |
The description of the index. |
id |
The unique ID for the index. |
name |
The name of the index. |
updated_at |
The timestamp at which the index was last updated. |
GET /indexes/{id}/profiles
Use the GET /indexes/{id}/profiles endpoint to return a paginated list of customer profiles.
Note
The maximum number of fields for an index is 30.
Request URL
Direct all requests to the GET /indexes/{id}/profiles endpoint to the request URL. The request URL uses the base URL with the endpoint path appended.
Amazon AWS
https://app.amperity.com/api/indexes/{id}/profiles
Microsoft Azure
https://{tenant-id}.amperity.com/api/indexes/{id}/profiles
cURL example
A request to the GET /indexes/{id}/profiles endpoint is similar to:
curl --request GET \
       'https://app.amperity.com/api/indexes/{id}/profiles \
       ?limit=100 \
       &with_total=true \
       &filter[<attribute>]=<value>' \
     --header 'amperity-tenant: {tenant-id}' \
     --header 'api-version: 2025-07-31' \
     --header 'Authorization: Bearer {token}'
This example is formatted for readability in a narrow page layout.
Request parameters
The following table describes the parameters that may be used with the GET /indexes/{id}/profiles endpoint.
Parameter |
Description |
|---|---|
filter |
String. Optional. One or more index attributes that are configured to be available as filter request properties. Each filter limits the response to include properties that match the attribute and value for each filter. filter[<attribute>]=<value>
where:
For example: filter[first_name]=Daniel
Apply additional filters to the request to narrow the response to return a specific set of profile attributes.
|
limit |
Integer. Optional. The maximum number of records to include in a single page of results. |
next_token |
String. Optional. An opaque token that is used to paginate results. Omit the next_token property to return the first page. Use the cursor value for next_token that was returned in a response to view the next page of results. For example: ABCd1fghIJk2l3M Note The possible values for next_token are returned within the 200 response. Important The value for next_token cannot be NULL. |
with_total |
Boolean. Optional. Set this value to true to include a total count of all results. Default value: false. Note Obtaining the total count of all results can be an expensive operation when there is a high number of pages in the results set. |
Response
The 200 response returns a set of customer profile indexes.
1{
2 "total": 2,
3 "next_token": "ABCa1bcdDEe2f3G",
4 "data": [
5 {
6 "id": "cl-abc123",
7 "index_id": "index-ID",
8 "attributes": "attributes"
9 },
10 {
11 "id": "cl-abc123",
12 "index_id": "index-ID",
13 "attributes": "attributes"
14 },
15 ]
16}
A 200 OK response has the following parameters.
Parameter |
Description |
|---|---|
data |
A JSON array of values for the current page of results. The array of values includes the following properties:
|
next_token |
The cursor value to use in the next request to return the next page of results. Note When the value for next_token is empty, the last page in the results set has been returned. |
total |
The total count of all results. |
GET /indexes/{id}/profiles/{id}
Use the GET /indexes/{id}/profiles/{id} endpoint to return a specific customer profile.
Request URL
Direct all requests to the GET /indexes/{id}/profiles/{id} endpoint to the request URL. The request URL uses the base URL with the endpoint path appended.
Amazon AWS
https://app.amperity.com/api/indexes/{id}/profiles/{id}
Microsoft Azure
https://{tenant-id}.amperity.com/api/indexes/{id}/profiles/{id}
cURL example
A request to the GET /indexes/{id}/profiles/{id} endpoint is similar to:
curl --request GET \
'https://app.amperity.com/api/indexes/{id}/profiles/{id} \
--header 'amperity-tenant: {tenant-id}' \
--header 'api-version: 2025-07-31' \
--header 'Authorization: Bearer {token}'
This example is formatted for readability in a narrow page layout.
Request parameters
The GET /indexes/{id}/profiles/{id} endpoint does not have any request parameters.
Response
The 200 response returns a specific customer profile.
1{
2 "id": "{profile_id}",
3 "index_id": "{index_id}",
4 "attributes": {
5 "attribute": "value",
6 "attribute": "value"
7 },
8}
where the contents of attributes depend on the attributes that are in the index. For example:
1{
2 "id": "{profile_id}",
3 "index_id": "{index_id}",
4 "attributes": {
5 "first_name": "Daniel",
6 "last_name": "Kuhlman",
7 "email": "danielkuhlman@email.com",
8 "loyalty_id": "123456789-0"
9 },
10}
A 200 OK response has the following parameters.
Parameter |
Description |
|---|---|
atttributes |
A JSON array of attributes for a profile in an index. The attributes that are returned are specific to the index. For example: 1{
2 "id": "{profile_id}",
3 "index_id": "{index_id}",
4 "attributes": [
5 {
6 "first_name": "Daniel",
7 "last_name": "Kuhlman",
8 "email": "danielkuhlman@email.com",
9 "loyalty_id": "123456789-0"
10 },
11 ]
12}
|
id |
The unique ID for the customer profile. |
index_id |
The unique ID for the profile index. |
Indexes
An index defines a list of customer profile attributes that can be accessed from a Profile API endpoint.
The fields that are available from an index are defined by a query.
The attribute associated with the profile ID field must contain a unique identifier.
All attributes associated with filter fields should have unique names
Add an index from the Profile API tab on the Destinations page. Click the Add index button to configure the index settings.
Queries
Each index is associated with a single query. The query must have a field that has a unique identifier and at least one other field that can be returned by the request to the Profile API endpoint.
Note
The maximum number of fields for an index is 30.
The field with the unique identifier is the profile ID field.
Tip
Do not use non-hashed email addresses as a unique value for an index.
Other fields may be configured as filter fields. These fields may be included in the request to filter the request to the GET /indexes/{id}/profiles endpoint.
All fields in the query are returned by a request to the GET /indexes/{id}/profiles endpoint.
Profile ID field
A profile ID is a unique identifier for individual customer profiles. Use the GET /indexes/{id}/profiles endpoint to access customer profiles using 1:1 lookups to enable personalization scenarios.
A request to the GET /indexes/{id}/profiles endpoint returns a unique profile identified by the profile ID and any filter fields included in the request.
The value for the lookup key must be a unique identifier. For example:
A loyalty program ID
A hashed email address that is generated after a customer logs into a website using their email address
Important
Do not use non-hashed email addresses as a lookup key.
A customer ID
A unique identifier used by a downstream workflow, such as the “external_id” field in Braze
Note
A request made to the Profile API must have an exact match to a profile ID field value within the index. For example: “Dennis” must match with an uppercase “D” and “Dennis “ must match with both an uppercase “D” and a trailing character.
Filter fields
Filter fields allow requests to the GET /indexes/{id}/profiles endpoint to be filtered on each field that is included in the request. Use filter fields to support use cases with many matching fields, such as “Get all profiles associated with a reservation ID”.
Filter fields must be defined in the query and the name of the filter field is the same as the name of the field in the query.
For example, to return a profile for “Daniel Kulhman”:
filter[first_name]=Daniel \
&filter[last_name]=Kulhman
A complete request for “Daniel Kulhman” is similar to:
curl --request GET \
     'https://tenant.amperity.com/api/indexes/{id}/profiles \
     &filter[first_name]=Daniel \
     &filter[last_name]=Kulhman' \
     --header 'amperity-tenant: {tenant}' \
     --header 'api-version: 2025-07-31' \
     --header 'Authorization: Bearer {token}'
Index IDs
The index ID is a unique identifier for an index. To make a request to an endpoint add the index ID to the end of the request URL:
https://tenant.amperity.com/api/indexes?index-id={id}
The index ID is available from:
The Profile API tab on the Destinations page. For each endpoint, open the actions menu, and then select “Copy ID”.
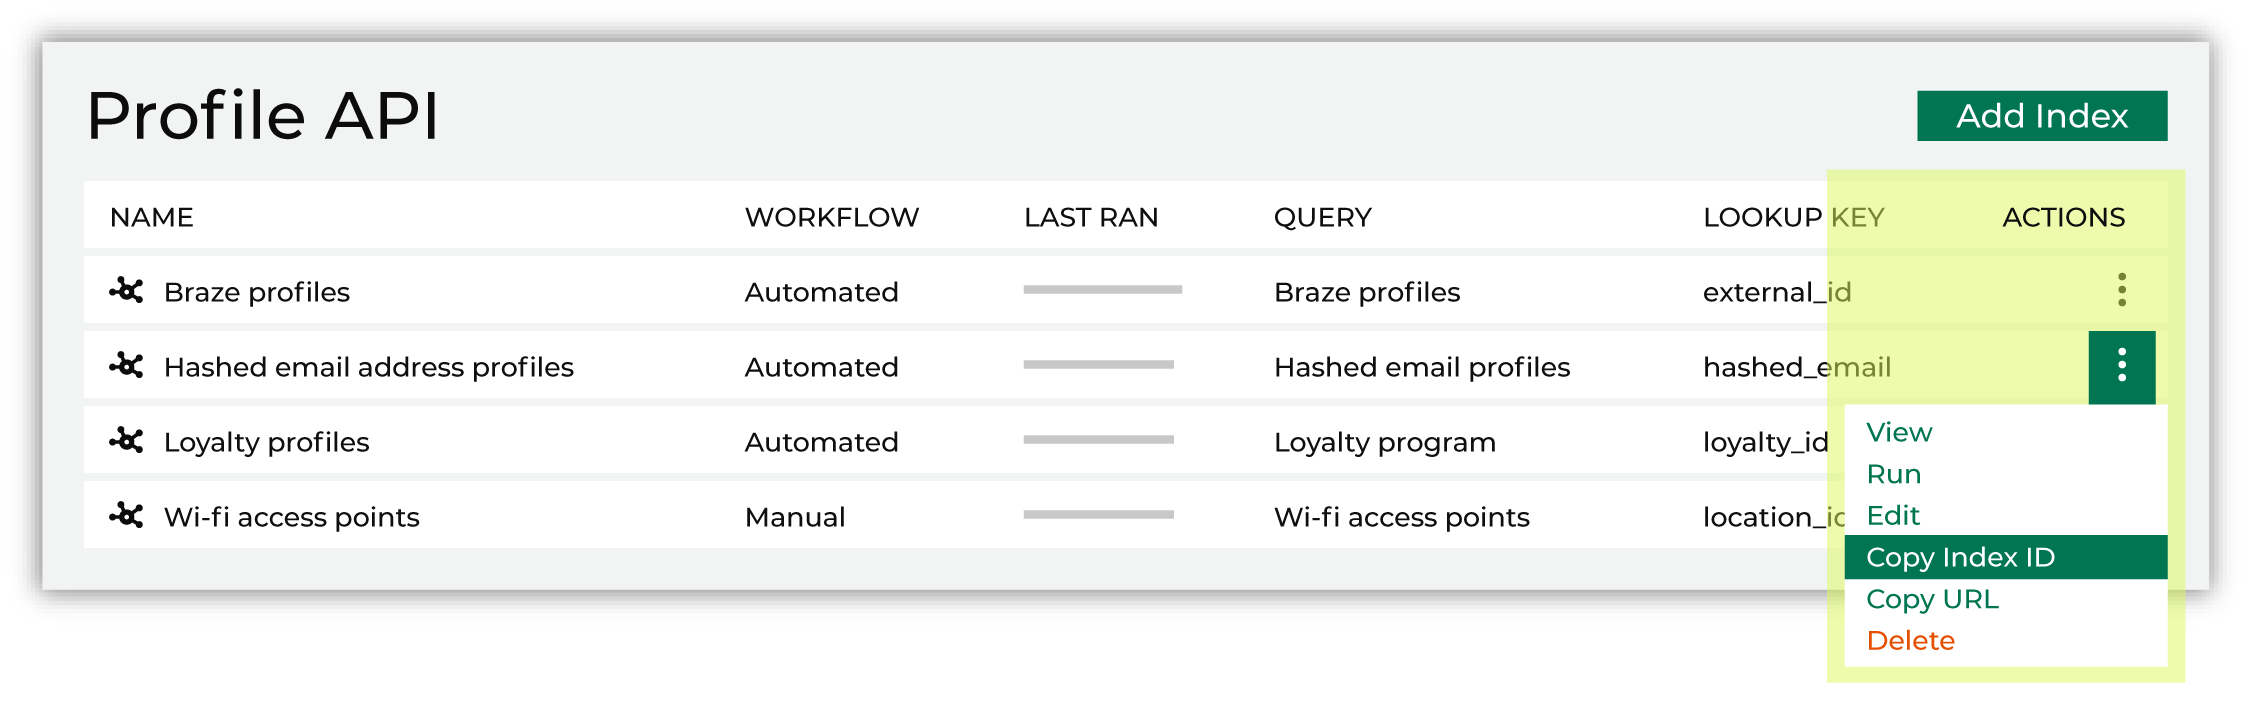
Returned by the GET /indexes endpoint.
Tip
You can copy the URL of the GET /indexes/{id}/profiles endpoint from the Profile API tab on the Destinations page. From the menu for an endpoint, select Copy URL.
The copied URL has the correct values for the selected endpoint’s {tenant} and {index-id} request parameters.
Access token
Amperity uses a JSON Web Token (JWT) for authentication to the Profile API.
The access token is self-generated from the Amperity user interface and authorizes requests to all indexes in the Profile API for your tenant. A self-generated access token ensures that only your team has access to the token and supports organizational security policies like periodic access token rotation.
The access token must be provided within each request made to the Profile API.
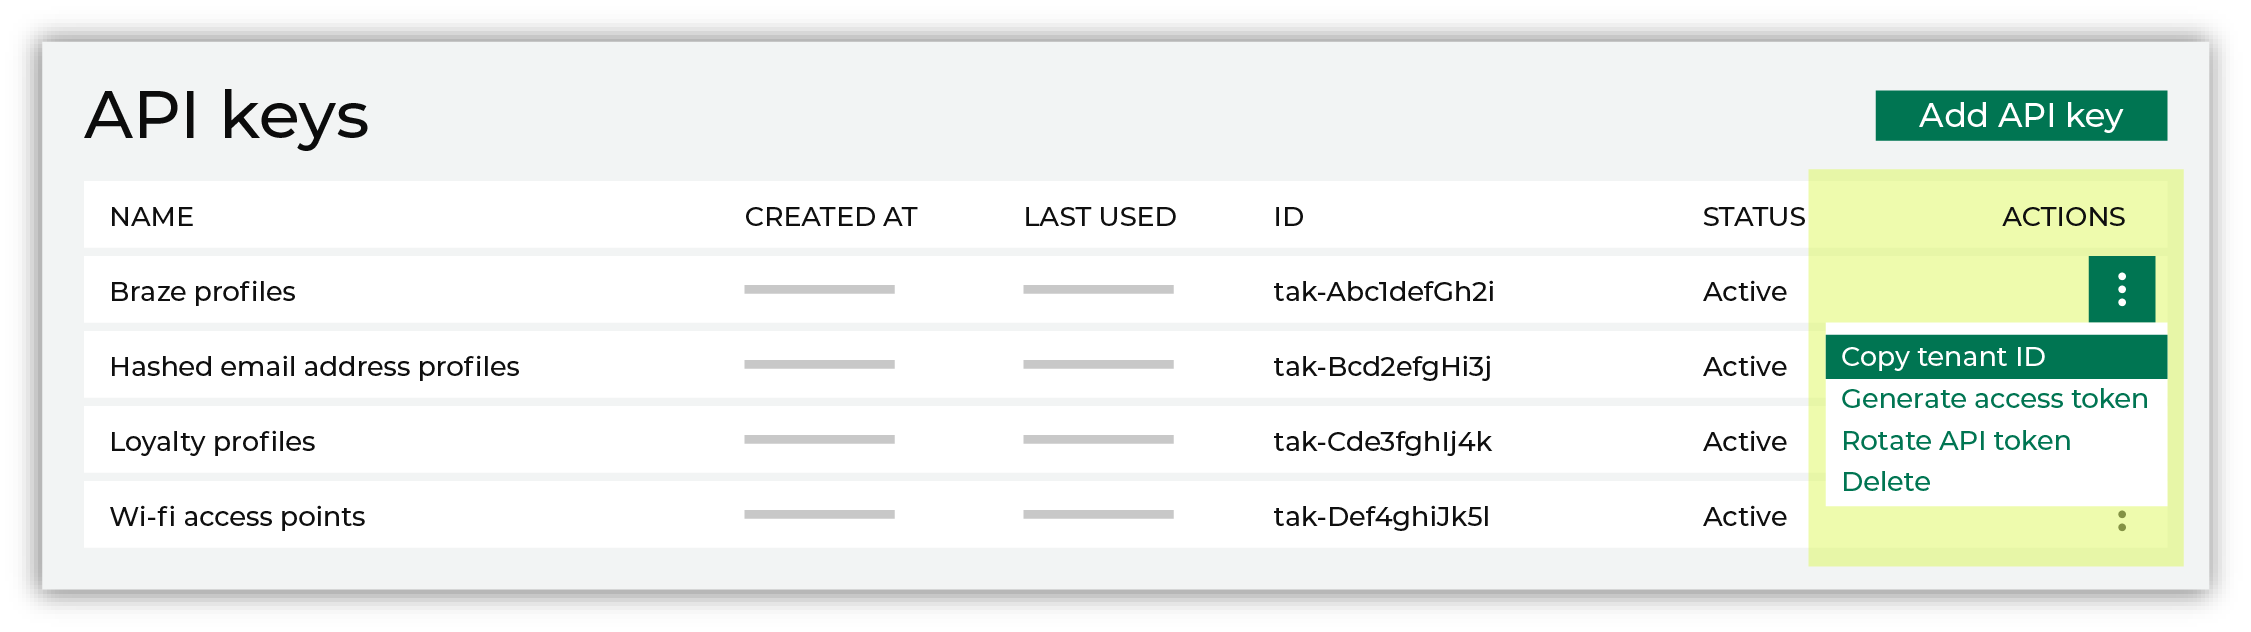
Tenant ID
The tenant ID is a unique identifier for your tenant. To make a request to an index you must include the tenant ID in the URL of the request.
The tenant ID is available from the Profile API list. For the index, open the actions menu, and then select “Copy tenant ID”.
Rate limit
The Amperity Profile API enforces a rate limit of 2000 requests per second across the entire tenant, including sandboxes.
Requests to the Profile API that exceed 2000 requests per second may return an error response with an HTTP 429 status code.
Rate limit increases are supported and requests for increased rate limits will be reviewed on a case-by-case basis. Reach out to Amperity Support or your Customer Success Manager for details.
Configure the Profile API
The Profile API must be configured for use in Amperity. This is done in a series of steps:
Build a query
Build a query that has the attributes you need to enable your downstream workflows. You can use any aspect of your unified customer profiles to define an index.
Note
The maximum number of fields for an index is 30.
Add API key
An API key enables your downstream use cases to read data from the Profile API.
To add an API key for the Profile API

|
Open the Settings page, and then select the Security tab. Under API keys click Add API key. |

|
From the Add API key dialog, add the name for the API key, select the Profile API Data Access option, and then click Save. 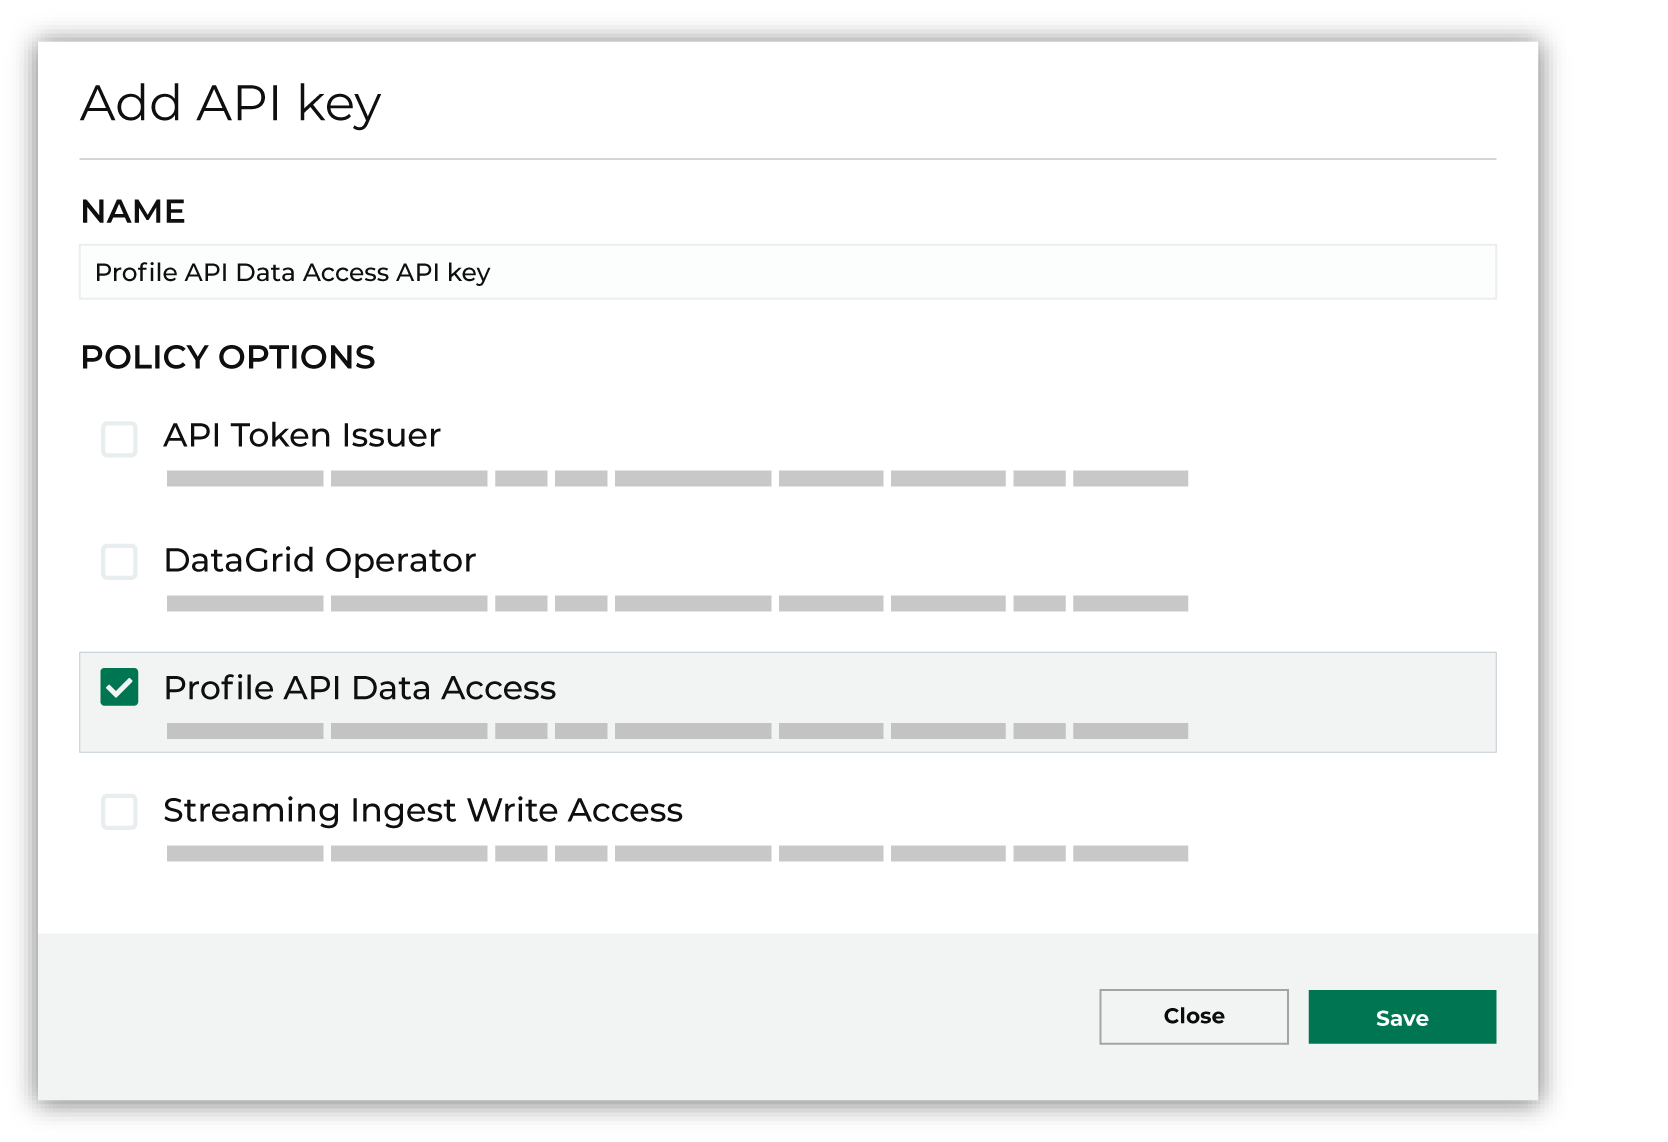
|
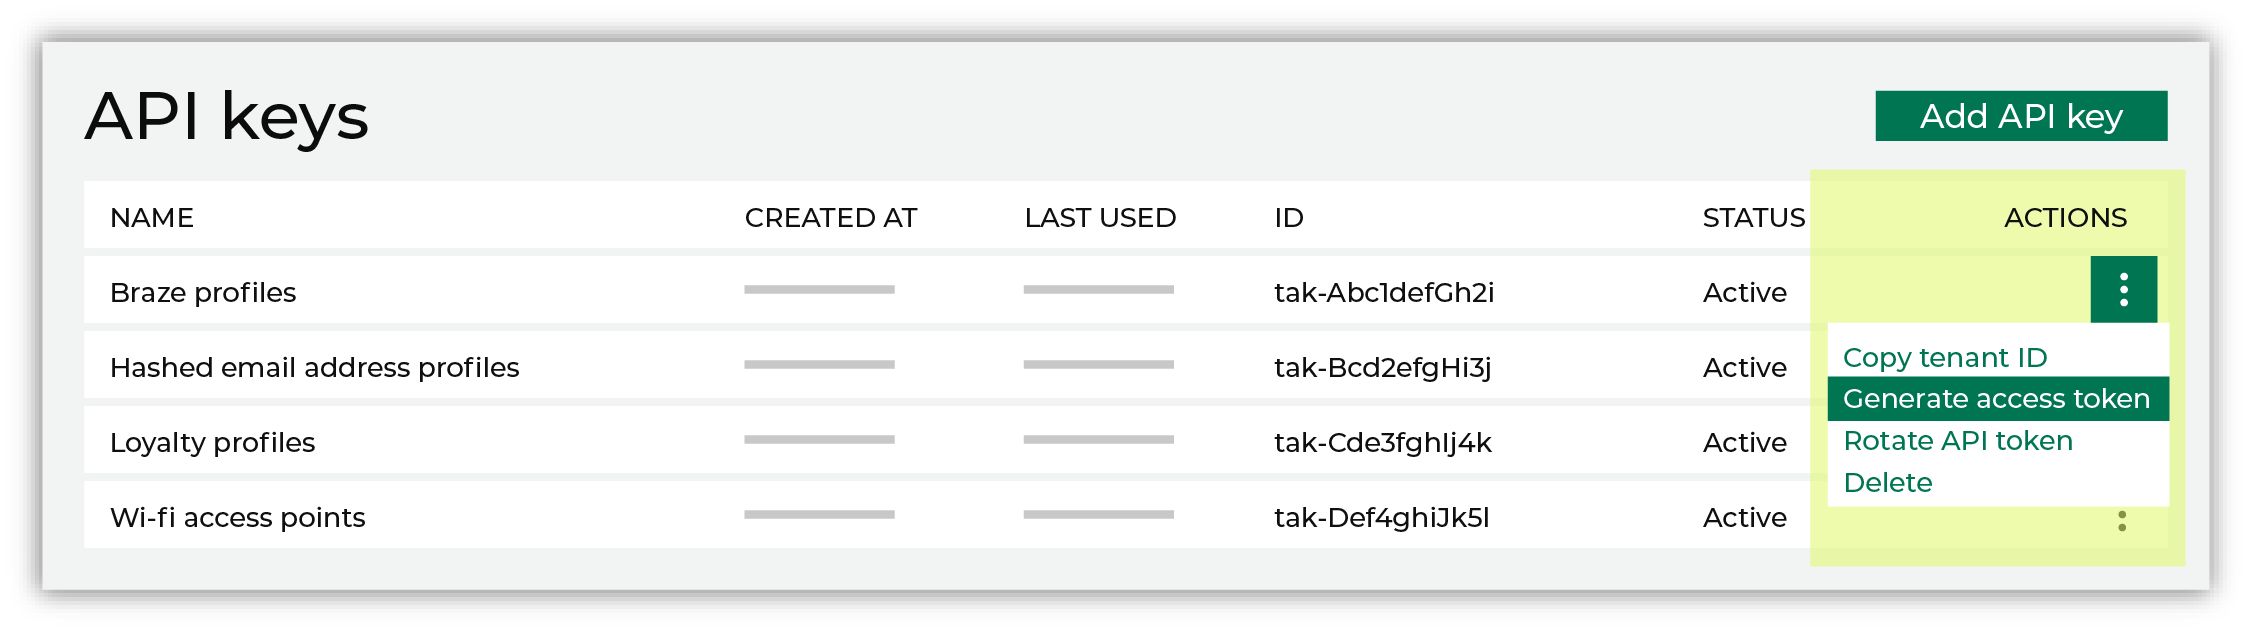
Generate an access token
Access tokens that enable authentication to the Amperity API are managed directly from the Settings page in Amperity.
To generate access tokens
|
|
Open the Settings page, and then select the Security tab. |
|
|
Under API keys find the API key for which you want to generate an access token, and then from the Actions menu select Get token.
|

|
Select the number of days this token allows access to the API, after which it will expire. For example, 3 days: 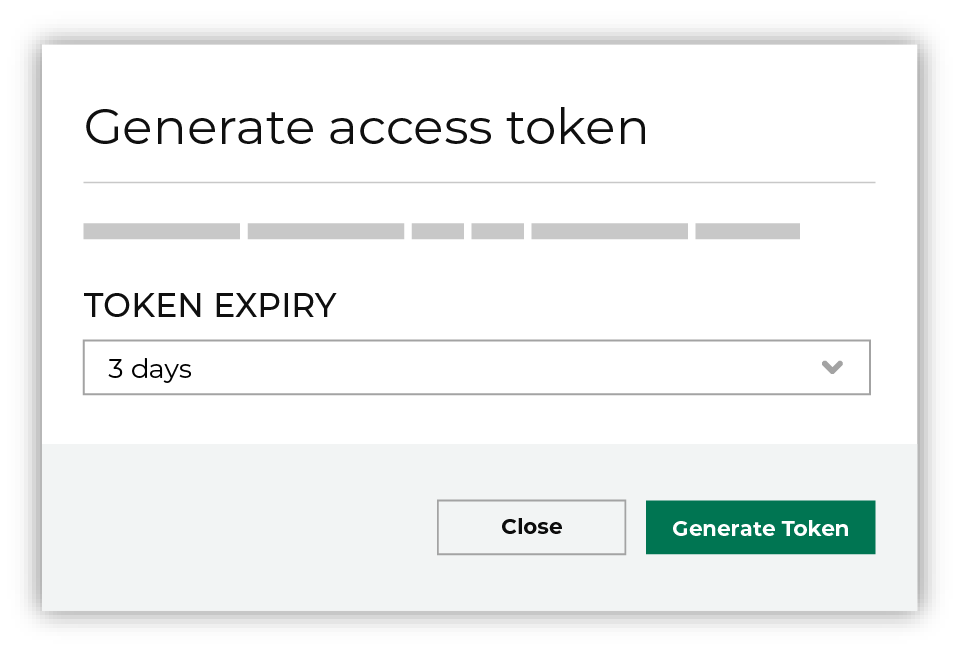
Use the Rotate key secret option to rotate an existing secret when generating an access token. This will force all previously provisioned tokens that are associated with the current API key to expire in 30 days. Click Generate token. The token is generated, and then is automatically copied to your clipboard. 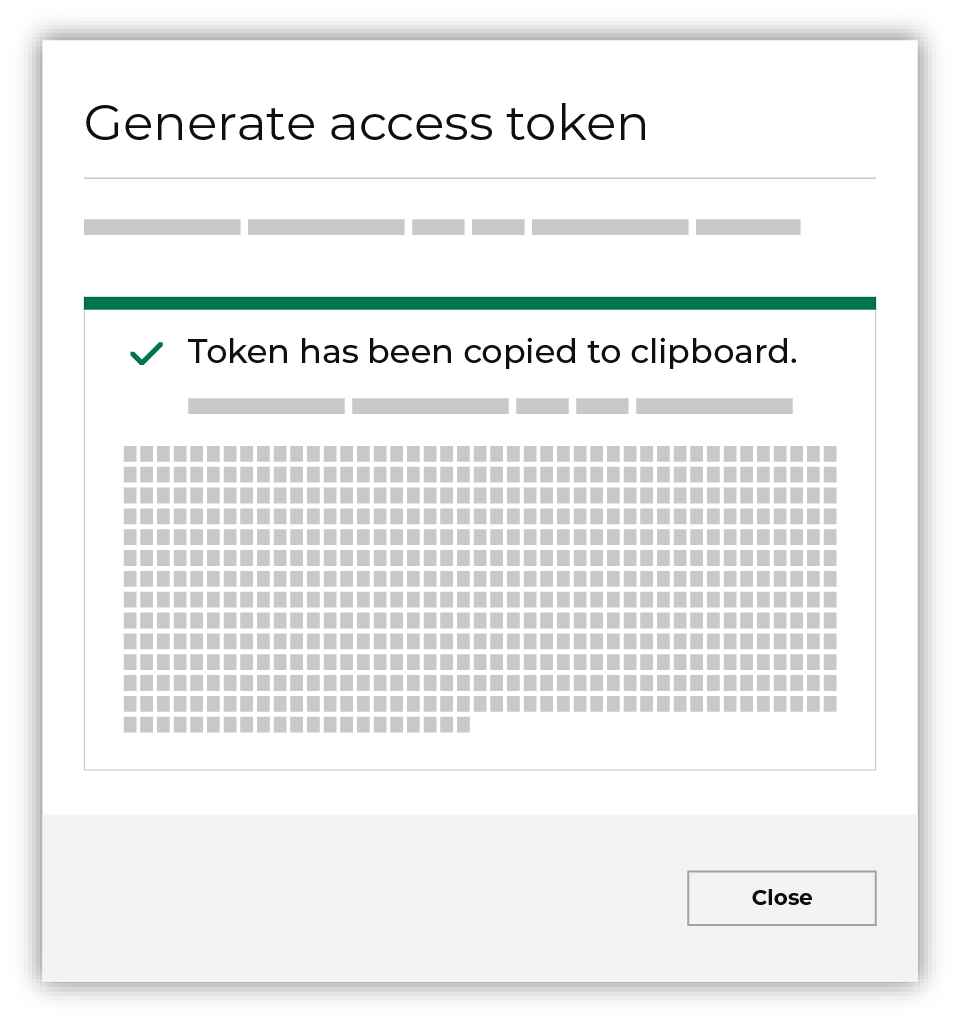
Important You are the only person who have access to the newly generated access key. Amperity does not save the access key anywhere and it will disappear when you close this dialog. Store the access key in a safe place. |
Add an index
An index must be defined for each query that is used to generate an endpoint for the Profile API.
To add an index for the Profile API
|
|
Open the Profile API tab on the Destinations page. Click the Add Index button. This button is located to the right of the Profile API section header. This opens the Add Index dialog box. Give the index a name that describes how it is used by downstream workflows. The name of an index must be unique and may not contain any of the following characters: Use a description to help other users in your tenant know what use cases this index enables. Note The name of the index is informational only. Indexes are listed alphabetically by name. Index names are not used within requests. |
|
|
Select the query that is used to generate the fields in the index, choose the field in that index that is used as the profile ID field, and then choose additional filtering fields. Define the run options, either as part of a scheduled workflow or manually. Save the index. |
Generate the endpoint
An index must be generated to make it available from the Profile API.
Note
The user interface for the Profile API shows a spinner icon– –when an index is being refreshed.
To generate an index for a Profile API endpoint
|
|
Manually. Open the Actions menu for the index, and then select Run. 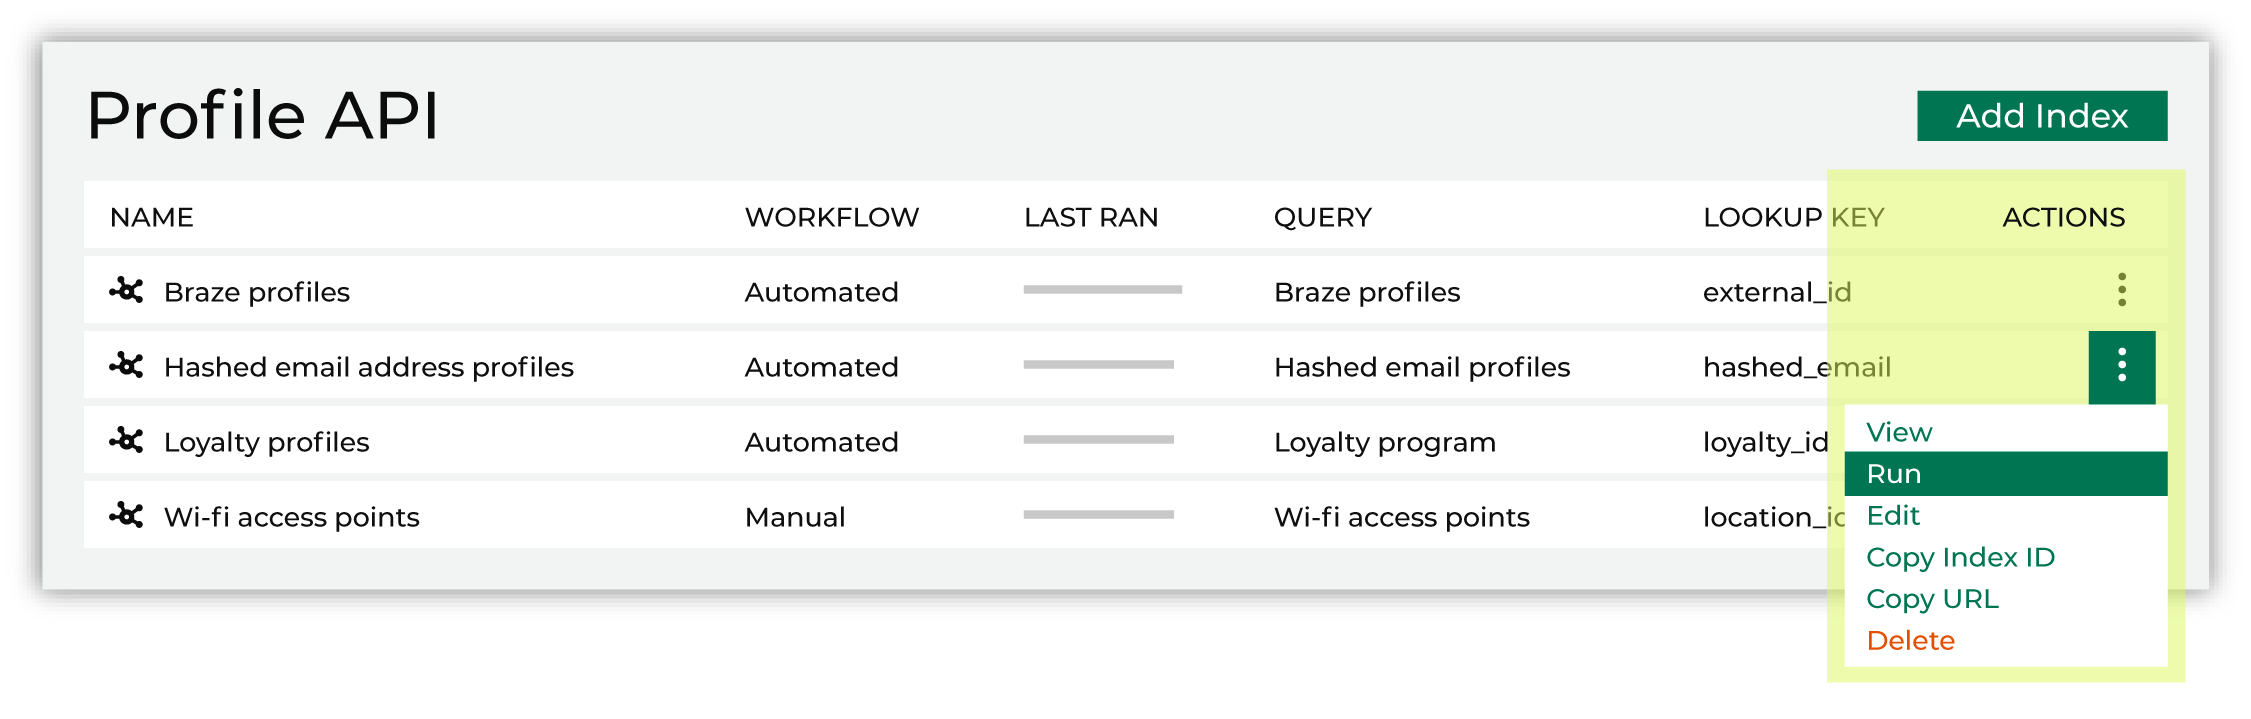
Run does one of the following actions:
|
|
|
After a courier group completes. 
This option regenerates the index and refreshes the data that is available at that endpoint. This option is recommended for indexes that depend on upstream data refreshes and will ensure that the index is regenerated at the same frequency as the upstream data refresh. |
Copy the tenant ID
The tenant ID is a unique identifier for your tenant. To make a request to an index you must include the tenant ID in the URL of the request.
The tenant ID is available from the Profile API list. For the index, open the actions menu, and then select “Copy tenant ID”.
Validate the endpoint
After the index has generated, validate the endpoint to verify that it is in the list of indexes, and then has the data that is required by your workflow.
The most direct way to validate the endpoints is to use cURL commands to access the Profile API endpoints.
Important
The steps to validate the endpoint may be different, depending on the downstream application or toolkit being used to enable your use case. For example, Braze Connected Content has its own syntax–Liquid–for building the interface that interacts with the endpoint in your tenant’s Profile API.
Build into use cases
After you have verified that a specific endpoint is accessible and that it has the data you expect it to contain, you can start building that endpoint into your workflows. See the list of use cases for some ideas as starting points.
The Amperity Profile API is accessed using cURL, Postman, or any other mechanism that can access a REST API with the access token that is required by the request.
Run as part of a workflow
A Profile API index can be configured to run as part of a scheduled workflow when the schedule is set to Run after courier group and an active courier group is selected from the dropdown menu.
Index response times
The Profile API supports p95 response times under 100 ms at 1000 requests per second. Response times will vary based on the number of attributes and profiles in an index.
The number of rows and filter fields available from a Profile API endpoint determine:
The length of time it takes to build or rebuild an index
The response time for requests that are made to an index
As the number of rows and filter fields increase, the performance of that index will decrease. Large indexes with 5 or more filter fields have decreased performance.
Note
The maximum number of fields for an index is 30.
The size of the index has a greater effect on the length of time required to build or refresh an index than the response times for requests that are made to that index.
Note
Response times were measured using traffic across many endpoints simultaneously from US-East to US-West. Use these response times as an indicator for the types of response times you will see for your tenant’s use of Profile API endpoints.
About response percentiles
Response percentiles divide individual response times into groups based on distribution: p95, and p99. Response percentiles are shown in milliseconds (ms).
p95
95% of the response times were below this value.
p99
99% of the response times were below this value.
5 columns 0 filters
The following table shows response times for a 5 column index with zero filter fields and outputs at 1, 10, and 100 million rows. All response times are in milliseconds.
1M rows |
10M rows |
100M rows |
|
|---|---|---|---|
Filter fields |
0 |
0 |
0 |
Workflow duration |
2 m 43 s |
3 m 40 s |
26 m |
Median latency (ms) |
41 ms |
36 ms |
60 ms |
P95 latency (ms) |
74 ms |
48 ms |
84 ms |
P99 latency (ms) |
97 ms |
58 ms |
110 ms |
Requests per second |
1000 |
1000 |
1000 |
5 columns 1 filter
The following table shows response times for a 5 column index with 1 filter field and outputs at 1, 10, and 100 million rows. All response times are in milliseconds.
1M rows |
10M rows |
100M rows |
|
|---|---|---|---|
Filter fields |
1 |
1 |
1 |
Workflow duration |
2 m 25 s |
3 m 19 s |
29 m |
Median latency (ms) |
63 ms |
71 ms |
68 ms |
P95 latency (ms) |
140 ms |
150 ms |
240 ms |
P99 latency (ms) |
210 ms |
200 ms |
380 ms |
Requests per second |
1000 |
1000 |
1000 |
5 columns 3 filters
The following table shows response times for a 5 column index with 3 filter fields and outputs at 1, 10, and 100 million rows. All response times are in milliseconds.
1M rows |
10M rows |
100M rows |
|
|---|---|---|---|
Filter fields |
3 |
3 |
3 |
Workflow duration |
3 m 2 s |
4 m 59 s |
34 m |
Median latency (ms) |
1000 ms |
8300 ms |
26000 ms |
P95 latency (ms) |
3500 ms |
19000 ms |
44000 ms |
P99 latency (ms) |
5300 ms |
24000 ms |
46000 ms |
Requests per second |
330 |
40 |
4 |
10 columns 0 filters
The following table shows response times for a 10 column index with zero filter fields and outputs at 1, 10, and 100 million rows. All response times are in milliseconds.
1M rows |
10M rows |
100M rows |
|
|---|---|---|---|
Filter fields |
0 |
0 |
0 |
Workflow duration |
2 m 25 s |
3 m 40 s |
42 m |
Median latency (ms) |
36 ms |
29 ms |
57 ms |
P95 latency (ms) |
48 ms |
52 ms |
100 ms |
P99 latency (ms) |
62 ms |
110 ms |
130 ms |
Requests per second |
1000 |
1000 |
1000 |
10 columns 1 filter
The following table shows response times for a 10 column index with 1 filter field and outputs at 1, 10, and 100 million rows. All response times are in milliseconds.
1M rows |
10M rows |
100M rows |
|
|---|---|---|---|
Filter fields |
1 |
1 |
1 |
Workflow duration |
2 m 29 s |
3 m 50 s |
43 m |
Median latency (ms) |
84 ms |
72 ms |
90 ms |
P95 latency (ms) |
150 ms |
200 ms |
290 ms |
P99 latency (ms) |
200 ms |
320 ms |
440 ms |
Requests per second |
1000 |
1000 |
1000 |
10 columns 3 filters
The following table shows response times for a 10 column index with 3 filter fields and outputs at 1, 10, and 100 million rows. All response times are in milliseconds.
1M rows |
10M rows |
100M rows |
|
|---|---|---|---|
Filter fields |
3 |
3 |
3 |
Workflow duration |
3 m 14 s |
5 m |
50 m |
Median latency (ms) |
420 ms |
6600 ms |
27000 ms |
P95 latency (ms) |
1400 ms |
15000 ms |
40000 ms |
P99 latency (ms) |
2300 ms |
19000 ms |
43000 ms |
Requests per second |
300 |
50 |
5 |
10 columns 5 filters
The following table shows response times for a 10 column index with 5 filter fields and outputs at 1, 10, and 100 million rows. All response times are in milliseconds.
1M rows |
10M rows |
100M rows |
|
|---|---|---|---|
Filter fields |
5 |
5 |
5 |
Workflow duration |
2 m 32 s |
4 m 10 s |
49 m |
Median latency (ms) |
390 ms |
3000 ms |
33000 ms |
P95 latency (ms) |
1500 ms |
11000 ms |
50000 ms |
P99 latency (ms) |
2200 ms |
15000 ms |
55000 ms |
Requests per second |
300 |
40 |
5 |
30 columns 0 filters
The following table shows response times for a 30 column index with zero filter fields and outputs at 1, 10, and 100 million rows. All response times are in milliseconds.
1M rows |
10M rows |
100M rows |
|
|---|---|---|---|
Filter fields |
0 |
0 |
0 |
Workflow duration |
2 m 50 s |
7 m 14 s |
2 h |
Median latency (ms) |
48 ms |
36 ms |
48 ms |
P95 latency (ms) |
89 ms |
91 ms |
120 ms |
P99 latency (ms) |
170 ms |
160 ms |
180 ms |
Requests per second |
1000 |
1000 |
1000 |
30 columns 1 filter
The following table shows response times for a 30 column index with 1 filter field and outputs at 1, 10, and 100 million rows. All response times are in milliseconds.
1M rows |
10M rows |
100M rows |
|
|---|---|---|---|
Filter fields |
1 |
1 |
1 |
Workflow duration |
2 m 32 s |
5 m 39 s |
– |
Median latency (ms) |
84 ms |
800 ms |
– |
P95 latency (ms) |
150 ms |
3700 ms |
– |
P99 latency (ms) |
200 ms |
6600 ms |
– |
Requests per second |
1000 |
700 |
– |
30 columns 3 filters
The following table shows response times for a 30 column index with 3 filter fields and outputs at 1, 10, and 100 million rows. All response times are in milliseconds.
1M rows |
10M rows |
100M rows |
|
|---|---|---|---|
Filter fields |
3 |
3 |
3 |
Workflow duration |
3 m 14 s |
6 m 51 s |
– |
Median latency (ms) |
420 ms |
1900 ms |
– |
P95 latency (ms) |
1400 ms |
11000 ms |
– |
P99 latency (ms) |
2300 ms |
15000 ms |
– |
Requests per second |
300 |
40 |
– |
30 columns 5 filters
The following table shows response times for a 30 column index with 5 filter fields and outputs at 1, 10, and 100 million rows. All response times are in milliseconds.
1M rows |
10M rows |
100M rows |
|
|---|---|---|---|
Filter fields |
5 |
5 |
5 |
Workflow duration |
2 m 32 s |
6 m 38 s |
– |
Median latency (ms) |
390 ms |
3400 ms |
– |
P95 latency (ms) |
1500 ms |
8700 ms |
– |
P99 latency (ms) |
2200 ms |
11000 ms |
– |
Requests per second |
300 |
40 |
– |
30 columns 10 filters
The following table shows response times for a 30 column index with 10 filter fields and outputs at 1, 10, and 100 million rows. All response times are in milliseconds.
1M rows |
10M rows |
100M rows |
|
|---|---|---|---|
Filter fields |
10 |
10 |
10 |
Workflow duration |
2 m 42 s |
6 m 54 s |
– |
Median latency (ms) |
550 ms |
3400 ms |
– |
P95 latency (ms) |
3800 ms |
22000 ms |
– |
P99 latency (ms) |
9700 ms |
26000 ms |
– |
Requests per second |
150 |
20 |
– |
Use cases
The Profile API can support any number of potential use cases. All you need to do is define the use case, identify the requirements for building that use case for your downstream workflow, and then access the customer profile data using the Profile API endpoints.
The following sections describe some ways to use the Profile API:
Braze Connected Content
You can use the Profile API to make extended profile attributes available to Braze using Connected Content .
Important
Connected Content does not write data to user profiles, which means you can use Connected Content to dynamically populate values into messages without consuming data points.
Tip
You can verify the attributes that are returned by the Profile API endpoint directly in the Connected Content preview editor. Use a block similar to:
{% connected_content
  https://{tenant-id}.amperity.com/api/indexes/{id}/profiles?filter[<attribute>]=<value>
%}


{{result text}}
This will return the set of attributes at the “{id}” index for the specified “filter”.
Braze uses a feature called Connected Content to define reusable blocks of message content that can then be used across a variety of marketing campaign scenarios.
|
|
Build an index that has the list default user profile attributes, and then extend the profile to include more details from Amperity unified customer profiles. |
|
|
Your Profile API access token is a JSON Web Token (JWT) that should be accessible from a safe location and not be embedded directly within your request. Use a “connected_content” block to get the access token, and then cache it with enough time to allow the next request to pull data from the index. In Braze Connected Content load the access token for the Profile API using a block similar to: {% connected_content
https://endpoint
:method post
:headers {
"Authorization": "Bearer refresh-token"
}
:cache_max_age 900
:save auth
%}
where “https://endpoint” is the URL at which the access token is located, and then “refresh-token” is the access token. |
|
|
After the access token is available to Connected Content, use the cached access token to access the index. The type of request to use in this step varies, depending on your use case. To query an index {% connected_content
https://{tenant-id}.amperity.com/api/indexes/{id}/profiles?filter[<attribute>]=<value>
:method post
:headers {
"Authorization": "Bearer {{auth.token}}",
"X-Amperity-Tenant":"socktown",
"Content-Type":"application/json"
}
:body key={{user_id}}
:save response
%}
Hello {{response.attributes.value.first_name}}.
To return a list of indexes {% connected_content
https://tenant.amperity.com/api/indexes
:method get
:headers {
"Authorization": "Bearer {{auth.token}}",
"X-Amperity-Tenant": "socktown"
}
:body key=external_id
:content_type application/json
:save result
%}
|

|
Add values from the index using the following syntax: {{result.attributes.value.name}}
where “name” is the name of a field in the index: {{result.attributes.value.given_name}}
{{result.attributes.value.surname}}
{{result.attributes.value.phone}}
{{result.attributes.value.loyalty_id}}
{{result.attributes.value.loyalty_points}}
{{result.attributes.value.loyalty_tier}}
For example: Hello {{result.attributes.value.given_name}}. Your
{{result.attributes.value.loyalty_tier}} balance is:
{{result.attributes.value.loyalty_points}}
|
Hashed email profiles
A hashed email is an email address encrypted with a hexadecimal string of numbers and letters. This creates a unique digital signature that is always the same even when customers use that email address to log in to different browsers, website, apps, and devices.
A hashed email
Is anonymous
Is not PII
Cannot be decrypted
Is browser and device independent
Enables multi-device, multi-browser, and multi-app tracking
Can be used to anonymously track users across websites, apps, and devices when the email address used to log into a website, app, or device matches the hashed email
and, most importantly, a hashed email can be used to associate a user to a unified customer profile from which your brand can build personalized workflows.
Note
More than one algorithm may be used to hash an email address. Amperity assumes that SHA-256 is the algorithm used for hashing email addresses.
A workflow that relies on hashed email addresses must use a consistent hashing algorithm at each point in the downstream workflow.
Build a column in a customer 360 table that includes a hashed email address. For example:
SELECT
  TO_HEX(SHA256(TO_UTF8(UPPER(TRIM(email))))) AS hashed_email
  ,given_name AS first_name
  ,surname AS last_name
  ,postal AS zip_code
FROM Merged_Customers
Use the hashed email address as the lookup key for the endpoint, generate the index, and then build workflows that your brand can use to personalize website, app, and browser experiences for your customers.
Wireless access points
You can use hashed email addresses to associate unified customer profiles to the email addresses that may be used to log into wireless access points.
This use case uses a combination of Profile API endpoints:
An endpoint that has a unified customer profile that uses a hashed email address as the lookup key.
An endpoint that has wireless access points unique identifiers as the lookup key. For example, this endpoint could be built using a query similar to:
SELECT
  wireless_access_point_id
  ,location_ID
  ,location_name
FROM Locations_Table
For example: A customer logs into the secure wireless that is offered by your hotel or resort using their email address.
A hashed version of that email address is built, and then is used as the lookup key for the endpoint in your Profile API that has the hashed email profile. The unique ID for the wireless access point is used to look up the hotel or resort.
Use the Profile API to update the welcome screen. For example:
Thank you {{first_name}} for visiting {{location_name}}.
We hope you enjoy your stay.
This message could be extended to include promos or offers or any type of additional messaging your brand chooses.
Loyalty profiles
You can use loyalty IDs to personalize welcome messages for your customers after they log into your website.
Build a query that includes the unified customer profile data that your brand wants to use to personalize welcome messages. For example:
SELECT
  ,amperity_id
  ,mc.given_name AS first_name
  ,mc.surname AS last_name
  ,mc.birthdate
  ,lt.loyalty_id
  ,lt.loyalty_tier
  ,lt.loyalty_points_date
  ,lt.loyalty_points
FROM Merged_Customers mc
LEFT JOIN Loyalty_Table lt
ON mc.amperity_id = lt.amperity_id
Use the loyalty ID as the lookup key for the endpoint, generate the index, and then build workflows that your brand can use to personalize your website for members of your loyalty program.
For example: A customer logs into your website using their loyalty ID, after which the loyalty ID can be used to look up an individual customer in your loyalty profile endpoint and be used to personalize their experience.
For example, a welcome message shown immediately after logging in:
Welcome back {{first_name}}.

Thank you for being a long-time member of our
{{loyalty_tier}} program.

As of {{loyalty_points_date}}, your loyalty points
total is: {{loyalty_points}}.
This message could be extended to include promos or offers or any type of additional messaging your brand chooses, such as extending the logic to include a message to customers whose birthday falls within the next 30 days:
Welcome back {{first_name}}.

{{ if birthdate = within the next 30 days }}

As a special thank you for being a long-time
member of our {{loyalty_tier}} program, here is
a {{discount_code_id}} discount code that you
may use on your next purchase: {{coupon_id}}.

{{ else }}

Thank you for being a long-time member of our
{{loyalty_tier}} program. As of
{{loyalty_points_date}}, your loyalty points
total is: {{loyalty_points}}.

{{ end }}
Movable Ink Studio
Use the Profile API to make real-time customer profile data available to Movable Ink Studio. Movable Ink Studio helps your brand scale 1:1 content personalization by automatically transforming data into personalized content unique to each customer at the moment of engagement.
Combine the Profile API with Movable Ink Studio to design campaigns and customer interactions that access the most current customer profile details and generate personalized content at scale.
Automatically transform data into unique composite images for each customer in real-time
Streamline steps in onboarding processes
Personalize monthly recaps and year-in-review use cases with real-time customer data
Target or segment creative based on profile attributes
Create long-lasting loyalty experiences for your customers
After Amperity is configured with a query that makes results available from a Profile API endpoint you can configure Movable Ink to connect to that endpoint. The user who configures the integration must be assigned to the Manager role in Movable Ink Studio.
To add the Amperity integration to Movable Ink Studio
|
|
Log in to Movable Ink. Expand Data and open the Integrations Gallery. Browse the integrations and choose Amperity. Click Connect to enable the Profile API integration. |
|
|
The following settings are required to configure a connection between Movable Ink Studio and a Profile API endpoint: Integration name
Bearer token
Tenant subdomain
Index ID
User ID
Tenant ID
When the settings are added correctly the Movable Ink Studio user interface will display a successful connection with a 200 OK response. 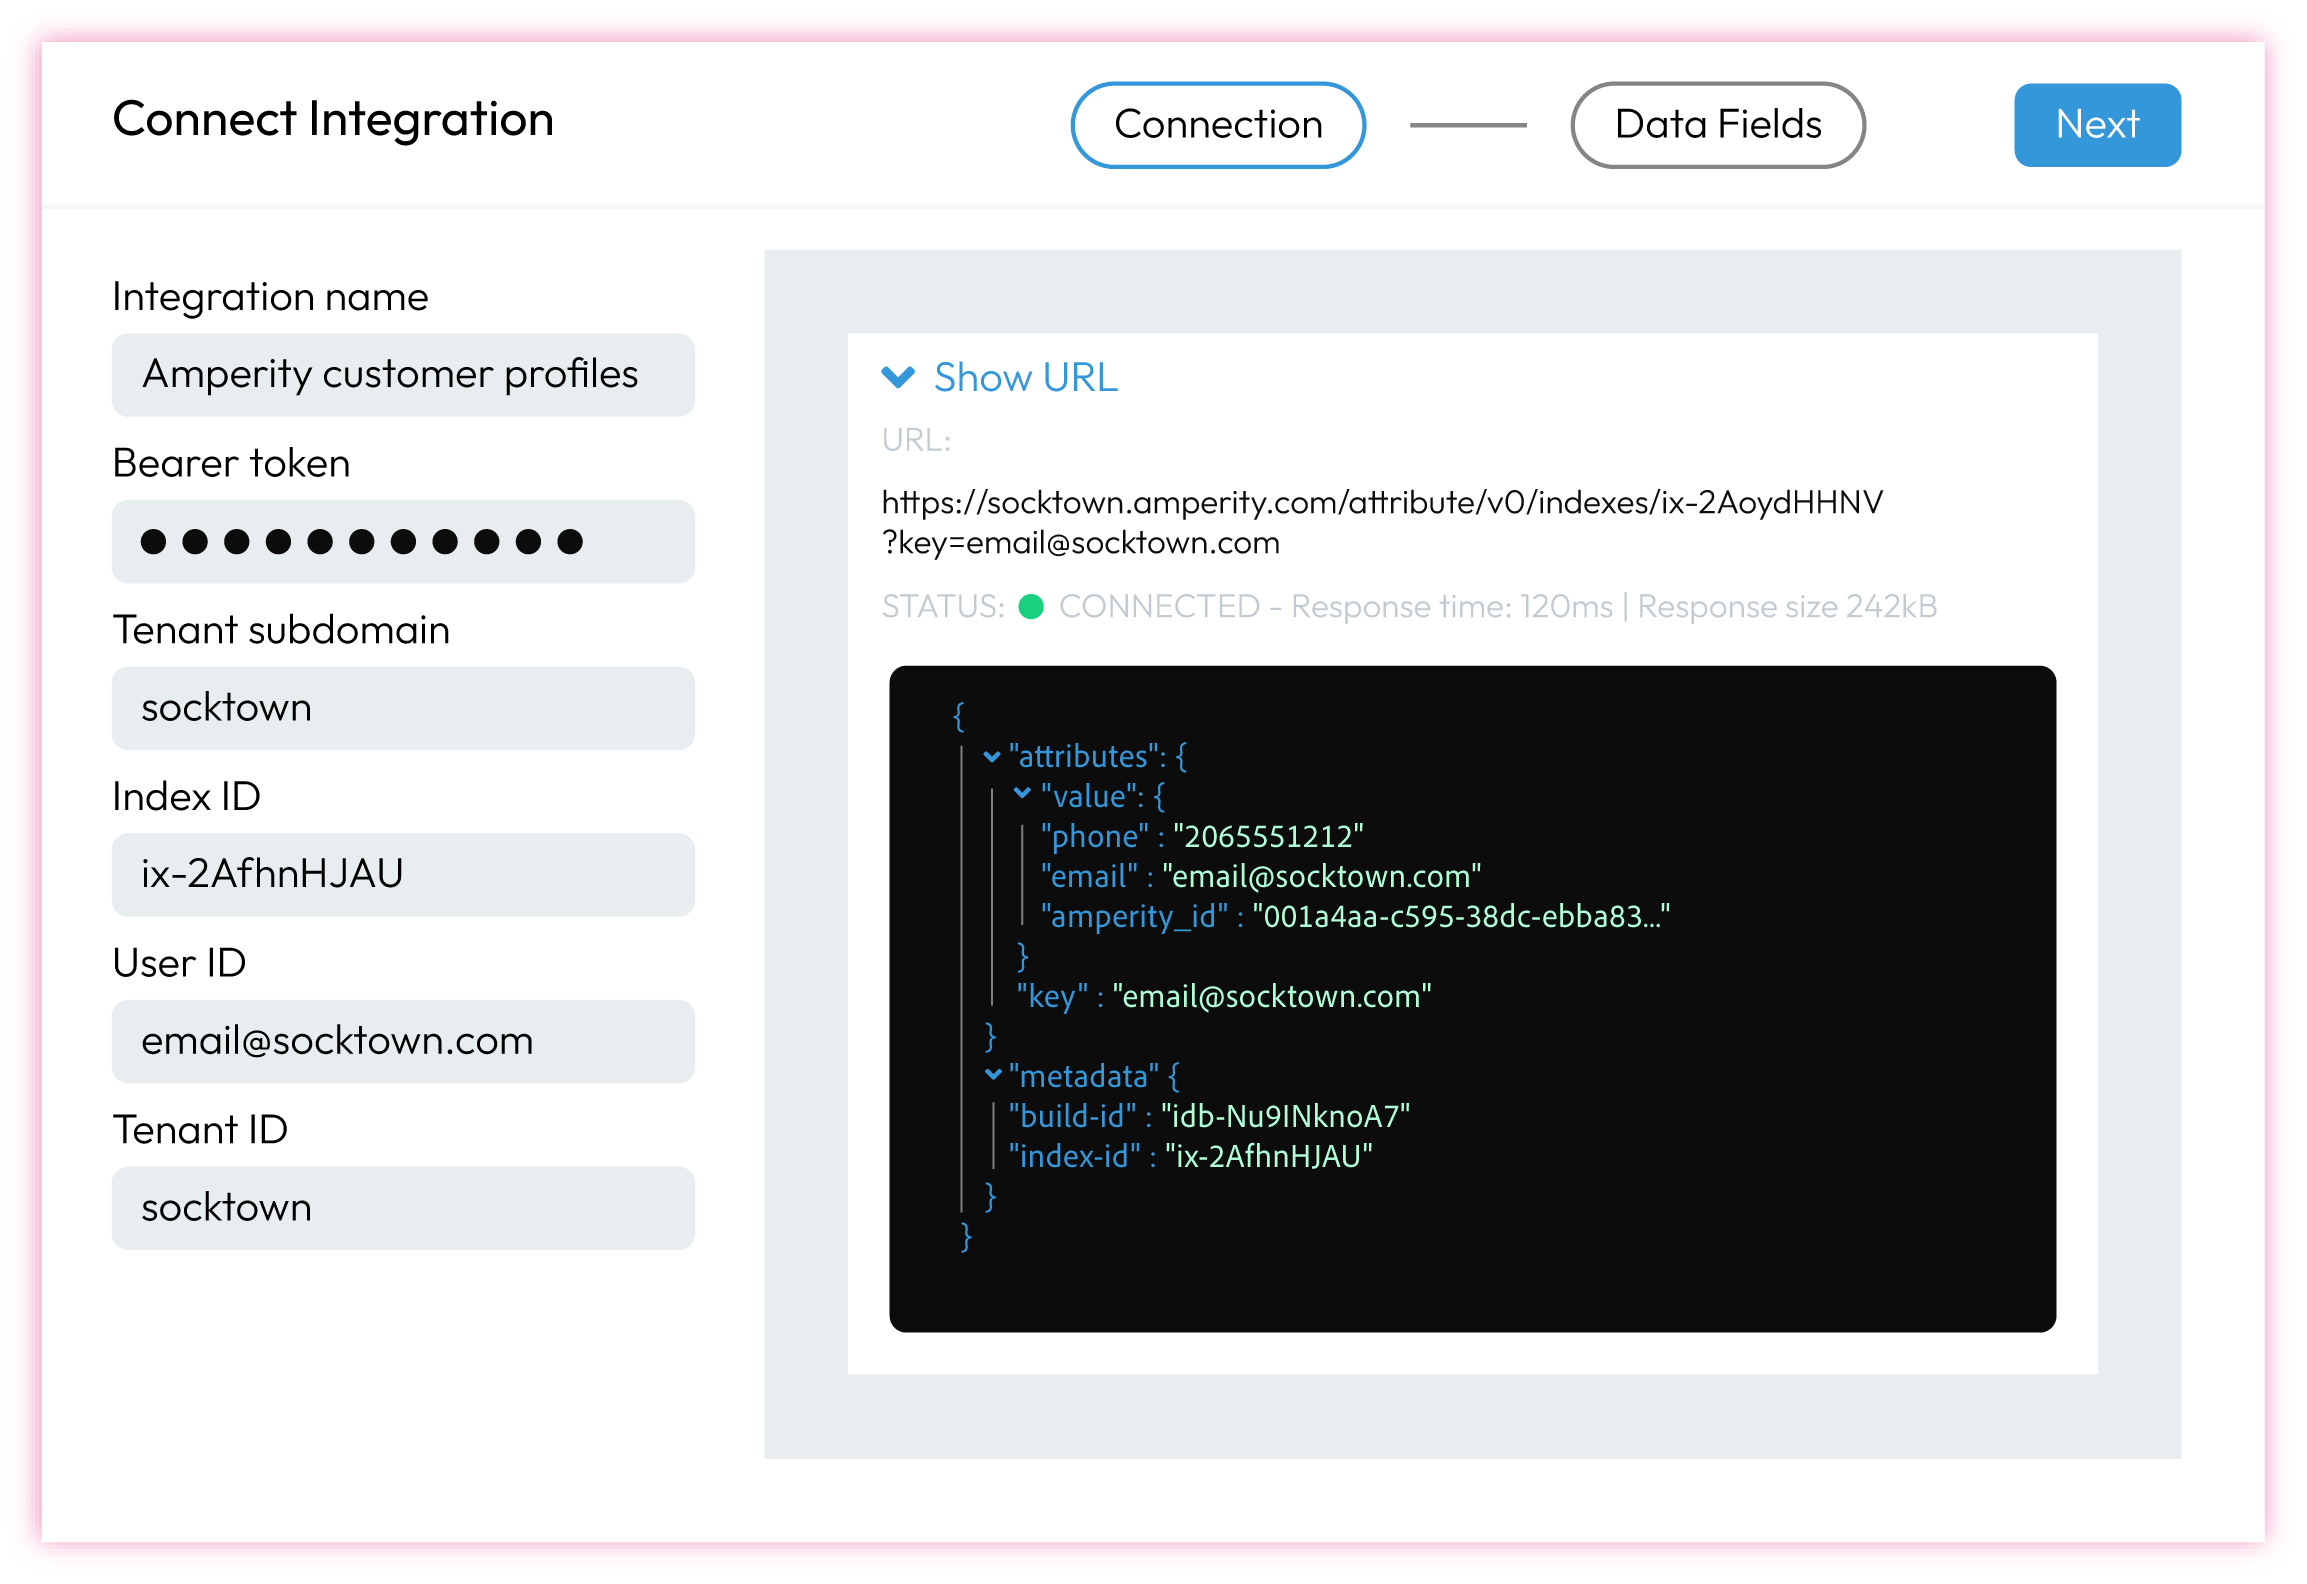
|
|
|
Click Next and configure how the fields in the Profile API index should be shown within Movable Ink Studio. 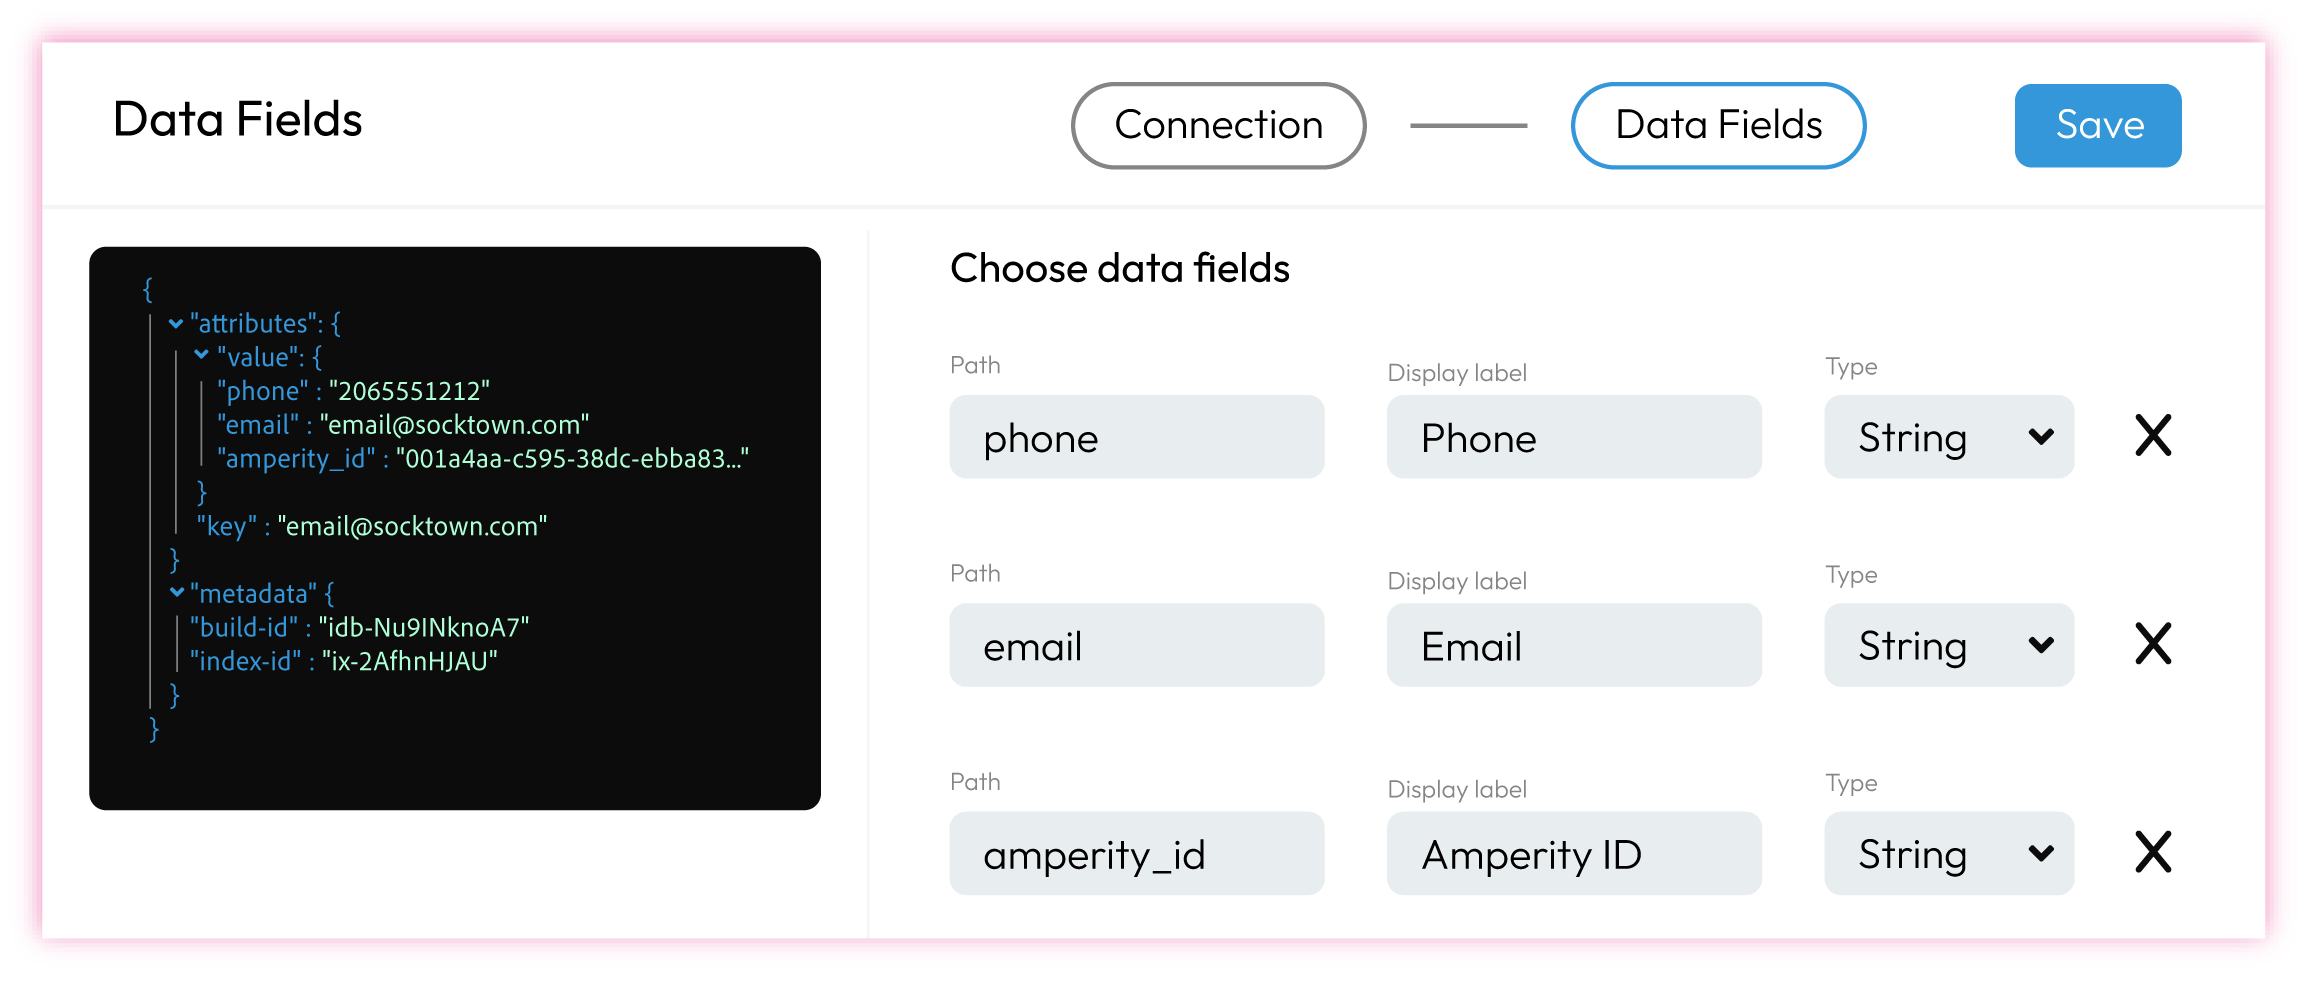
|
|
|
Click Save. The integration is added to the list of active integrations and is available for use within Movable Ink Studio. |
Server-side JavaScript in Salesforce
AMPscript is a scripting language used by Salesforce Marketing Cloud to render content on a subscriber-by-subscriber basis in. Embed AMPscript variables within HTML emails, text emails, landing pages, SMS messages, and push notifications. These variables are updated at the time a message or notification is sent or shown to a subscriber.
Use Amperity unified customer profiles as values for variables defined by AMPscript. Use Server-Side JavaScript (SSJS) to return data from a Profile API endpoint, and then make that data available to AMPscript.
The following example shows how replace a variable with an email address from a Profile API endpoint just before sending a message.
Use AMPscript to return a value from the subscriber/data extension that is defined within the message template. For example, email:
%%[
  SET @Email = email
]%%
Load the values from the Profile API endpoint using SSJS. This will make those values available to AMPscript variables:
<script runat="server">

  Platform.Load("core", "1.1.1");
  var email = Variable.GetValue("@Email");

  //Set up Amperity Profile API call
  var url = 'https://tenant.amperity.com/api/indexes/{id}';
  var contentType = 'application/json';
  var payload = '{"key":"' + email + '"}';
  var names = ["X-Amperity-Tenant", "Authorization"];
  var values = ["$tenant-id", "Bearer $ACCESS-TOKEN"];
  var res = HTTP.Get(url, contentType, payload, names, values);

  //Process results from Amperity Profile API call
  var objResp = Platform.Function.ParseJSON(res.Response[0]);
  Variable.SetValue("@AmperityID",objResp.attributes.value.amperity_id);
  Variable.SetValue("@FirstName",objResp.attributes.value.firstname);
  Variable.SetValue("@LastName",objResp.attributes.value.lastname);
  Variable.SetValue("@LifetimeSpend",objResp.attributes.value.lifetimespend);
  Variable.SetValue("@FavoriteBrand",objResp.attributes.value.favoritebrand);
  Variable.SetValue("@LoyaltyPoints",objResp.attributes.value.loyaltypoints);
  Variable.SetValue("@LoyaltyTier",objResp.attributes.value.loyaltytier);

</script>
Update the $INDEX-ID, $tenant-id, and $ACCESS-TOKEN placeholders for the correct index ID, tenant ID, and access token.
Use the Variable.SetValue("@$FIELD",objResp.attributes.value.$FIELD); function to declare the list of fields that are available to SSJS from the Profile API endpoint.