Real-time datasets in Movable Ink Studio
Movable Ink helps marketers design dynamic creatives for personalized content experiences that combine business logic with access to real-time customer profiles.
Use the Profile API to make real-time customer profile data available to Movable Ink Studio. Movable Ink Studio helps your brand scale 1:1 content personalization by automatically transforming data into personalized content unique to each customer at the moment of engagement.
Combine the Profile API with Movable Ink Studio to design campaigns and customer interactions that access the most current customer profile details and generate personalized content at scale.
Automatically transform data into unique composite images for each customer in real-time
Streamline steps in onboarding processes
Personalize monthly recaps and year-in-review use cases with real-time customer data
Target or segment creative based on profile attributes
Create long-lasting loyalty experiences for your customers
Get details
Review the following details before configuring Profile API endpoints for use with Movable Ink. The Profile API endpoint must be available before the integration can be configured in Movable Ink.

|
To configure Profile API endpoints in Amperity |
|
|
To configure MoveableInk A user with access to Movable Ink and who is assigned to the Manager role is required to configure the Amperity integration with Movable Ink. Log in to Movable Ink and finish the steps that are required for this integration. |
Build a query
Use the Query Editor to build a query that returns customer profiles for use in Movable Ink Studio.
Add an API key
An API key enables your downstream use cases to read data from the Profile API.
To add an API key for the Profile API

|
Open the Settings page, and then select the Security tab. Under API keys click Add API key. |

|
From the Add API key dialog, add the name for the API key, select the Profile API Data Access option, and then click Save. 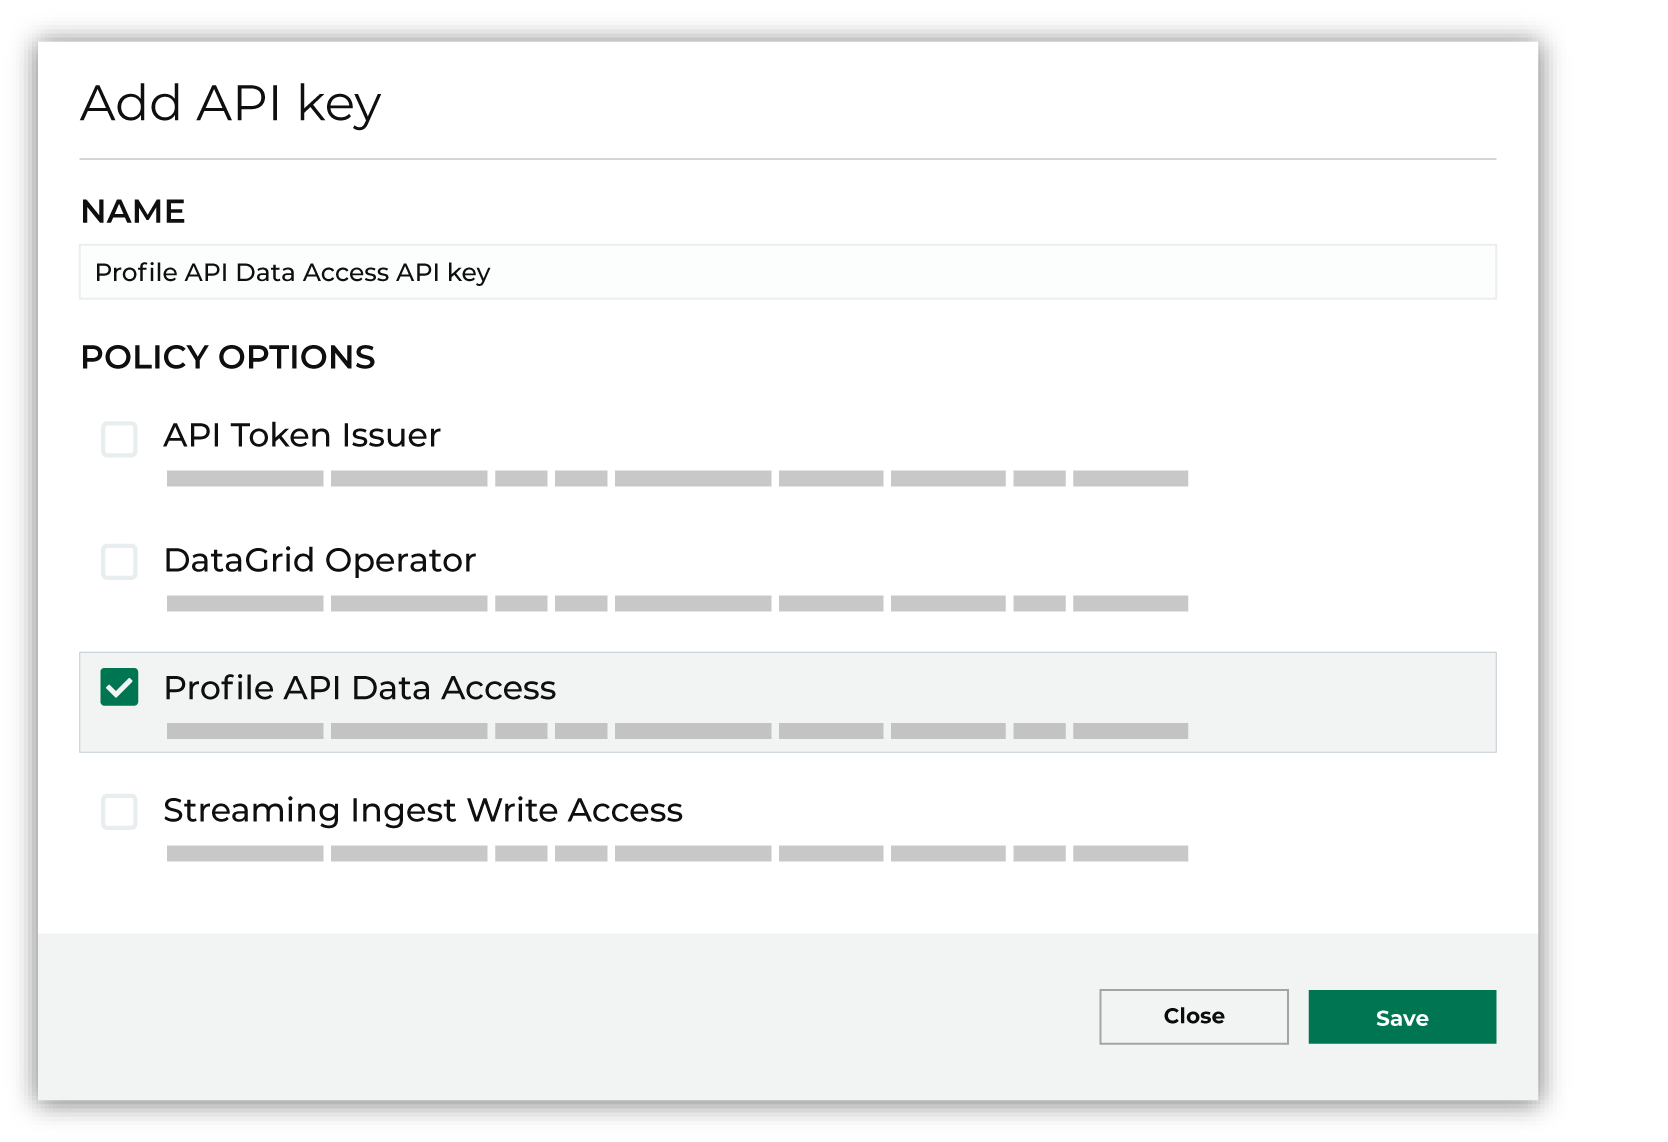
|
Generate an access token
Access tokens that enable authentication to the Amperity API are managed directly from the Settings page in Amperity.
To generate access tokens
|
|
Open the Settings page, and then select the Security tab. |
|
|
Under API keys find the API key for which you want to generate an access token, and then from the Actions menu select Get token. 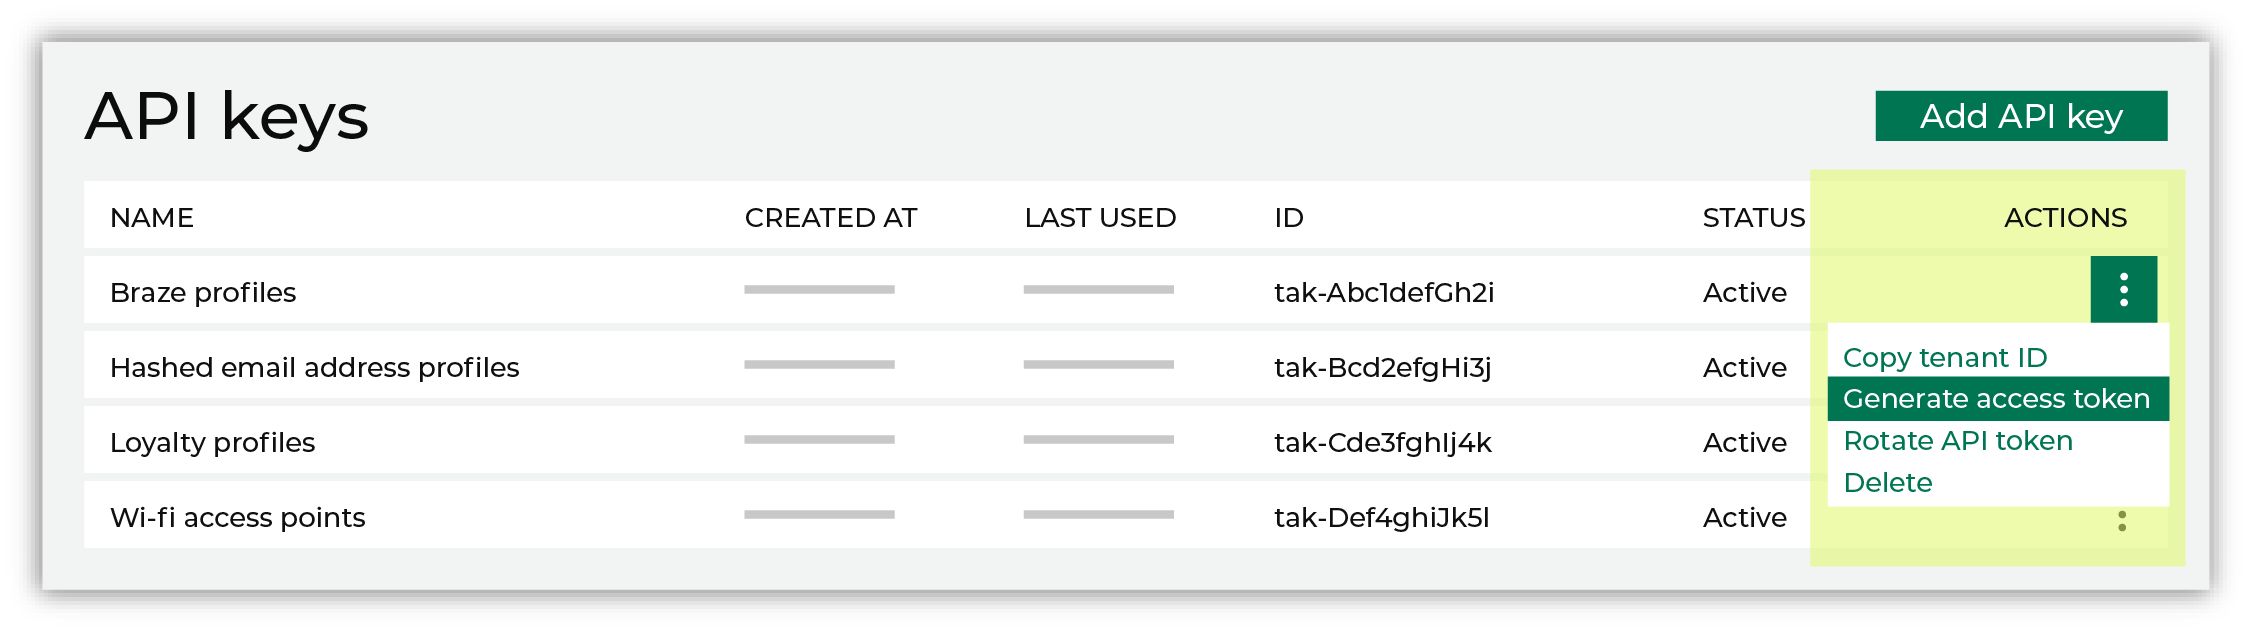
|

|
Select the number of days this token allows access to the API, after which it will expire. For example, 3 days: 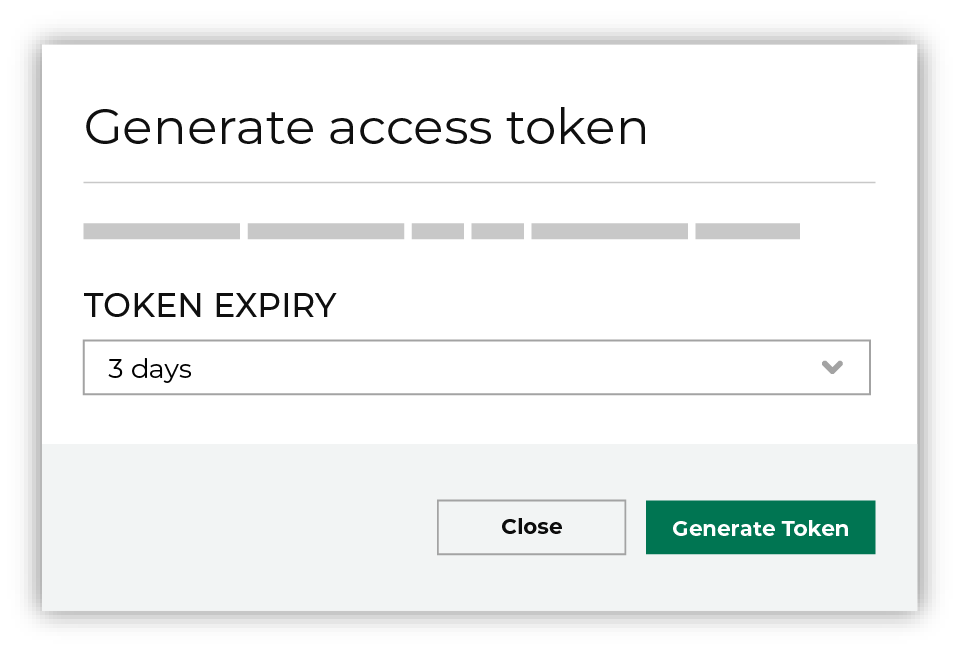
Use the Rotate key secret option to rotate an existing secret when generating an access token. This will force all previously provisioned tokens that are associated with the current API key to expire in 30 days. Click Generate token. The token is generated, and then is automatically copied to your clipboard. 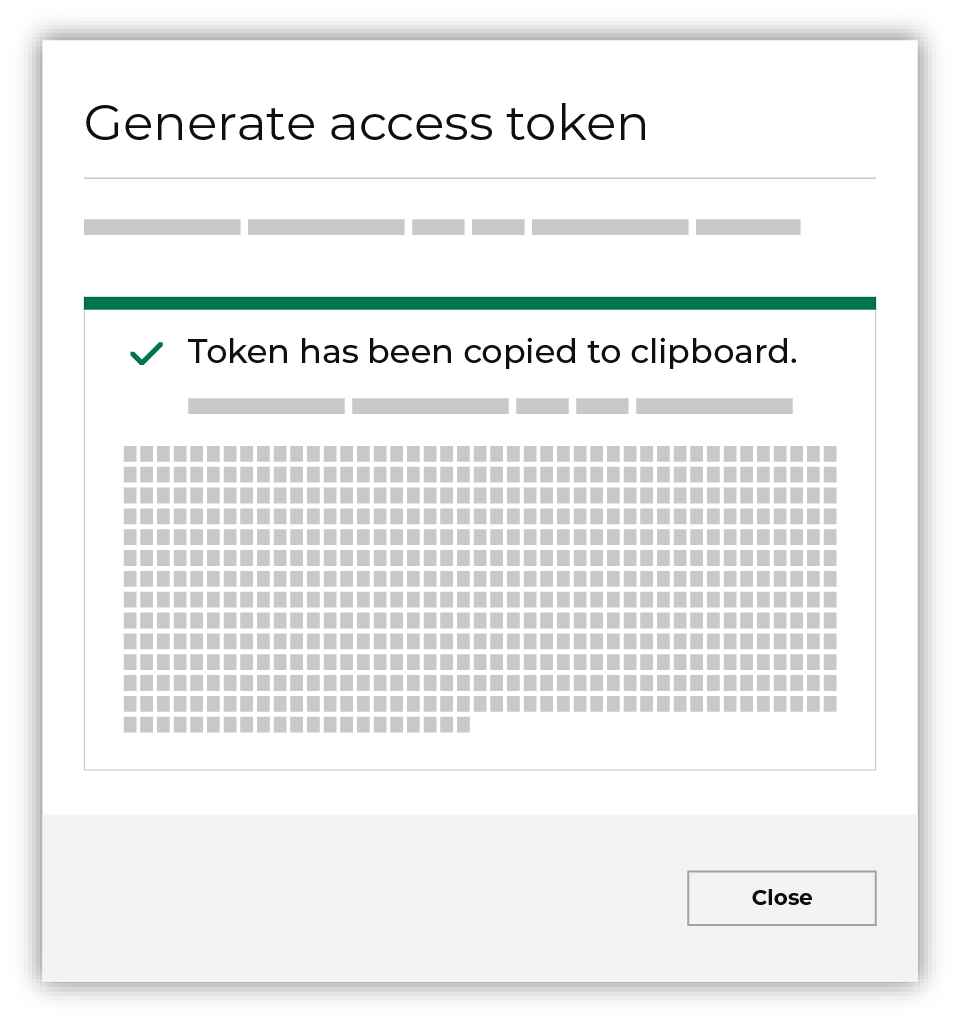
Important You are the only person who have access to the newly generated access key. Amperity does not save the access key anywhere and it will disappear when you close this dialog. Store the access key in a safe place. |
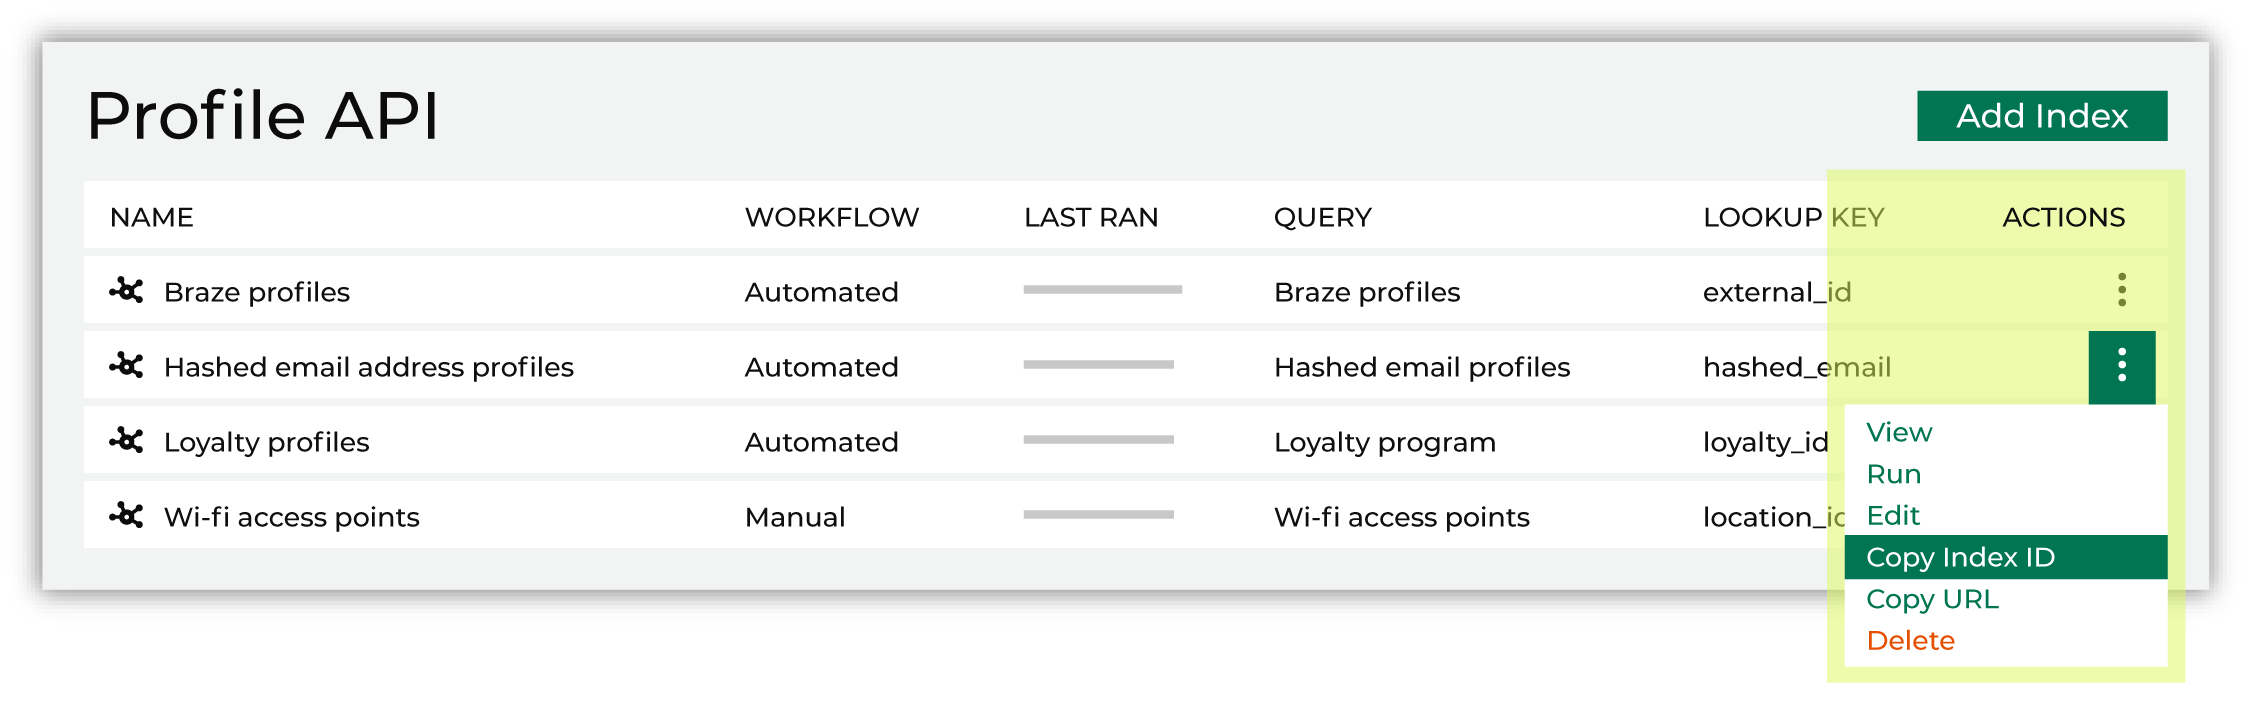
Add the Profile API index
An index must be defined for each query that is used to generate an endpoint for the Profile API.
An index defines a list of customer profile attributes that can be accessed from a Profile API endpoint.
The fields that are available from an index are defined by a query.
The attribute associated with the profile ID field must contain a unique identifier.
All attributes associated with filter fields should have unique names
Add an index from the Profile API tab on the Destinations page. Click the Add index button to configure the index settings.
Copy the profile ID field
A profile ID is a unique identifier for individual customer profiles. Use the GET /indexes/{id}/profiles endpoint to access customer profiles using 1:1 lookups to enable personalization scenarios.
A request to the GET /indexes/{id}/profiles endpoint returns a unique profile identified by the profile ID and any filter fields included in the request.
The value for the lookup key must be a unique identifier. For example:
A loyalty program ID
A hashed email address that is generated after a customer logs into a website using their email address
Important
Do not use non-hashed email addresses as a lookup key.
A customer ID
A unique identifier used by a downstream workflow, such as the “external_id” field in Braze
Note
A request made to the Profile API must have an exact match to a profile ID field value within the index. For example: “Dennis” must match with an uppercase “D” and “Dennis “ must match with both an uppercase “D” and a trailing character.
Verify the list of filter fields
Filter fields allow requests to the GET /indexes/{id}/profiles endpoint to be filtered on each field that is included in the request. Use filter fields to support use cases with many matching fields, such as “Get all profiles associated with a reservation ID”.
Filter fields must be defined in the query and the name of the filter field is the same as the name of the field in the query.
Copy the index ID
The index ID is a unique identifier for an index. To make a request to an endpoint add the index ID to the end of the request URL:
https://tenant.amperity.com/api/indexes?index-id={id}
The index ID is available from:
The Profile API tab on the Destinations page. For each endpoint, open the actions menu, and then select “Copy ID”.
Returned by the GET /indexes endpoint.
Generate the endpoint
The tenant ID is a unique identifier for your tenant. To make a request to an index you must include the tenant ID in the URL of the request.
The tenant ID is available from the Profile API list. For the index, open the actions menu, and then select “Copy tenant ID”.
Copy the tenant ID
The tenant ID is a unique identifier for your tenant. To make a request to an index you must include the tenant ID in the URL of the request.
The tenant ID is available from the Profile API list. For the index, open the actions menu, and then select “Copy tenant ID”.
Configure Movable Ink Studio
After Amperity is configured with a query that makes results available from a Profile API endpoint you can configure Movable Ink to connect to that endpoint. The user who configures the integration must be assigned to the Manager role in Movable Ink Studio.
To add the Amperity integration to Movable Ink Studio
|
|
Log in to Movable Ink. Expand Data and open the Integrations Gallery. Browse the integrations and choose Amperity. Click Connect to enable the Profile API integration. |
|
|
The following settings are required to configure a connection between Movable Ink Studio and a Profile API endpoint: Integration name
Bearer token
Tenant subdomain
Index ID
User ID
Tenant ID
When the settings are added correctly the Movable Ink Studio user interface will display a successful connection with a 200 OK response. 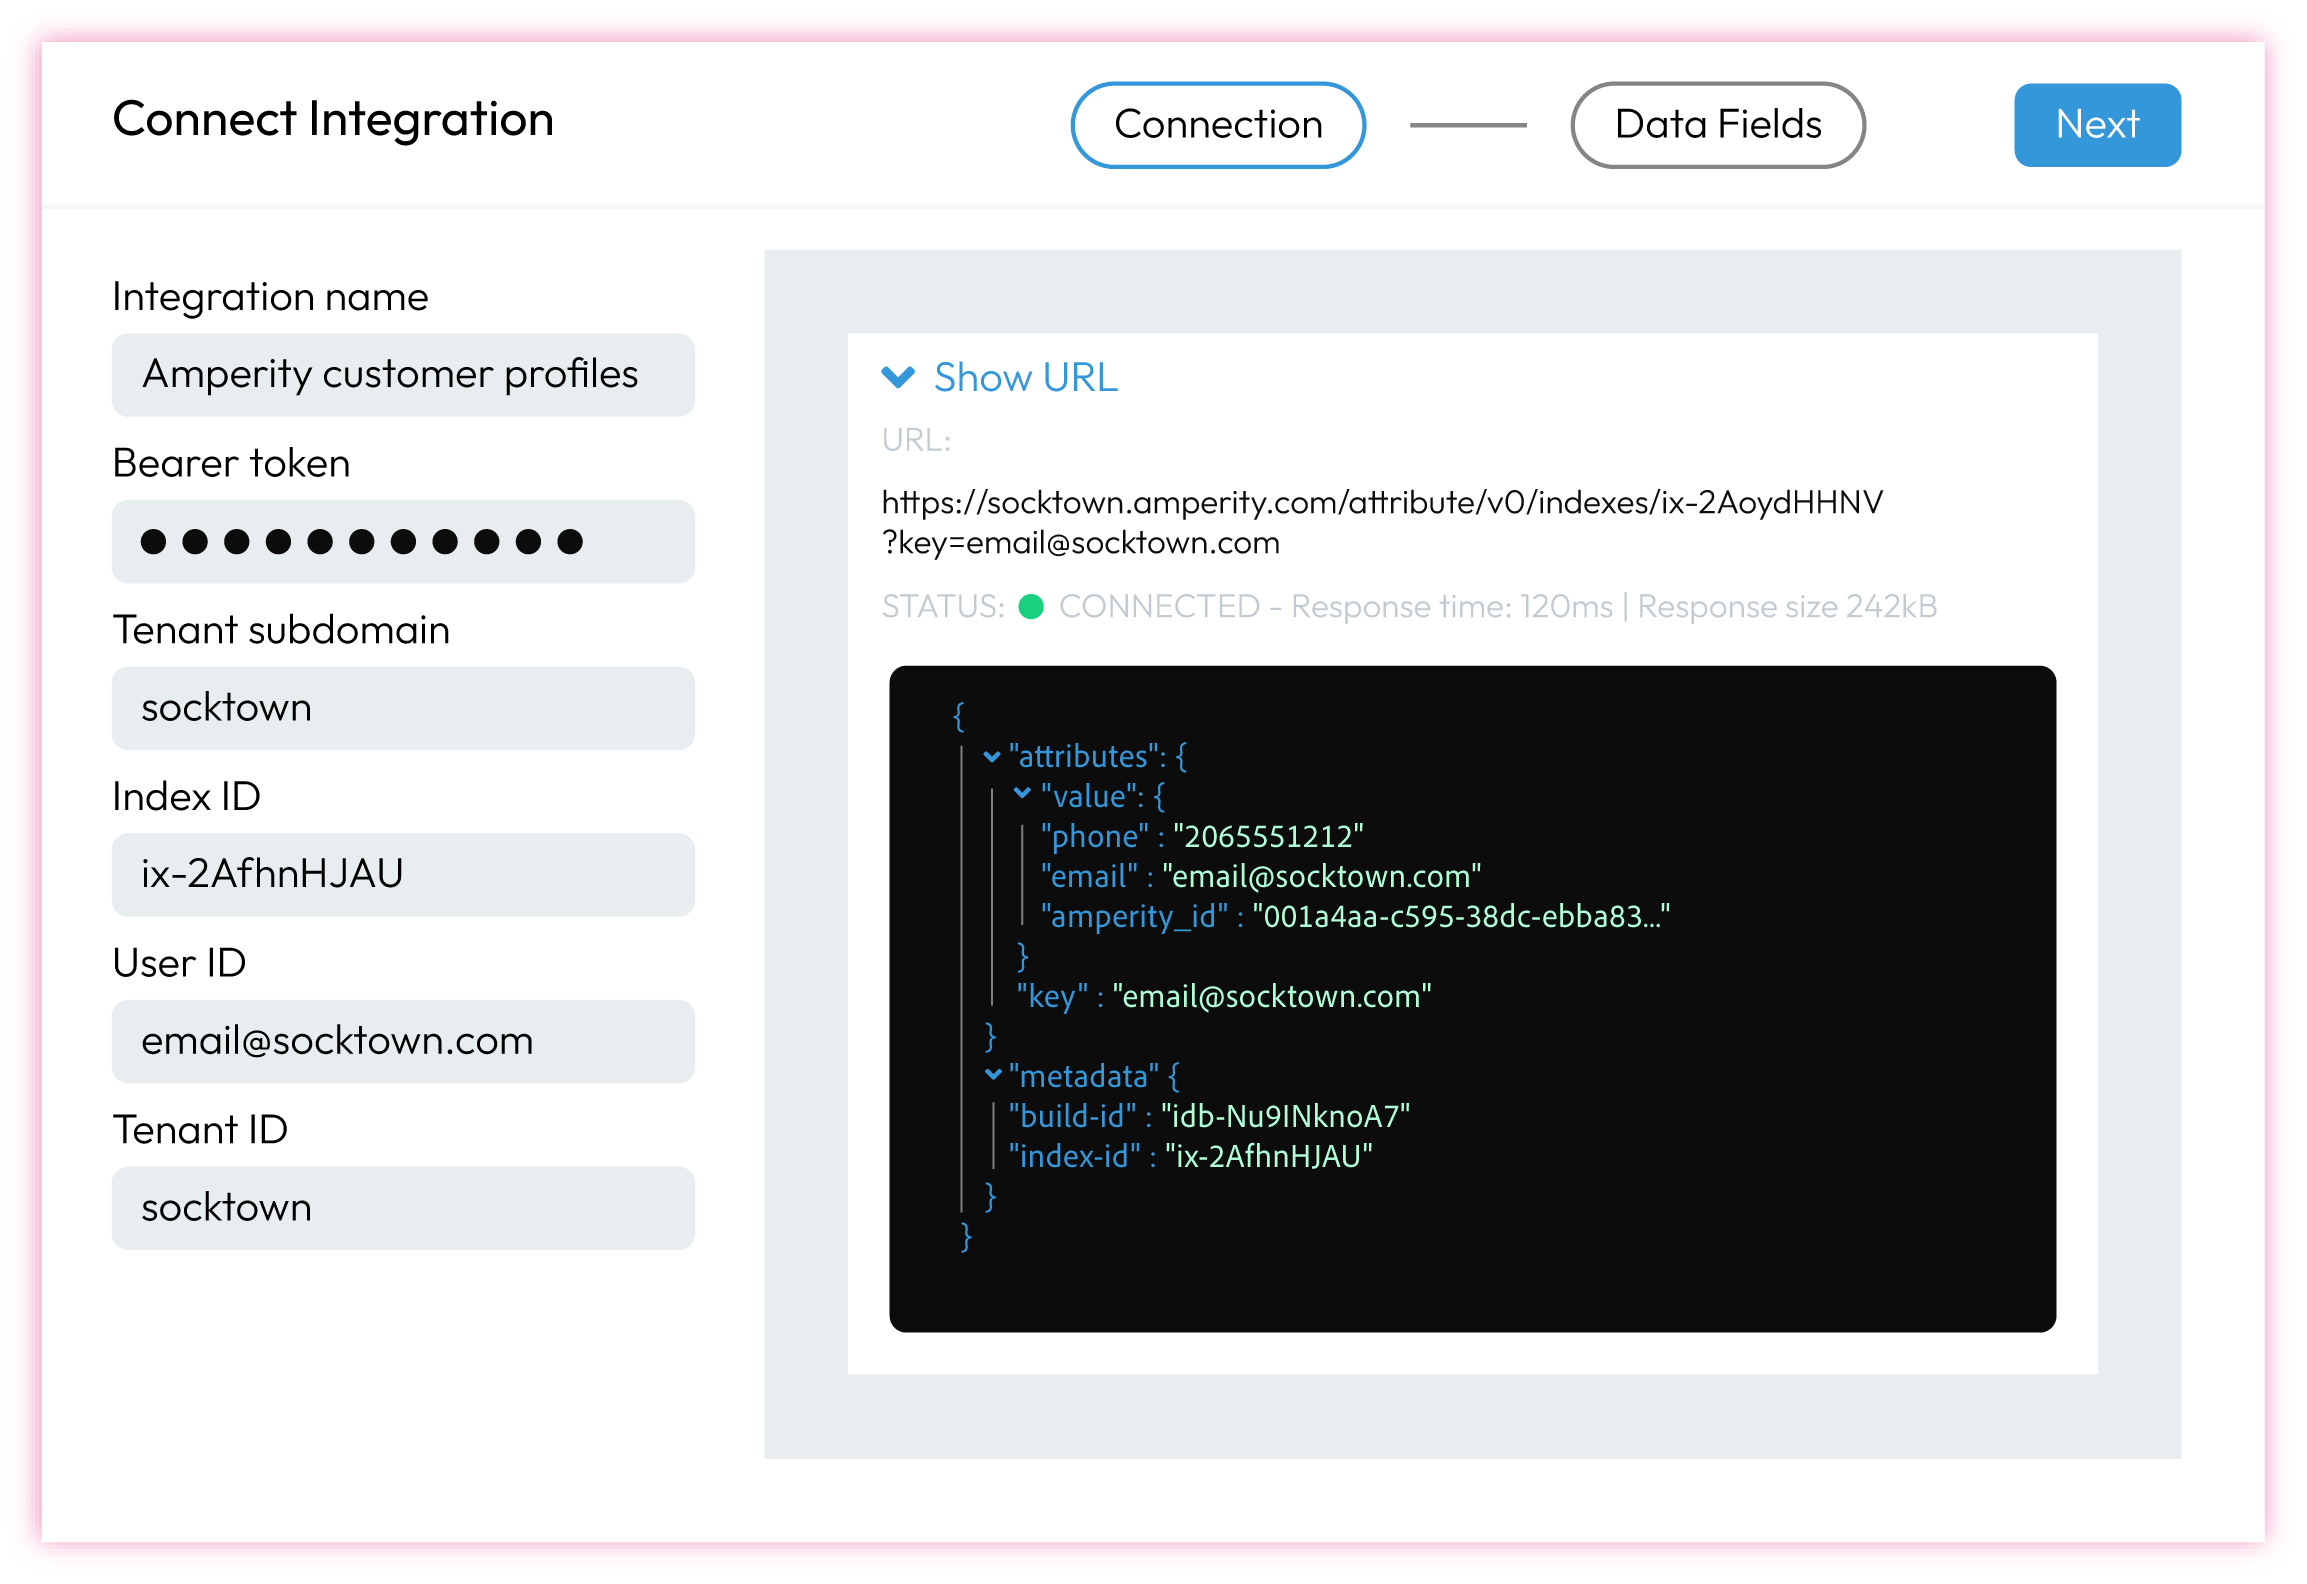
|
|
|
Click Next and configure how the fields in the Profile API index should be shown within Movable Ink Studio. 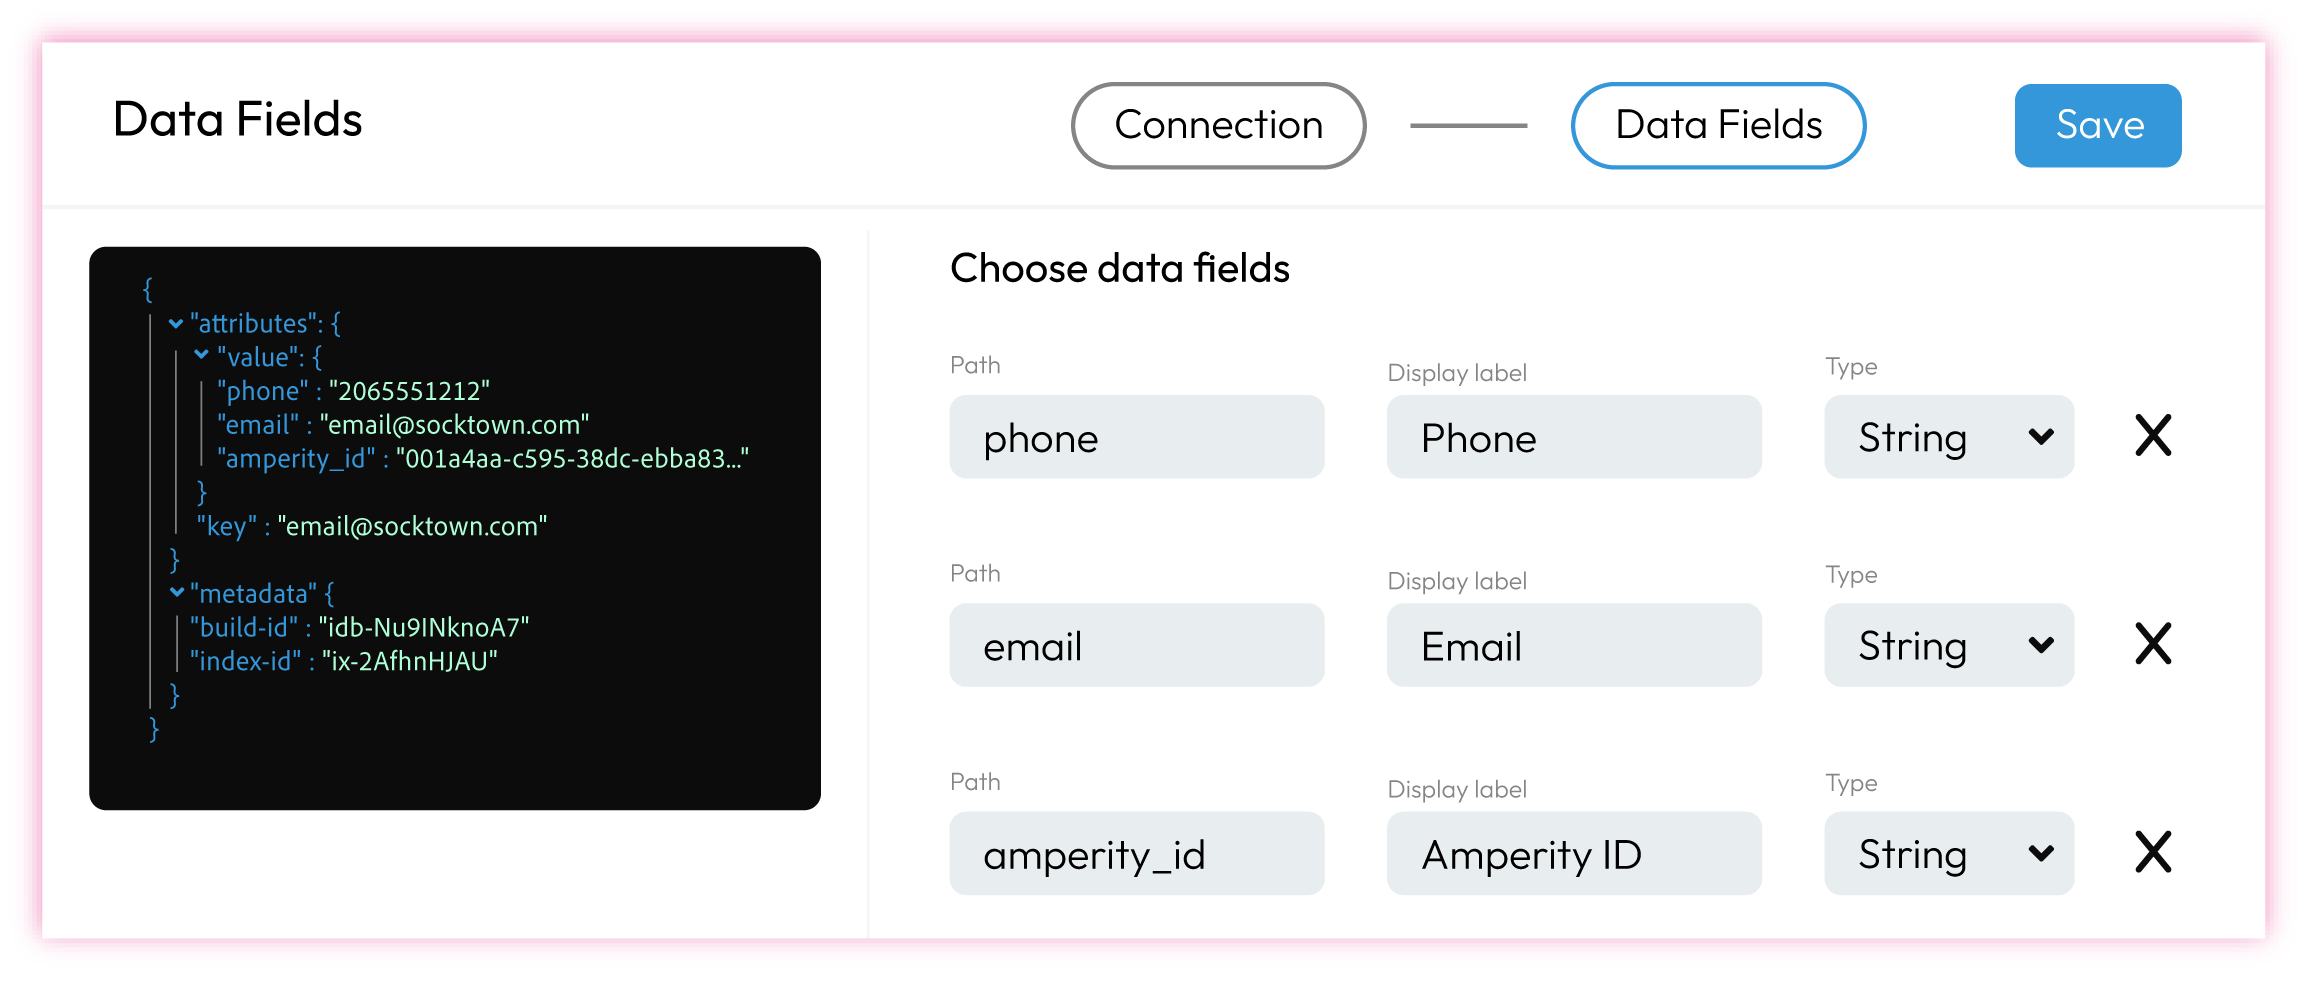
|

|
Click Save. The integration is added to the list of active integrations and is available for use within Movable Ink Studio. |