About sandboxes
A sandbox is a copy of your production tenant in which you can make configuration changes, verify the results, and then promote those changes to production.
Amperity Learning Lab
Ensure data is always available in production by making changes in a sandbox.
Each sandbox tracks changes, provides validation workflows and audit tools that do not need to be configured or customized, and automates monitoring and alerts for changes in the sandbox.
Open Learning Lab to learn more about how sandboxes work. Registration is required.
Allow sandbox administration
The Allow sandbox administration policy option allows full access to all sandboxes in a tenant. Access includes the ability to view details for any sandbox, access any sandbox, promote changes from any sandbox, and delete any sandbox.
Assign this policy to one or more users assigned to the DataGrid Operator policy so they can manage all sandboxes that exist for your production tenant.
Important
A user who is assigned to the DataGrid Operator policy can create a sandbox, and then open that sandbox to make configuration changes. While working in a sandbox, a DataGrid Operator is assigned the DataGrid Administrator policy, which allows a user to have full access to the configuration state of the sandbox.
A user must be assigned the Allow sandbox administration policy option to do any of the following:
View details for all sandboxes
Access any sandbox
Promote changes from a sandbox to production.
Delete a sandbox from the Sandboxes tab on the Settings page or by selecting the Promote and delete sandbox option while promoting changes from a sandbox.
About sandbox workflows
Amperity recommends using a sandbox to make all configuration state changes to your brand’s production tenant.
A sandbox is a copy of your production tenant in which you can safely make configuration changes, validate the results of those changes, and then from which you can safely promote those changes to production.
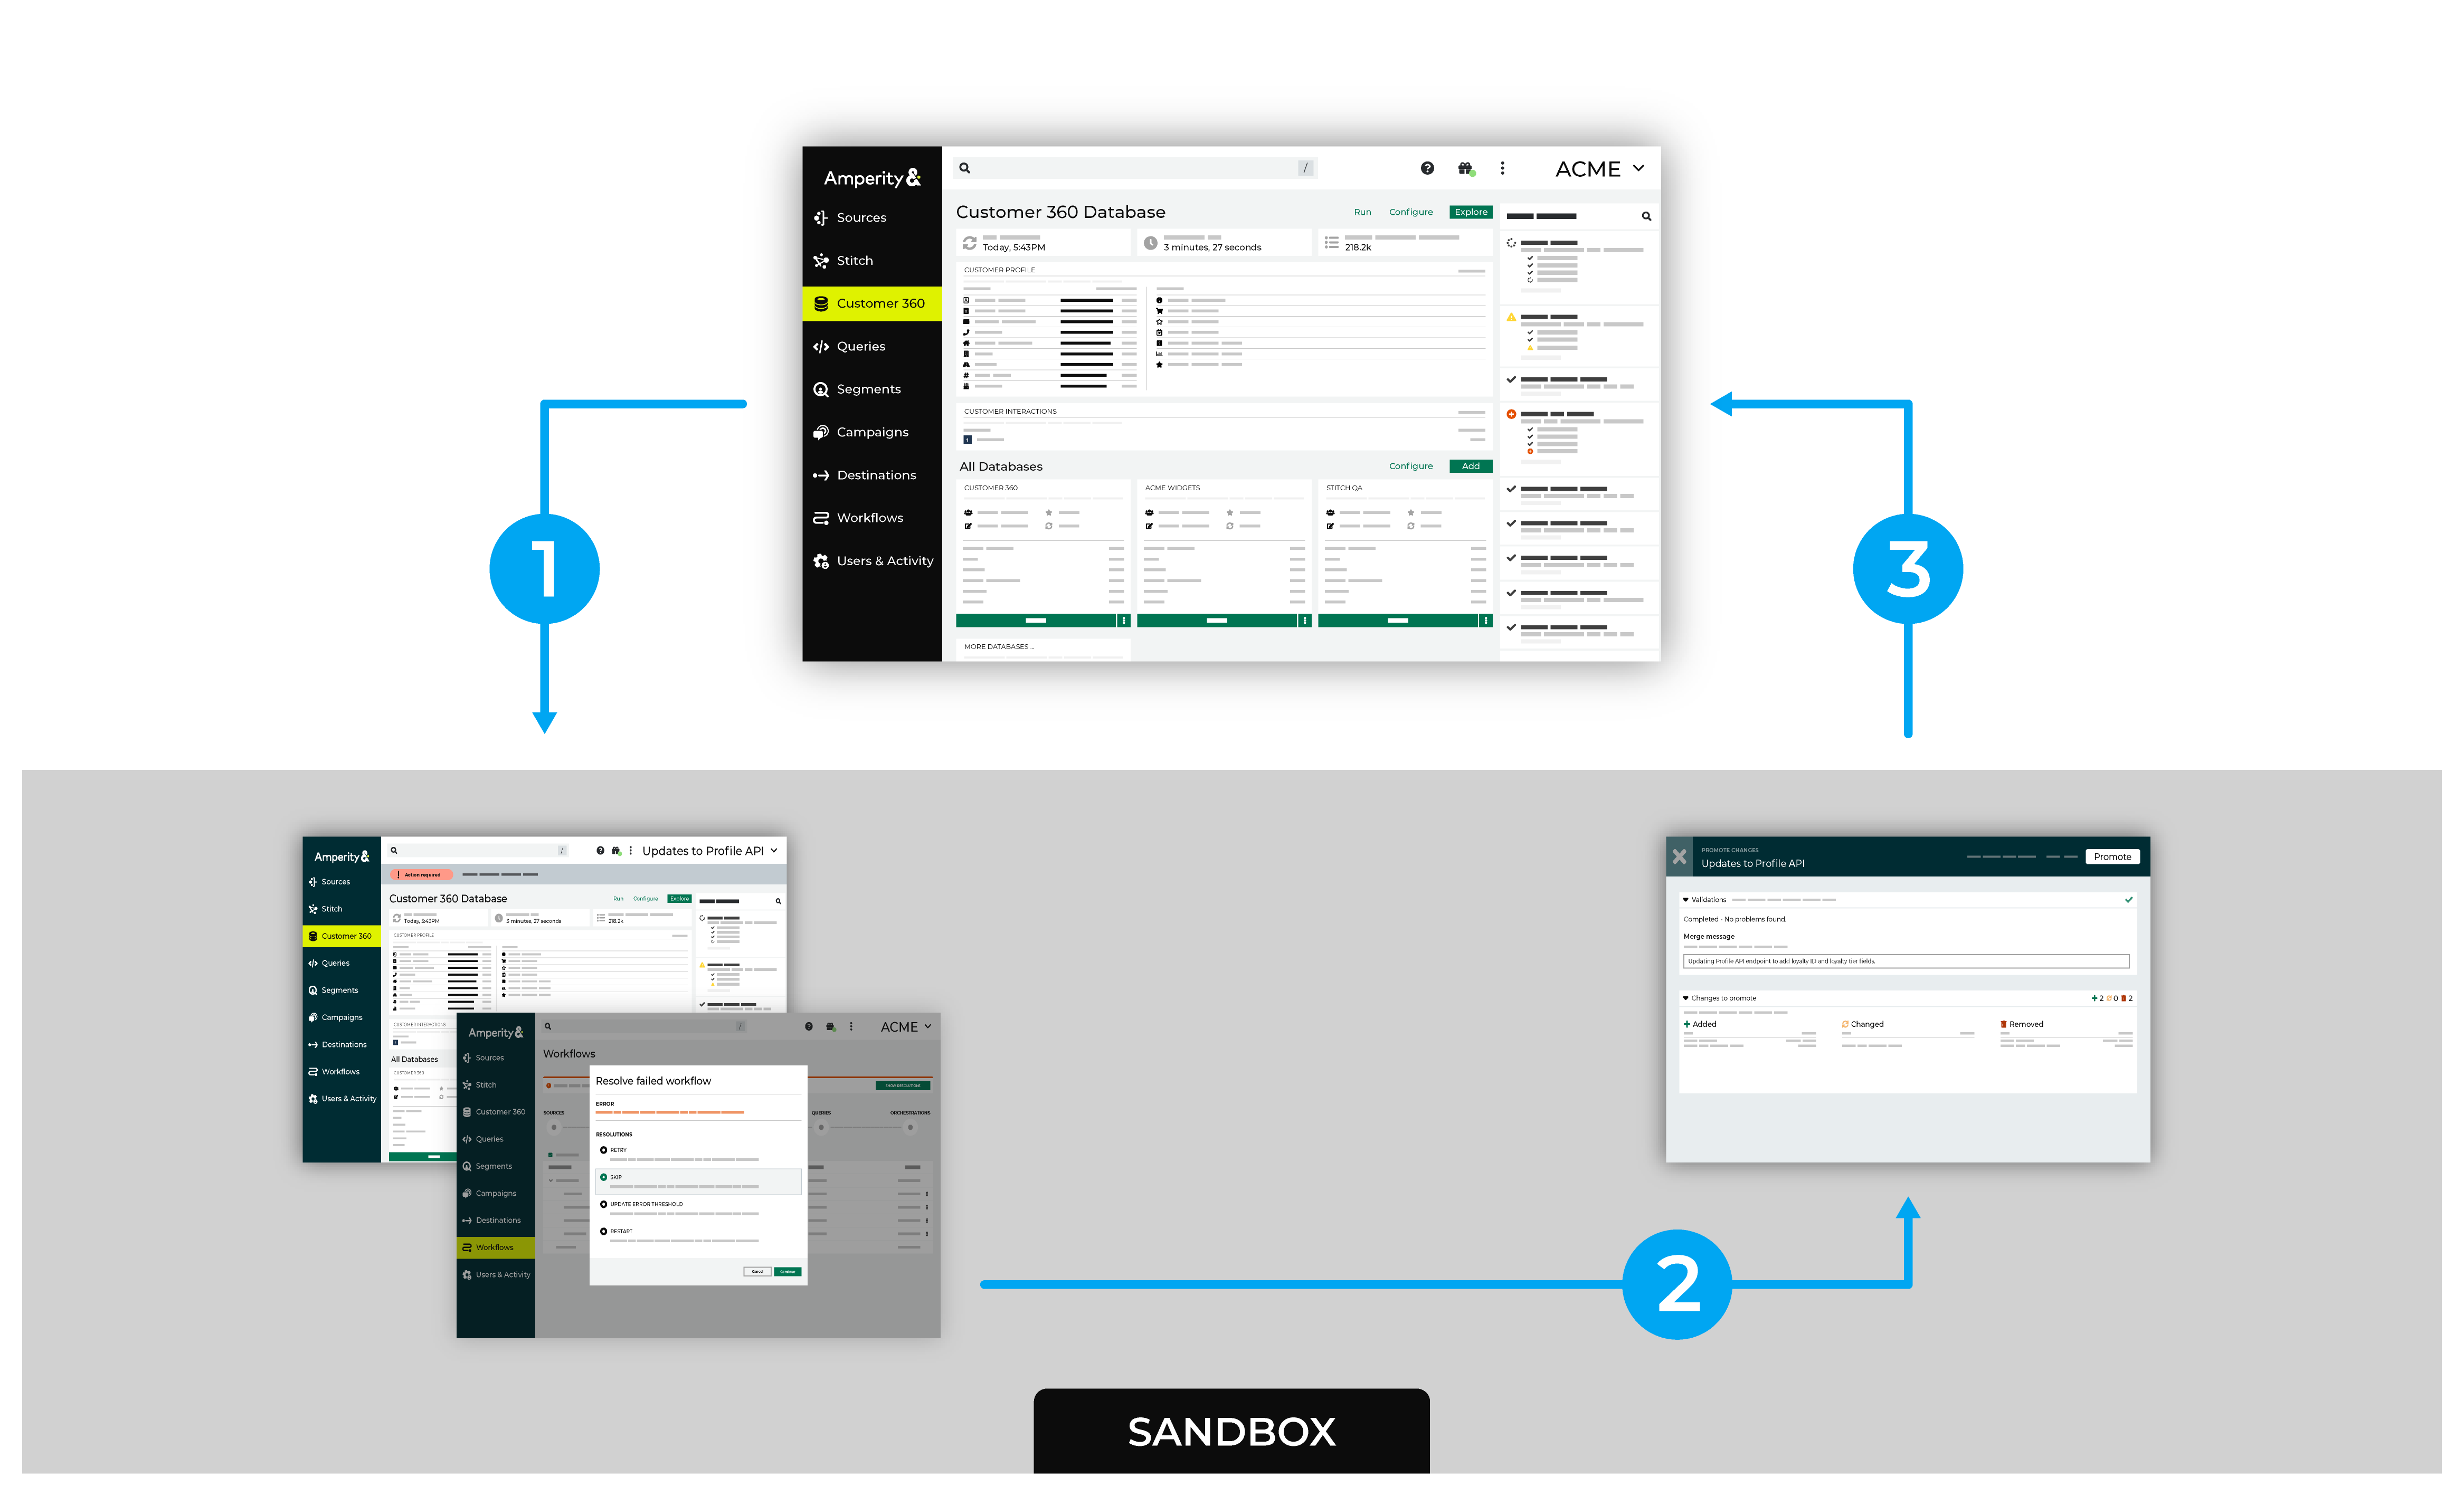
All sandbox workflows follow the same pattern: create a sandbox, make iterative changes in the sandbox, review and validate all changes, promote validated changes to production.

|
Sandboxes are created from the Settings page. Open the Sandboxes tab, and then click Create sandbox. 
To access a sandbox, from the list of sandboxes, select the icon, and then from the list of options select Access sandbox. 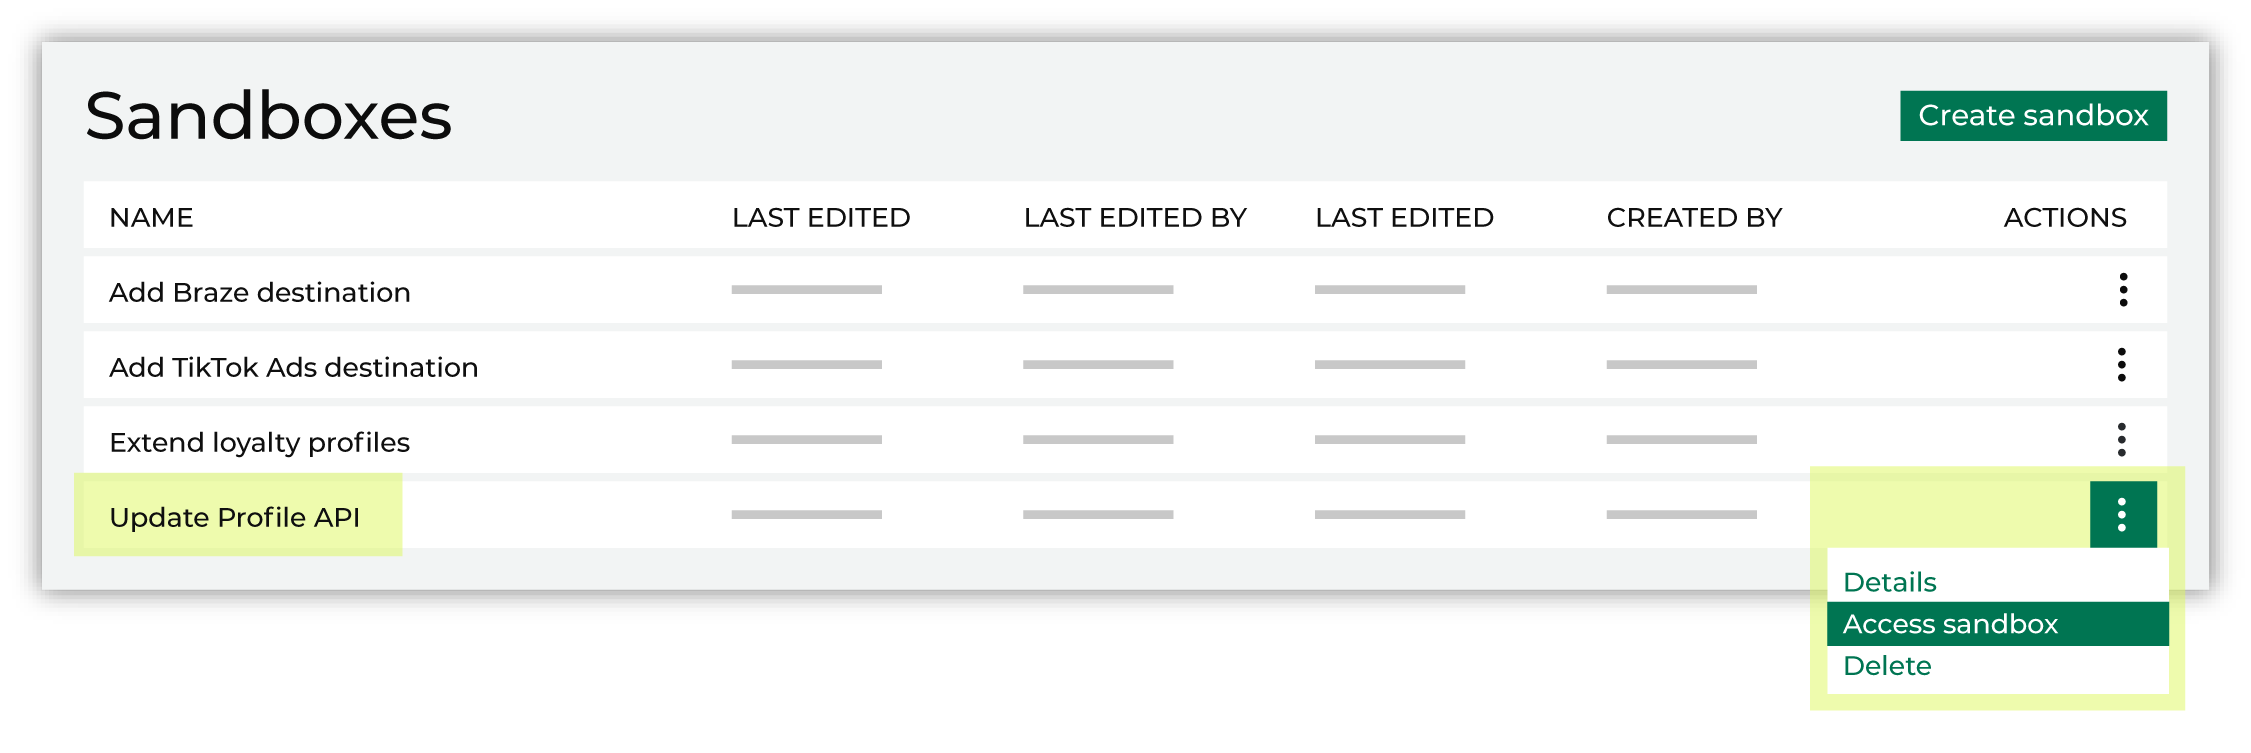
Important Data is not moved between production and a sandbox. Configuration state is copied from production, and then applied to the sandbox. Tip If a sandbox is created while a Stitch run is in progress, wait for the Stitch run to finish in production before running the database in the sandbox. This allows the database in the sandbox to use the most recent Stitch outputs in production for the initial database refresh in the sandbox. Note Configuration state for an inbound bridge is copied from production, and then applied to the sandbox. Configuration state for an outbound bridge is not copied. An outbound bridge must be configured within the sandbox. |

|
Sandbox configuration works the same way as it does in production with all of the same features and functionality. The main difference is that users in a sandbox are assigned the DataGrid Administrator policy, which gives them full access to the configuration state within the sandbox. When you access a sandbox, it will look much the same as production, but with a different color scheme. 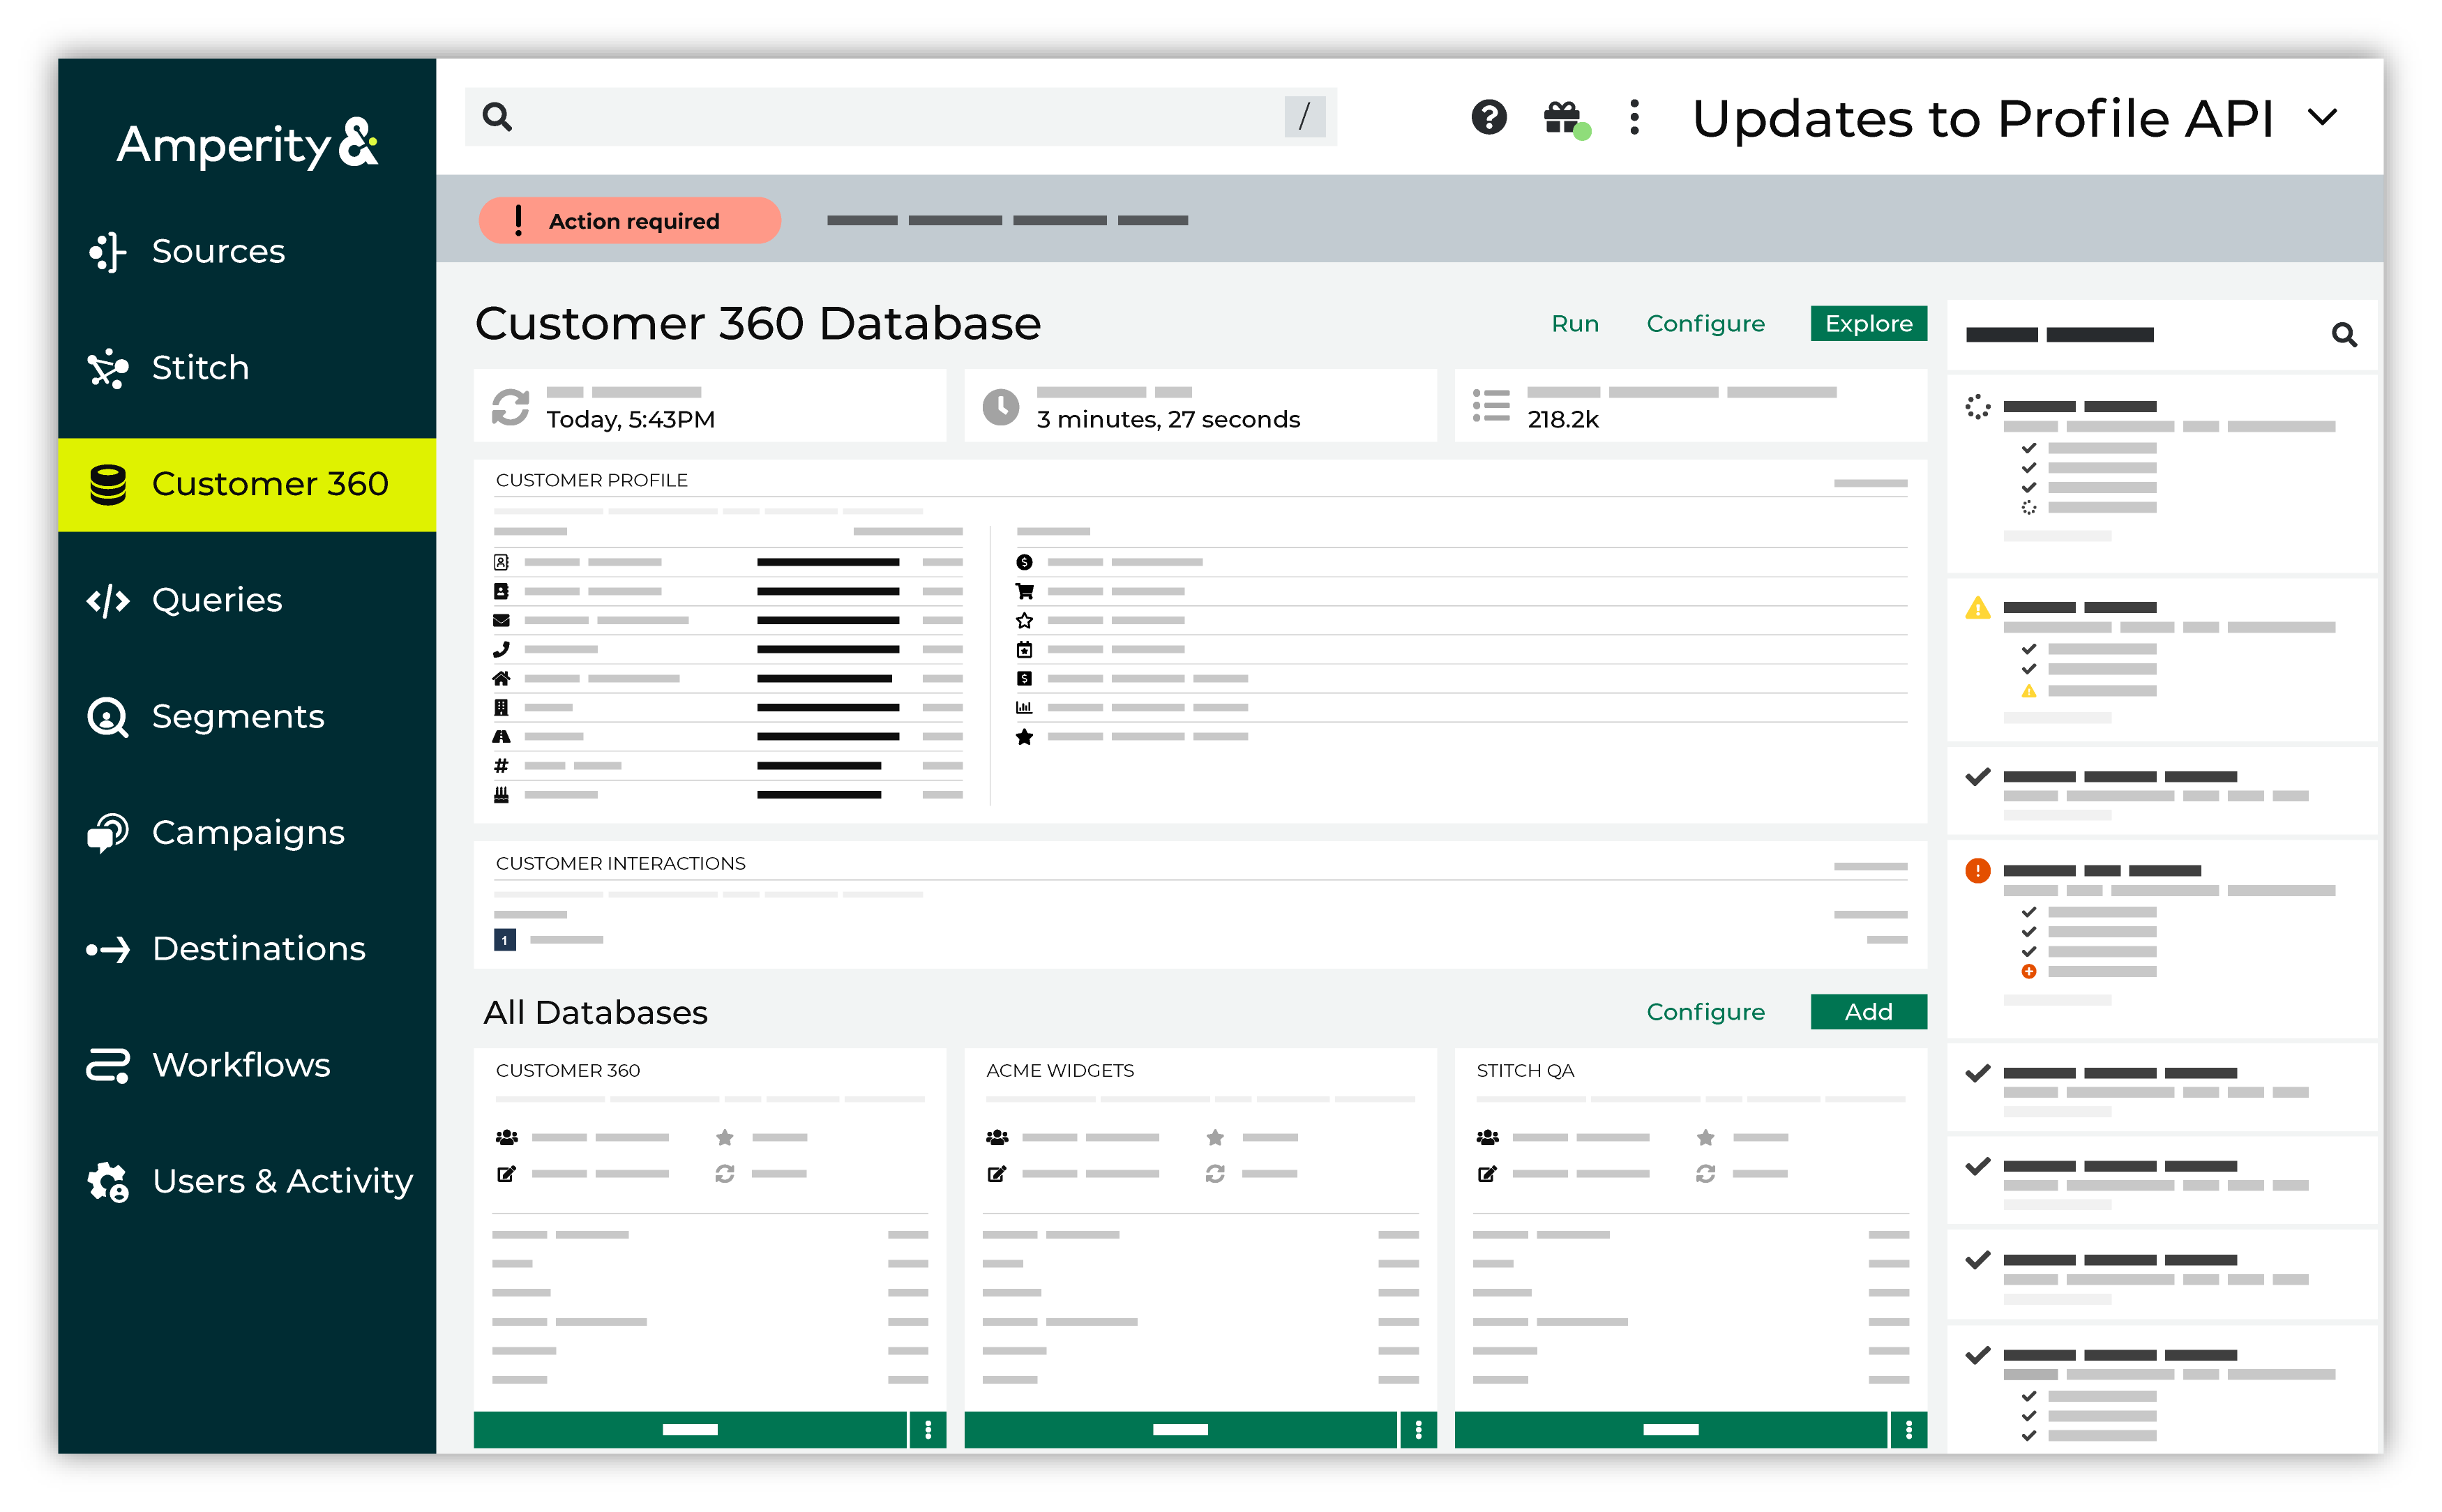
Validate all configuration changes Sandbox-specific notifications are built into the pages to help you identify the current configuration state of the sandbox as it relates to the configuration state in production. These appear near the top of each page. A notification is shown when action is required to synchronize the configuration states between a sandbox and production. For example: 
after which you can review the details for each update that may be available. 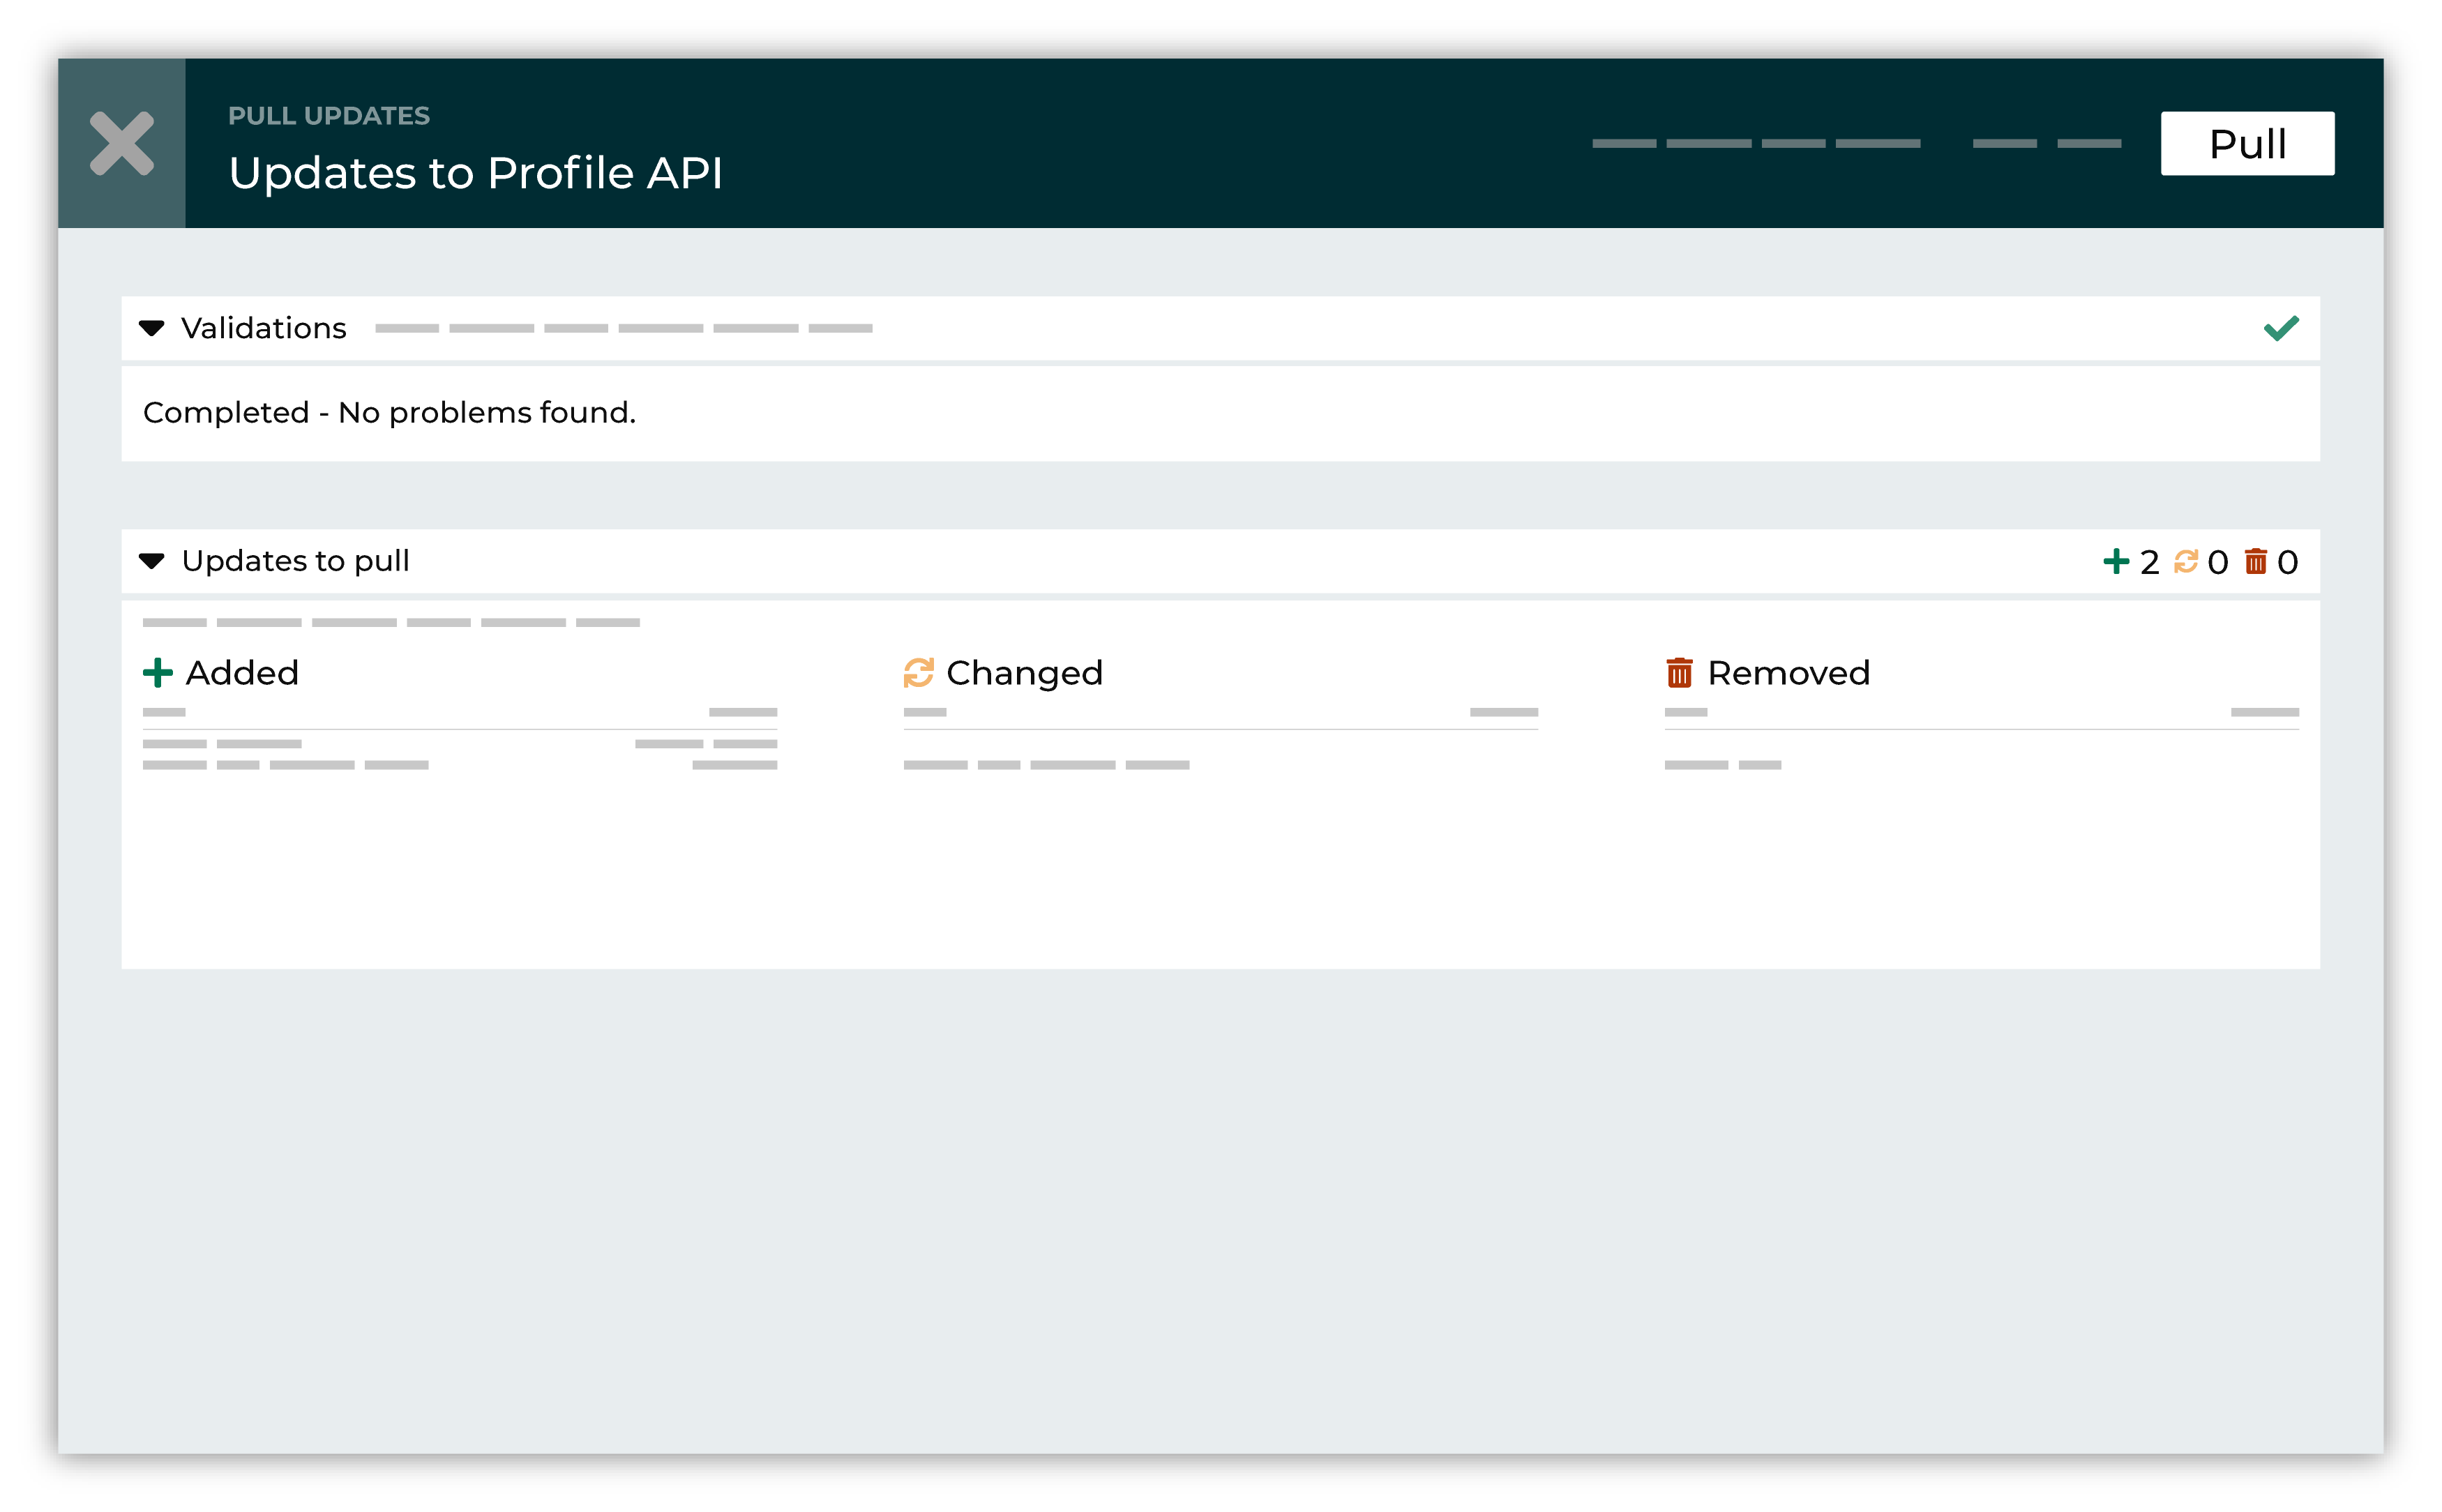
A list of changes appears under the Added, Changed, or Removed sections. Click the name of the update to learn more about the differences between the configuration states of your sandbox and production. Review the list of Added, Changed, and Removed configuration state changes. Click the name of the added, changed, or removed object to review the details for the configuration state change. Resolve validation issues, as necessary. 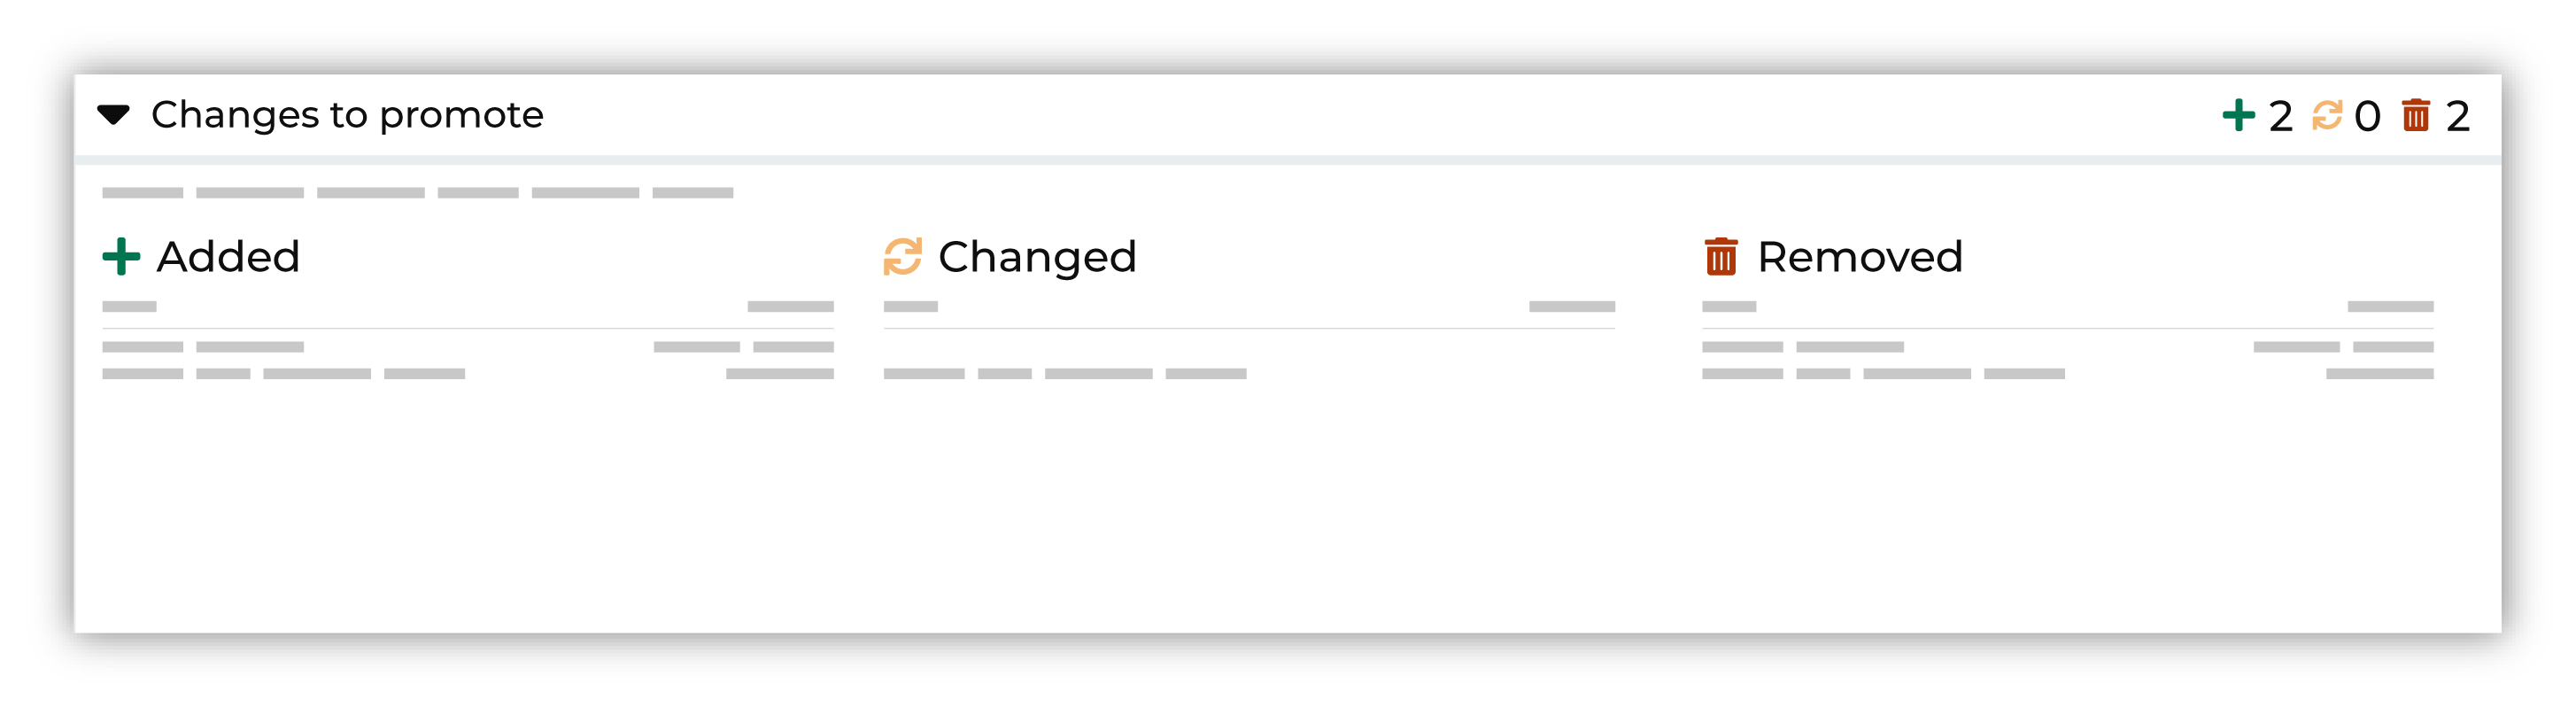
|

|
When the sandbox is ready to be promoted, click Promote. Enter a merge message for this set of configuration state changes. 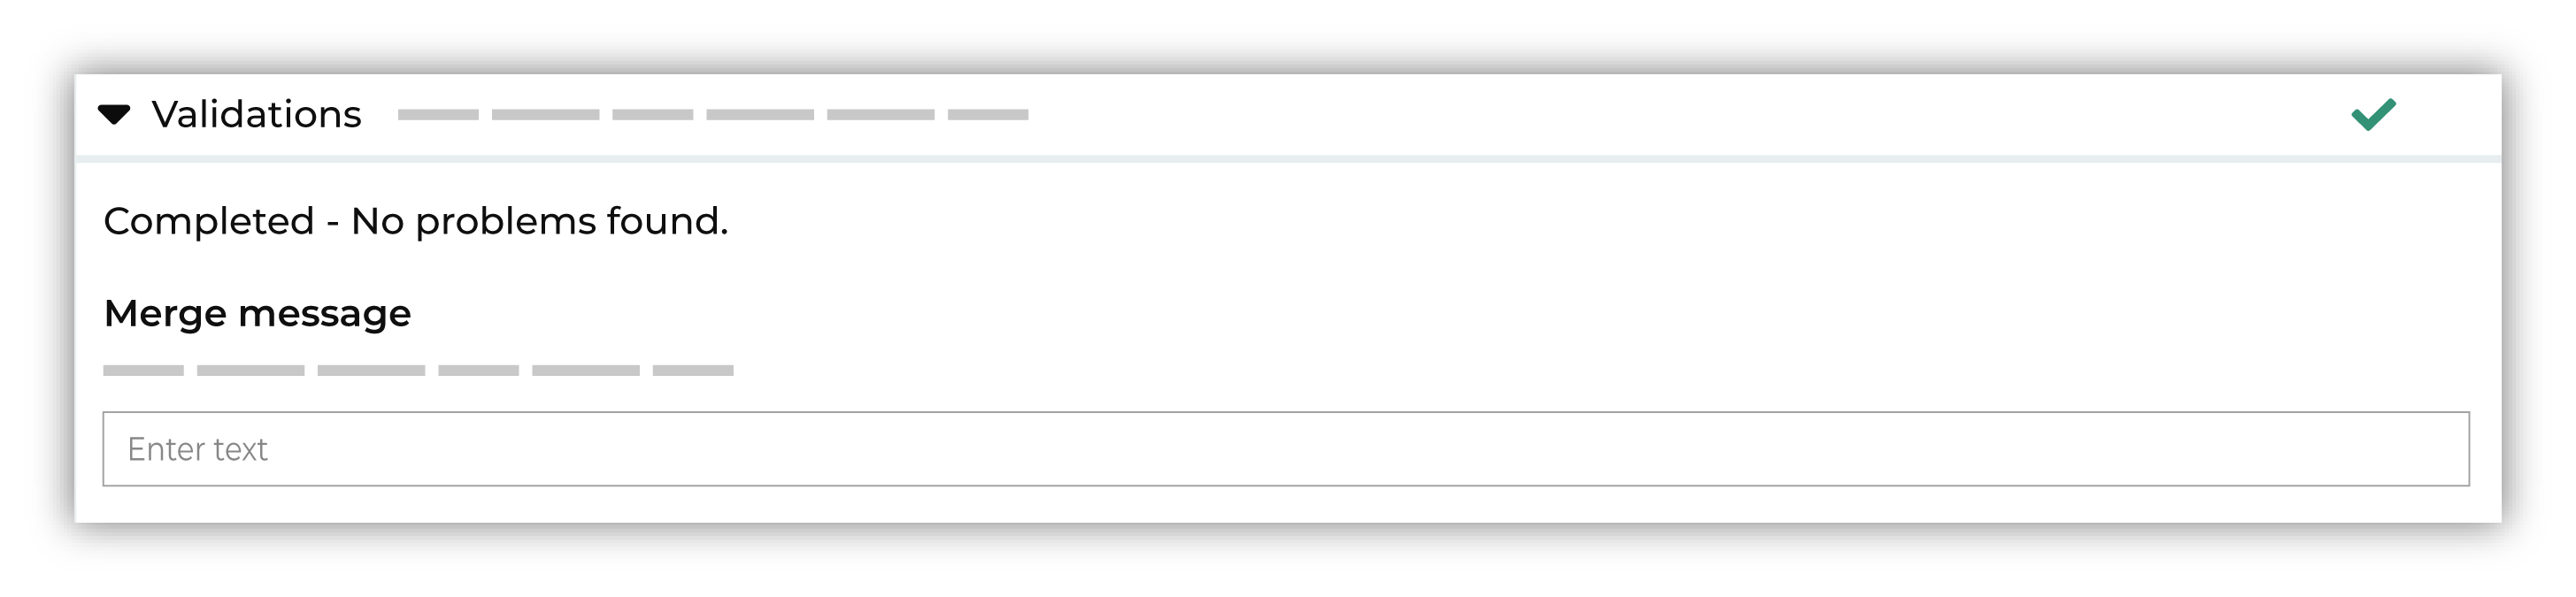
|
What is not copied?
Some objects are not copied to a sandbox:
API keys
API keys are tenant-specific and are not pulled to a sandbox or promoted from a sandbox to production. API keys must be created in a sandbox to use an Amperity API endpoint, stream data using the Streaming API, or access Profile API indexes.
Versioned table histories
Versioned table histories are not copied to a sandbox.
A sandbox is a copy of your production tenant. A database in a sandbox must be run before tables in that database has data.
The initial database run in the sandbox is different from the database run in your production tenant and, as such, starts a new version history for each table in the sandbox.
Amperity Bridge shares
Configured shares are not copied to a sandbox.
You can configure outbound shares in a sandbox, and then share data with Databricks, Snowflake, and Google BigQuery.
Always use unique share names in a sandbox. This ensures the fully qualified reference in Databricks, Snowflake, or Google BigQuery is different and sending data from the sandbox will not overwrite data sent from production.
Best practices
Amperity recommends the following patterns when working with sandboxes:
Activate queries
Be sure to activate all queries that should be promoted from the sandbox to production. Any query in a draft state is not promoted.
Continuous validation
As you make changes within a sandbox, Amperity will continuously run validations against those changes. If an issue is discovered a notification appears along with a link to learn more about the validation issue and the steps that may be required to resolve it. You should fix validation issues as they arise to keep your sandbox ready to be promoted to production.
Required. Errors must be addressed before a sandbox can be promoted.
Recommended. Warnings should be addressed before promoting a sandbox.
Sandbox validations are only available in a sandbox. Amperity recommends that all changes be made in sandboxes. This helps ensure that errors are not present in production and that causes of warnings can be investigated in a safe environment.
Important
Drafts do not move between a sandbox and production and are not included in sandbox validations. Anything that should be promoted to production must be saved in a sandbox, and then validated.
The following table describes examples of errors and warnings that may be shown by sandbox validations.
Component |
Severity |
Description |
|---|---|---|
Couriers |
Error |
Couriers shows an error when they refer to an ingest query that was renamed or deleted. |
Data exports |
Error |
A database export shows an error when the tables to be exported are renamed or deleted. |
Databases |
Error |
Database tables in databases that run automatically shows an error when:
|
Queries |
Warning |
A query shows a warning when it is used with:
The warning appears if there is a missing field or table, such as when a query references a that field has been deleted or renamed. Note A query that is not configured for an orchestration, orchestration group, or used with a campaign is not included in sandbox validations. |
Queries |
Error |
A query shows an error when it is used with:
The error appears if there is a missing field or table, such as when a query references a that field has been deleted or renamed. |
Segments |
Error |
A segment shows an error when it is used with a scheduled campaign. The error appears if there is a missing field or table, such as when a segment references a that field has been deleted or renamed. |
Data across environments
Data is not moved between your production environment and a sandbox environment. Only the configuration state is copied to the sandbox environment and only changes to the configuration state are copied back to your production environment.
For example, if you use a sandbox to add the components required by a new data source, such as a courier, a feed, along with a custom domain table in which semantic tags are applied, after promoting those changes from a sandbox environment you need to run the courier to pull the data to your production environment.
Delete sandbox on promote
You can automatically delete a sandbox using the Promote and delete sandbox option when promoting changes from a sandbox to production.
Run partial workflows
Each workflow should be validated before promoting changes to production using a partial workflow.
A partial workflow pulls data from upstream sources to the sandbox, run Stitch, and then refresh databases.
A partial workflow does not run orchestrations or campaigns. This ensures that data in your sandbox is not inadvertently sent to any downstream workflows.
Short-lived sandboxes
A sandbox should be short-lived and should be used to make small, iterative changes within your tenant. After these changes are safely promoted to production, the sandbox should be deleted. Use a sandbox for each iterative change to ensure that you are never making large changes to production.
Examples of small, iterative changes
Each sandbox should exist only to support a specific set of planned configuration state changes.
A new data source in sandbox A
A new destination in sandbox B
Changes to a Profile API endpoint in sandbox C
A set of custom database tables in sandbox D
After these changes are promoted to production, the sandbox should be deleted.
How-tos
Tasks related to working with sandboxes in Amperity:
Access a sandbox
A user who is assigned the Allow sandbox administration policy option can, in addition to opening sandboxes they have created, can also access sandboxes other users have created.
This process is similar to opening a sandbox, except the name of the link is Access sandbox and sandboxes that other users have created is not available from the menu in the top-right of your tenant.
Add a sandbox
Sandboxes are created from the Sandboxes tab on the Settings page.
To add a sandbox
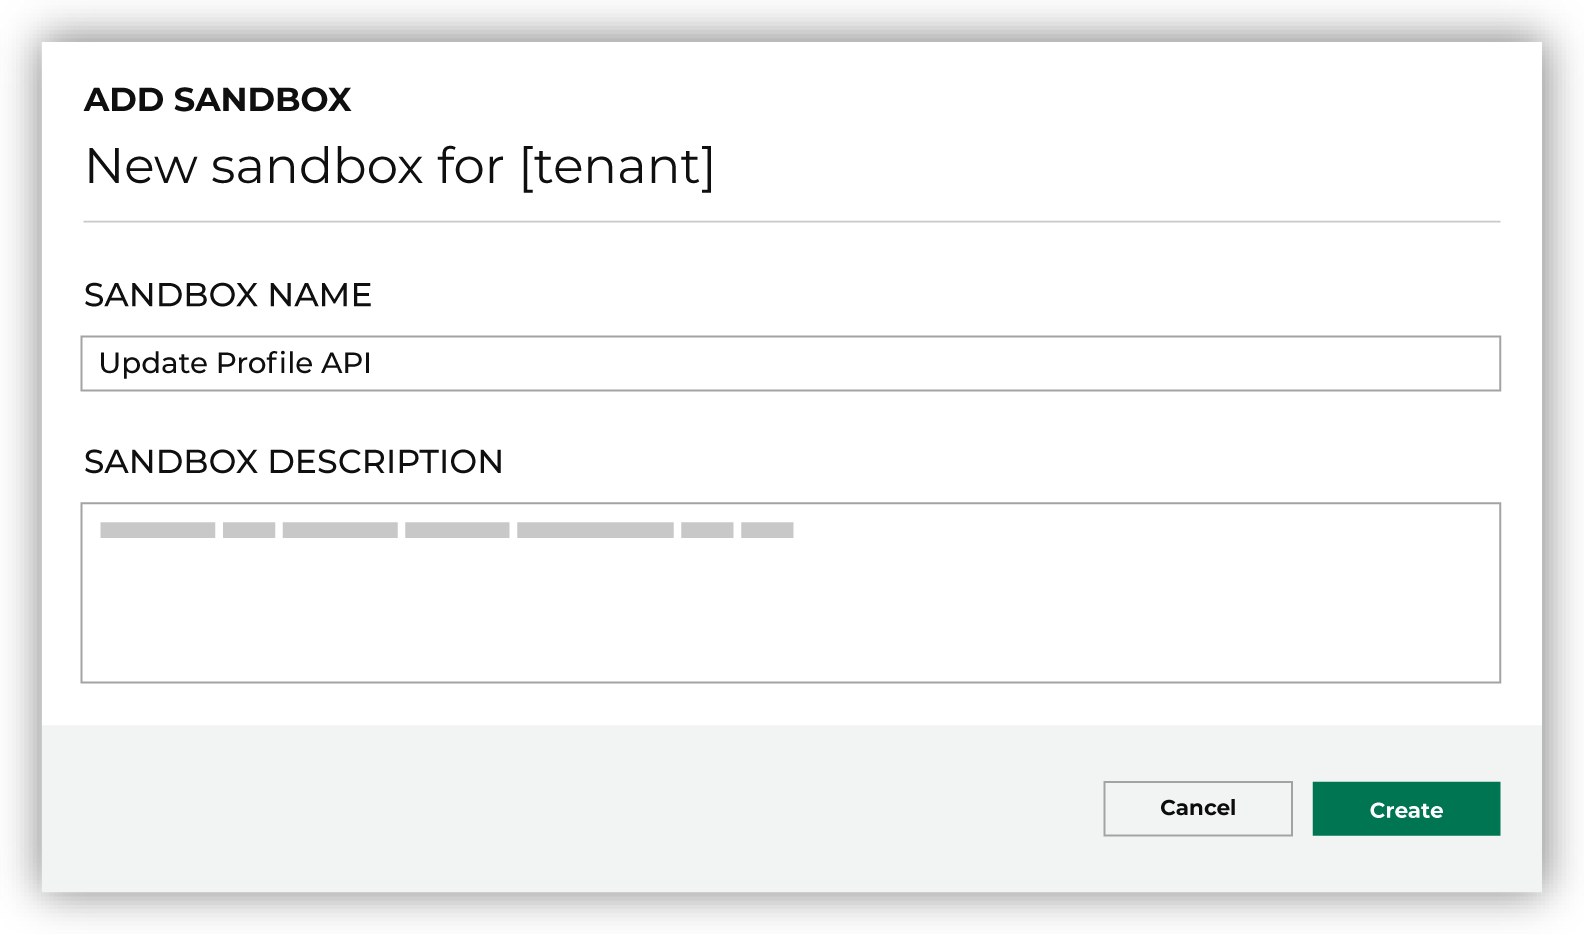
From the Settings page open the Sandboxes tab, and then click Create sandbox.
Each sandbox should be given a name that identifies the type of configuration state change that will be made in that sandbox, along with an expanded description of those changes.
Note
The name of a sandbox may have up to 64 characters. The description for a sandbox may have up to 512 characters.
Click Create to generate the sandbox for your tenant.
Delete a sandbox
You can delete a sandbox from the list of sandboxes in the Sandboxes tab on the Settings page.
To delete a sandbox
From the Settings page open the Sandboxes tab, and then from the list of sandboxes select the icon.
From the list of options select Delete.
On the Delete sandbox window, enter the sandbox ID in the field to confirm that you want to delete the sandbox, and then click Delete.
Edit sandbox details
The name and description of a sandbox can be edited after it has been created.
To edit sandbox details
From the Settings page open the Sandboxes tab, and then from the list of sandboxes select the icon.
From the list of options select Details.
The Sandbox details window appears with information about the sandbox.
Click the Edit button and make your changes. When finished, click Save.
Open a sandbox
A sandbox is accessible from the Sandboxes tab on the Settings page or from the dropdown menu in the top-right of your tenant.
To open a sandbox
From the Settings page open the Sandboxes tab, and then from the list of sandboxes select the icon.
From the list of options select Open sandbox.
This opens the sandbox in a new page in your Web browser.
Tip
To open a sandbox in the same page, click the menu in the top-right of your tenant, and then from the dropdown list that appears, select a sandbox.
Promote changes
Validated changes within a sandbox can be promoted to production.
Tip
You can automatically delete a sandbox using the Promote and delete sandbox option when promoting changes from a sandbox to production.
To promote changes from a sandbox
From the Settings page open the Sandboxes tab, select the icon, and then open a sandbox.
From the sandbox, resolve all validation issues.
Click the Promote button, and then specify if you want to delete the sandbox immediately after promoting your changes or if you want to only promote changes and keep the sandbox.
Click Promote.
Pull updates from production
The state of production can change independently of the state of a sandbox. For example, changes were promoted from a different sandbox that updated the schema of a database table.
A sandbox must contain the current state of production to ensure that all changes in the sandbox can be validated. A notification appears when updates are available to be pulled from production to your sandbox. This notification is similar to:
This sandbox is out of sync
8 updates to pull from production
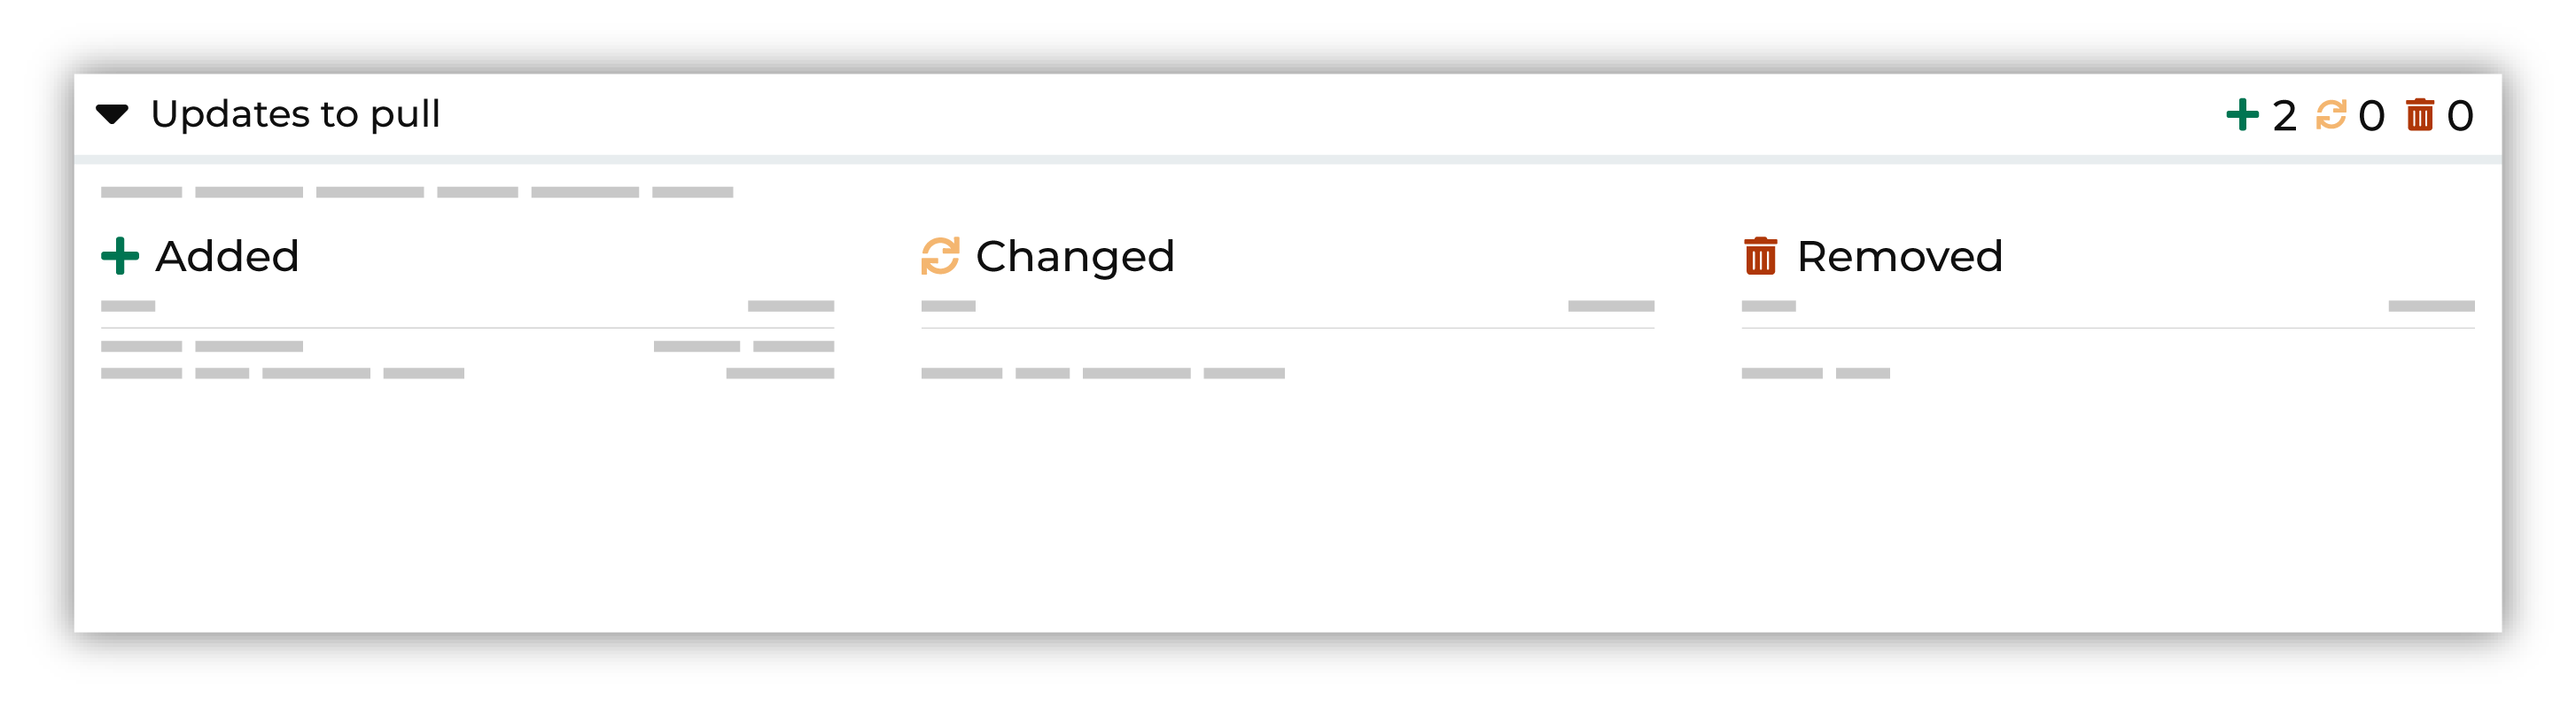
This opens the Pull updates page, on which you can review all of the updates that is pulled from production into your sandbox.
To pull updates to a sandbox from production
From the Settings page open the Sandboxes tab, select the icon, and then open a sandbox.
Click the “Updates to pull from production” link in the sandbox notification banner.
The Pull updates page opens. Review all of the updates that is pulled to your sandbox.
Click Pull.
Resolve validation issues
As you make changes within a sandbox, Amperity runs validations against those changes. A notification appears when validation issues are present in your sandbox with a link similar to:
This sandbox has errors blocking promotion
followed by the number of validation issues:
2 current errors to address
Click this link to open the Promote changes page, from which each validation issue appears as a row in a list of validation issues.
In situations where there is a conflict between the state of the sandbox and production, that conflict must be resolved before any changes in production can be pulled into the tenant.
Tip
Sandbox validations only appear within sandboxes. Resolve all validation issues before promoting your changes to production.
Review changes
A series of validations are run against updates. These validations will notify you within the sandbox when the configuration states of production and sandbox conflict.
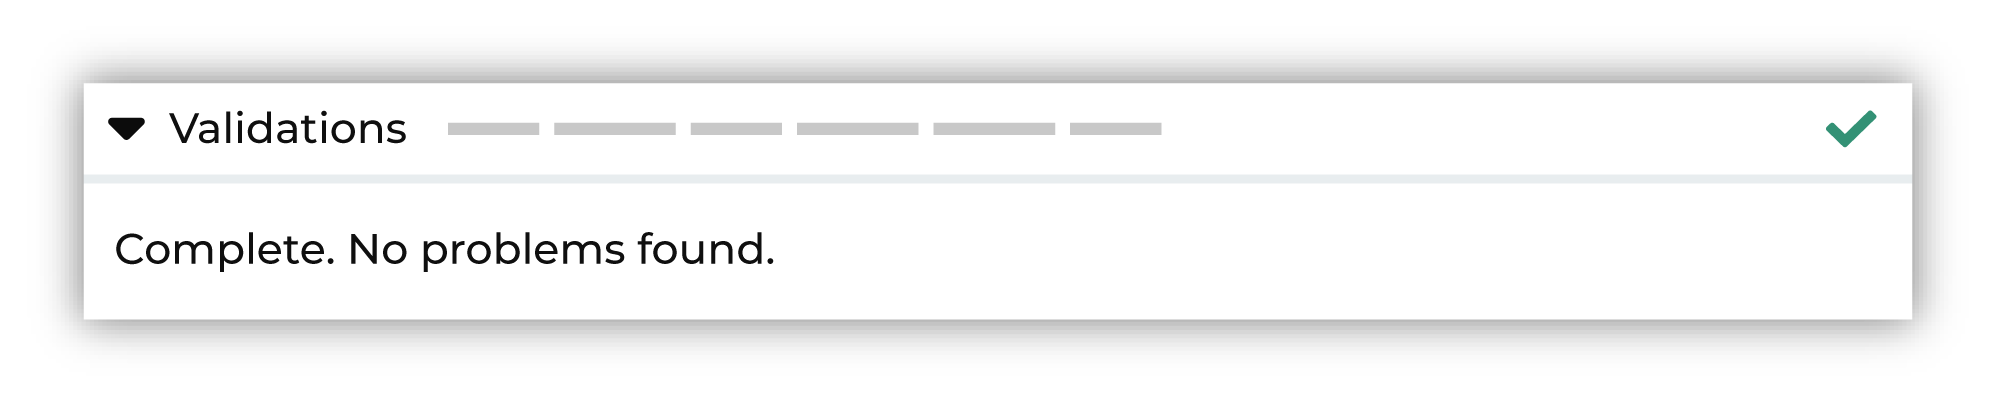
Most of the time you should receive a validation report that does not contain a list of conflicts, similar to:
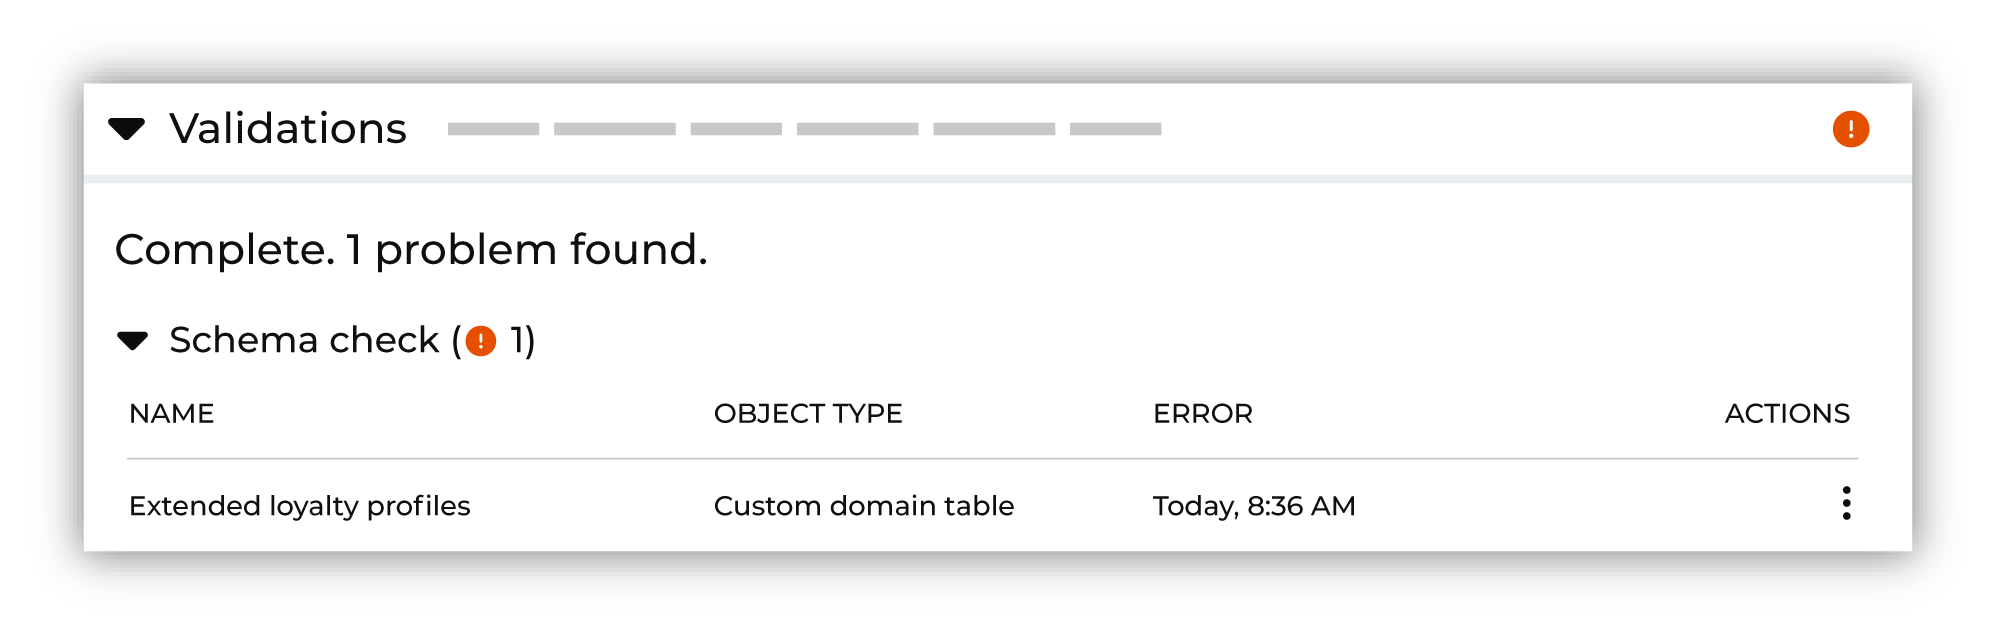
Occasionally, you will receive a validation report that shows one or more validation errors. For example, a schema mismatch between a custom domain table in production and a custom domain table in the sandbox:
If you receive a validation report with errors, investigate each error and work to resolve the underlying issue. It is possible that resolution must be done in the production tenant before pulling updates to the sandbox. It is also possible that the resolution is done in the sandbox. It depends on the error.
Restore changes
Changes that are promoted to production from a sandbox may be restored to a previous state. Do one of the following:
In many situations you can use a sandbox workflow to restore the state of production, especially when a sandbox was used to make small, iterative changes. First create a sandbox, and then make changes in that sandbox that returns your tenant to its previous state.
In situations where this cannot be done using a sandbox workflow, ask for assistance from your Amperity representative or the Amperity Support pages.
Important
If your tenant is restored to a previous version, all changes that were made to your tenant after that version will be lost. This includes changes made in production and changes that may have been promoted from other sandbox workflows.
View sandbox details
Sandbox details include the name of the sandbox, its tenant ID and URL, when it was created, when it was last updated, and which user in your tenant is the sandbox owner. You can edit some sandbox details.
To view sandbox details
From the Settings page open the Sandboxes tab, and then from the list of sandboxes select the icon.
From the list of options select Details.
The Sandbox details window appears with information about the sandbox.
View validation details
All changes in a sandbox are validated automatically. Once the validation process is complete and there are no validation issues, you may promote changes in a sandbox to production.
When changes in a sandbox have validation issues
A notification appears when validation issues are present in your sandbox with a link similar to:
This sandbox has errors blocking promotion
Click this link to open the Promote changes page, from which each validation issue appears as a row in a list of validation issues.
Important
You cannot promote changes in a sandbox to production until all validation issues are resolved.
To view validation details
In a sandbox, click View errors. This opens the Promote changes page.
From the list of validation errors, select the icon, and then choose View details.
The Sandbox resolutions dialog box opens. This dialog describes the cause of the validation issue, and then, if available, provides one or more steps you can use to resolve the validation issue.