About queries
A query is SQL that runs from the Queries page against database tables in the Customer 360 page. A query returns a refined and filtered subset of useful customer data.
Amperity Learning Lab
Use the Queries page to build queries using a visual editor or by writing custom SQL.
Open Learning Lab to learn more about creating and editing queries and how query alerts work. Registration is required.
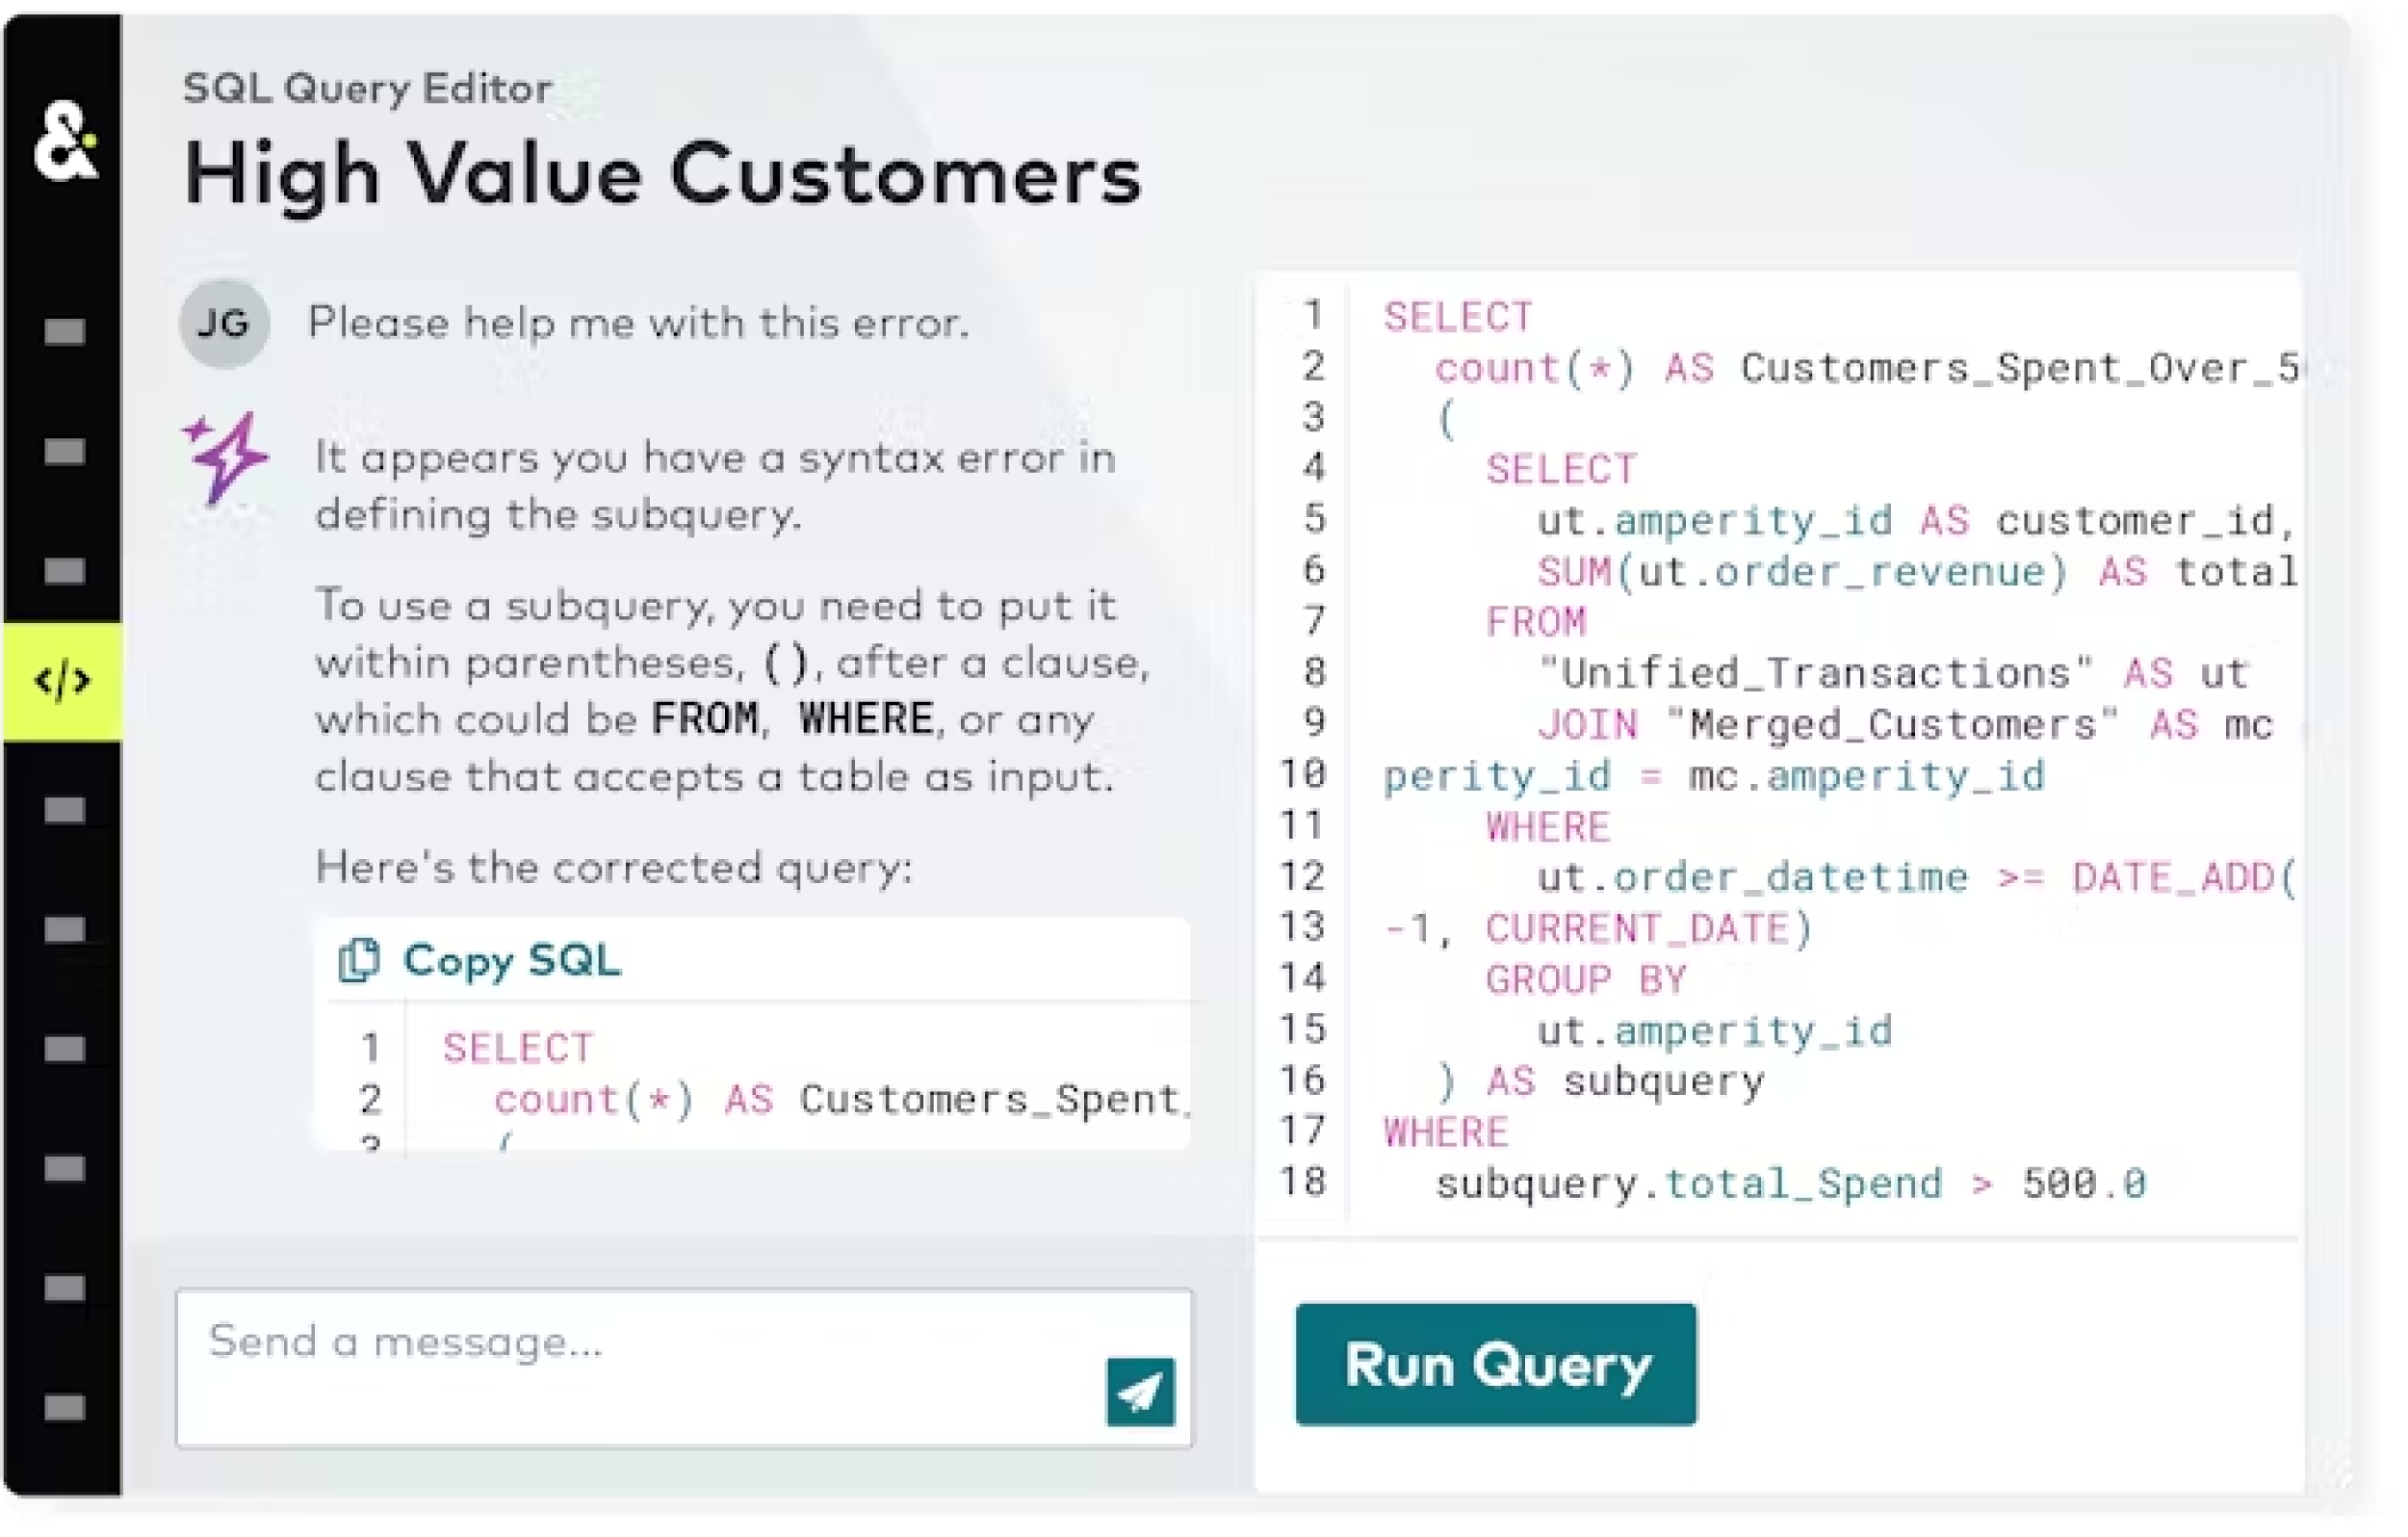
About the Queries AI Assistant
The Queries AI Assistant is a generative AI feature within the SQL Query Editor that provides real-time insights while you author SQL queries against any database in the Customer 360 page.
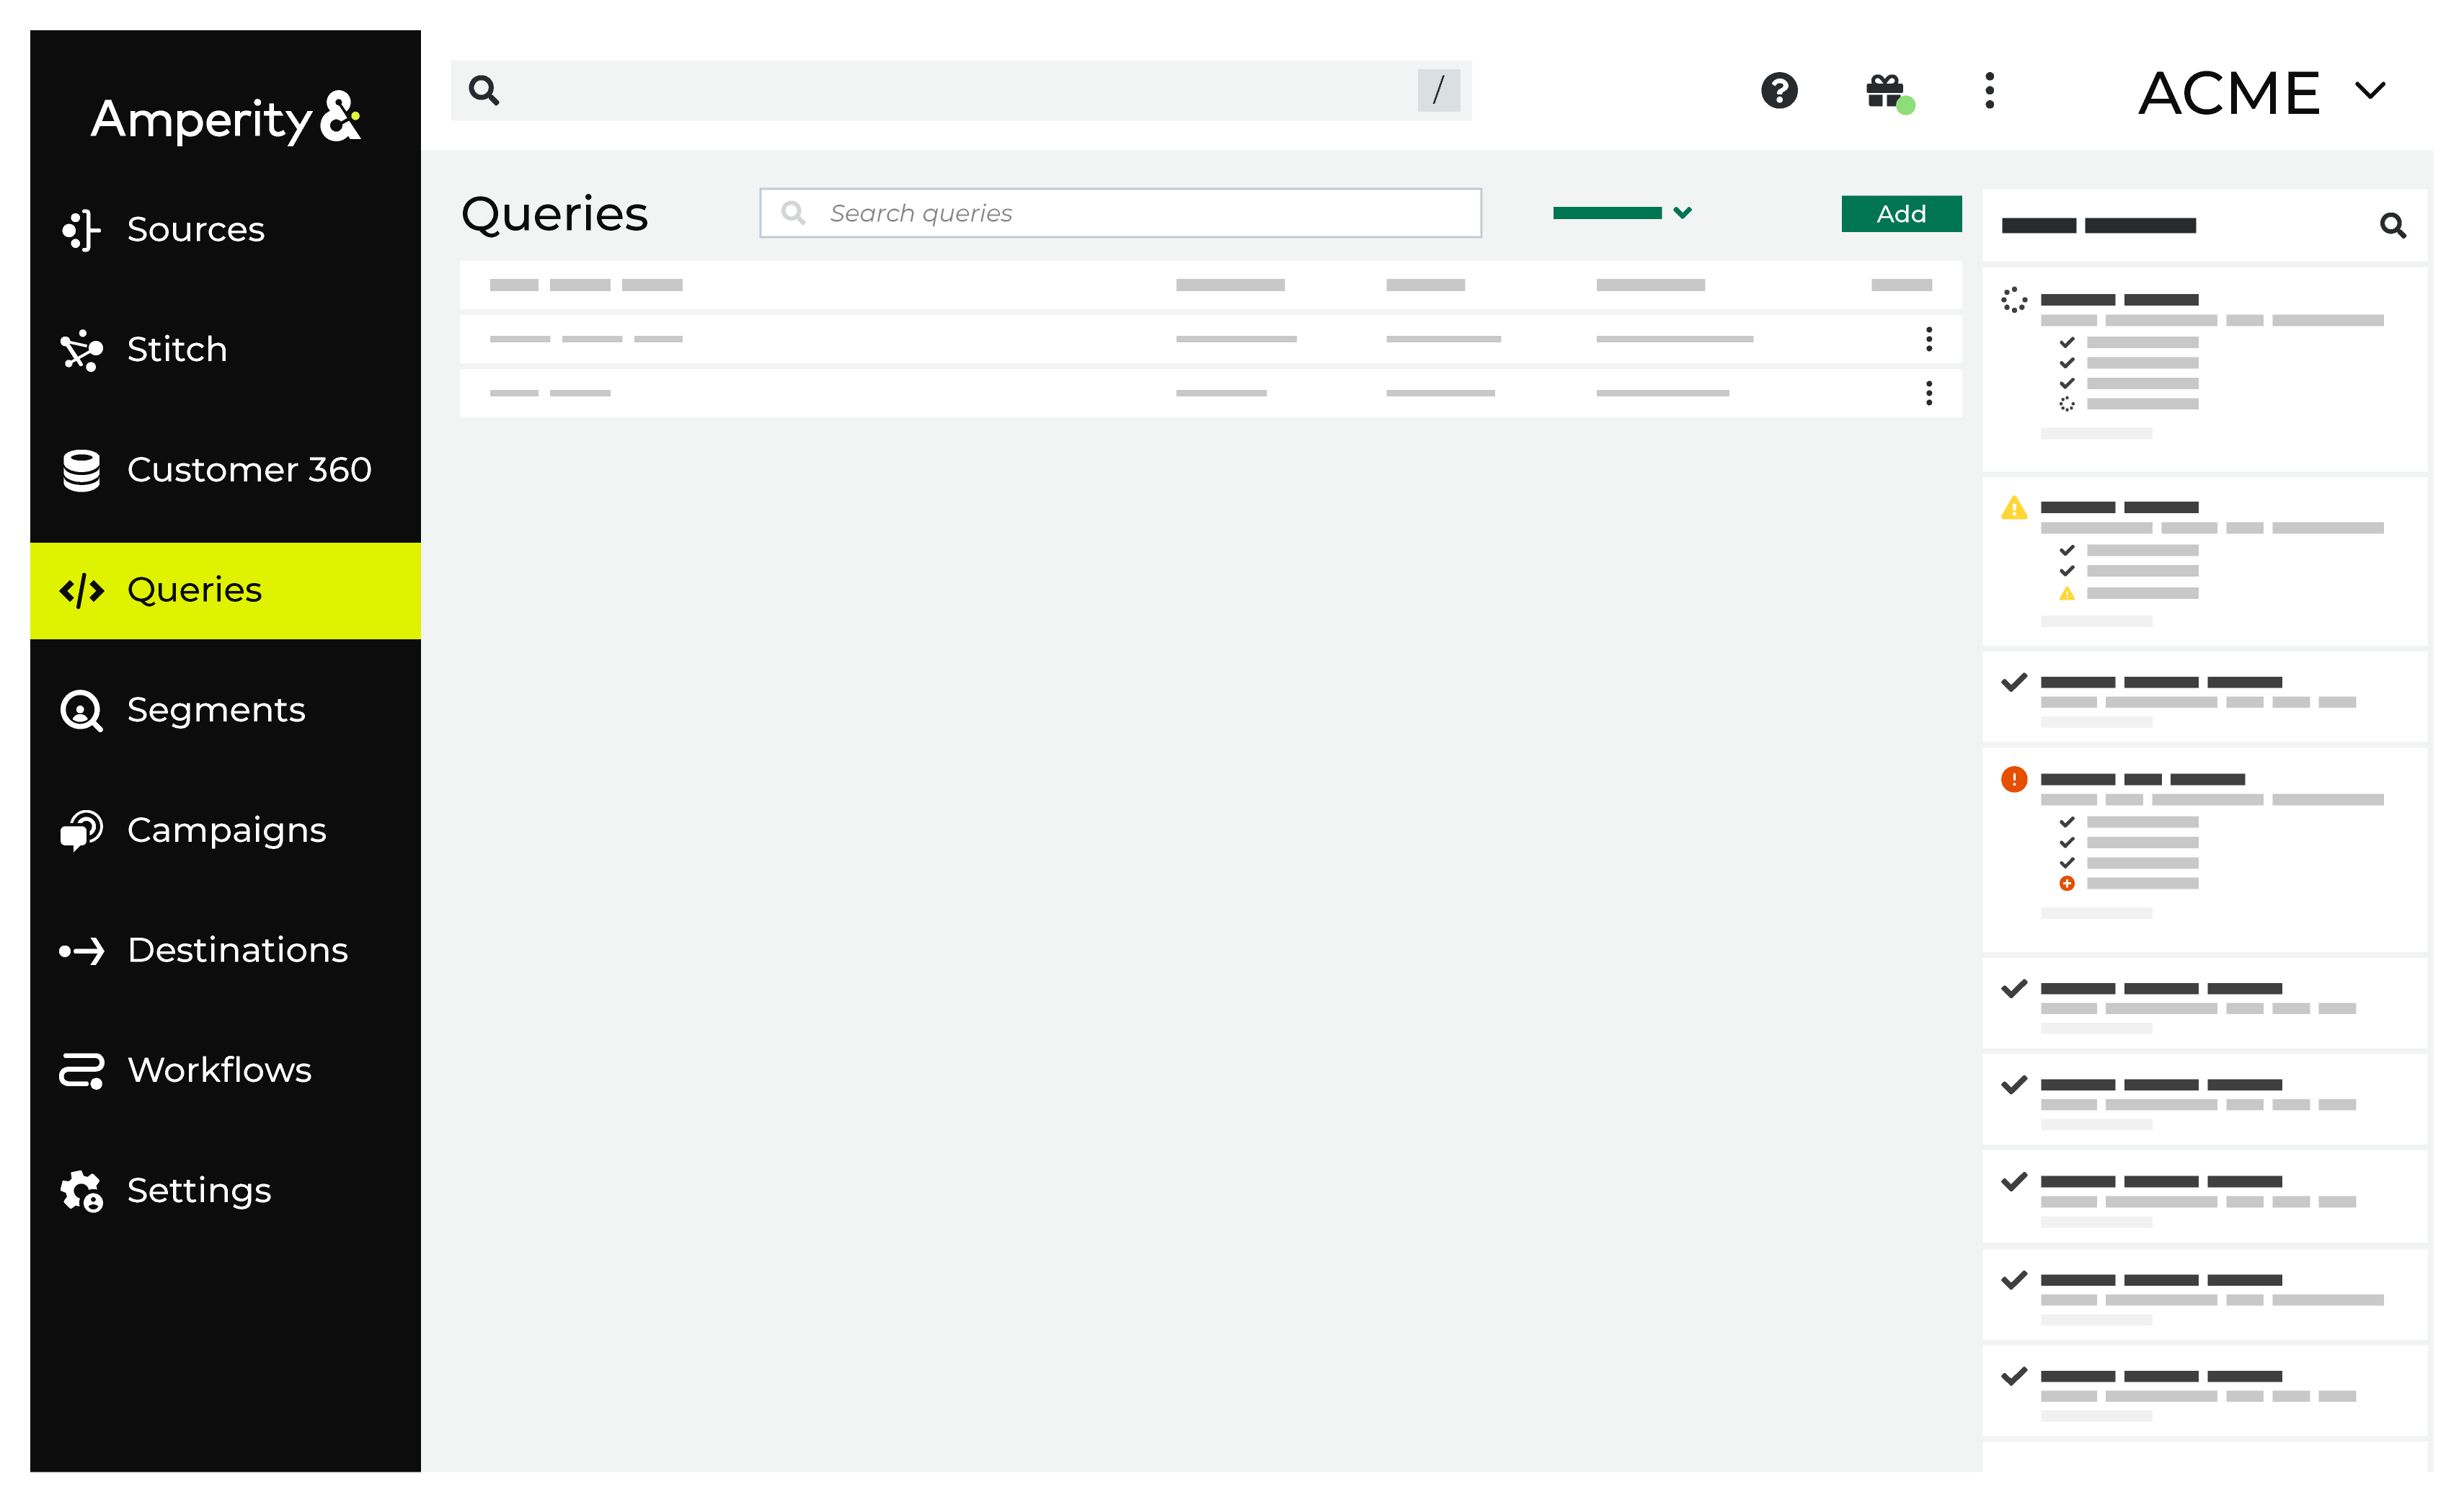
Queries page
The Queries page provides an overview of the status of every query. A table shows the status and details. Queries are listed by row. The details include the date and time at which this query last ran, along with the number of records (rows) that were returned during the last completed run.
Query types
A query may be in one of the following types:
Type |
Icon |
Description |
|---|---|---|
SQL query |
|
SQL queries are built using the SQL Query Editor. |
Visual query |
|
Visual queries are built visual Query Editor. |
Query status indicators
Every query is assigned one of the following status indicators:
Status |
Icon |
Description |
|---|---|---|
Draft |
|
A draft query that may only be run against the customer 360 database from a query editor. |
Activated, not run |
|
An active query that has not yet run against the customer 360 database. |
Waiting to run |
|
An active query that is waiting in the queue to be run against the customer 360 database. |
Running |
|
An active query that is in the queue running against the customer 360 database. |
Completed |
|
A completed query is an active query that has run successfully through Amperity as part of an orchestration within the past 24 hours. |
Inactive |
|
An active query that has not run in the past 30 days. |
Error |
|
An active query that returned some type of error while running against the customer 360 database. |
Search queries
You can search for queries on the Queries page. From the search box, start searching by typing a string of characters.
The list of queries is filtered to contain only queries that match the search criteria. Click the name of the query to view it. Use the individual query menu to edit, make a copy, run, download, move, or delete the query.
Click Clear to return to the unfiltered queries list.
Data Explorer
The Data Explorer offers a detailed way to navigate through data tables in Amperity. The Data Explorer displays each column in the data table as a row, with the column name, data type, associated semantic, and a data example. A sample of real table data is available on another tab.
The Data Explorer may be accessed from the Queries page via the Open Data Explorer link in the right-side navigation. This link is visible when working in the visual Query Editor or the SQL Query Editor. When clicked it opens the data explorer for the selected database and will display all of the tables in the database. Click any of the databases to explore the schema, view sample data, and details.
To open the Data Explorer
From the Queries page, open the menu for a query, and then select View. This opens the query editor.
Under Database, click Open Data Explorer.
Click any table name to view columns and rows, schemas, example data, and table details.
When finished exploring the data, click Close.
Docked mode
A docked mode for the data explorer is available from the Queries page when building queries. This mode of the data explorer shows a list of tables in the customer 360 database, and then for each table a list of columns and data types. This mode provides a useful quick reference for tables, columns, and data types as you are building SQL queries.
Full-screen mode
A full-screen mode for the data explorer is available from most areas within Amperity that shows data tables in the customer 360 database. This mode enables detailed exploration of each table, including an overview, the data table schema, examples of data, and source table details.
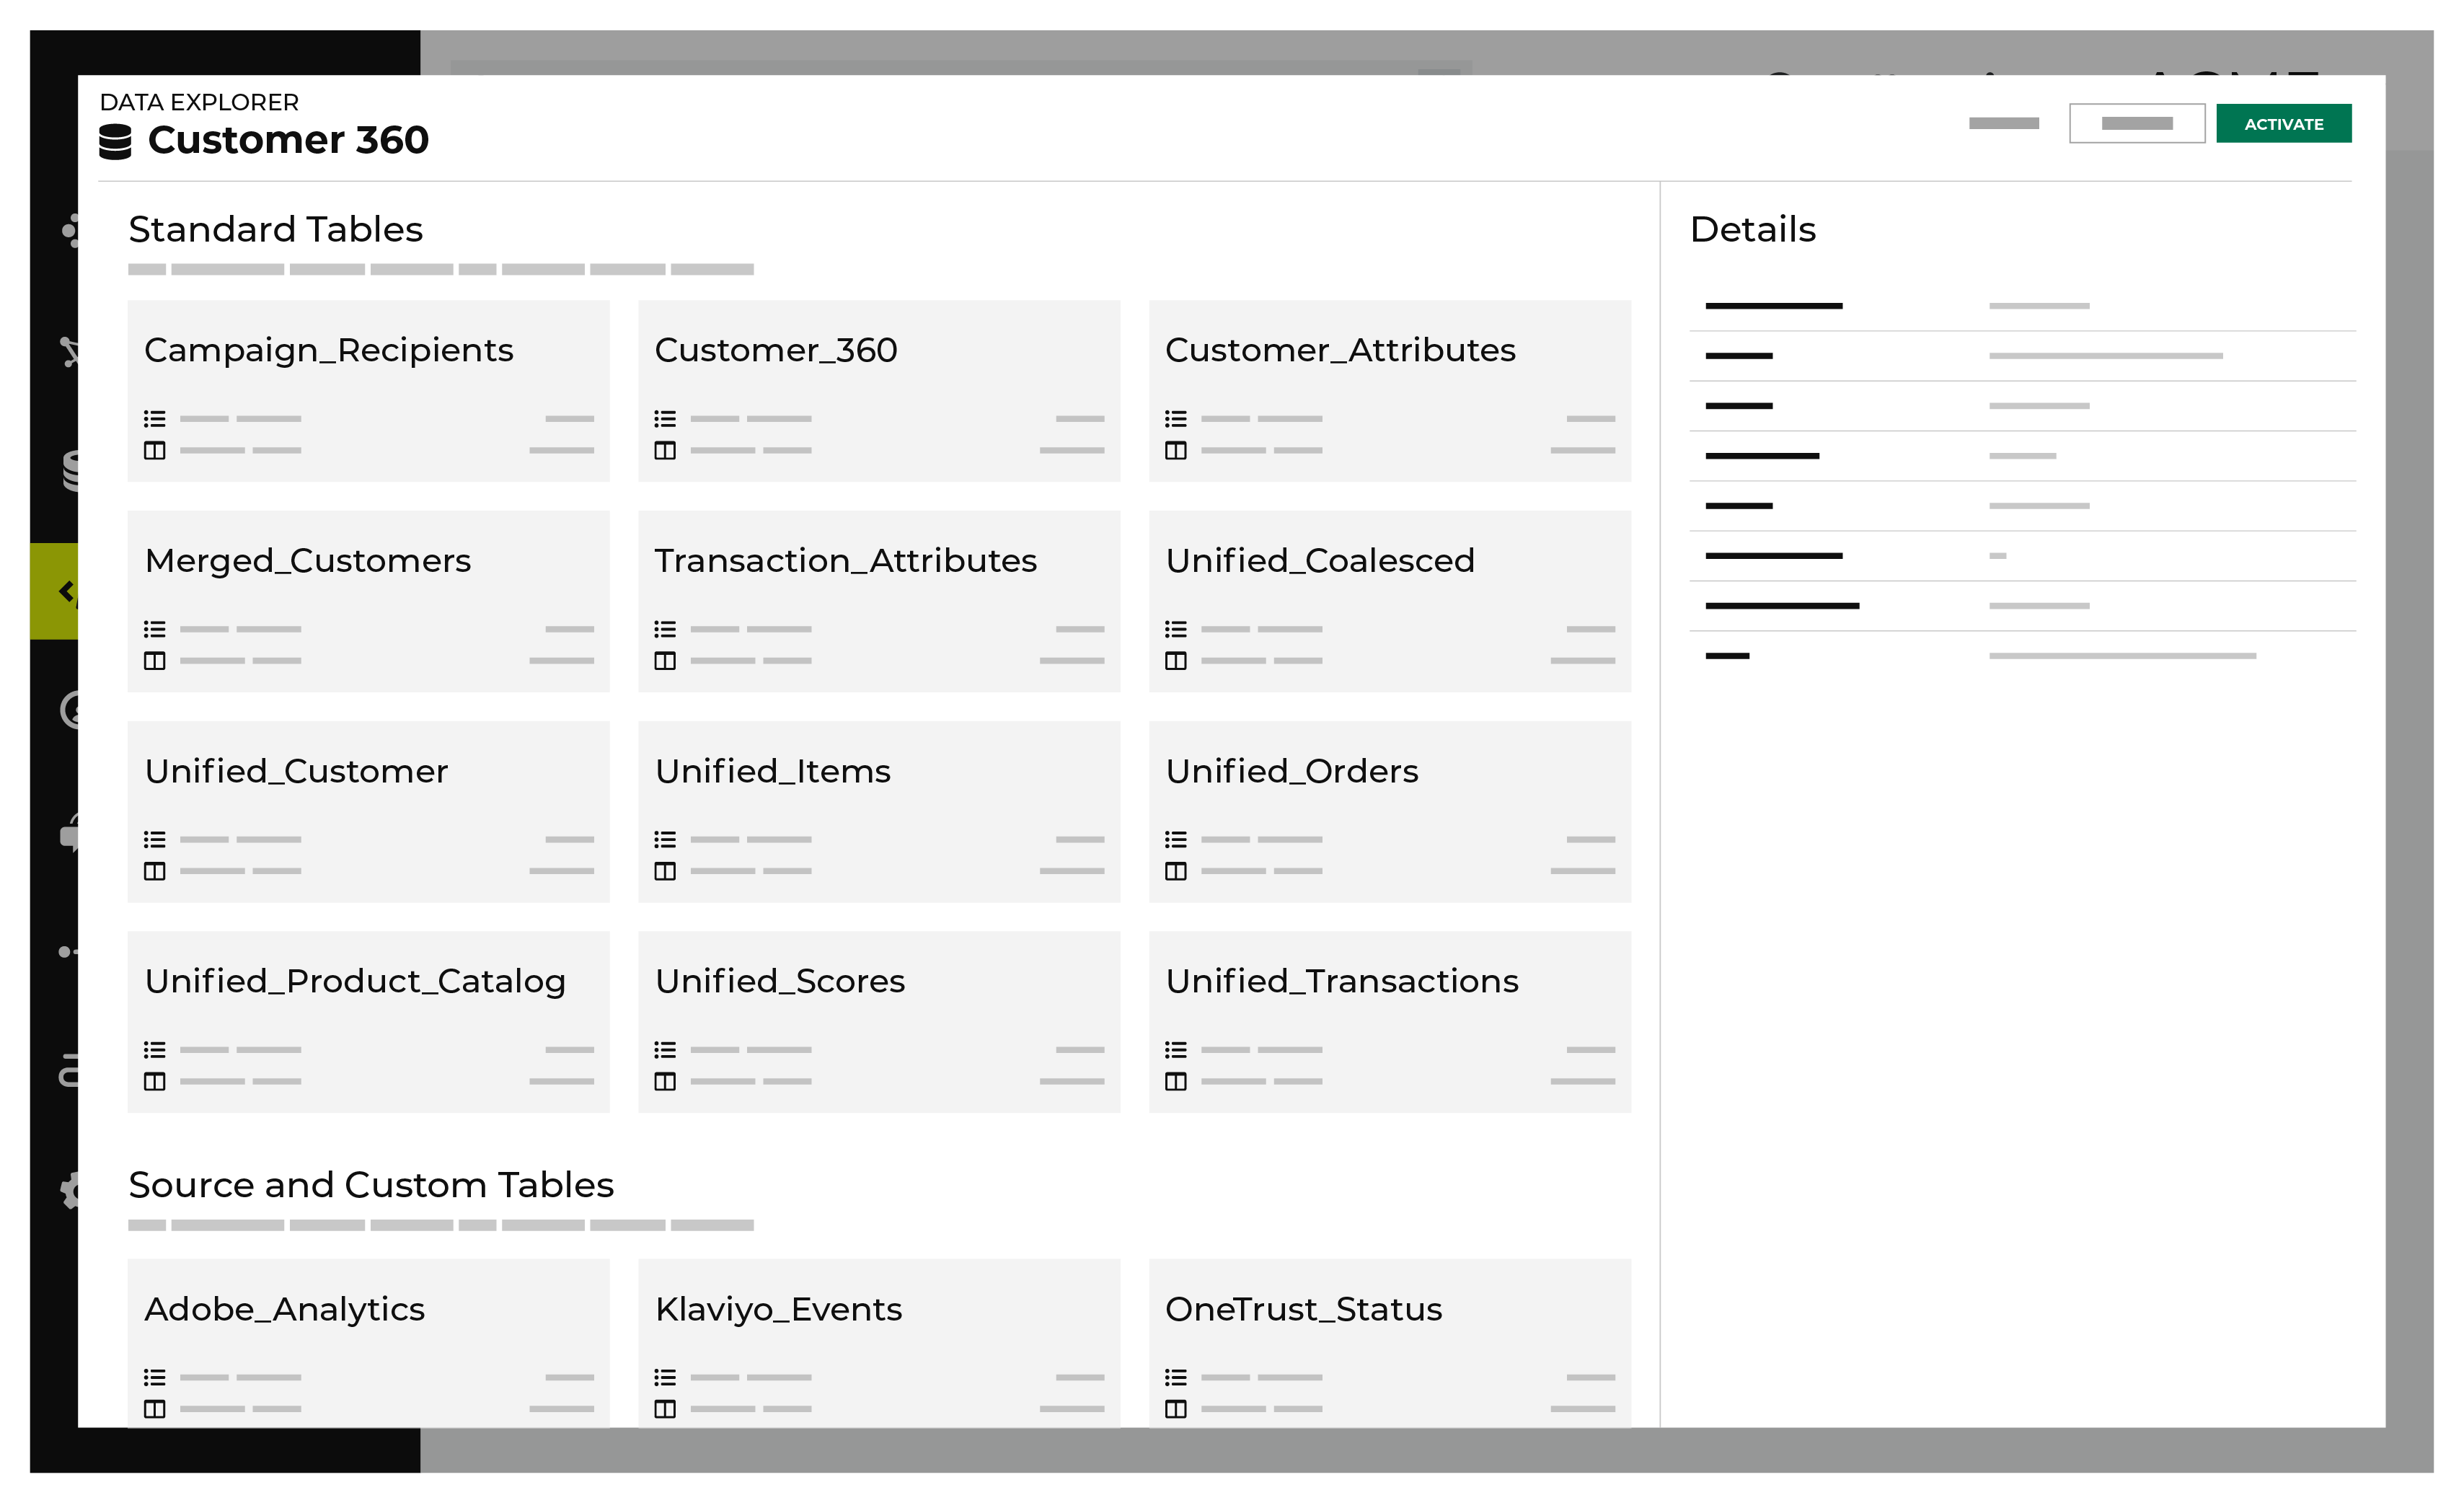
Table schema
The Schemas view in the Data Explorer displays information about each column in the table, along with an example, and information about completion, uniqueness, and cardinality.
Completion
Completion is the percentage of non-NULL values within a column.
Tip
Ensure that before filtering a column that it actually has data that can match the search criteria.
Cardinality vs. uniqueness
Cardinality is a measure of how many unique values are present in data. A higher cardinality indicates a larger percentage of unique values, whereas a lower cardinality indicates a higher percentage of repeat values.
Uniqueness divides the number of unique values–cardinality–by the number of rows in a table.
Use cardinality and uniqueness to help guide the creation of well-behaved JOIN operations when authoring SQL queries.
Avoid using JOIN operations when columns have lower cardinality. The high frequency of duplicate values will result in a row for every possible match.
Columns with low uniqueness values as keys on both sides of a JOIN operation runs more slowly and is less likely to return the desired results.
Empty fields, such as NULL values, are counted as duplicates or “not unique”. For example: a field with 90% completion and 90% uniqueness has different values for each of the non-empty rows.
Table examples
The Examples view in the Data Explorer shows actual data for a randomly selected set of rows in the data table.
Note
Users with restricted access to PII will not see data for PII-restricted columns, but will see data for all other columns.
Table details
The Details view in the Data Explorer shows summary data about the table, along with information about which source tables were used to build it.
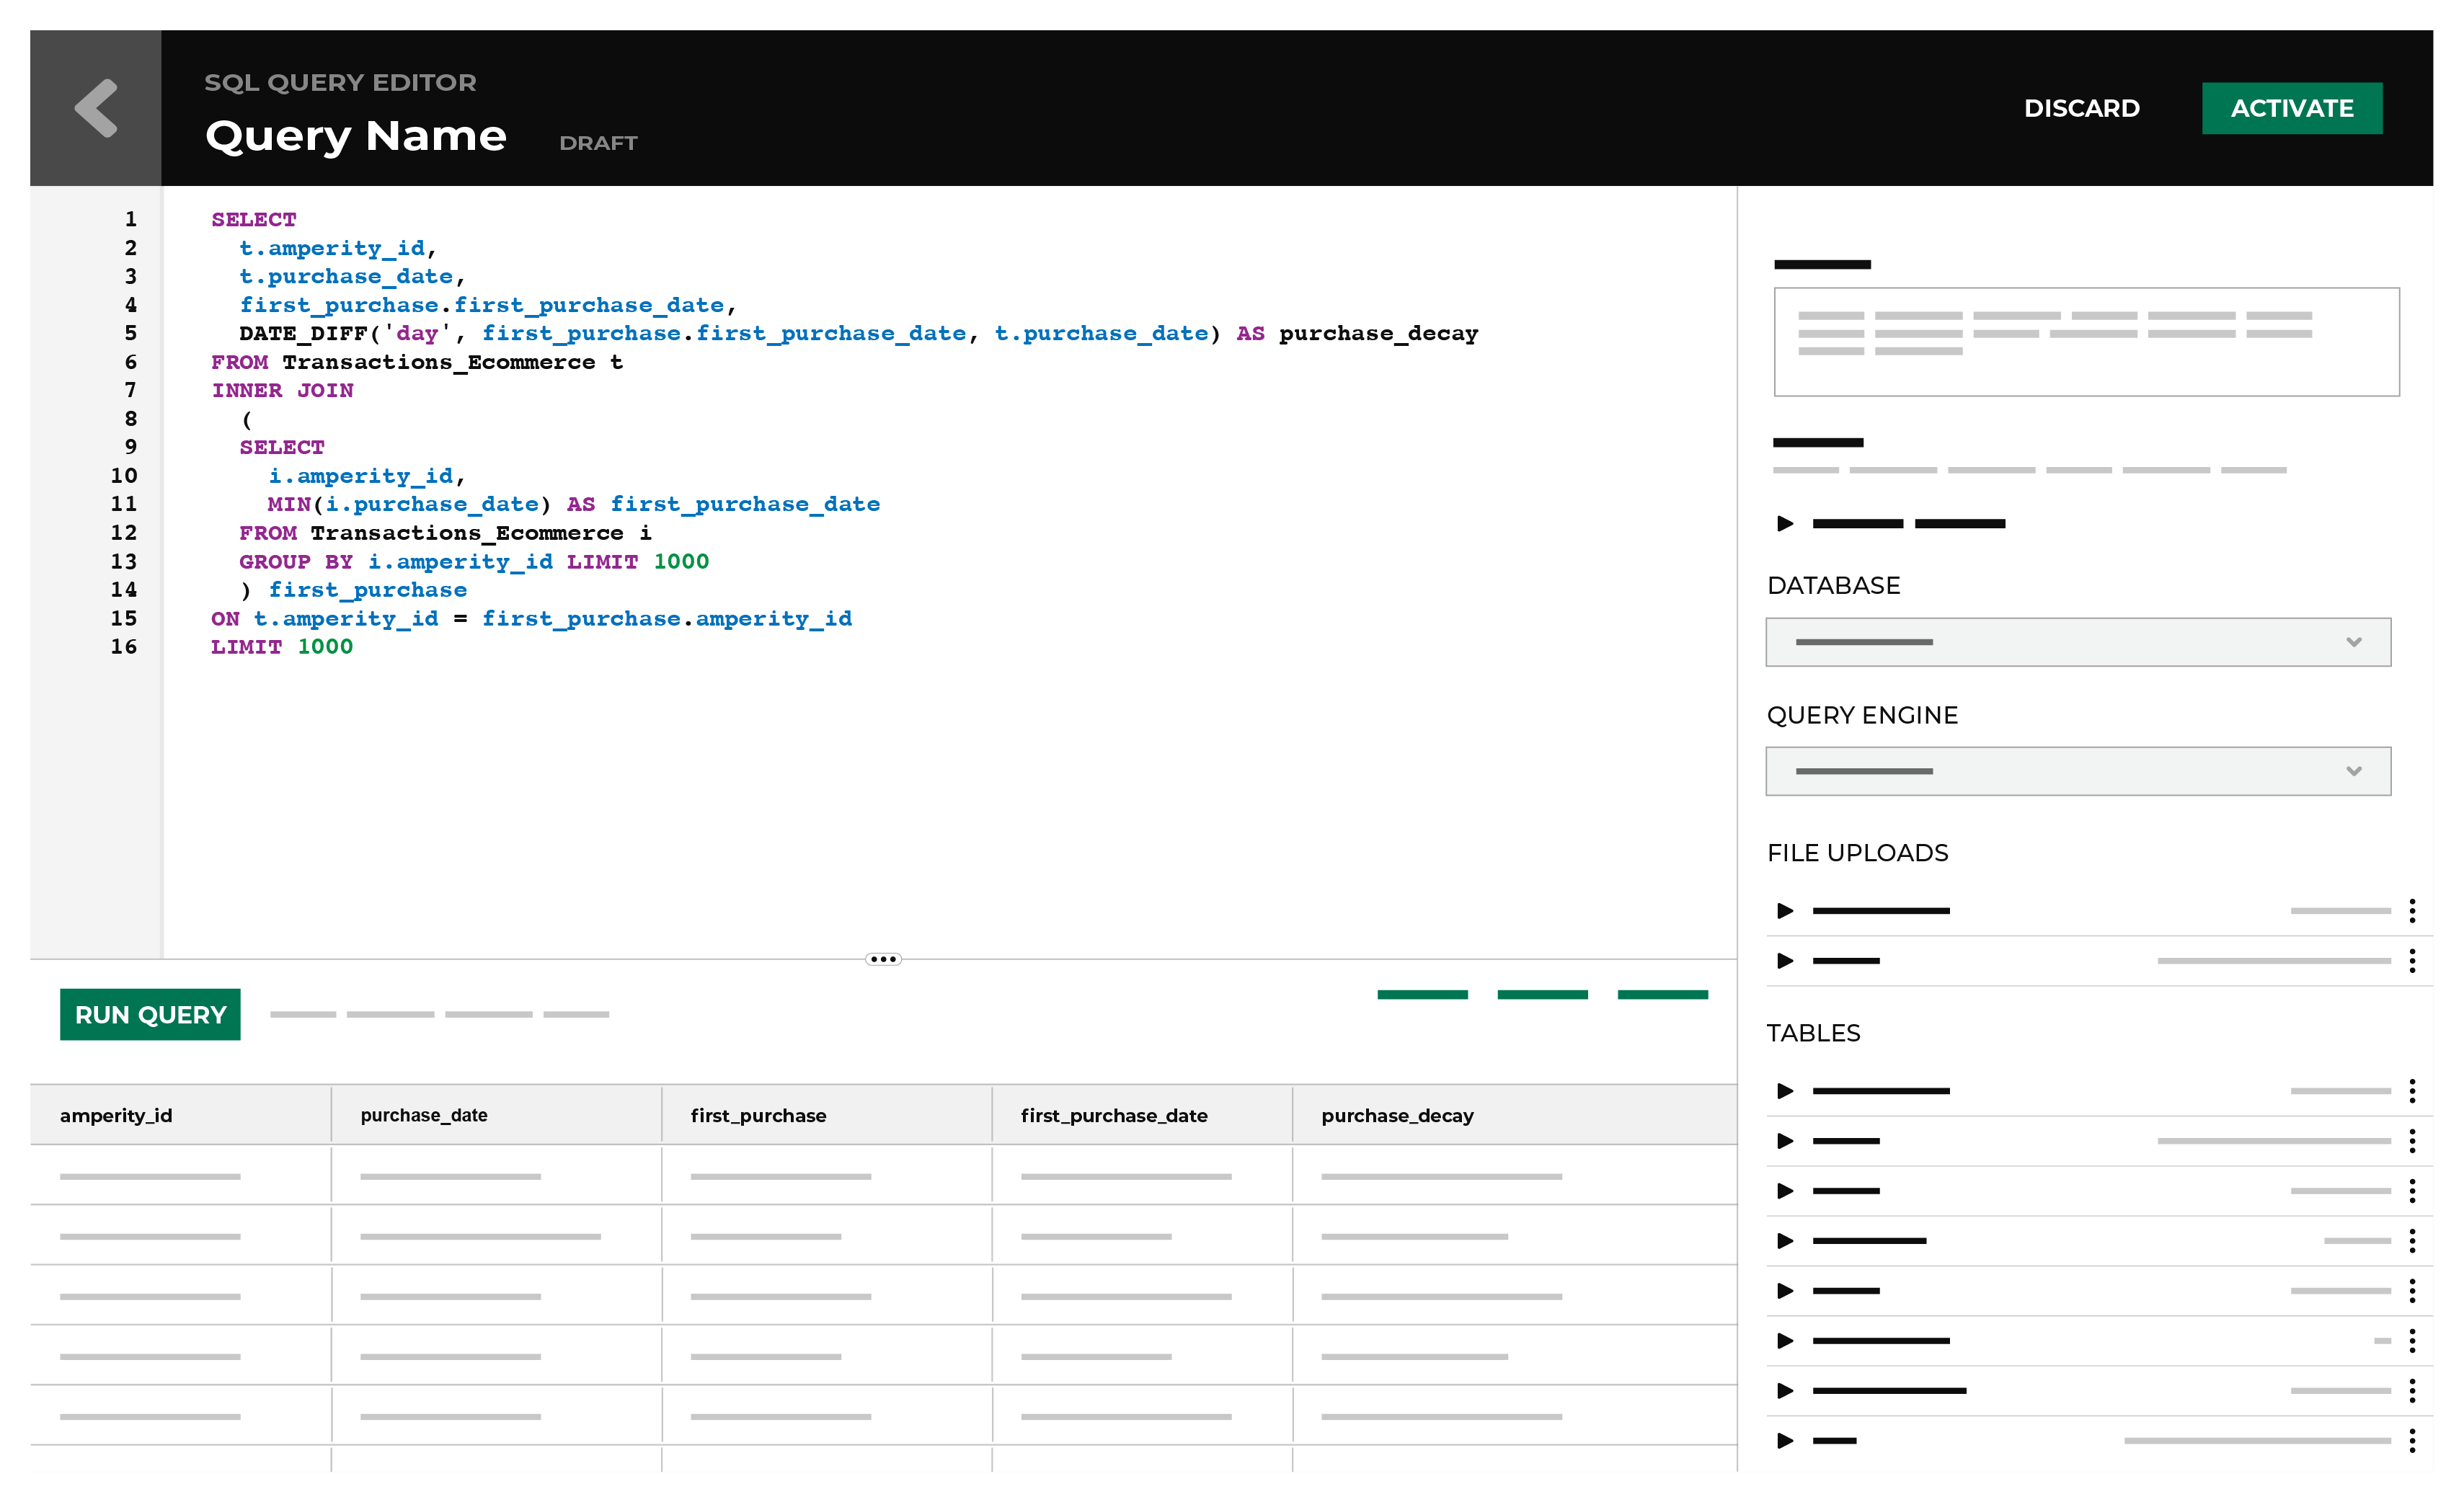
Query editor
The SQL Query Editor is the user interface for a full SQL query engine based on Presto SQL that interacts with customer database tables in Amperity. The SQL Query Editor relies primarily on using the SELECT statement, along with common table expressions, joins, functions, and other parts of Presto SQL to build and design advanced queries.
Use the Query Editor to build SQL queries against tables and columns in your customer 360 database to support any downstream workflow. The Query Editor uses Presto SQL.
Queries may be authored using the visual Query Editor or the SQL Query Editor. Click Create, and then select the query editor to open. Queries that are already created have an icon that shows from which query editor they were authored.
indicates the query was created using the visual Query Editor.
indicates the query was created using the SQL Query Editor.
All queries must be activated before they can run as part of a scheduled workflow.
Note
Amperity is a multi-user system and the set of queries for your company is shared across all users. That means that if one user creates a draft query, another can open and edit it, so work can be easily passed between people on your team.
However, it also means that if 2 users are editing the same query at the same time, their changes will collide. Amperity resolves this by applying the last set of changes saved as a whole.
This keeps the query in a consistent state and ensures it will never be half-finished. Changes that were saved first will be overwritten. Be sure to coordinate changes to ensure that only one individual is working in a query.
About Presto SQL
Presto is a distributed SQL query engine designed to efficiently query large amounts of data using distributed queries. The Queries and Segments pages use Presto to return query results and audience segments.
Amperity queries are built using Presto SQL to define a SELECT statement. Refer to the About Presto SQL.
All queries that are built via the SQL Query Editor are done using a SELECT statement. In some cases, a WITH clause is used along with the SELECT statement. Each select statement can additional functionality, such as WHERE, LEFT JOIN, GROUP BY, ORDER BY, LIMIT clauses, CASE expressions, functions, operators, and other components that are part of Presto SQL, which is the underlying SQL engine for both the visual Query Editor and SQL Query Editor.
Tip
Follow the general recommendations and patterns for indentation, naming conventions, reserved words, and whitespace.
Validate queries
SQL queries are validated from the SQL Query Editor by clicking the Run Query button. The results of the query are returned in the results window. The quality of the results can be inspected, and then fine-tuned. Errors in the syntax are reported in the results window.
How-tos
Tasks related to building queries in Amperity:
Add comment to query
You can add a comments to a SQL query to explain sections or to prevent execution of that line within a SQL statement.
To add comments to a query
From the Queries page, open the menu for a SQL query, and then select Edit. This opens the SQL Query Editor.
Select a row in the SQL query to which a comment will be added. A row must have content. You may need to add the comment first, and then comment it out.
– OR –
Select a line in the SQL statement that should not be run.
Below the SQL query, click Comment. “–” is added at the start of the line and it is commented out.
For example, compare a SQL query without comments:
1SELECT
2  amperity_id
3  ,(.20*Recency + .30*Frequency + .50*Monetary) AS NewRFM
4  ,RfmScore AS DatabaseGeneratedRFMSCORE_WithoutWeights
5FROM Customer360
6LIMIT 100
to a SQL query with comments:
 1SELECT
 2  amperity_id
 3
 4  -- default with no weighting:
 5  -- ,(.33*Recency + .34*Frequency + .33*Monetary) AS NewRFM
 6
 7  -- versus a 20/30/50 weighting:
 8  ,(.20*Recency + .30*Frequency + .50*Monetary) AS NewRFM
 9  ,RfmScore AS DatabaseGeneratedRFMSCORE_WithoutWeights
10FROM Customer360
11LIMIT 100
Add query
Queries may be authored using the visual Query Editor or the SQL Query Editor. Click Create and then select the query editor to open. Queries that are already created have an icon that shows from which query editor they were authored. All queries must be activated before they can run as part of a scheduled workflow.
You can add a query in the following ways
Add as copy
Use the Make a copy option to add a copy of an existing query. This creates a draft query with the same settings and SQL query as the copied query, along with a placeholder name. Rename the query, and then make any other changes before activating it.
To add a query as a copy of an existing query
From the Queries page, open the menu for a query, and then select Make a copy. This refreshes the recently edited queries list to add a query with
COPY - DRAFTappended to the name.The copied query will be of the same type–visual or SQL–as the original query.
From the Queries page, open the menu for a query, and then select Edit. This opens a query editor.
Make your changes to the query, and then validate them.
Click Activate.
In the Activate Query dialog box, select Activate.
Add as SQL query
The SQL Query Editor is the user interface for a full SQL query engine based on Presto SQL that interacts with customer database tables in Amperity. The SQL Query Editor relies primarily on using the SELECT statement, along with common table expressions, joins, functions, and other parts of Presto SQL to build and design advanced queries.
To add a query using the SQL Query Editor
From the Queries page, click Create, and then select SQL Query. This opens the SQL Query Editor.
Under Database, select a database. The Customer 360 database is selected by default.
Define the query against the selected database.
Click Run Query and debug any issues that may arise.
Click Activate.
Add as visual query
The visual Query Editor allows creating queries using Presto SQL without having to write SQL. It has a series of dropdown menus, pick-lists, and combinations of WHERE and AND clauses. Use it to build SQL queries that run against tables in the customer profile database.
To add a query using the Visual Query Editor
From the Queries page, click Create, and then select Visual query. This opens the Visual Query Editor.
Define the query using the dropdown menus and buttons.
Click Run Query and debug any issues that may arise.
Click Activate.
Add to orchestration
Use the Orchestration option to define a schedule for a query.
To add a query to an orchestration
From the Queries page, open the menu for a query, and then select View. This opens the query editor.
Tip
The query does not need to be in edit mode to configure an orchestration.
Under Being Sent To click Add. This opens the Add Orchestration dialog box.
Follow the steps to add an orchestration. The steps will vary depending on the destination, the data template, and the orchestration.
Click Save.
Autocomplete table names
Start typing table names in the SQL Query Editor and a list of available tables appears. Use an arrow key to select a table, which autocompletes the rest of the table name.
Browse tables and columns
A docked mode for the data explorer is available from the Queries page when building queries. This mode of the data explorer shows a list of tables in the customer 360 database, and then for each table a list of columns and data types. This mode provides a useful quick reference for tables, columns, and data types as you are building SQL queries.
To browse tables and columns
From the Queries page, open the menu for a query, and then select View. This opens the query editor.
Tip
The query does not need to be in edit mode to browse tables and columns.
Under Database, select a database from the dropdown menu. The list of tables is updated to show the tables in that database.
Under Table, expand the name of a table. Details include the number of records in the table, a list of columns, and for each column its data type.
Convert query to segment
You can convert a query to a segment on the Queries page.
To convert a query to a segment
From the Queries page, click Create, and then select Visual query. This opens the Visual Query Editor.
Define the query using the dropdown menus and buttons.
In the Query Details pane, select the Make query available for segment editor checkbox.
Click Activate.
From the Activate Query dialog box, click Activate.
The query is available on the Segments page.
Note
To convert a query into a segment, the Amperity ID column must be added to the SQL in the query.
Copy column names
You can copy the name of a column from the list of tables available to the SQL Query Editor. Use this to type fewer characters and to ensure that columns with long names are added to the query accurately.
To copy a column name
From the Queries page, open the menu for a SQL query, and then select Edit. This opens the SQL Query Editor.
Under Database, select a database from the dropdown menu. The list of tables is updated to show the tables in that database.
Under Table, expand the name of a table.
Click a column name to copy it.
Paste the column name into SQL query.
Copy SELECT statement
When adding a table, it is often necessary to reference many columns within that table. You can copy the SELECT statement for any table to use as a starting point for a table.
Tip
Use the copy SELECT statement functionality as a way to use existing queries that are similar to your use case as a template when adding queries. Be sure to review the SELECT statement and make any necessary updates for your new use case.
To copy a SELECT statement
From the Queries page, open the menu for a SQL query, and then select Edit. This opens the SQL Query Editor.
Under Database, select a database from the dropdown menu. The list of tables is updated to show the tables in that database.
Under Table, to the left of the table name click the icon to copy the SELECT statement.
Paste the SELECT statement into SQL query.
Delete query
Use the Delete option to remove a query from Amperity. Verify that both upstream and downstream processes no longer depend on this query before deleting it.
To delete a query
From the Queries page, open the menu for a query, and then select Delete. The Delete Query dialog box opens.
Click Delete.
Disable AI Assistant
AmpAI assistants include the following:
Amp Insights helps users understand Amps usage and consumption
Journeys AI Assistant helps users build and personalize multi-touch journeys
Queries AI Assistant helps users author SQL queries and resolve errors
Segments AI Assistant helps users build segments
Explains workflow task errors inline on the Workflows page
Generates field descriptions for database tables in the table editor
Formats SQL in the custom table editor, with optional custom instructions
These assistants are generative AI features within Amperity that use natural language as input commands.
To disable the AI Assistant
From the Settings page, open the AmpAI tab.
Under Advanced settings, select the Disable AmpAI features option to disable AmpAI features, including the AmpAI Assistant.
Click Confirm.
Discard a draft query
While a query is in draft mode it may be discarded. An active query that is opened for editing automatically creates an instance of that query as a draft query with “–Draft” appended to the name. Keep the Queries page free of long-lived draft queries as much as possible.
To discard a draft query
From the Queries page, open the menu for a query with “– DRAFT” appended to the name, and then select Discard.
Warning
Discarding draft queries does not open a confirmation dialog box. Discarded draft queries are removed immediately.
Download query
When a query returns fewer than 100,000 rows of data, you can download those query results as a CSV file. The CSV format is supported by many applications, which makes the format a great way to send smaller results sets or to test the potential of orchestrating queries for downstream applications and workflows. (For queries that return more than 100,000 rows of data use orchestrations to send those results to cloud-based storage, such as SFTP or Amazon S3, as a CSV file.)
Note
You cannot download the results of any query that returns an error.
Tip
Downloaded files can enable ad hoc workflows in any downstream tool that supports directly uploading or using CSV files. For example, marketing applications like Airship , Attentive , Bluecore , Braze , Facebook Ads , Iterable , Pinterest, Reddit Ads, and SendGrid all support directly uploading CSV files. Downloaded CSV files can be opened directly in Microsoft Excel and Google Sheets.
To download a query as a CSV file
From the Queries page, open the menu for a query, and then select View. This opens the query editor.
Click Run Query to run the query. Wait for it to return results.
Click Download.
A CSV file with a filename that is identical to the query name is downloaded to your local machine.
Edit query
Use the Edit option in the row for a specific query to make changes. A very common scenario for editing a query is to update a query after new data has been added to Amperity. Changes to queries are saved automatically as a draft query. Any changes made to the query must be re-activated before they can be added to a scheduled workflow.
Note
When an active query is edited Amperity creates a copy of it and appends “–Draft” to the name. The query must be reactivated to apply changes and upon reactivation it will replace the active query.
To edit a query
From the Queries page, open the menu for a query, and then select Edit. This opens the query editor with the query labeled a draft query.
Make your changes.
Click Run Query and debug any issues that may arise.
Click Activate.
Enable performance mode
You may enable performance mode for any query that returns large result sets. Performance mode wraps a CREATE TABLE operation around the SELECT statement in the query, writes the results to an Apache Parquet file, and then makes that file available to Amperity as a table.
Note
If you make a copy of a query that is enabled for performance mode, performance mode is disabled in the copy. You must re-enable performance mode in the copied query.
Important
Performance mode is faster than running a query in non-performance mode, but has the following limitations:
Sort order is not guaranteed because results are written in parallel to many files.
The UNION clause requires data types to match exactly.
Column names cannot contain spaces.
Column names are output in lowercase.
Small queries may take longer.
Part file names in Apache Parquet orchestrations have a different pattern.
Date fields will be output as timestamps.
The CURRENT_TIMESTAMP function must be cast as a timestamp. For example:
CAST(CURRENT_TIMESTAMP AS timestamp)
To enable performance mode
From the Queries page, open a query.
Under Query Settings, select the Enable performance mode checkbox.
Click Activate.
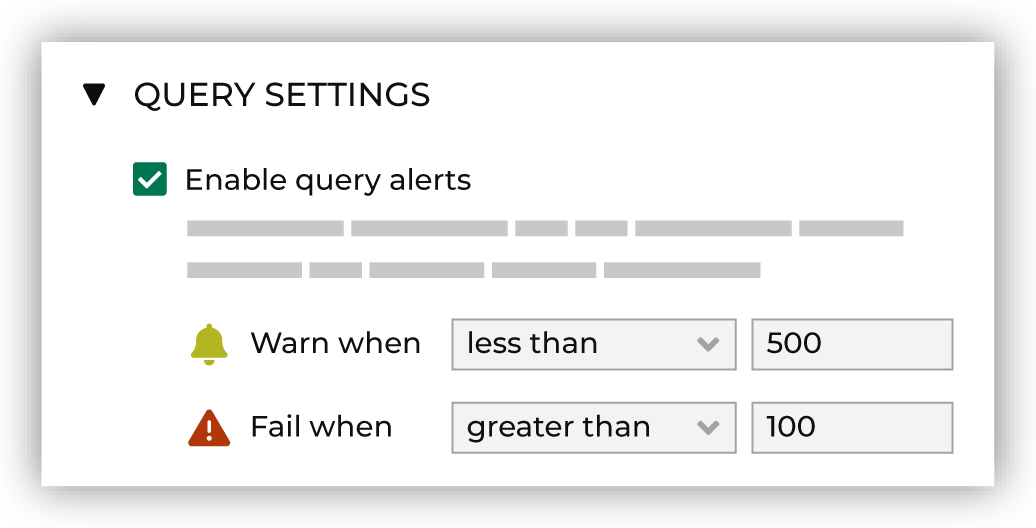
Enable query alerts
Any query can be configured to send workflow alerts when configured thresholds are met. This is an important way to ensure that queries that have dependencies on courier groups so they never send inaccurate or incomplete data.
Alerts are sent when the record count in the query output has errors that exceed the configured threshold. Alert levels include:
Warn when record counts exceed the configured threshold. The workflow will continue running.
Tip
Use this threshold for queries that are not associated with an orchestration.
Fail when record counts exceed the configured threshold. The workflow is stopped.
Caution
A query with a configured query alert is always run even if the query is not associated with an orchestration.
A query that runs and fails when record counts exceed the configured threshold stops a workflow.
Use the Warn when threshold for queries that are not associated with an orchestration. This prevents that query from stopping the workflow when record counts exceed the configured alert threshold.
You may sign up for workflow-based query alerts from the Workflows page. Provide your email address to receive alerts when this query is associated with one or more courier groups or scheduled orchestration groups.
To enable query alerts
From the Queries page, open the menu for a query, and then select Edit. This opens the query editor with the query labeled a draft query.
Select the Enable query alerts checkbox, and then configure the thresholds for alerts that notify and for alerts that stop the workflow.
Click Activate.
Amperity Learning Lab
Open Learning Lab to learn more about how query alerts work.
Filter queries
You can filter the list of queries that appear on the Queries page. Click Show filters to open the filter bar, and then select values from any combination of the following:
By status. Select any combination of Active and Draft.
By database. Select a database to show only queries associated with that database.
By created by. Select any combination of users who created queries.
By last edited by. Select any combination of users who most recently edited queries.
By label. Select one or more labels to filter queries by organizational category.
Tip
Labels help organize journeys by grouping related items together. For example, use labels to:
Identify journey types: “Welcome series”, “Retention”, or “Winback”
Assign team ownership: “Marketing” or “Analytics”
Track status: “In review” or “Approved”
Indicate priority: “High priority” or “Evergreen”
Labels are created on the Settings page, in the Labels tab, by clicking Add label. Label naming conventions should:
Not exceed 35 characters
Contain only alphanumeric characters, hyphens, and underscores allowed
Not exceed 10 labels per journey
Use consistent prefixes for related labels. For example: “Q1-” or “Holiday-”
Note
When many labels are selected, queries matching any selected labels will be shown.
Format SQL
You can format the SQL from the SQL Query Editor. Click the Format button next to Databases under the query window. This will apply standardized formatting to the entire query.
Open query
You can view details for any query, including the SQL query associated with the query, along with any refresh or alert settings, and configuration details for destinations, data templates, and orchestrations.
To open a query (view-only)
From the Queries page, open the menu for a query, and then select View. This opens the query editor with the query as view-only.
Click Edit to make changes. This will change the query to a draft query, which requires re-activation when you are done making changes.
Organize queries
A folder helps you organize the list of segments in the Queries page. You may configure up to three levels of folders.
You can organize the queries shown in the Queries page:
Add folder
Folders may be expanded or collapsed to view and hide the list of queries and subfolders contained within.
To add a folder
From the Queries page click Create, and then select Add Folder. This opens the Create Folder dialog box.
Enter the name for the folder.
Click Save.
Add subfolder
Use the Create folder option in the menu to add up to three levels of subfolders. All folder names must be unique.
To add a subfolder
From the Queries page, open the menu for a folder, and then select Create folder. This opens the Create Folder dialog box.
Enter the name for the folder.
Click Save.
Bulk delete
Bulk delete many queries on the Queries page.
To bulk delete queries
From the Queries page, select the checkboxes next to the queries to delete.
Click Delete at the bottom of the page.
Bulk move
Bulk move many queries on the Queries page.
To bulk move queries
From the Queries page, select the checkboxes next to the queries to move.
Click Move at the bottom of the page.
Move query
Use the Move option to move around and organize the list of folders and queries. Folders may be expanded to view the list of queries and subfolders contained within.
To move a query
From the Queries page, open the menu for a query, and then select Move. This opens the Move Query dialog box.
Select the name of an existing folder to which a query will be moved, and then click Move.
Hint
If the folder to which a query will be moved is not present in the list of folders, you can add it directly from the Move Query dialog box. Click the + New folder link, type a name for the folder, and then select it.
Preview results
You can preview the results of a SQL query by clicking the Run Query button. This will do one of the following things:
Return the first 100 results of the query to the preview pane directly below the query editor.
Return an empty table.
Return some type of error.
Use the preview results pane to fine-tune your queries, to make sure they return the data you want, and to make sure they do not contain any errors.
Tip
SQL queries in the Query Editor often evaluate millions of records and can take a few minutes to run. You may use other areas of Amperity while a query is being run.
For draft queries, setting a LIMIT 100 while developing a query is often enough to test and validate query design against very large data sets.
To preview query results
From the Queries page, open the menu for a query, and then select View. This opens the query editor.
Click Run Query to run the query. Wait for it to return results.
Example the columns and the data that is in them.
Adjust your query as necessary until it runs correctly.
Click Activate.
Query domain data
You may build queries against domain tables in your tenant, including custom domain tables.
Note
Queries that are built from domain tables may not be activated.
To query domain data
From the Queries page, open the query editor.
From the Database dropdown menu, under Other datasets, select “Domain tables”. This will refresh the list of tables available for queries to be the list of domain tables in your tenant.
Note
This includes all domain tables, including custom domain tables.
Build a query against any combination of domain tables.
Refresh query automatically
A query may be configured to be refreshed automatically. When enabled, an active query is run automatically whenever an upstream process is refreshed.
To refresh a query automatically when upstream data changes
From the Queries page, open the menu for a query, and then select Edit. This opens the query editor with the query labeled a draft query.
Under Query Settings, select the Refresh automatically checkbox. This option is required to enable query alerts.
Click Activate. The query runs automatically when upstream data changes.
Rename query
Use the Rename option to rename a query. Verify that both upstream and downstream processes no longer depend on this query before renaming it.
To rename a query
From the Queries page, open the menu for a query, and then select Edit. This opens the query editor with the query labeled a draft query.
In the name field, type the new query name.
Click Activate.
Run query
Amperity processes data in batches on automated schedules that start with collecting the data, bringing it into the system, creating the customer 360 database, and then sending the results to any number of downstream workflows.
To run a query
From the Queries page, open the menu for a query, and then select Run.
After a few moments, a notification appears in the Notifications list that reports the status of the query run.
Run selection
You can run part of a statement from the SQL Query Editor.
To run a selection of a SQL query
From the Queries page, open the menu for a SQL query, and then select Edit. This opens the SQL Query Editor with the SQL query labeled a draft query.
Within the SQL query, highlight part of the statement, and then select Run selection.
If the selected SQL is valid, Amperity runs it and return the results.
Select database
You can build a query against any database that is visible from the Customer 360 page.
To select a database
From the Queries page, click Create, and then select SQL Query. This opens the SQL Query Editor.
Under Database, select a database. The Customer 360 database is selected by default.
Build your query against the list of tables that are available in that database.
Uncomment lines
Some lines within a SQL query are commented out to prevent them from running as a normal part of the query. These lines may be useful when the query is run manually. Uncomment them before running the query.
To uncomment lines in a SELECT statement
From the SQL Query Editor, select one or more lines of SQL that is commented out.
Next to Database, click Uncomment.
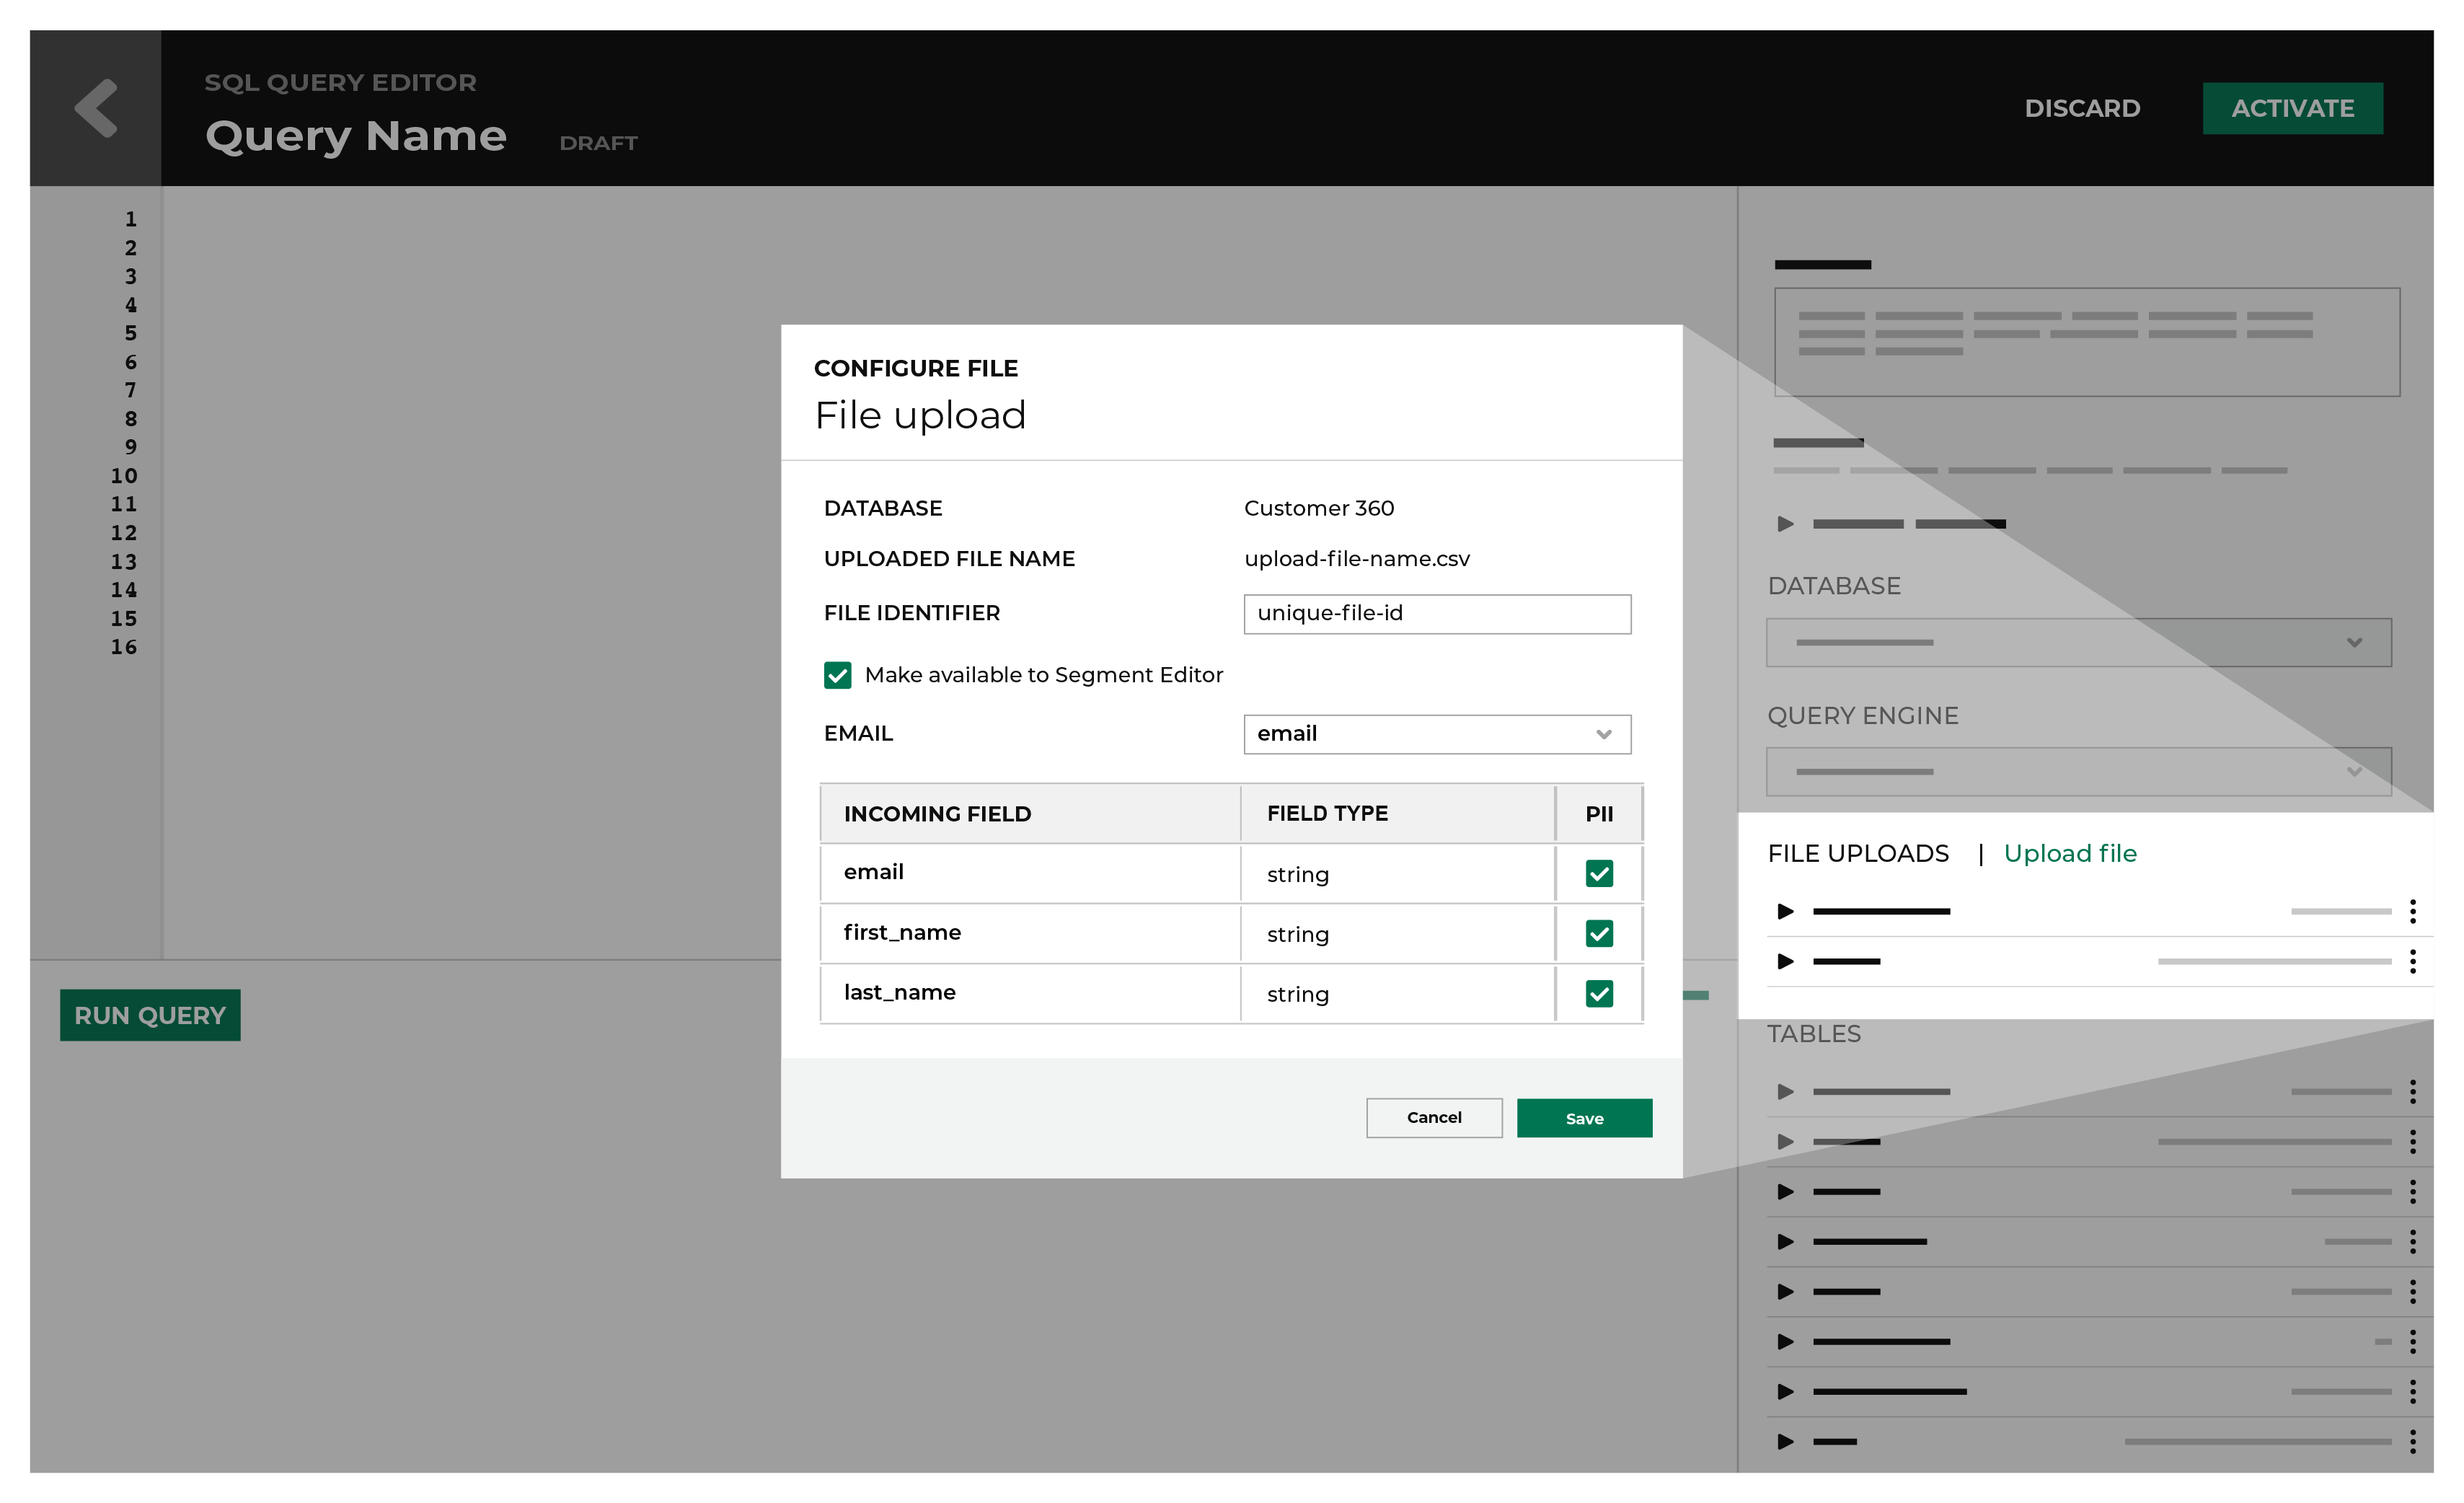
Upload file via the Query editor
You can upload a CSV file from the Query Editor page.
Note
When you upload a CSV file from the Query Editor and then discard the query, it will automatically associate the contact information in the uploaded file to Amperity IDs.
To upload a file via the Query editor
From the Queries page, click on a query.
From the Query Editor, in the Query Details section on the right-side of the page, click Upload Files in the File Uploads section.
From the Configure File window, drag and drop a file in the window or click the window to browse for files on your computer.
Wait a few moments for the file to upload.
In the File Identifier field, select a file.
Select Make available in segment editor.
In the Email field, select a incoming field to have the data mapped to that field.
Click Save.
Note
The uploaded file is not added as a table to your database.
Warning
Only upload CSV files on the Query Editor, if you are going to add additional SQL to your query.
View uploaded files
You can view a list of uploaded files on the SQL Query Editor.
To view uploaded files
From the SQL Query Editor, in the File Uploads section, view a list of uploaded files.
Use keyboard shortcuts
The SQL Queries Editor supports the following keyboard shortcuts:
Action |
Shortcut |
|---|---|
Autocomplete |
Click Control + Space at the same time to autocomplete. |
Comment line |
Click Command + / (forward slash) at the same time to comment out the line or selection. |
Extend selection |
Click Shift + Arrow at the same time to extend selection by word or line in the direction of the arrow key. |
Format query |
Click Command + L at the same time to apply default formatting to the query or selection. |
Move to previous word |
Click Control + Left Arrow at the same time to move to the previous word in the SQL query. |
Move to next word |
Click Control + Right Arrow at the same time to move to the next word in the SQL query. |
Move to start of line |
Click Command + Left Arrow at the same time to move to the start of a line in the SQL query. |
Move to end of line |
Click Command + Right Arrow at the same time to move to the end of a line in the SQL query. |
Move to start of query |
Click Command + Up Arrow at the same time to move to the beginning of a SQL query. |
Move to end of query |
Click Command + Down Arrow at the same time to move to the end of a SQL query. |
Run current line of SQL query |
Click Command + Shift + Enter at the same time to run the current line of a SQL query. |
Run SQL query |
Click Command + Enter at the same time to run a SQL query. |
Run up to current line of SQL query |
Click Command + Option + Enter at the same time to run the SQL query up to the current line. |
View notifications
Notifications for the Queries page appear after Amperity has processed a query and passed the results to a downstream process. Notifications typically indicate successful outcomes. Less often, notifications contain details for non-successful outcomes, such as failures related to upstream or downstream processes.

If a notification is about a non-successful outcome, the details for why and what happened can be found in the notification itself. Click More to view the full notification. Click View Workflow to open the workflow in the Workflows page.
In some cases viewing the log files may be helpful. In many cases, fix the root cause of the non-successful outcome, and then rerun the process manually. The Workflows page provides a set of workflow actions that you can initiate directly.
View query
You can view details for any SQL query, including the SQL query associated with the SQL query, along with any refresh, or alert settings, and configuration details for destinations, data templates, and orchestrations.
To view a SQL query
From the Queries page, open the menu for a SQL query, and then select View. This opens the SQL Query Editor with the SQL query as view-only.
Click Edit to make changes. This will change the query to a draft query, which requires re-activation when you are done making changes.
View query details
Query details show the time at which the query last ran, when it was activated, to which database it is associated, what type of workflow it has been assigned, the destination to which it is being sent, and visual graph that shows trends over time.
To view query details
From the Queries page, from the menu for a query, click the right angle icon. This opens the details pane for that query.
Click the name of the query to view the orchestration details. The View Orchestrations dialog box opens. You can fully manage the orchestration from this dialog box.
Click Run to run the query from the details pane.
View query version history
Query version history is available in the visual Queries Editor on the Queries page.
To view query version history
From the Queries page, from the menu for a query, click Version history. This opens the SQL version history window.
Click the version to view the SQL details.
View recently edited queries
Recently edited queries are sorted at the top of the Queries page.
Comment lines
Use comments to mark out lines that document how the SQL query is designed or to keep lines that may be useful in the query within the query, but not in a state where they are run as part of the query.
To comment lines in a SELECT statement
From the SQL Query Editor, select one or more lines of SQL.
Next to Database, click Comment.