About Journeys
A journey is an automated sequence for connecting with customers across channels like email, paid media, SMS, and direct mail. Each step in a journey represents a decision point or action: send a message, wait for further customer engagement, or split the audience onto different paths.
By using Journeys, marketers can implement cross-channel strategies, improve targeting precision, and activate the right message at the right moment to drive better engagement and higher conversions.
Amperity Learning Lab
A journey is an automated sequence for connecting with customers across channels.
Open Learning Lab to learn more about how to automate multi-touch marketing with journeys . Registration is required.
How Journeys work
A journey starts with a defined audience that moves through a series of interactions based on criteria you specify, like customer behavior, attributes, or engagement history. The sequence can branch depending on what conditions you set, so that customers have a different experience depending on what actions they take.
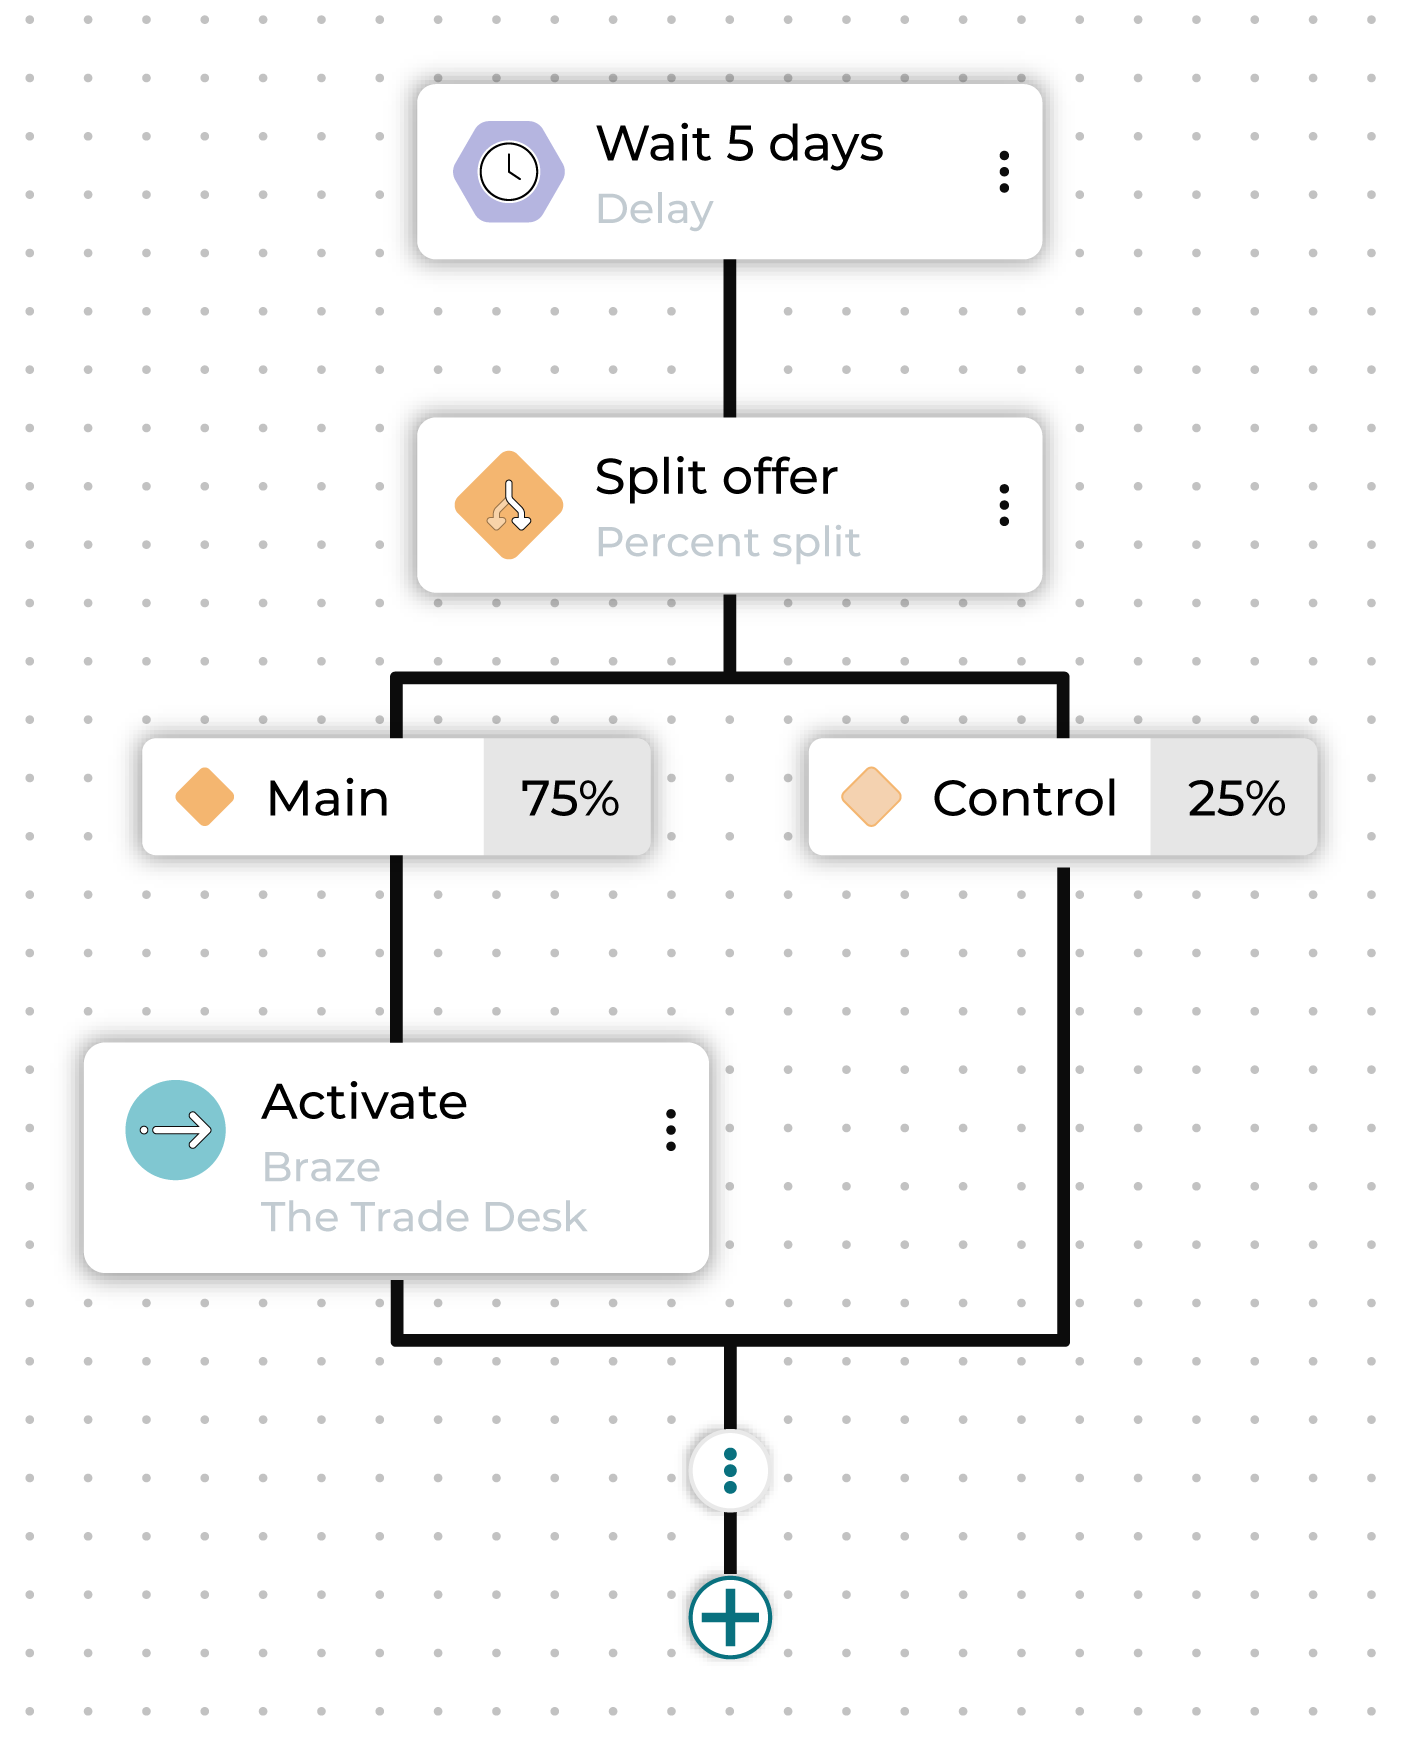
Here is an example of a built-out journey:
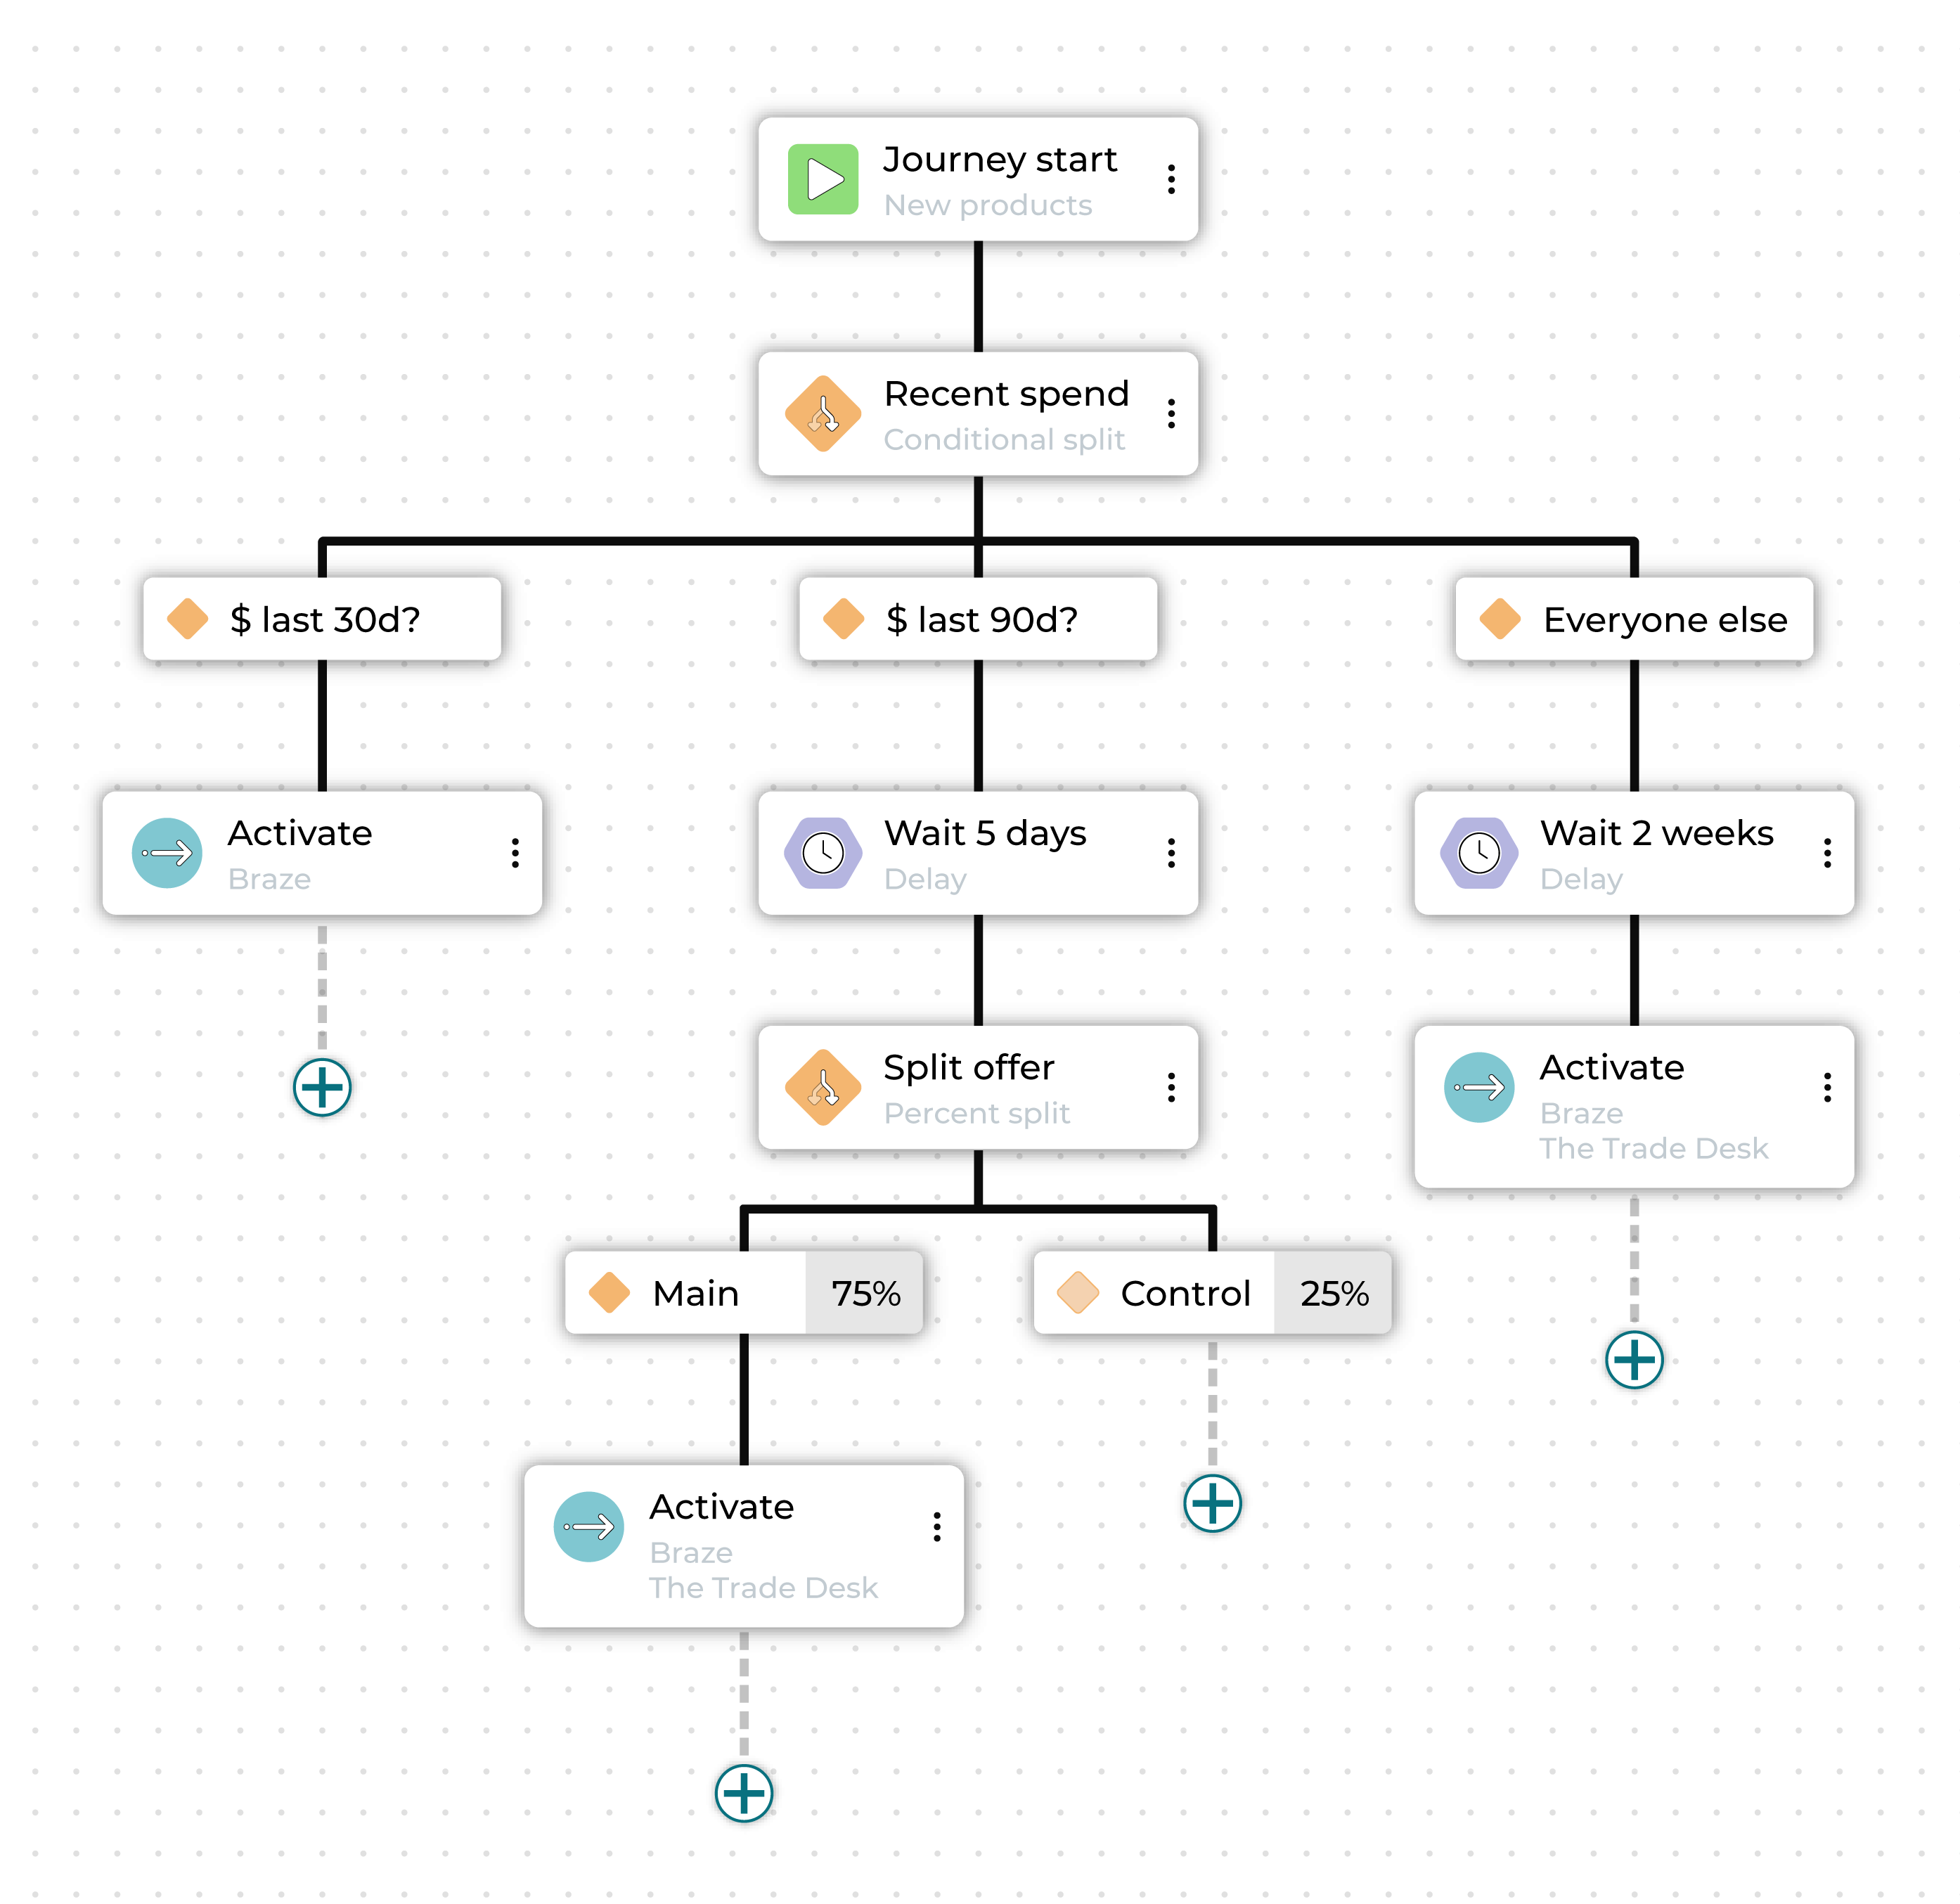
In this case, the marketer is offering high-value customers early access to new products before general release in two weeks. They start by creating an audience segment made up of customers in the top 10% of customer lifetime value.
The first step divides this audience into three sub-audiences: those who purchased in the last 1-30 days, those whose purchased in the last 31-90 days, and those whose most recent purchase was more than 90 days ago.
Each different audience is sent down a different path toward activation in a marketing channel.
The high-value customers who purchased most recently are contacted immediately, giving them exclusive early access.
The high-value customers who purchased between 1 and 3 months ago are set for a delay followed by an activation, as a second wave of early access.
Additionally, this audience is further split, so that 75% receive a special promotion and 25% do not, to see how important an added incentive is for getting customers to purchase again.
Finally, the high-value customers who have not purchased in the last three months are contacted when the new products become available to make sure they are among the first to know.
The journey can be further built out beyond this, with additional splits based on whether or not customers purchase or how they engage with the communications they receive.
Journeys setup
Journeys require that segments are available and that at least one destination has been configured.
Access the Journeys Canvas by selecting Journeys at the top of the Activations page, and then click Create journey.
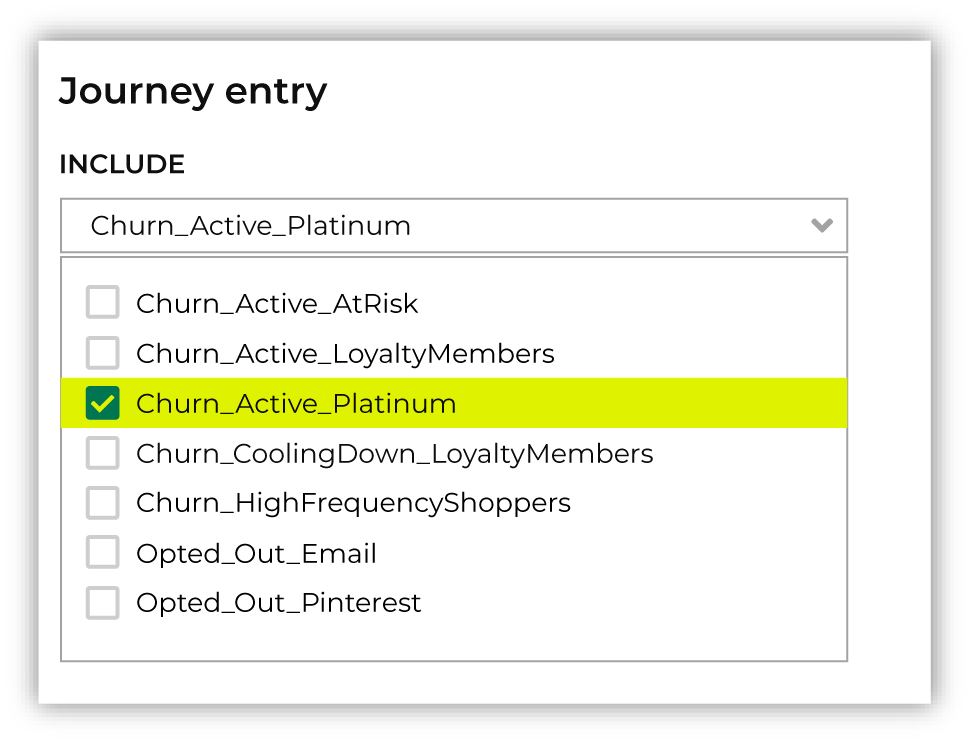
Who enters?
Every journey starts with an audience defined by one or more segments that determine which users enter this journey.
Choose one or more segments from the Select inclusion segments dropdown list. The customers in that list will become the audience for this campaign.
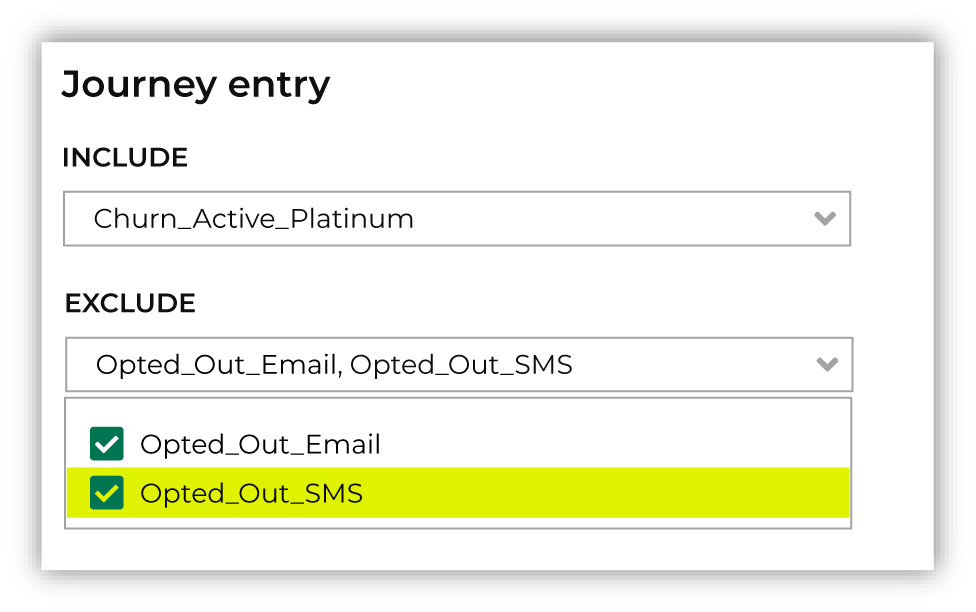
Who is excluded?
Sometimes a journey needs to exclude certain members of your audience. For example, a journey aimed at churn prevention often excludes customers who have opted-out of SMS messaging or who have unsubscribed from an email list.
When you need to exclude audience members, choose one or more segments from the Select exclusion segments dropdown list. The customers in an exclusion list will be removed from the audience for this journey.
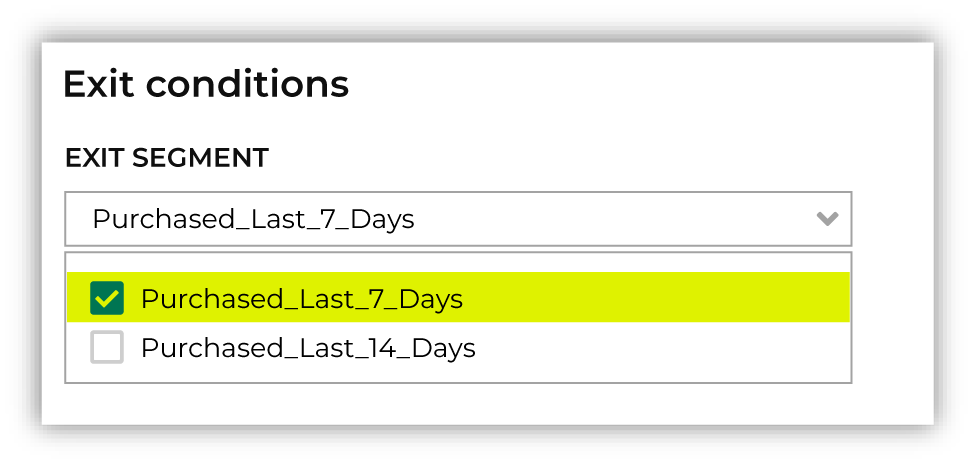
Exit conditions
Some customers should exit a journey when a particular criterion has been fulfilled. For example:
The goal of a churn prevention campaign is to convince a customer to make a purchase. If a customer who is part of a churn prevention campaign makes a purchase they should be removed from the campaign.
An audience starts with customers who have opted in to receiving marketing messages from your brand. If a customer who is part of that journey later opts out they should be removed from the campaign.
Exit conditions are defined using a segment. One or more segments that define exit conditions may be added to a journey using the Select exit segments dropdown.
Note
When adding many exit condition segments, all segments are unioned, so a customer only needs to match one of the segments in the exit conditions category to be considered part of it. You may add up to ten exit condition segments.
Goal conditions
Set goals to track when customers included in the journey reach designated segments. This differs from an exit condition in that reaching a goal segment does not remove the customer from the journey. You can measure progress on specific business goals while the customer continues on the journey.
Goal conditions are defined using a segment. One or more segments that define goal conditions may be added to a journey using the Select goal segments dropdown.
Note
When adding many goal condition segments, all segments are unioned, so a customer only needs to match one of the segments in the goal conditions category to be considered part of it. You may add up to five goal condition segments.
Important
Journey goals require batch segments (SQL-based segments). Real-time segments are not supported for journey goals.
Allow re-rentry?
If a journey is set to recur, you can allow the same customer to re-enter the journey on its next run if the customer has both previously exited the journey and once again qualifies for the inclusion segment.
Note
When a journey is set to run on a recurring schedule, only customers who have newly qualified for the inclusion segment since the last run will enter the journey.
For example, if the segment had 1,500 members at launch, all 1,500 would enter the journey.
On the next run, if the segment has grown to 1,700, only the 200 new members–those who joined the segment after the previous run–are guaranteed to be included.
If you have selected Allow re-entry customers who have previously exited the journey must re-qualify for the inclusion segment. For example, if the segment is based on a time window, such as “purchased in the last 7 days”, and they meet the criteria again, they can re-enter.
To prevent this, use an exclusion segment to filter out users who have already participated, or who meet other disqualifying conditions.
Journeys Canvas
After establishing the audience and starting conditions of the journey, you will be taken to the Journeys Canvas. This is the interface where you determine the steps of the journey and define how your brand will interact with customers at each step.
The following building blocks are available to users for creating journeys:
Important
Each node in a journey must have a name that is unique within that journey. If two nodes share a name (for example, two Activate nodes), they must be differentiated (for example, “Activate 1” and “Activate 2”).
Journey start
A start node displays the starting segments in a journey along with any exclusions.
A start node displays the starting segments in a journey along with any exclusions.
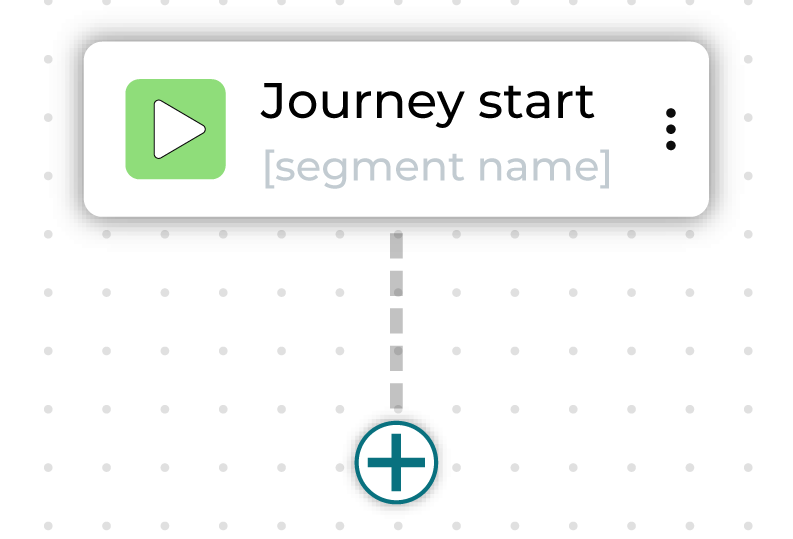
To edit inclusions, exclusions, or exit conditions, click on the Journey start node. Click the plus button underneath to add nodes to the journey.
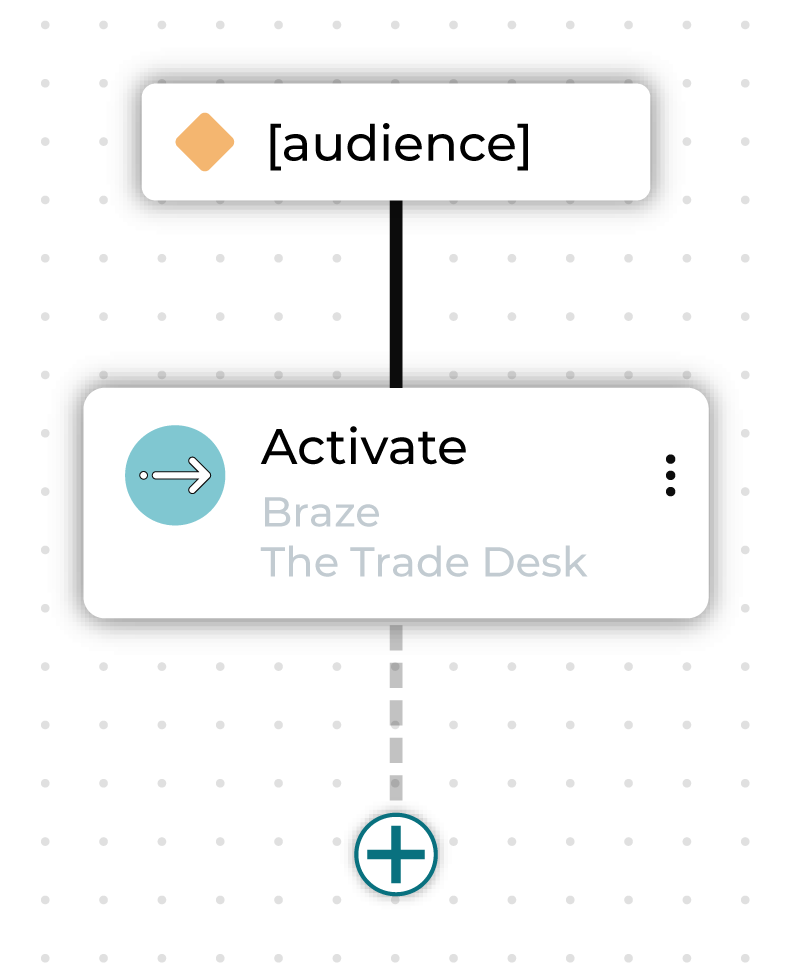
Activate
An activate node sends an audience to one or more destinations.
You can rename the activate node. Node names must be unique within a journey. For example, you cannot have many activate nodes named “Activate” but you can have “Activate 1”, “Activate 2”, and so on.
You can configure a single activation node to send to many destinations at once, and this is recommended for simplicity and efficiency.
Note
If you are activating to several destinations and each one uses different custom attributes, you will need to create a separate activation node for each destination to assign those attributes correctly.
Tip
Avoid activation file naming conflicts
Running a journey generates a file for every activation node. The filename is constructed using:
the journey name
the activation node name
If many activation nodes have the same filename, it will cause an error.
To avoid this error, make sure each activation node within a journey has a unique name. Renaming the node will automatically update the generated filename.
You can check an activation node’s path and file name in the Node configuration panel on the righthand side of the Journeys Canvas, under “Destination Summary”.
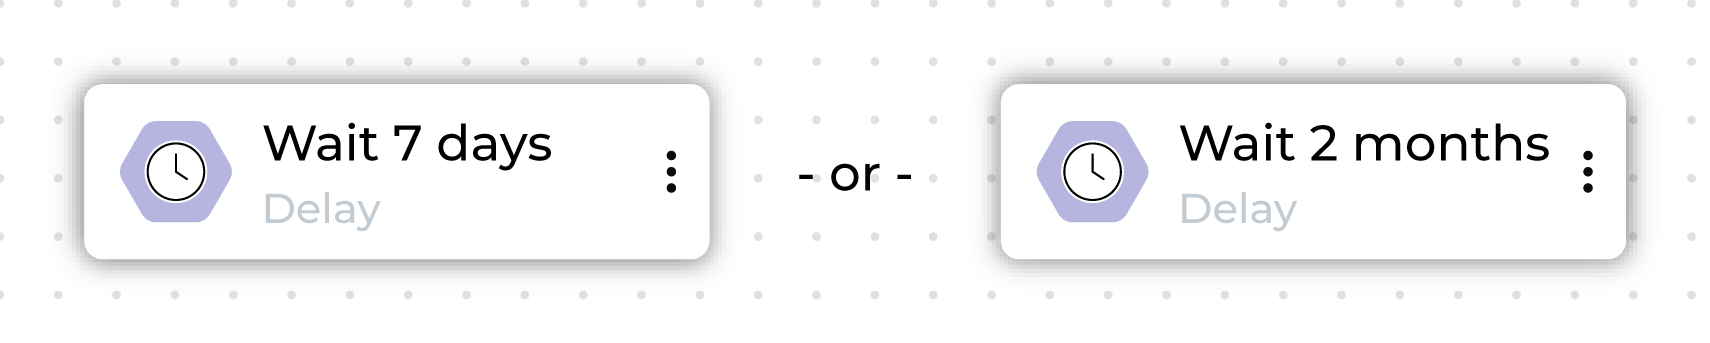
Delay
A delay node defines a minimum amount of time that customers must wait before moving to the next step in a journey.
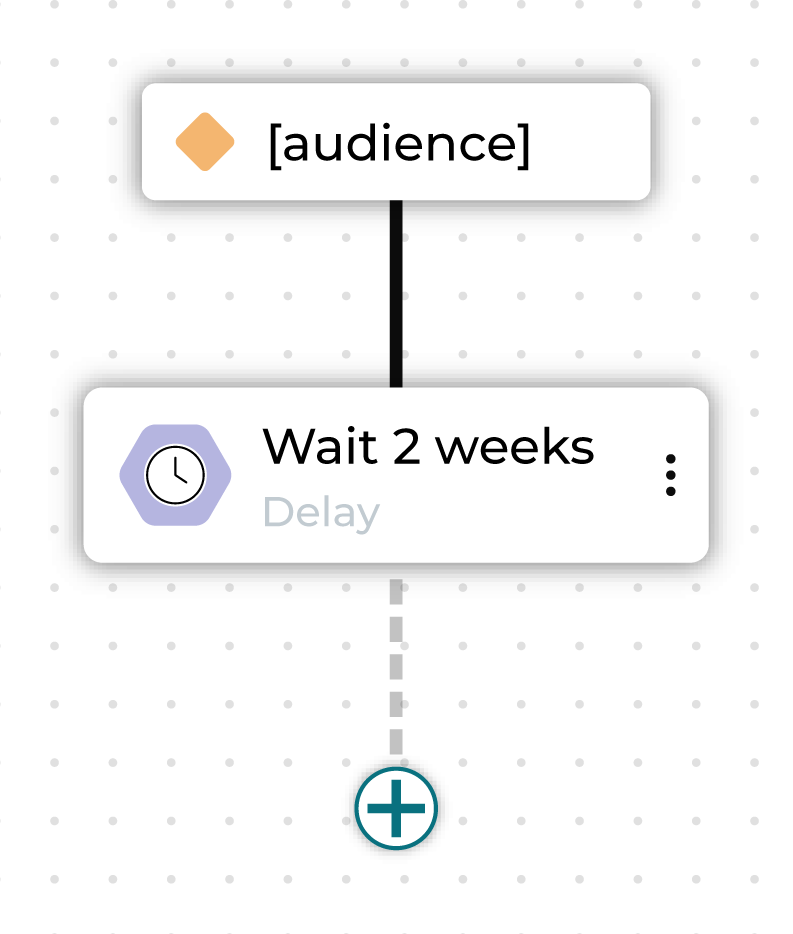
Choose a combination of an integer plus “days”, “weeks”, or “months” to designate how long to wait before the next step in the journey begins.
A delay is applied to a single parent node.
You can rename the delay node. Node names must be unique within a journey. For example, you cannot have many delay nodes named “Delay” but you can have “Delay 1”, “Delay 2”, and so on.
Important
Customers do not automatically move forward after the wait period ends. Progression only occurs the next time the journey runs.
For example, if a delay node is set to 3 days but the journey is scheduled to run weekly, customers will remain at the delay node until the next scheduled run, waiting up to 7 days.
If a journey is set to run only once, customers will not move beyond the delay node after it executes.
Conditional split
A conditional split node splits a journey into branching paths, where each path defines one or more segments.
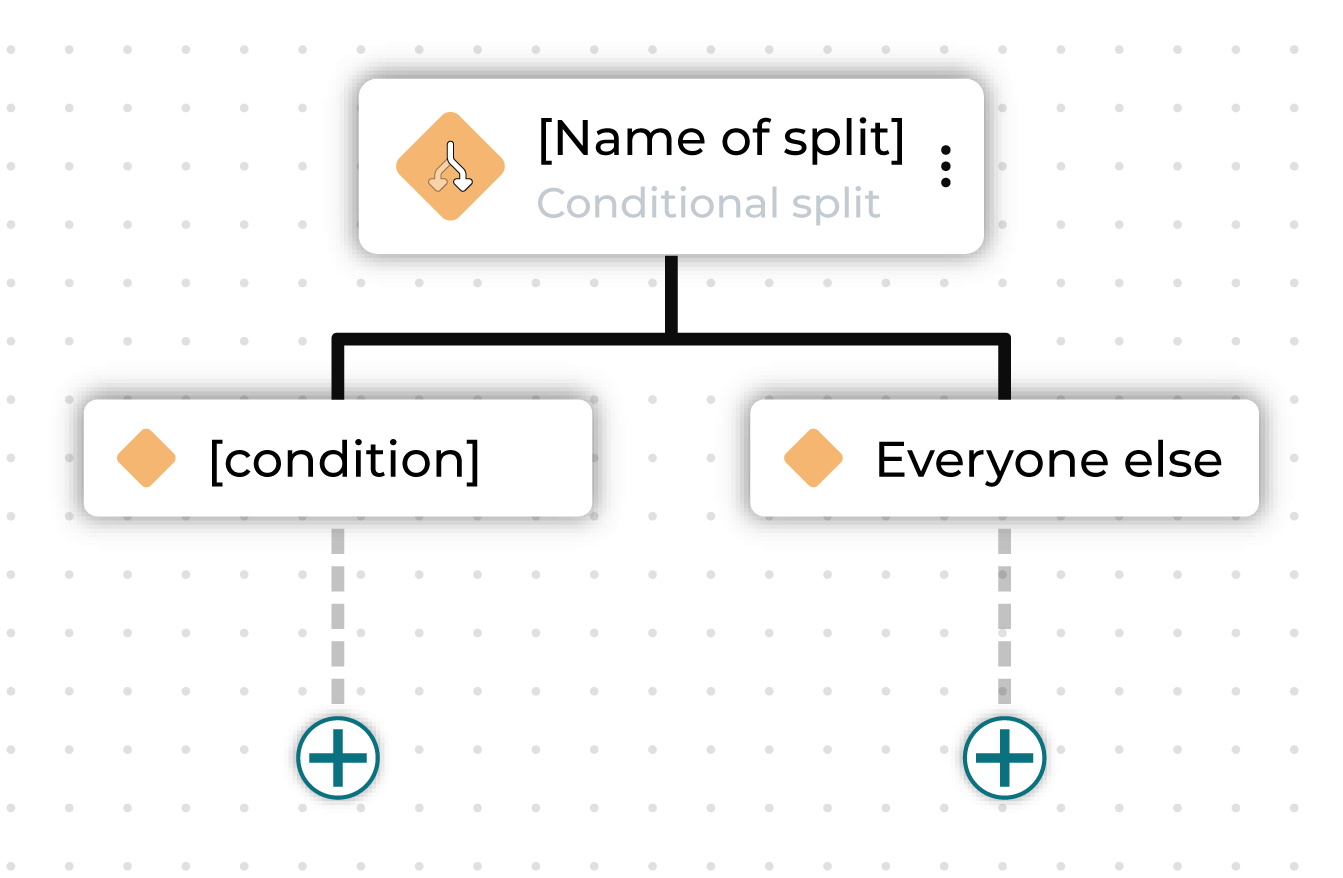
These segments may already exist or may be defined within this journey using custom criteria.
You can rename the conditional split node and rename the “Everyone else” sub-audience. Node names must be unique within a journey. For example, you cannot have many conditional split nodes named “Conditional Split” but you can have “Conditional Split 1”, “Conditional Split 2”, and so on.
Percent split
A percent split node splits a journey into branching paths, where each path applies to a randomly selected percentage of the audience that entered the branch.
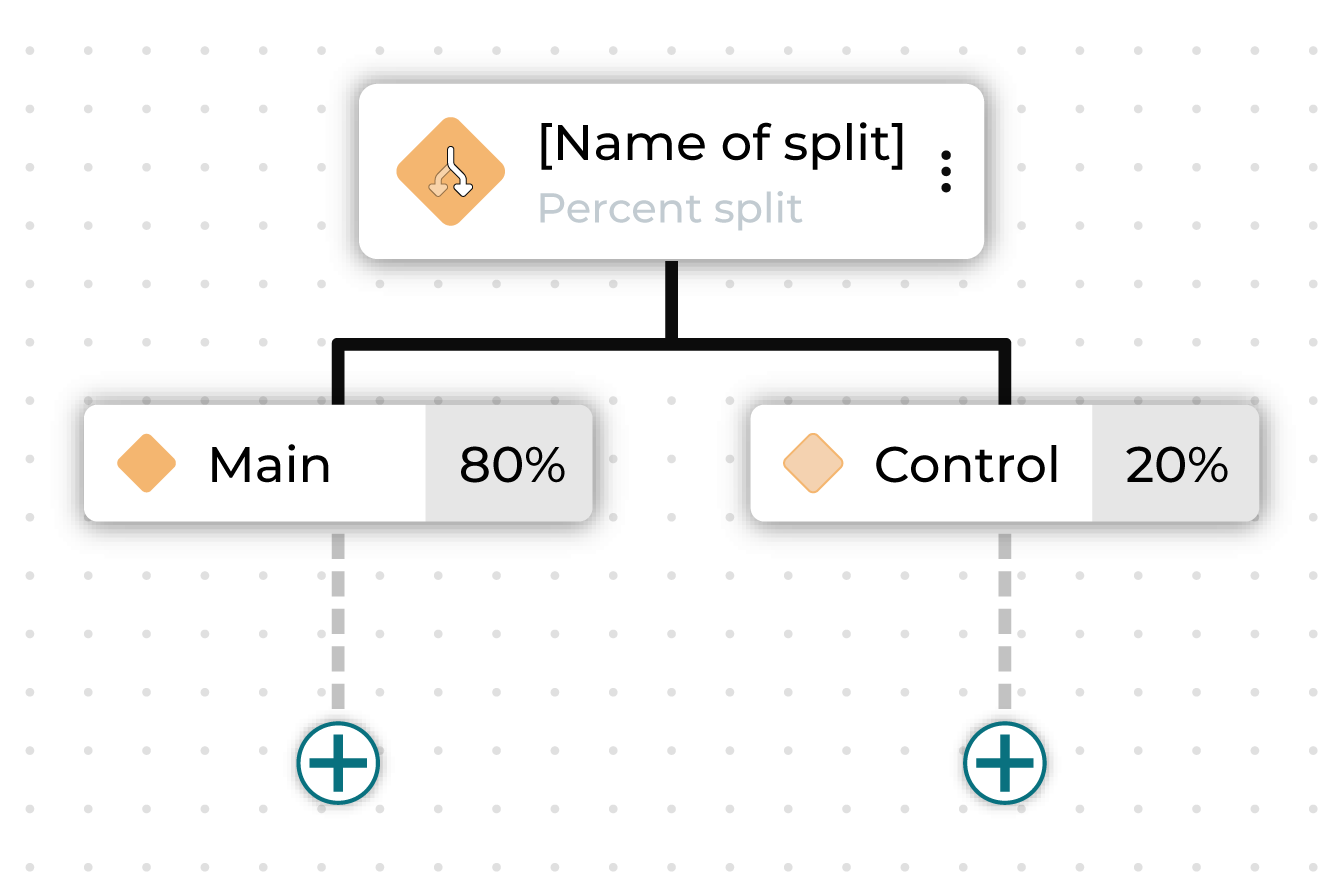
The percentage of all individual nodes under a percent split must add up to 100% of the audience, including the control group.
You can rename the percent split node and rename the individual paths. Node names must be unique within a journey. For example, you cannot have many percent split nodes named “Percent Split” but you can have “Percent Split 1”, “Percent Split 2”, and so on.
Individual split
An individual split node represents each path in a journey that defines a conditional or percent split.
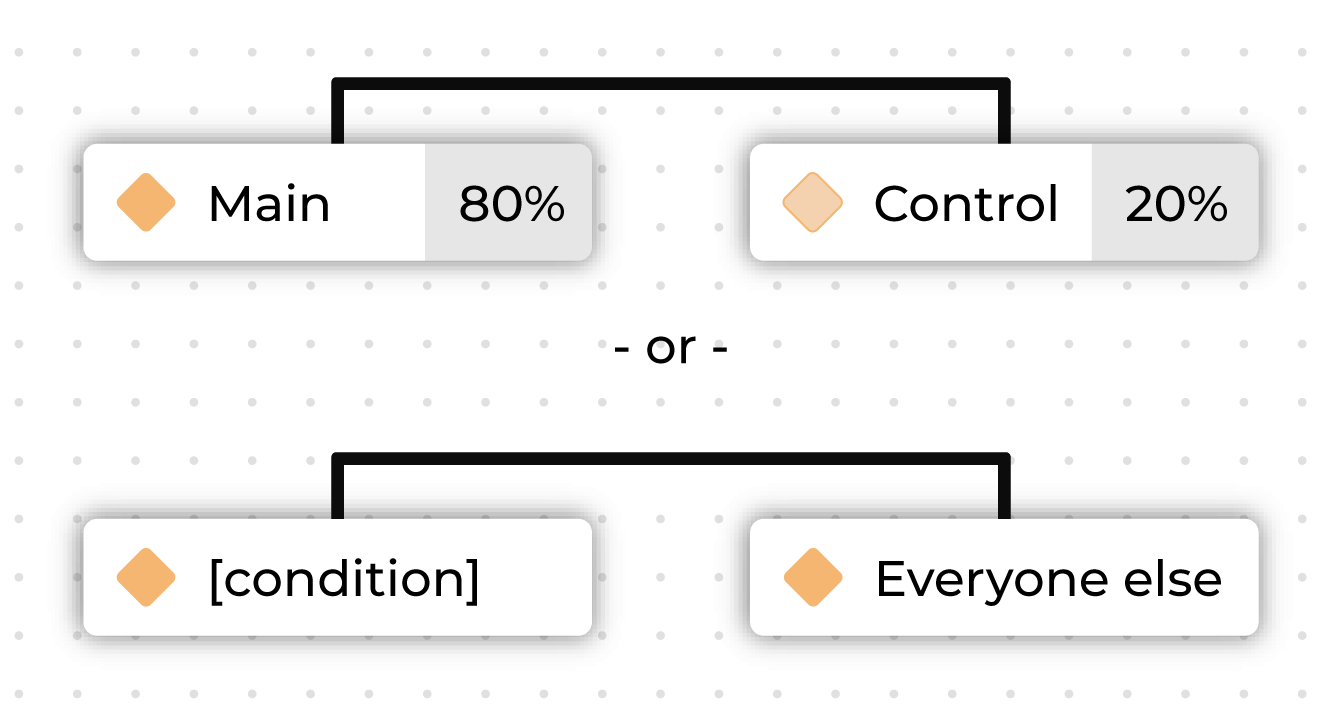
Note
To edit sub-audiences conditions and naming, click into the parent node.
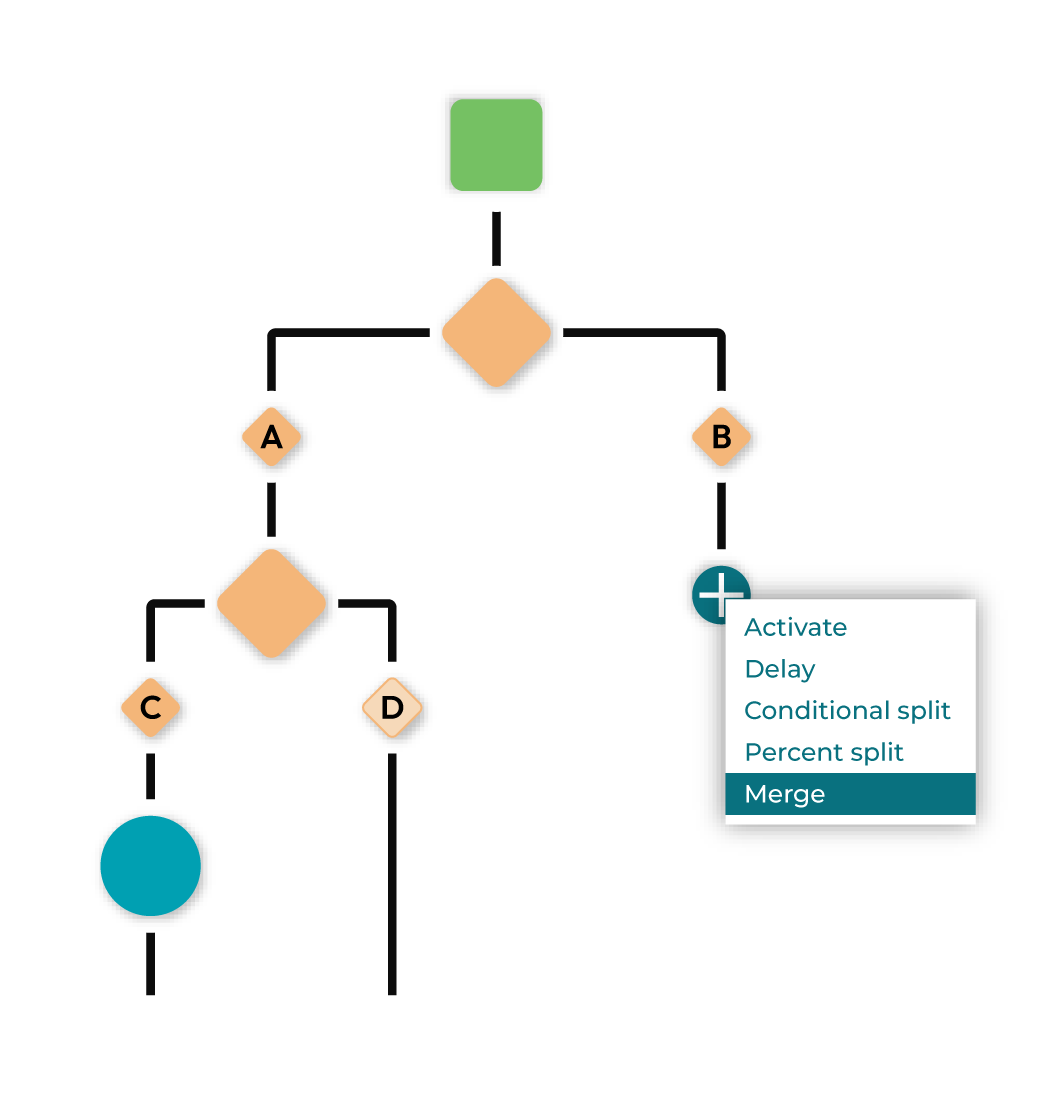
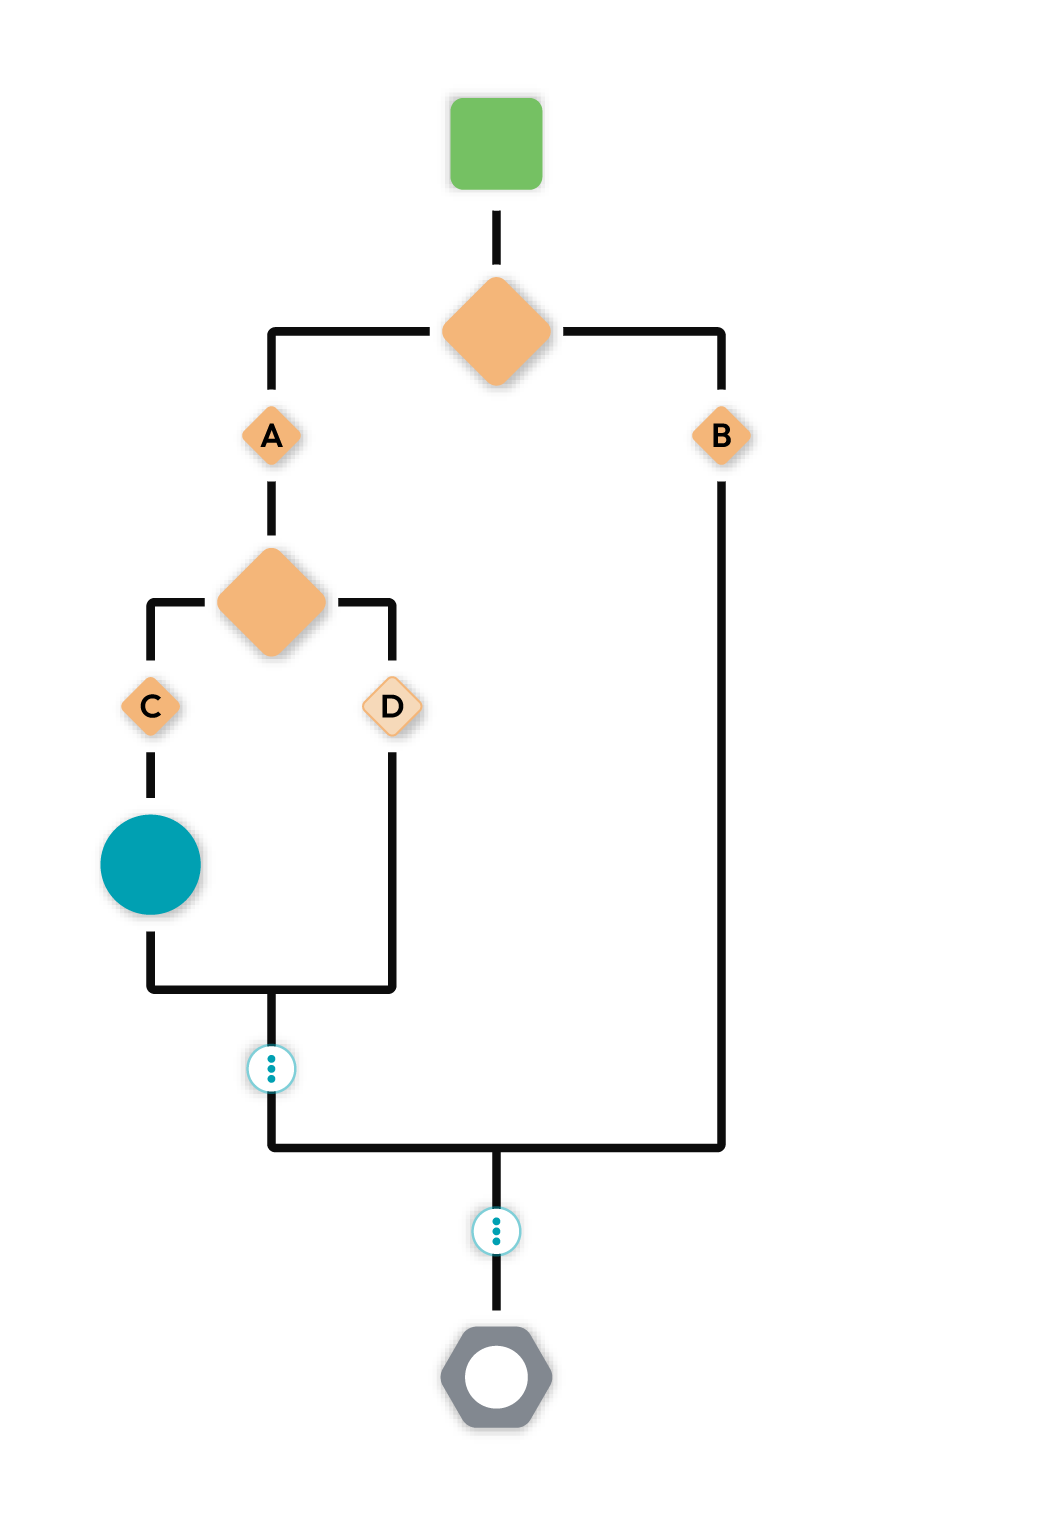
Merge
A merge joins together paths in a conditional split or percent split to ensure consistency and avoid the need to duplicate logic if the journey for both paths should be the same after the split.
Note
The option to merge only appears when you click the plus button below a split.
Note
If a journey ends on a merge, that merge is removed upon saving the journey because a closing merge does not result in any action.
Note
Merging an outer path will first merge the inner path.
Add a node
Click the plus button to add a node to the journey. May be one of “Activate”, “Delay”, “Conditional Split”, or “Percent Split.”
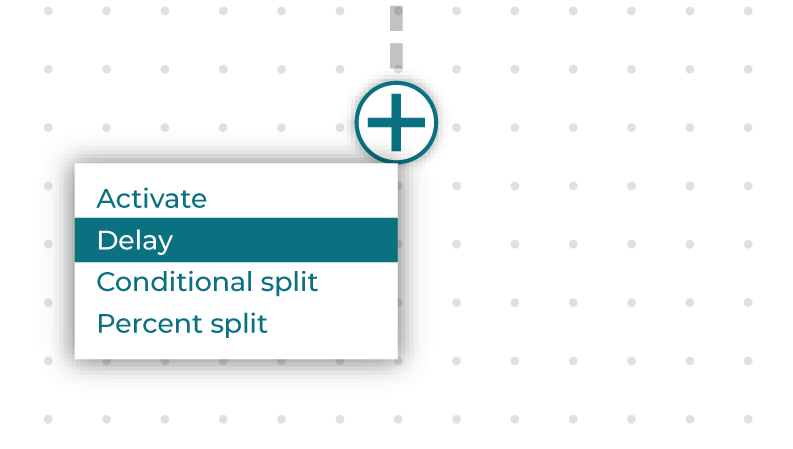
If the plus button is after a split node, there will also be the option to choose “Merge.”
Configure destination attributes
The attributes that are sent to each destination that are configured for activation in a journey can be edited.
To configure destination attributes
From the Journeys Canvas, select an activation node.
Open the Node configuration sidebar. For each configuration destination, a list of attributes may be edited.
Select a destination from the Destination dropdown.
Open the Attributes panel. A list of attributes is shown with the field in Amperity on the left and the field that is sent to the destination on the right.
Click the Edit button to update the list of attributes that are sent to this destination.
When finished, click Save.
Schedule a journey
A journey may be configured to run once, daily, weekly, monthly, or quarterly.
To schedule a journey
From the Journeys Canvas, click Edit schedule in the top navigation.
From the Recurrence dropdown menu choose one of the options: “once”, “every 3 hours”, “every 6 hours”, “twice daily”, “daily”, “weekly”, “monthly”, or “quarterly”.
Important
Delay nodes require the journey to run again to progress. For journeys set to run only once, customers will not move beyond delay nodes. Use recurring schedules to ensure customers continue through the journey after delay node wait periods.
Journeys measurement
Journeys measurement provides insight into performance by tracking milestones, measuring goal achievement, and calculating incremental lift on test versus control splits. Use journey goals and exit measurement to understand which paths drive the most conversions.
Journeys measurement helps you:
Track customer milestones including journey exits and goal achievements
Measure progress toward specific business goals without removing customers from the journey
Calculate path-specific goal achievement via percent-split testing
View metrics across many time windows (7, 30, and 90 days)
Export detailed journey travel logs for advanced analysis
Important
Journeys measurement requires batch segments (SQL-based segments). Real-time segments are not supported for journey measurement.
How measurement works
Journeys measurement uses two primary data structures to track customer progress:
Journey Travel Log (JTL) records every stage transition with enriched metadata including:
Journey and stage identifiers
Traveler entry and exit timestamps
Split path details (test group names, control flags)
Exit segment information when applicable
Milestones dashboard tracks significant events including:
Goal achievements (customers meeting success criteria after entering the journey; will not show customers already in the goal segment at the start fo the journey)
Exit events (customers leaving the journey)
Complete path reconstruction for each traveler
Time-based aggregations (all-time, 7-day, 30-day, 90-day windows)
Types of journey goals
Journey goals can be configured at two levels:
Journey-level goals Applied to the entire journey to track overall success metrics:
Track achievement regardless of path taken
Available in the Journey Goals card on the canvas
Maximum 5 goal segments per journey
Percent-split goals Applied to specific percent-split nodes for A/B testing:
Track achievement by split path (test vs control)
Enable incremental lift calculation
Available when configuring percent-split nodes
Maximum 2 goal segments per percent-split node
Important
The total number of goal segments across your entire journey (journey-level + all percent-split nodes) cannot exceed 10.
Milestones tracking
The milestones dashboard on the Journeys Canvas capture significant events as customers travel through your journey. The system automatically tracks:
Goal milestones Customer achieved a journey or split goal
Exit milestones Customer met exit criteria and left the journey
Milestone metrics
Metric |
Description |
|---|---|
All-time count |
Total milestone achievements since journey start |
Past 7 days |
Achievements in the last 7 days |
Past 30 days |
Achievements in the last 30 days |
Past 90 days |
Achievements in the last 90 days |
Median duration |
Median time in days from journey entry to milestone achievement |
Tip
Use time-windowed metrics to understand recent performance trends and seasonal patterns in goal achievement.
Percent-split testing
Percent-split nodes with goals configured enable A/B testing capabilities. Goals set for percent-split nodes only apply to customers passing through that node, rather than all customers in the journey.
Configuration requirements
One path must be designated as the control group
Other paths become test groups
Weights must sum to exactly 100%
Maximum 2 goal segments per split node
Must be configured before the journey begins to record goals
Path-specific metrics
The system tracks goal achievement by path, enabling calculation of:
Conversion count per path
Incremental lift (test vs control)
Time-windowed performance comparison
Path reconstruction showing exact journey taken
Tip
After accumulating data, review the path-specific metrics to determine which path performs better. Consider adjusting split percentages based on lift results.
Journey Travel Log
The Journey Travel Log (JTL) provides detailed tracking of every traveler’s journey with enriched metadata.
Travel log schema
Field |
Type |
Description |
|---|---|---|
entry_at |
Datetime |
When the traveler entered a given node |
event_id |
String |
Customer identifier, typically based on Amperity ID |
exit_segments |
String |
Pipe-separated list of exit segment names |
is_control |
Boolean |
For percent-splits: whether this is the control path |
is_remaining |
Boolean |
For conditional-splits: whether this is the last default path |
journey_id |
String |
ID of journey in URL (jny-xxx) |
journey_name |
String |
Name of journey |
journey_version |
String |
Journey version ID (jnv-xxx) |
mxs_ids |
String |
Pipe-separated list of exit segment IDs |
parent_id |
String |
ID of previous node customer passed through |
parent_name |
String |
Name of the parent node |
split_condition_name |
String |
Name of the split condition node corresponding with this path |
stage_id |
String |
Node ID (jnn-xxx) or lifecycle stage (start, complete, exit, orphan) |
stage_name |
String |
Name of node |
stage_type |
String |
Node type (activation, wait, merge, percent-split, conditional-split) |
test_group_name |
String |
For percent-splits: name of the test group |
Journey Travel Log export
Travel log data can be exported to external systems for advanced analysis:
Path reconstruction
Split performance analysis
Exit pattern identification
Time-to-goal calculations
Exporting automatically enriches metadata with node details, and includes exit information when applicable.
Only exports previously unsent entries (tracked via egress_sent_at).
Journey Travel Log export supports batch export to data warehouses.
Journeys use case examples
The following examples demonstrate how to structure a journey in the Journeys Canvas to achieve specific business outcomes.
Note
These are hypothetical examples to give a sense of what is possible. Use them as inspiration or a starting point to structure a journey that fits your brand’s particular circumstances.
New customer
The goal of a new customer journey is to turn a new customer into an engaged participant by providing helpful, sequenced information that guides customers to a second purchase.
Why new customer journeys work
A new customer journey ensures the customer receives prompt, relevant communication, and non-engaged users get an additional message on a separate channel with an incentive to act.
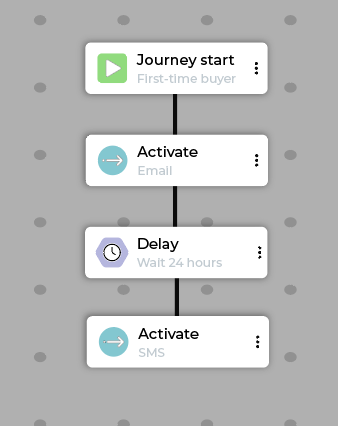
Example basic new customer journey
Step |
Description |
|---|---|
Start |
Customer meets the “First-time buyer” segment criteria. |
Activate |
Send a personalized “Welcome” email with a thank you and brand story/mission. |
Delay |
Wait 24 hours. |
Activate |
Send a short, high value SMS (for example, “Use code WELCOME10 for 10% off your next order!”). |
Exit |
Customers exit a new customer journey when they complete a second purchase. |
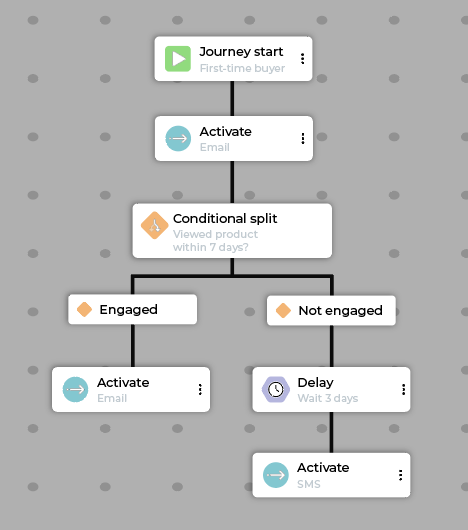
Example new customer journey flow with split
Step |
Description |
|---|---|
Start |
Customer meets the “First-time buyer” segment criteria. |
Activate |
Send a personalized “Welcome” email with a thank you and brand story/mission. |
Conditional split |
Check if the customer has viewed a product page within 7 days. |
Path A (Engaged) |
Activate Send a “Tips and Tricks” email relevant to their viewed product. |
Path B (Not Engaged) |
For customers who have not made a second purchase or viewed any additional products, take the following steps:
|
Exit |
Customers exit a new customer journey when they complete a second purchase. |
Abandoned cart
The goal of an abandoned cart journey is to convert users who started a purchase but abandoned their cart before completing the transaction.
Why abandoned cart journeys work
An abandoned cart journey reinforces the same intent across many touchpoints without redundancy. It uses immediate, low-incentive reminders first, reserving the higher-value incentive (the 10% discount) for the most valuable, high-AOV abandoned carts, thus protecting margins.
Note
Abandoned cart journeys require real-time functionality to be enabled.
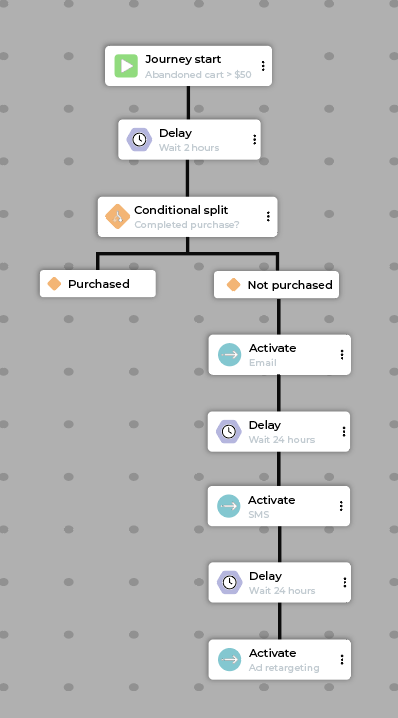
Example abandoned cart journey flow
Step |
Description |
|---|---|
Start |
Customer meets the “Abandoned cart > $50” segment criteria.. |
Delay |
Wait 2 hours to allow for organic purchase completion. |
Conditional split |
Check if the customer has completed the purchase to meet the exit condition. |
Path A (Purchased) |
Customer exits journey |
Path B (Has not purchased) |
For customers who have not purchased, take the following steps:
|
Exit |
Customers exit an abandoned cart journey when they complete the purchase. |
Birthday
The goal of a birthday journey is to drive immediate, high-margin revenue through a personalized, time-sensitive offer. At the same time, it aims to deepen emotional connection and increase retention.
It can also be used for other similar milestones, like the aniversary of reaching a new tier in the loyalty program.
Why birthday journeys work
A birthday journey uses a highly personal attribute and tailors the channel and incentive to protect margin while getting the most impact from the most valuable customers.
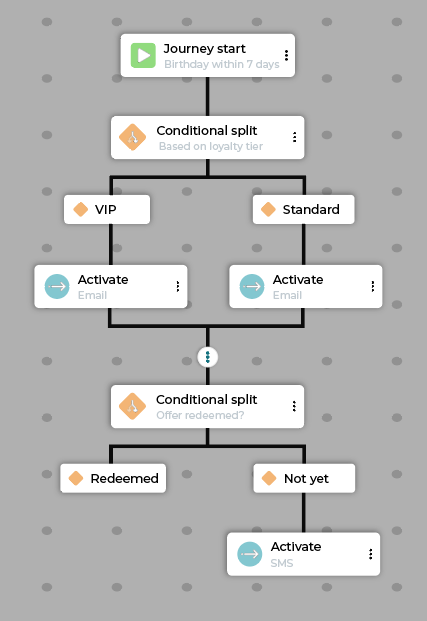
Example birthday journey flow
Step |
Description |
|---|---|
Start |
Customer meets the “Birthday within 7 days” segment criteria. |
Conditional split |
Split based on loyalty tier (for example, VIP vs. Standard). |
Path A (VIP) |
Activate Send an exclusive “Happy birthday, VIP!” email with a high-value offer (for example, 20% off, double points, etc). Activate Optional. Send a physical postcard with a high value offer. |
Path B (Standard) |
Activate Send a “Happy Birthday” email with a standard offer (for example, 10% off). |
Merge |
Merges paths back together. |
Conditional split |
Check if the customer has redeemed the offer. |
Path A (Did redeem) |
Customer exits the journey. |
Path B (Did not redeem) |
Activate Send an SMS reminder that the offer expires soon. |
Exit |
Customers exit a birthday journey if they redeem the offer and make a purchase. |
Product consideration
The goal of a product consideration journey is to convert recent browsers and product page viewers into purchasers by nudging them with relevant product information and social proof.
Why product consideration journeys work
Product consideration journeys use multi-channel engagement to keep the product top-of-mind, while the A/B test measures the incremental lift provided by the paid advertising or discount channel against organic email.
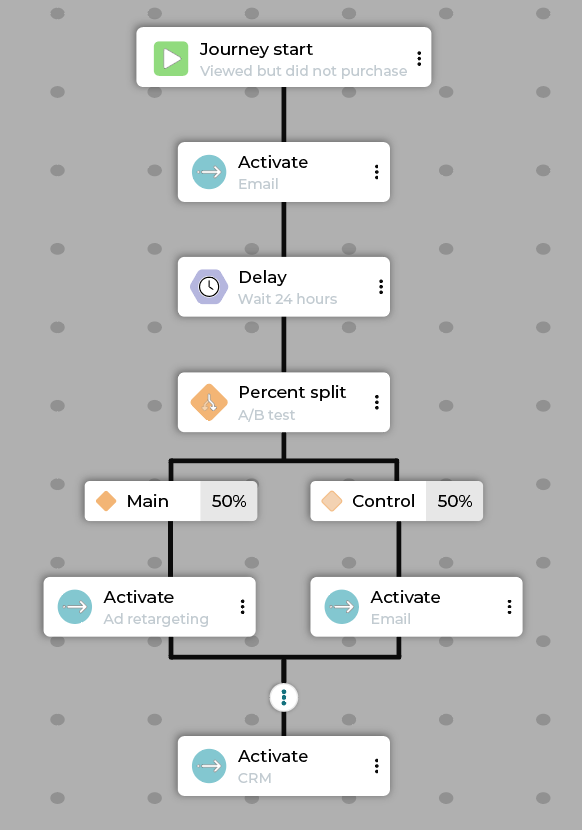
Example product consideration journey flow
Step |
Description |
|---|---|
Start |
Customer meets the “Viewed Product Category X in last 48 hours, but did not purchase” segment criteria. |
Activate |
Send an email featuring social proof (customer reviews, ratings) for the viewed products. |
Delay |
Wait 24 hours. |
Percent split |
A/B test with a 50/50 split. |
Path A (Treatment) |
Activate Add the customer to a lookalike/retargeting audience to receive ads featuring a discount code. |
Path B (Control) |
Activate Send a “Bestsellers in Category X” email without a discount. |
Merge |
Merges paths back together. |
Activate |
CRM syncs with point of sale so that if customers visit a store, associate sees the same recommendations. |
Exit |
Customers exit a product consideration journey when they make a purchase. |
Cross-sell
The goal of a cross-sell journey is to increase order frequency by recommending complementary products immediately following a purchase. A cross-sell journey activates customers using email or SMS campaigns and through paid media advertising, depending on the type of customer and the immediate goal.
Why cross-sell journeys work
A cross-sell journey references immediate purchase data to stay relevant. Split this audience by loyalty status to offer the best incentives, such as double loyalty points for VIPs and free shipping for everyone else.
Example cross-sell journey flow
Step |
Description |
|---|---|
Start |
Customer meets the “Purchased product Y in the last 24 hours” segment criteria. |
Conditional split |
Check if the customer is already a VIP/loyalty member. |
Path A |
Activate Send a “Complete your look” email to VIPs featuring high-margin, complementary products and offering double loyalty points on the next purchase. |
Path B |
Activate Send a “Complementary items” email to everyone else with a focus on free shipping for the next order. |
Merge |
Bring the two paths back together. |
Delay |
Wait 48 hours. |
Conditional split |
Check if a cross-sell purchase has been made. |
Path A |
Customers who have made a qualifying second purchase exit the journey. |
Path B |
For customers who have not made a qualifying second purchase within the last 48 hours, send a reminder focused on purchasing a complementary product. Path B takes the following steps:
|
Exit |
Customers exit a cross-sell journey after they make a second, qualifying purchase within the timeframe defined by the cross-sell journey. |

Seasonal campaign
The goal of a seasonal campaign journey is to drive revenue and brand engagement during key shopping periods (for example, Black Friday, Summer sale).
Why seasonal campaign journeys work
The seasonal campaign journey uses highly personalized, category-specific messaging and time-sensitive incentives across many channels, mitigating message fatigue and ensuring campaign theme consistency.
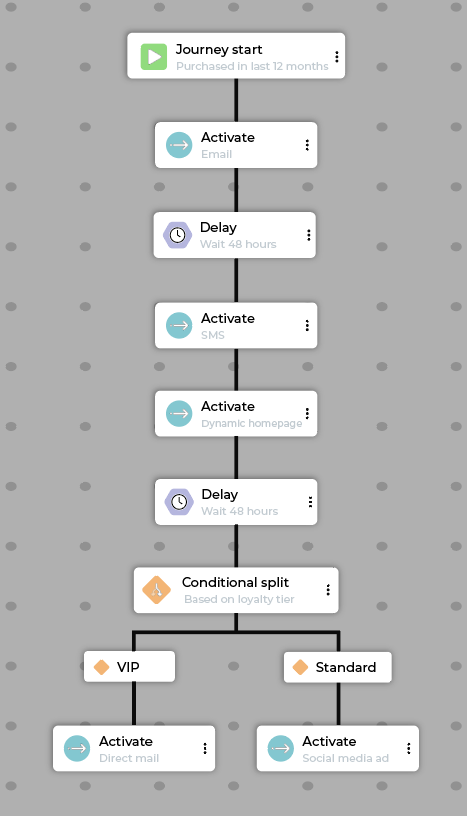
Example seasonal campaign journey flow
Step |
Description |
|---|---|
Start |
Customer meets the “Has purchased in the last 12 months” segment criteria. |
Activate |
Send a pre-sale email with a sneak peek of new products. |
Delay |
Wait 24 hours. |
Activate |
Send a last-chance SMS reminder about exclusive early access to the sale. |
Activate |
Use dynamic homepage to display products on site matching promotion in targeted emails & SMS. |
Delay |
Wait 48 hours. |
Conditional split |
Check if the customer is a VIP/loyalty member |
Path A (VIP) |
Activate Exclusive direct mail catalog with QR to curated collection. |
Path B (Non-VIP) |
Activate Social media ad carousel featuring relevant items. |
Exit |
Customers exit a seasonal campaign journey by making a purchase during the defined seasonal window. |
Loyalty tier upgrade
The goal of a loyalty tier upgrade journey is to reward and retain high value customers when they hit a new level of the loyalty program, encouraging future engagement and spend.
Why loyalty tier upgrade journeys work
Loyalty tier upgrade journeys provide the recognition and exclusivity that build emotional connection and brand loyalty.
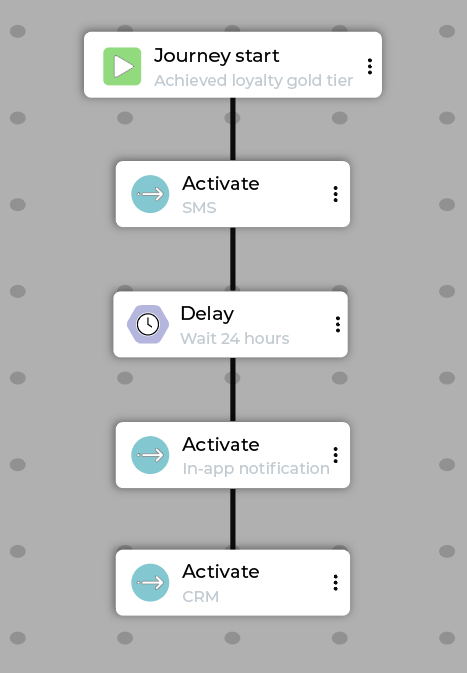
Example loyalty tier upgrade journey flow
Step |
Description |
|---|---|
Start |
Customer meets the “Achieved loyalty gold tier” segment criteria. |
Activate |
Send an SMS with a personalized thank you and link to a website detailing new perks. |
Delay |
Wait 24 hours. |
Activate |
In-app notification with access to bonus reward or exclusive collection. |
Activate |
CRM syncs with point of sale so store associate greets customer by name and mentions benefits. |
Exit |
Customers exit a loyalty tier upgrade journey 30 days after achieving the new status tier. |
Car test-drive
The goal of a car test-drive journey is to convert website interest (for example, “Build and Price” activity) into an in-person appointment or service booking.
Why car test-drive journeys work
Car test-drive journeys create a multi-touchpoint experience, bridging the gap between digital behavior and physical action by sending a lead to the sales CRM to trigger a response outside the marketing automation system.
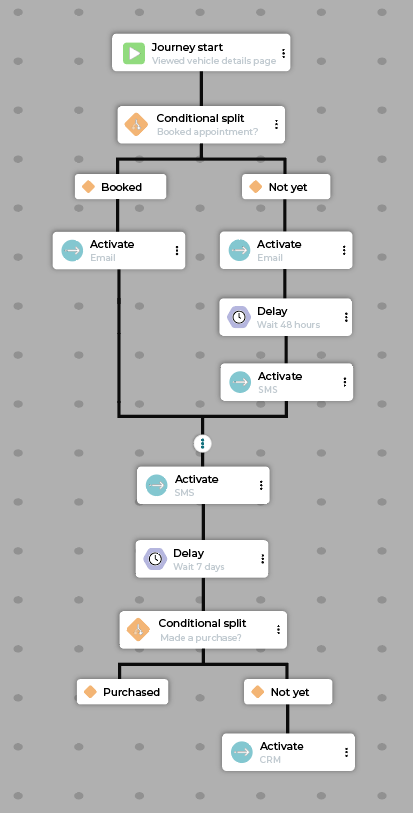
Example car test-drive journey flow
Step |
Description |
|---|---|
Start |
Customer meets the “Viewed Vehicle Details Page or Used ‘Build & Price’ tool in last 7 days” segment criteria. |
Conditional split |
Check if the customer has already booked an appointment. |
Path A (Appointment booked) |
Activate Send a “Pre-appointment checklist” email with confirmation details and required documentation. |
Path B (No appointment) |
For customers who have not yet booked an appointment, take the following steps:
|
Merge |
Bring the two paths back together. |
Activate |
Send an SMS with reminder and details on the upcoming appointment. |
Delay |
Wait 7 days. |
Conditional split |
Check if the test-drive customer has made a purchase. |
Path A (Purchase made) |
Exit condition is satisfied. |
Path B (No purchase made) |
Activate CRM alerts sales rep to call customer. |
Exit |
A customer exits a car test-drive journey when they have completed a purchase. |
Product replenishment
The goal of a product replenishment journey is to drive repeat purchases based on predicted product consumption cycles.
Why product replenishment journeys work
A product replenishment journey segments customers not just by what they bought but by when they are predicted to need it again, combining precise timing with a multi-channel nudge to maximize repeat sales.
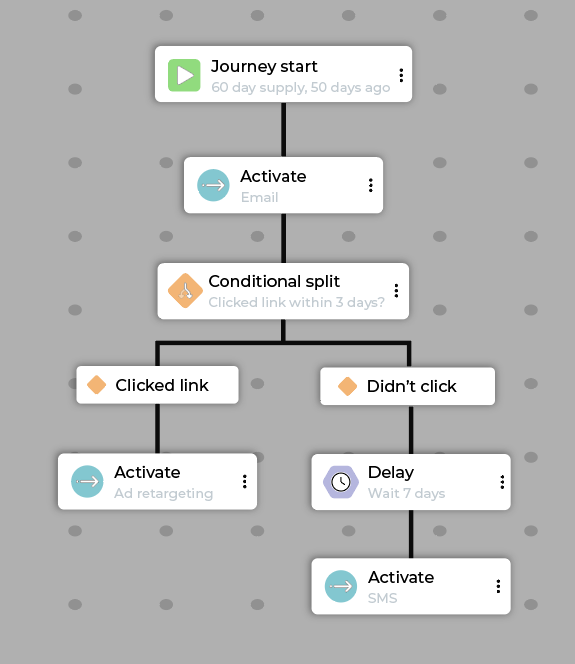
Example product replenishment journey flow
Step |
Description |
|---|---|
Start |
Customer meets the “Purchased 60-day size of Product Y, 50 days ago” segment criteria. |
Activate |
Send a “Time to reorder” email with a direct link to the product page. |
Conditional split |
Check if the customer has clicked the reorder link within 3 days. |
Path A (clicked link) |
Activate Add customer to a retargeting audience to see display ads featuring the product and a small incentive (for example, free sample with reorder). |
Path B (did not click) |
For customers who did not click the reorder link, take the following steps:
|
Exit |
Customers exit a product replenishment journey when they purchase the specific product or activate a subscription. |
Financial services welcome
The goal of a financial services welcome journey is to guide new account holders to full product adoption and usage.
Why financial services welcome journeys work
A financial services welcome journey uses data across channels to move customers from awareness to activation, building deeper engagement.
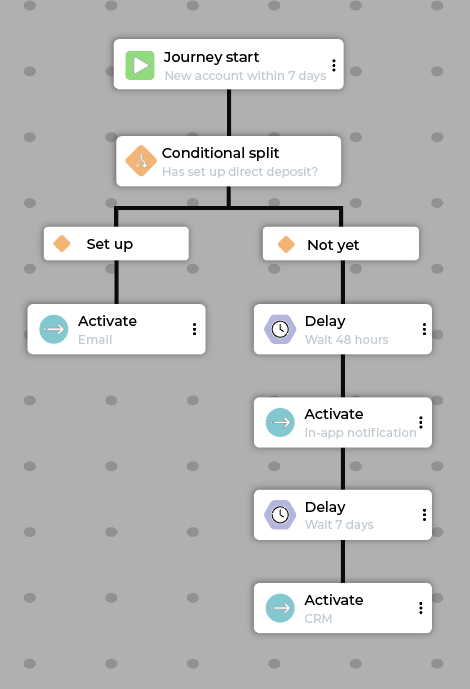
Example financial services welcome journey flow
Step |
Description |
|---|---|
Start |
Customer meets the “New checking account opened in last 7 days” segment criteria. |
Conditional split |
Split based on setup progress (for example, Has direct deposit been set up?). |
Path A (Direct deposit set up) |
Activate Send “Congratulations!” email introducing advanced features (for example, mobile check deposit). |
Path B (Direct deposit not set up) |
For customers who have not yet set up direct deopsit take the following steps:
|
Exit |
Customers exit a financial services welcome journey when direct deposit is set up. |