About campaigns
Use the Campaigns page to build the audiences to which you want to send messages or offers. Configure the campaign to send those audiences to downstream marketing tools, such as email service providers, SMS providers, paid media, digital advertising, personalization, and more.
Amperity Learning Lab
Campaigns break audiences into sub-audiences that align to your marketing strategies and goals.
Open Learning Lab to learn more about creating and launching a campaign . Registration is required.
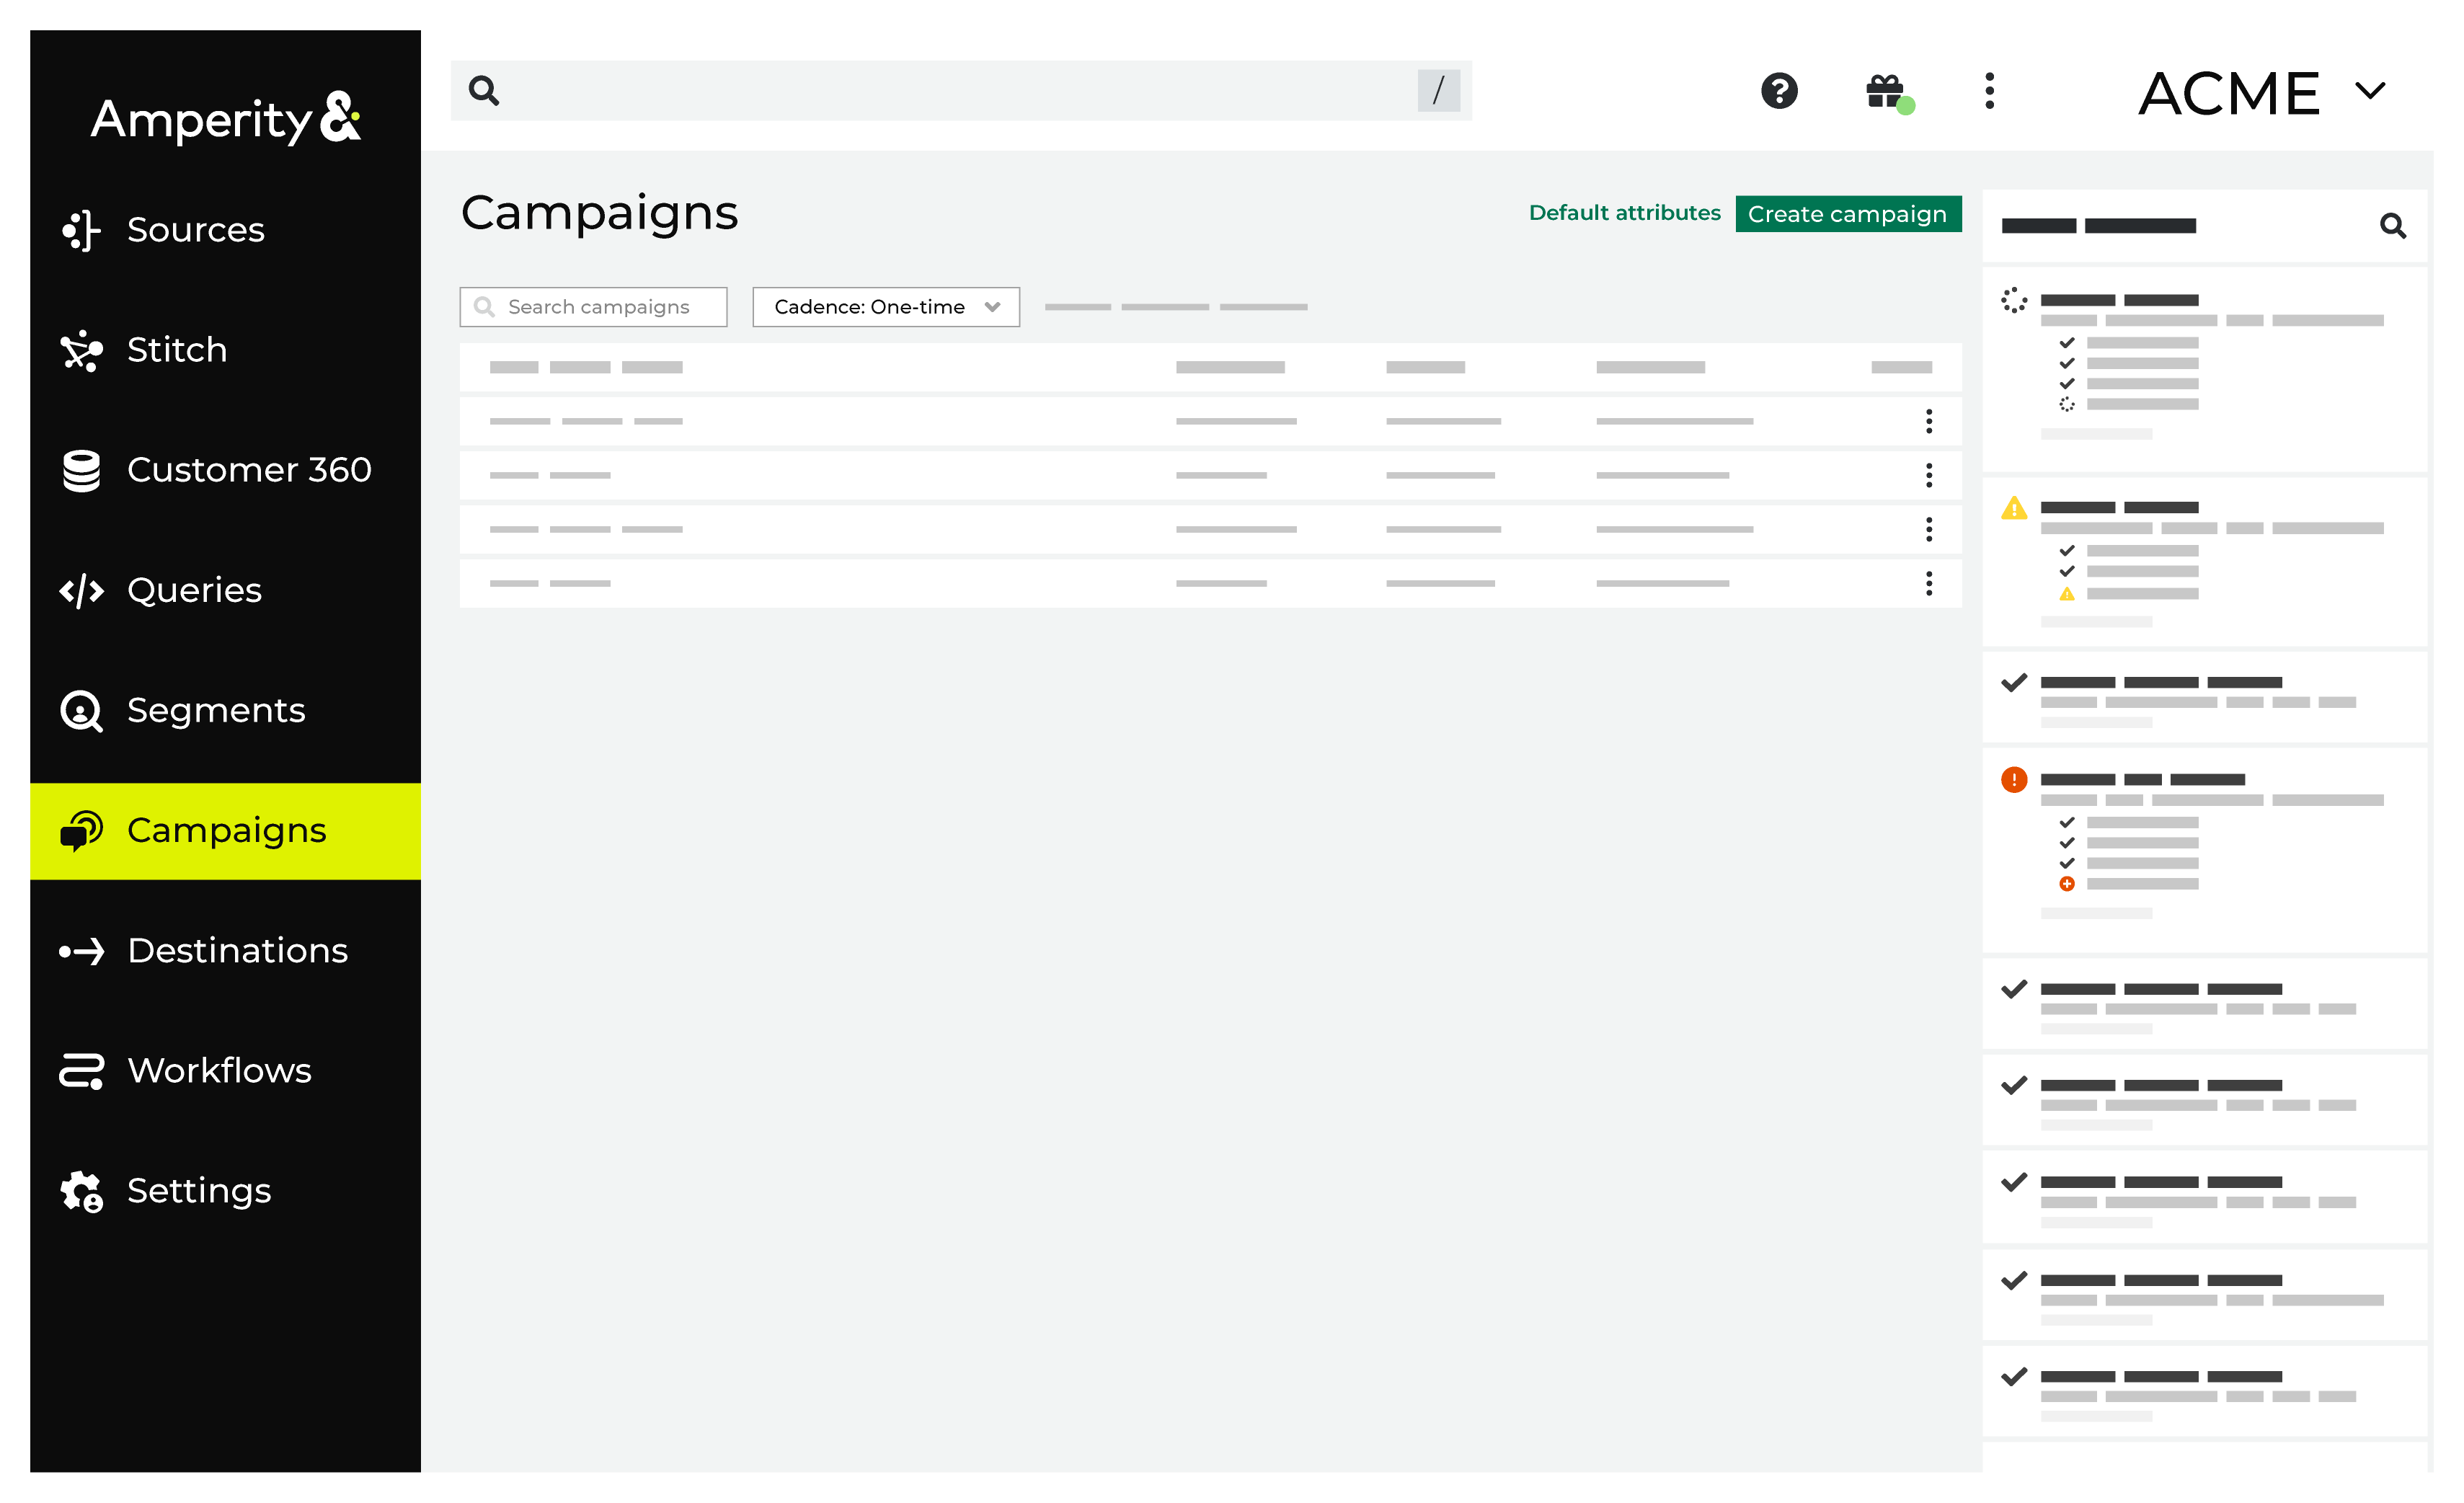
About the Campaigns page
The Campaigns page uses segments to build audiences, and configure how Amperity send audiences to any downstream marketing workflow.
Use the Campaigns page to activate a variety of use cases across your marketing stack. For example:
Viewing your recently edited campaigns
Messaging a group of high customer lifetime value (CLV) customers on Facebook for a VIP event
Emailing customers with an affinity toward blue button down shirts for a product liquidation
Targeting a segment of customers who are more likely to add a visit to the hotel spa
Messaging a group of customers likely to churn without a special offer
Showing an ad to re-engage customers who have unsubscribed from email
Reaching out to customers that have enrolled in your loyalty program
Identifying customers within existing lists, and then pushing targeted subsets for downstream messaging to any channel
Using a control group, along with any number of treatment groups, to measure the quality of a campaign
How campaigns work
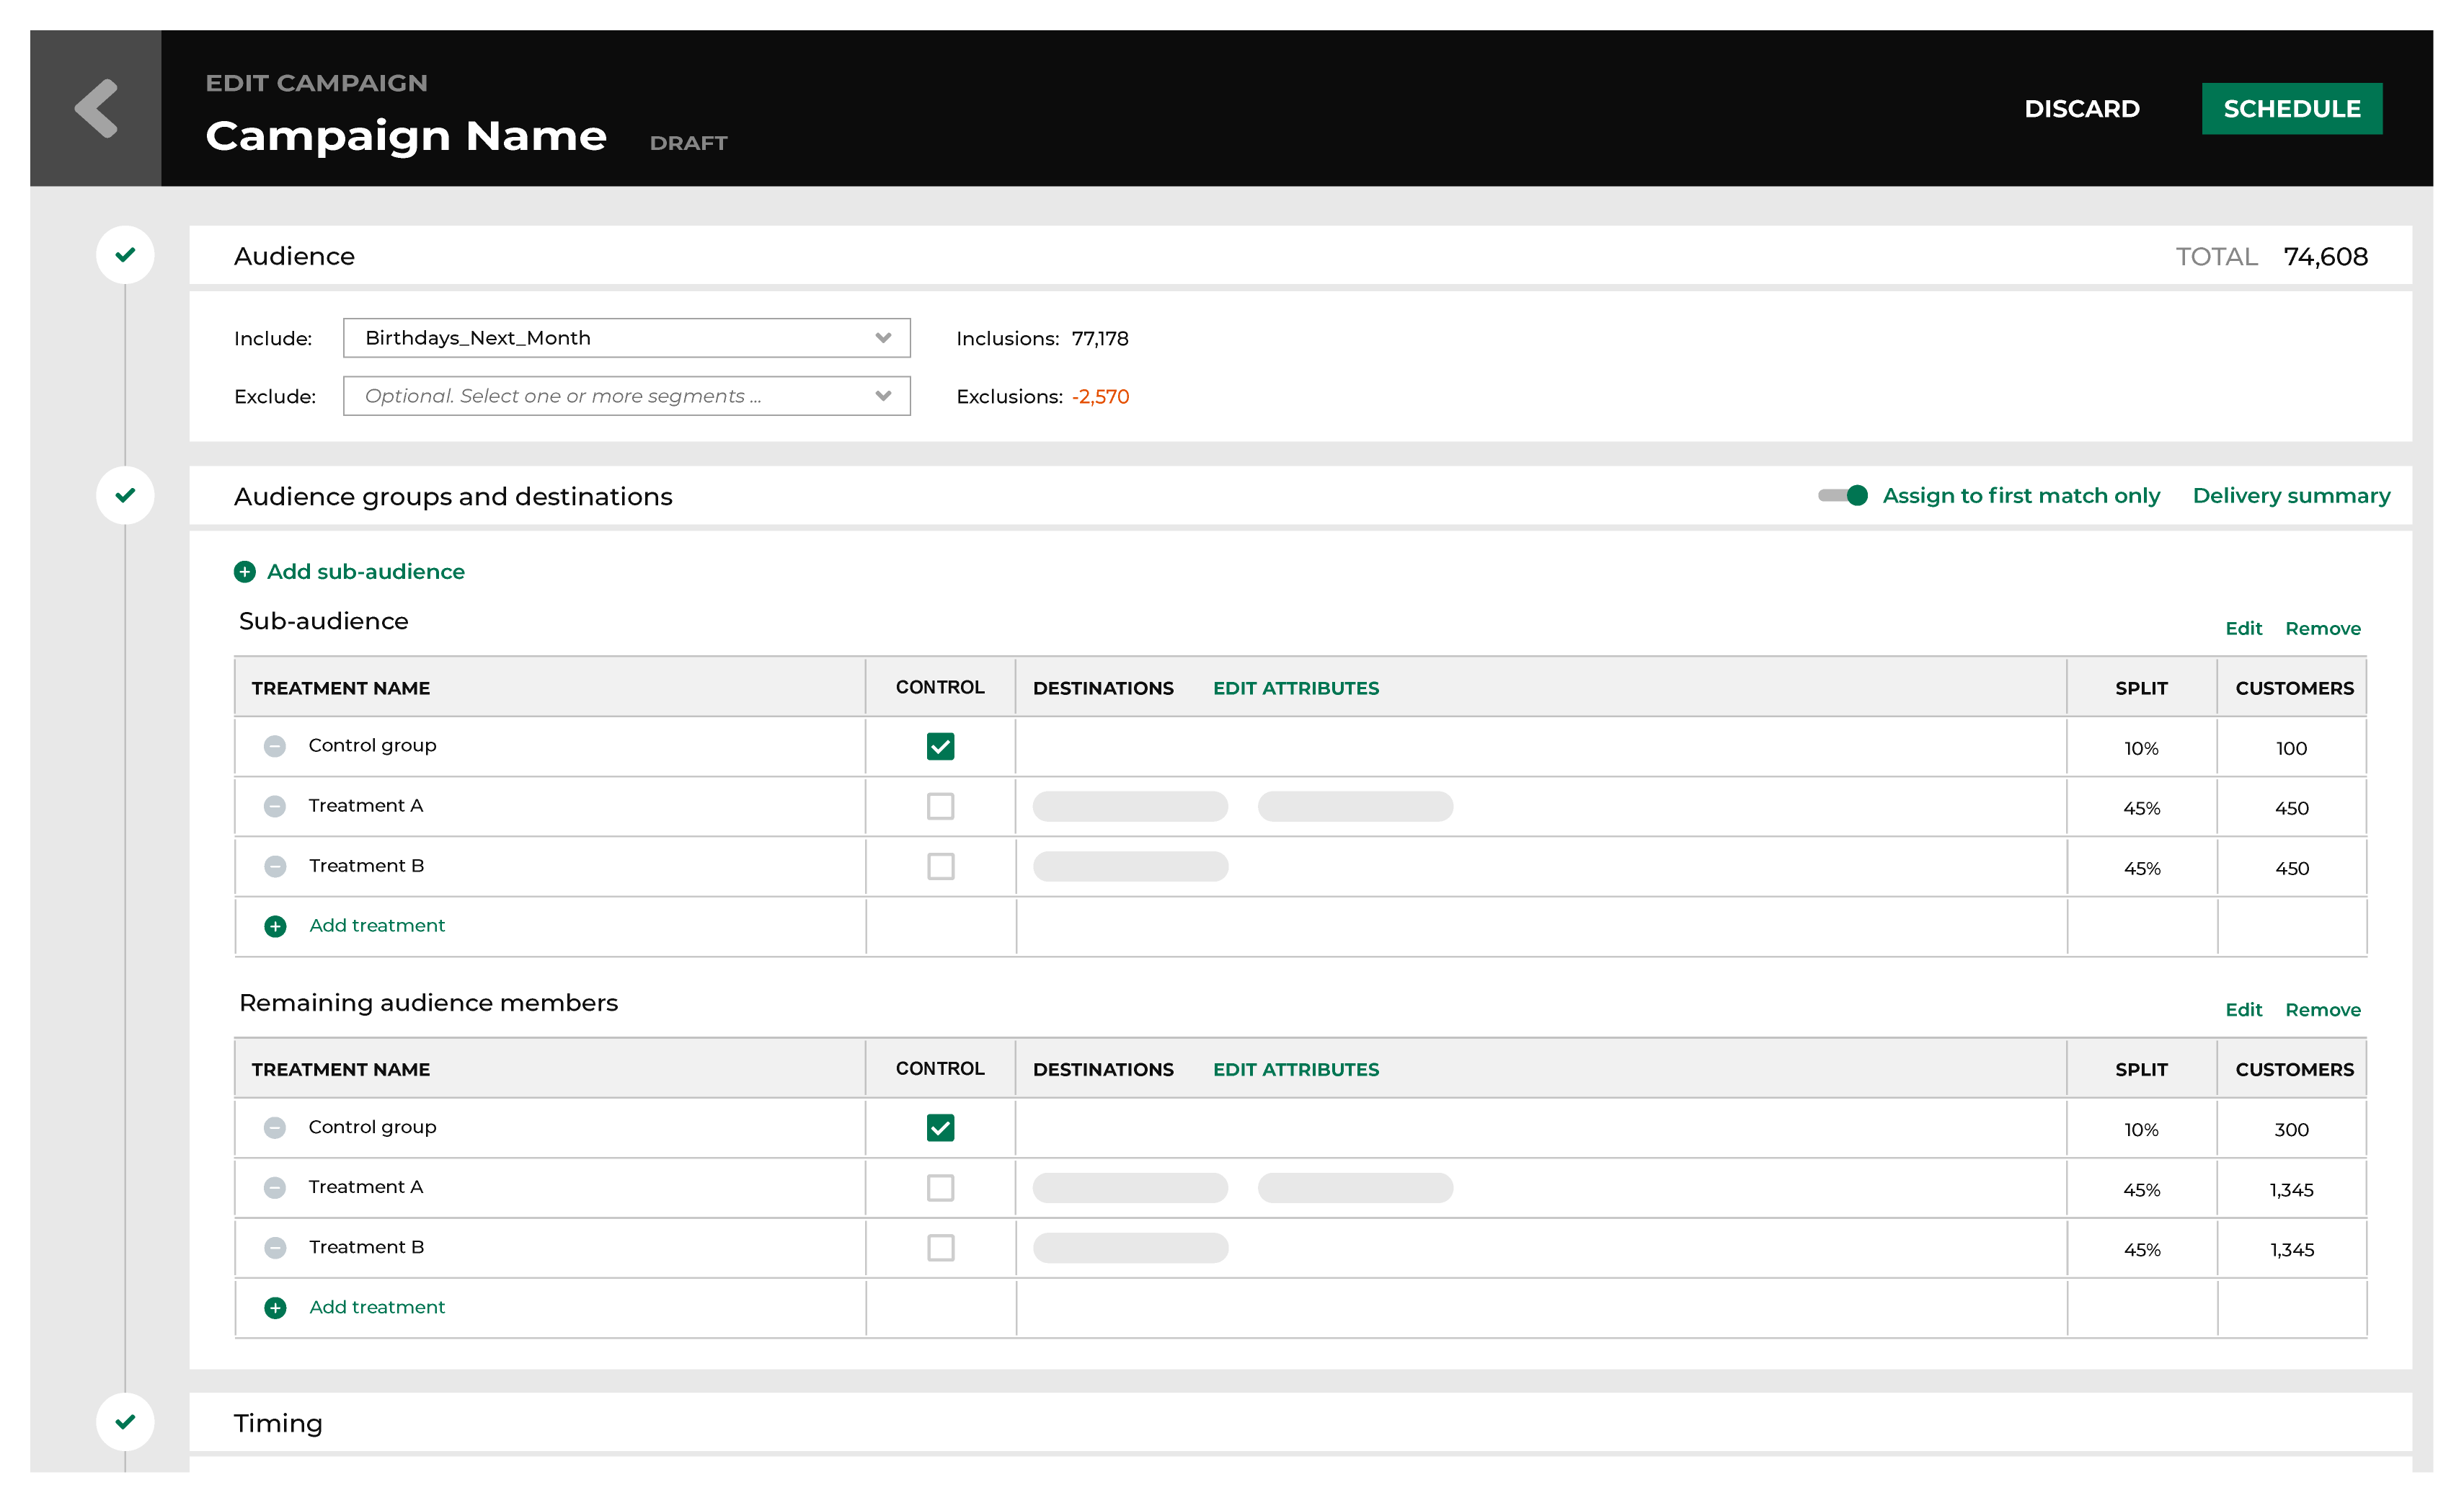
A campaign is defined in the Campaigns page, from which you configure the audience and sub-audiences that is associated with the campaign, the downstream locations to which the campaign is sent, and the time at which the campaign is to begin.
Follow this sequence when building a campaign:

|
The campaign builder is available from the Campaigns page. The Create Campaign button in the top right corner of the page opens the campaign builder. 
After the campaign builder opens, give your campaign a name. Tip Use good naming patterns to ensure that you can always find your campaigns in the various applications to which you sends them. The campaign name will always appear in the filename that is sent to any destination. Avoid duplication between campaign and treatment group names. Avoid using the names of destinations as campaign names unless the campaign is sent to only that destination. Use a naming pattern that ensures the campaign name works across every treatment group that is configured within any sub-audience. If brand names or region names apply to all sub-audiences in the campaign, consider using them within the campaign name. Some examples:
|
|
All campaigns start with an audience. Choose a segment from the Include dropdown list. The customers in that list will become the audience for this campaign. 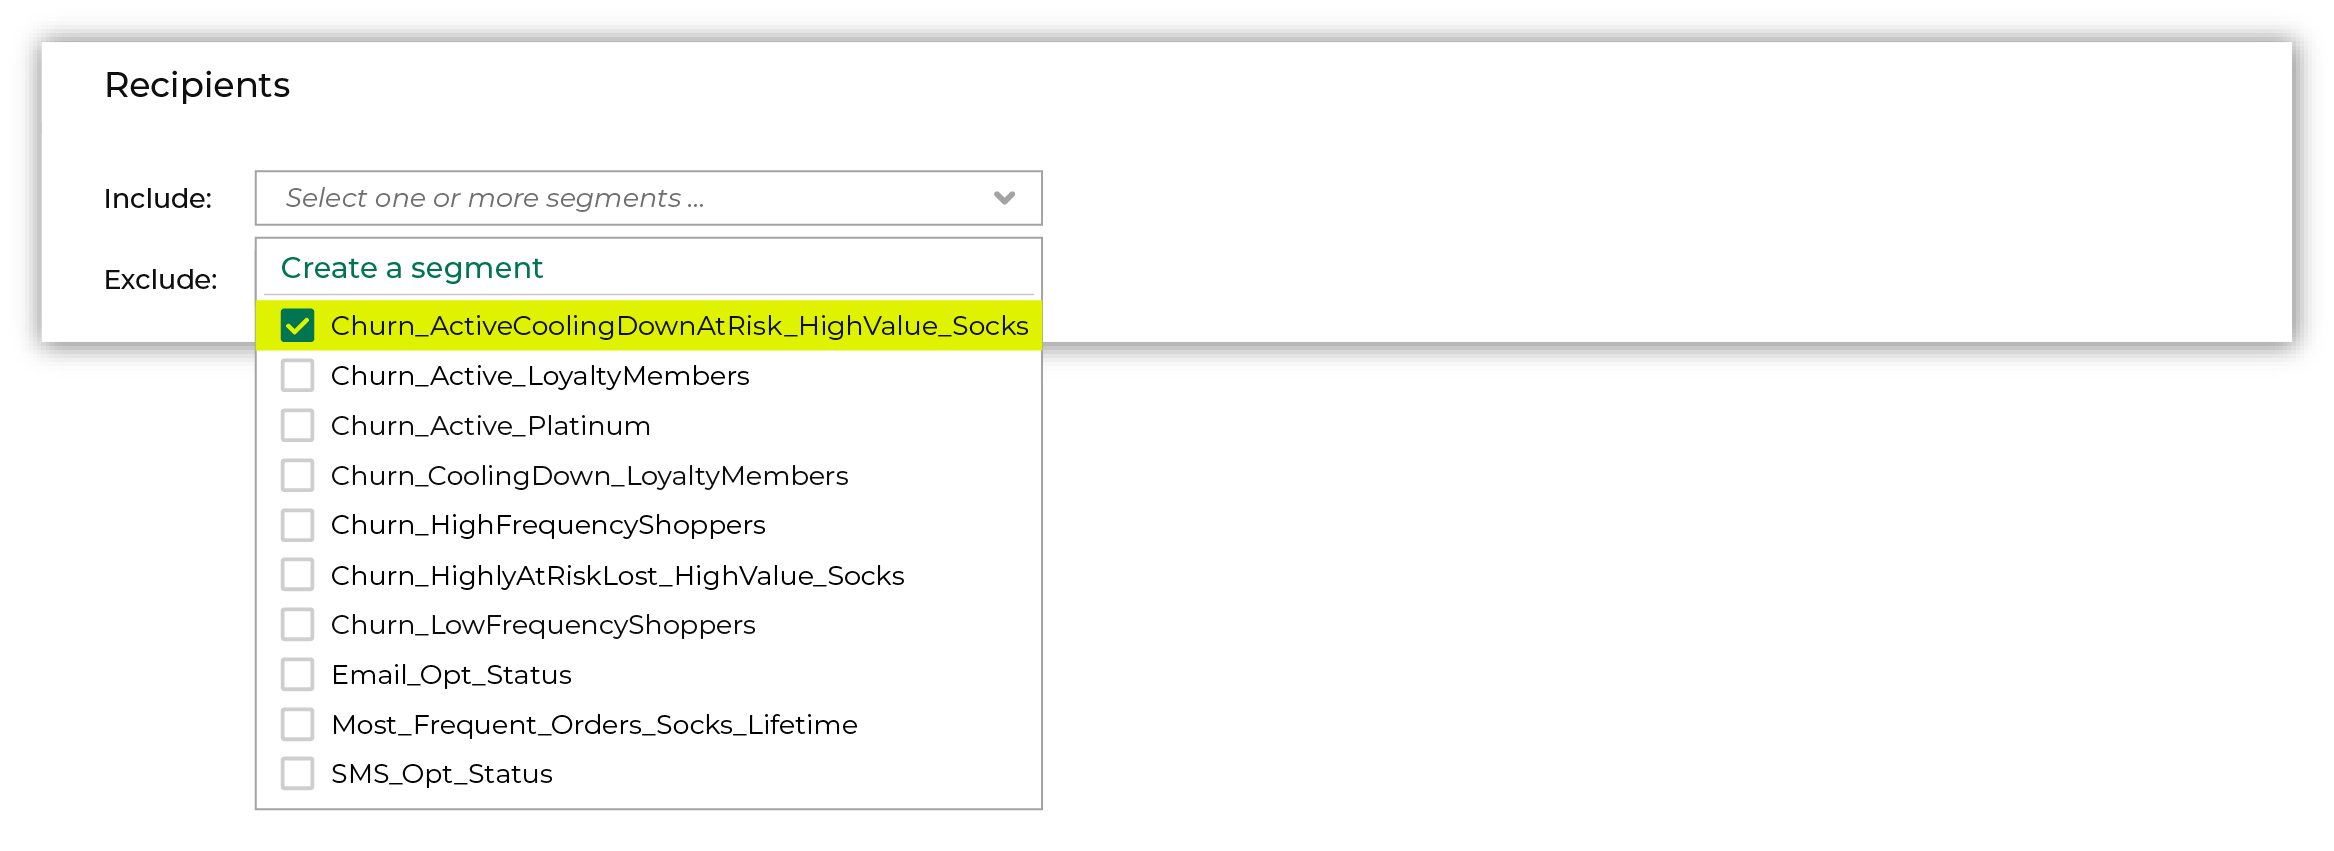
Tip When a campaign starts with an audience that is defined by a single segment, you can use the segment insights for that segment as a way to measure the performance of that audience over time. |
|
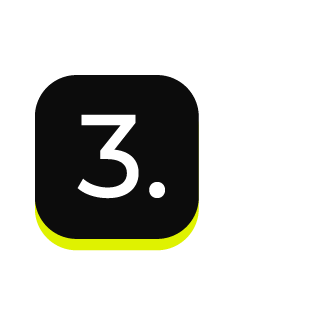
Sometimes campaigns need to exclude certain members of your audience. For example, a churn prevention campaign is often configured to exclude customers who have opted-out of SMS messaging and who have unsubscribed from an email list. When you need to exclude audience members, choose one or more segments from the Exclude dropdown list. The customers in an exclusion list will be removed from the audience for this campaign. 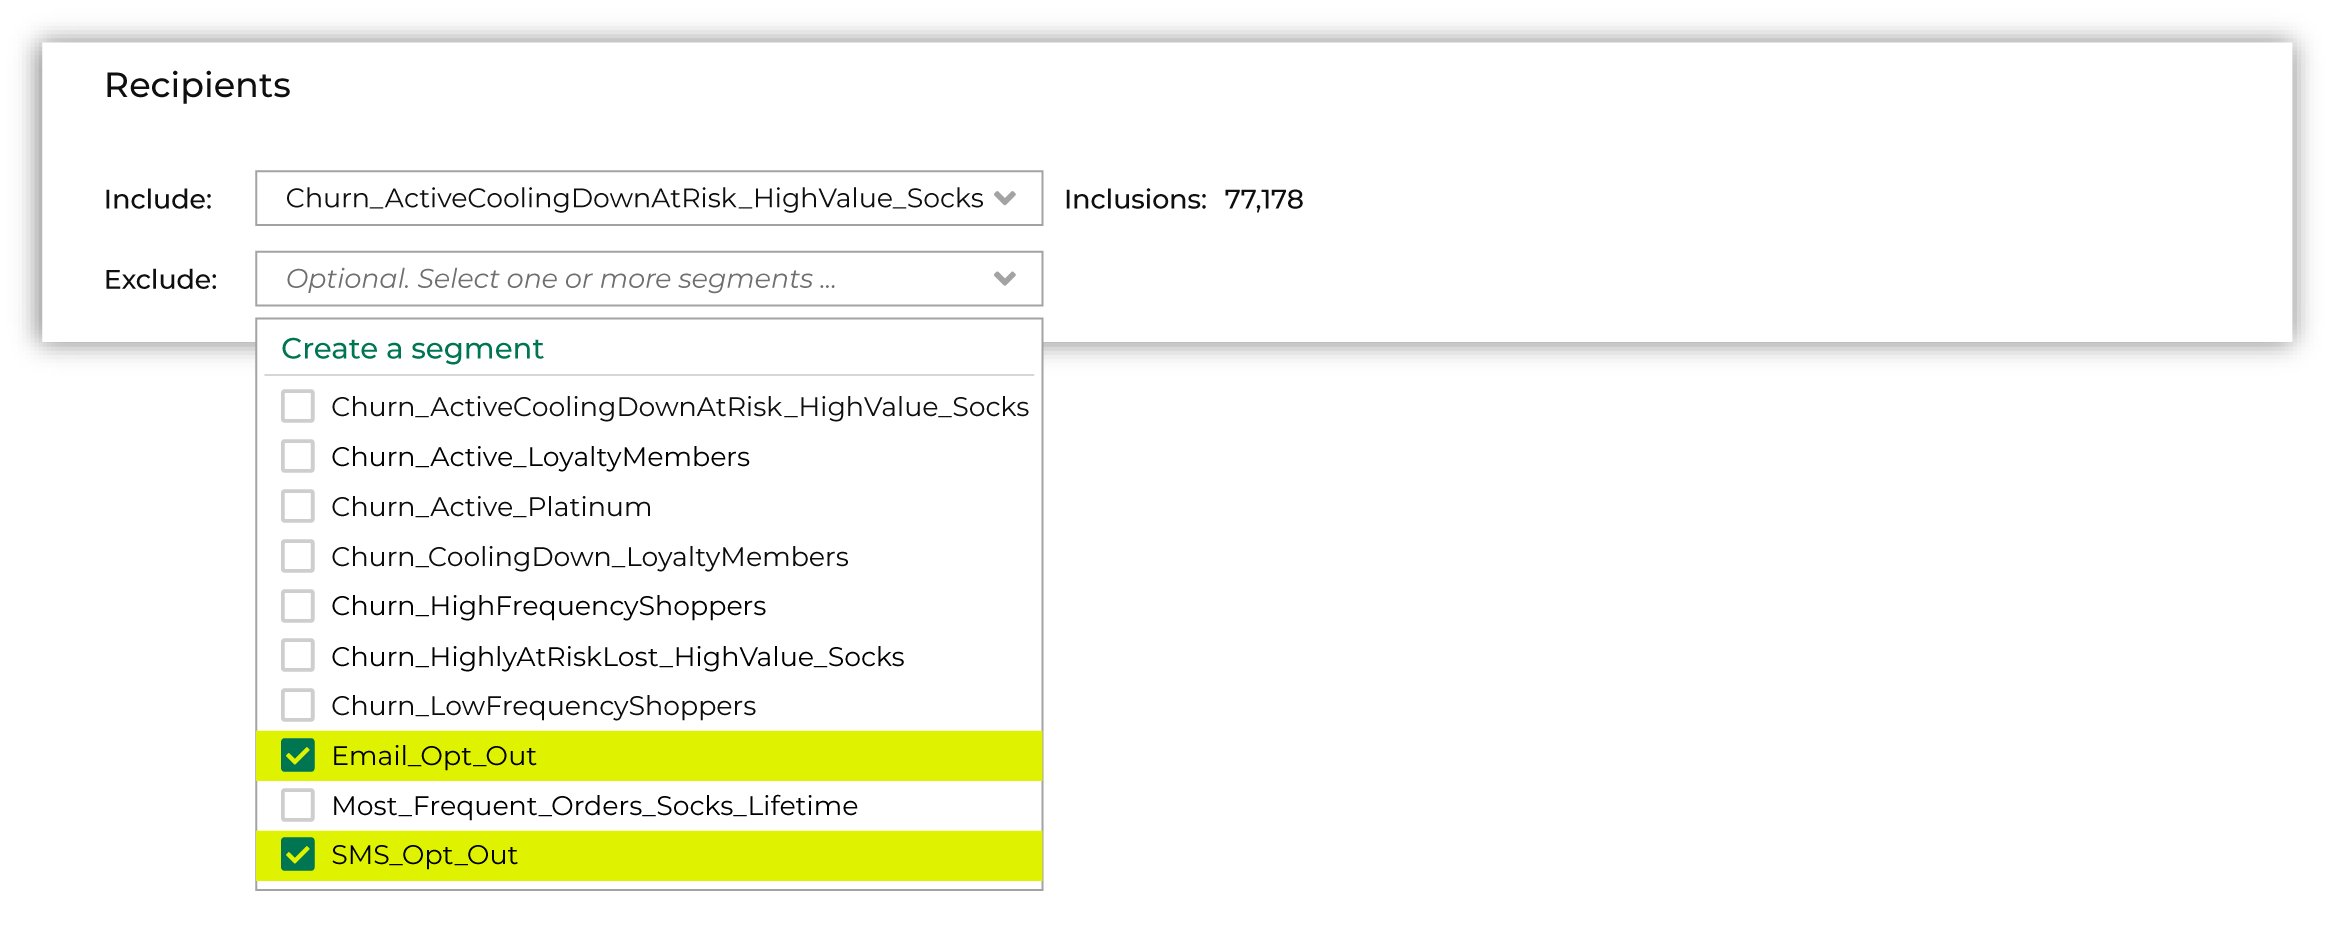
|

|
Some campaigns have just one audience, while others require sub-audiences. Sub-audiences can be many things. How you choose to configure them is dependent on your audience, marketing strategy and goals, and the type of campaign. Use sub-audiences to split the combined high-value audience into more specific audiences by lifecycle status. Click Add sub-audience to open the Audience Builder, find the Predicted CLV Attributes table, choose the Predicted Lifecycle Status attribute, and then select “Active”. 
Then update the name of the treatment group. In this example, it is “Active_Socks”. This is part of the filename that you will see in the application to which you send this sub-audience. For example: “Churn_HighValue_Early_Active_Socks”. 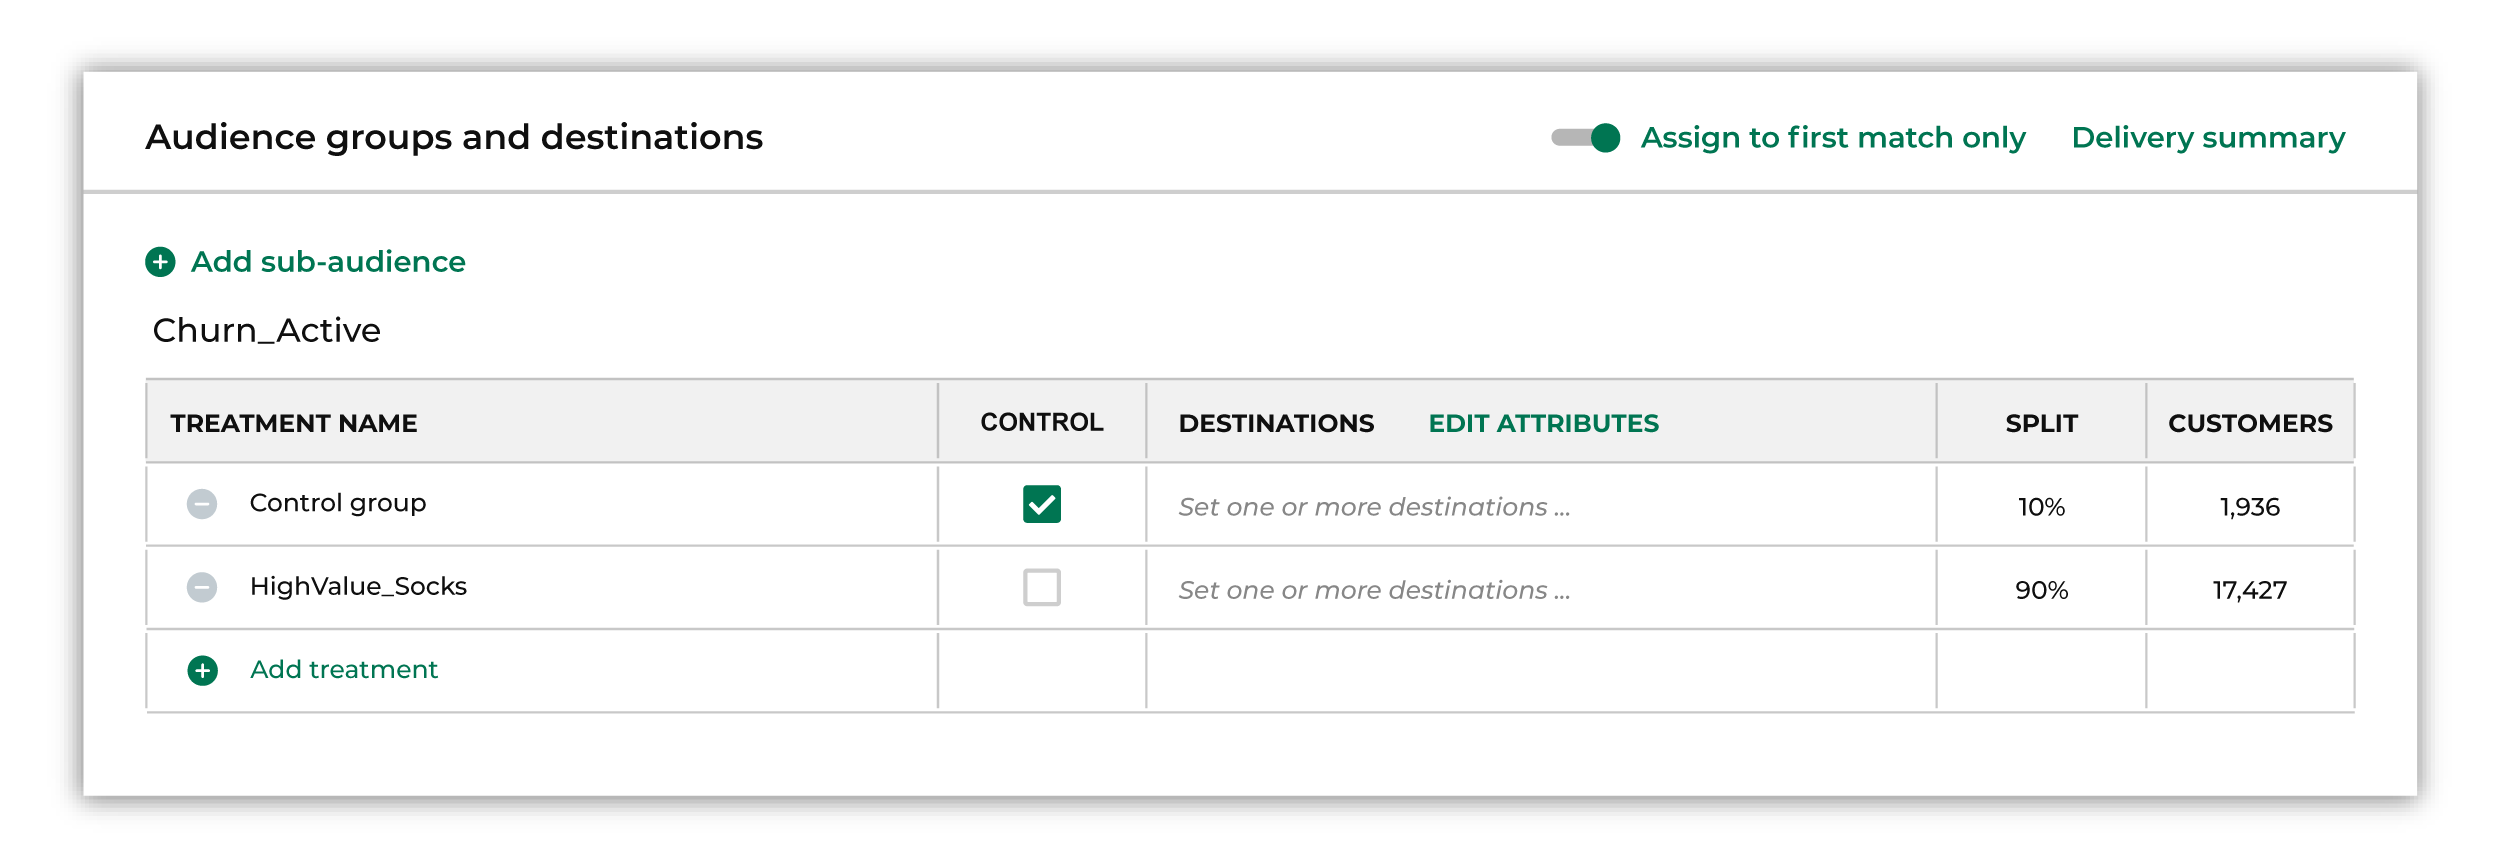
Assign one or more destinations to this treatment group, and then edit the attributes to ensure Amperity is sending the right data. Tip Use good naming patterns to ensure that you can always find your campaigns in the various applications to which you sends them. The campaign name will always appear in the filename that is sent to any destination and the treatment group name is often appended. Use a naming pattern that allows the treatment group name to build on the campaign name. Avoid duplication between campaign and treatment group names. Avoid using the names of destinations as treatment group names unless the treatment group is sent to only that destination. If brand names or region names are specific to sub-audiences, consider using the brand names within the treatment group names. Add details like “historical”, “daily”, or “test” as appropriate. Be sure to include the region name if you have many regions. Some examples:
The campaign and treatment group names are concatenated, typically as {{ campaign_name }}_{{ recipient_group_name }}. The campaign and treatment group names become part of the filename that is visible to users in the application to which you send this treatment group. |

|
The second sub-audience is similar to the first one, but instead choose the “Cooling down” value from Predicted Lifecycle Status. 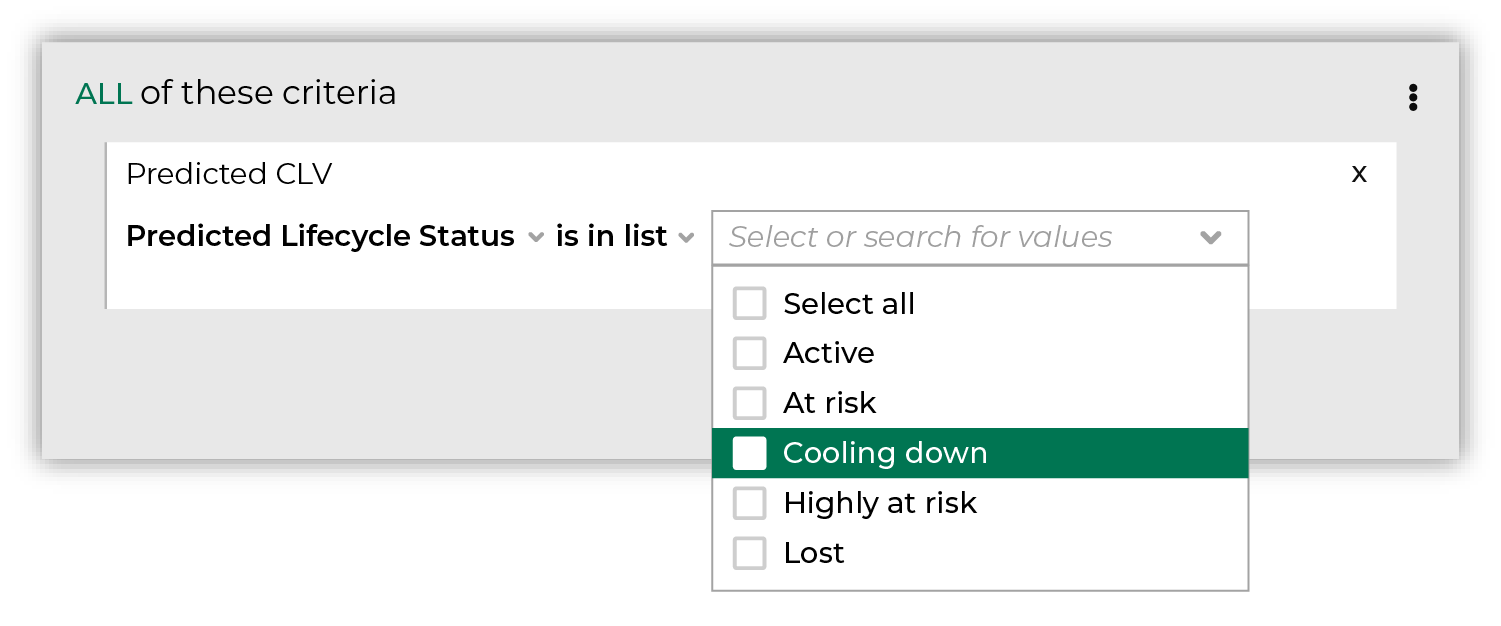
Then update the name of the treatment group. In this example, it is “CoolingDown_Socks”. This is part of the filename that you will see in the application to which you send this sub-audience. For example: “Churn_HighValue_Early_CoolingDown_Socks”. 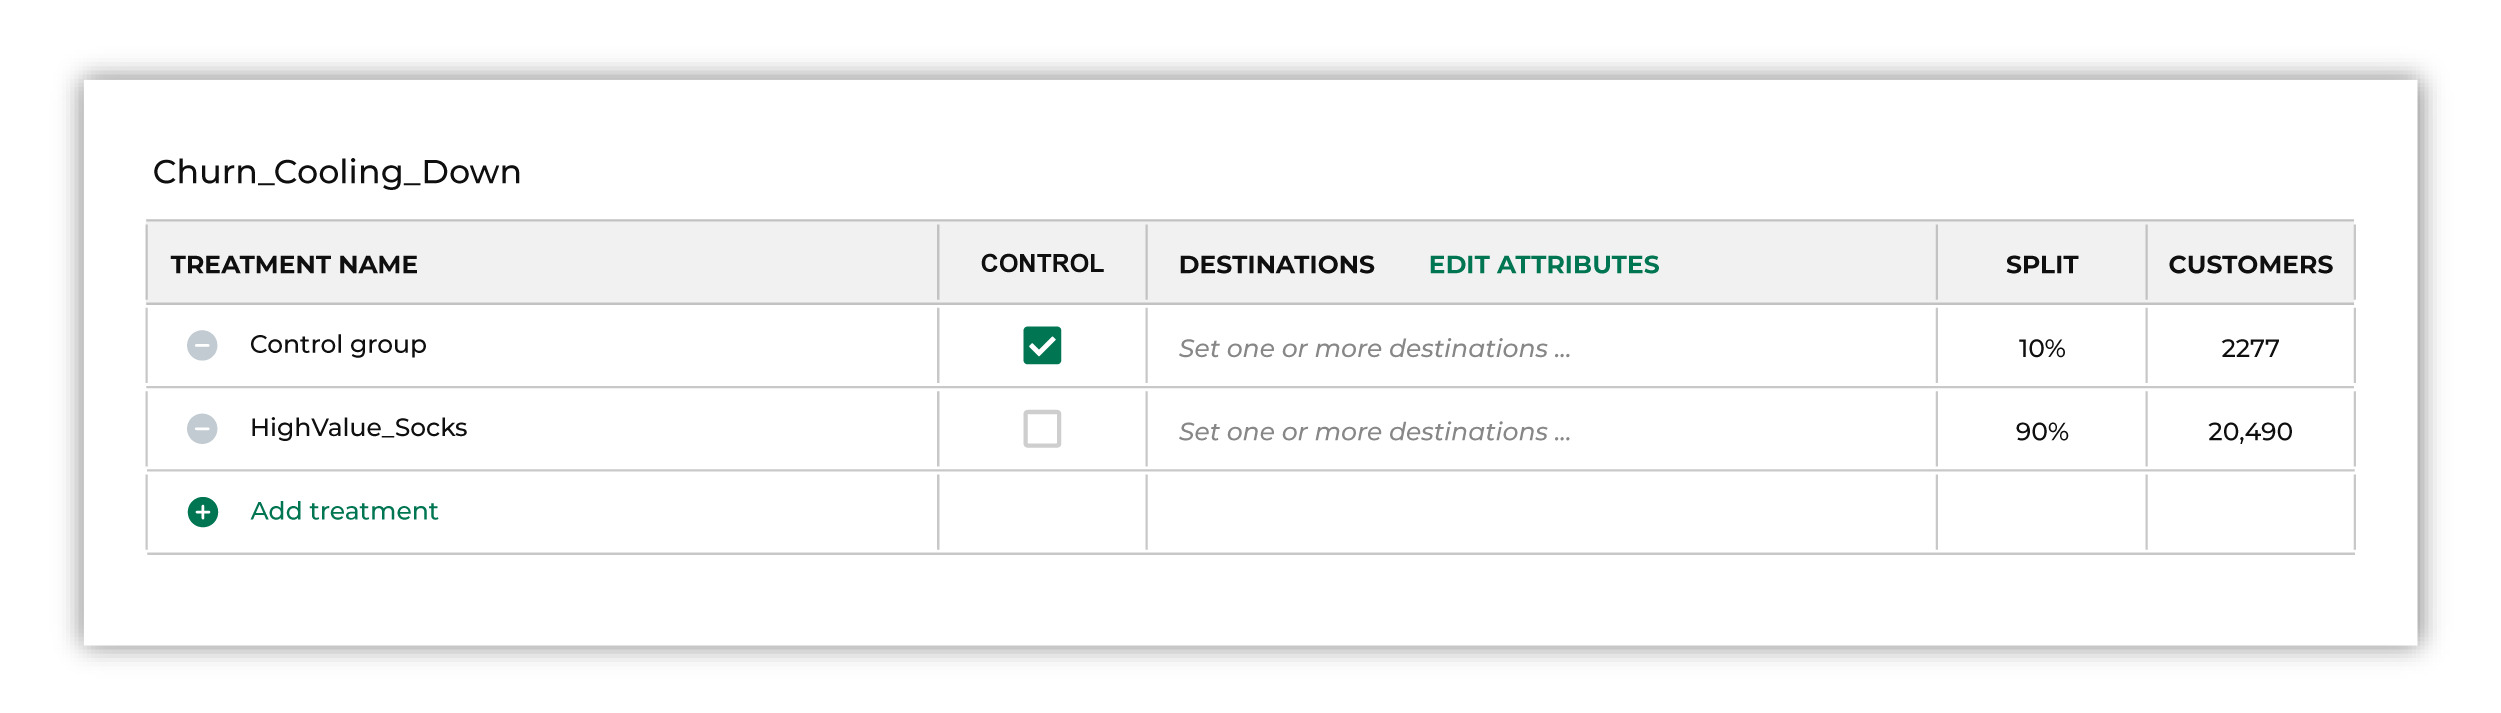
|

|
The third sub-audience is similar to the previous two, but instead choose the “At risk” value from Predicted Lifecycle Status. 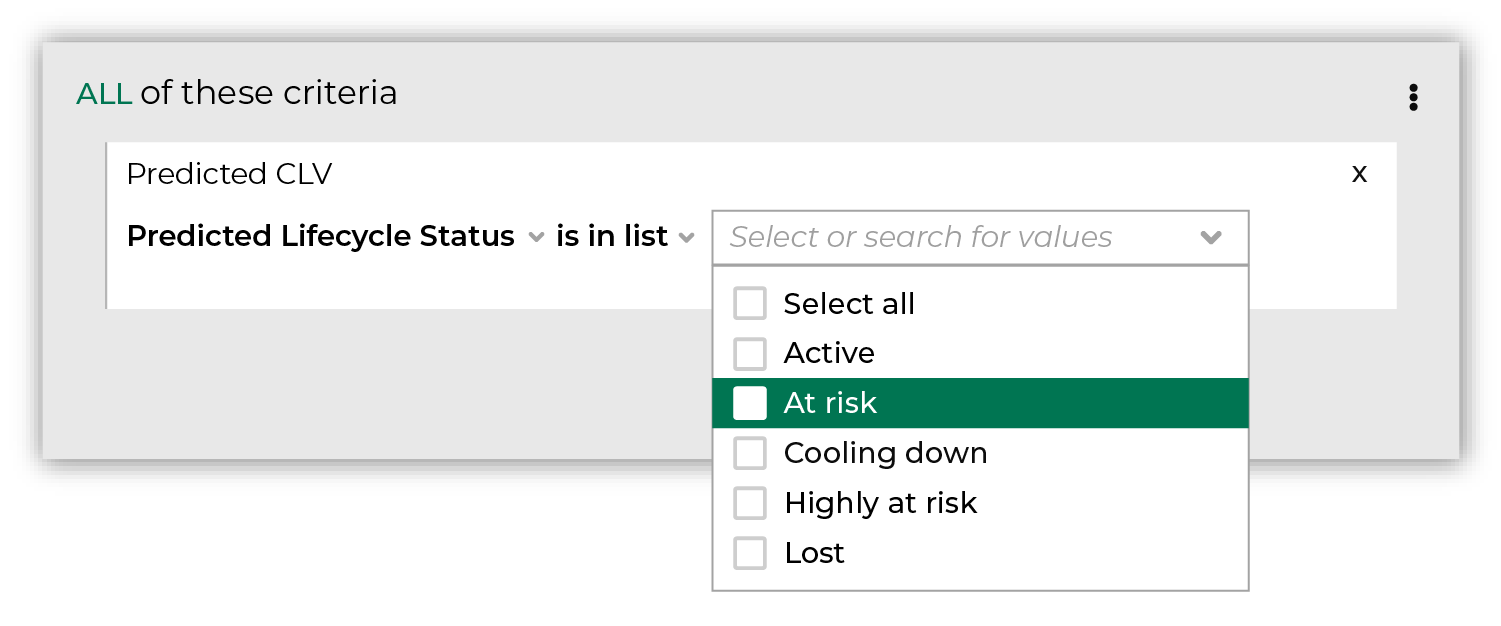
Then update the name of the treatment group. In this example, it is “AtRisk_Socks”. This is part of the filename that you will see in the application to which you send this sub-audience. For example: “Churn_HighValue_Early_AtRisk_Socks”. 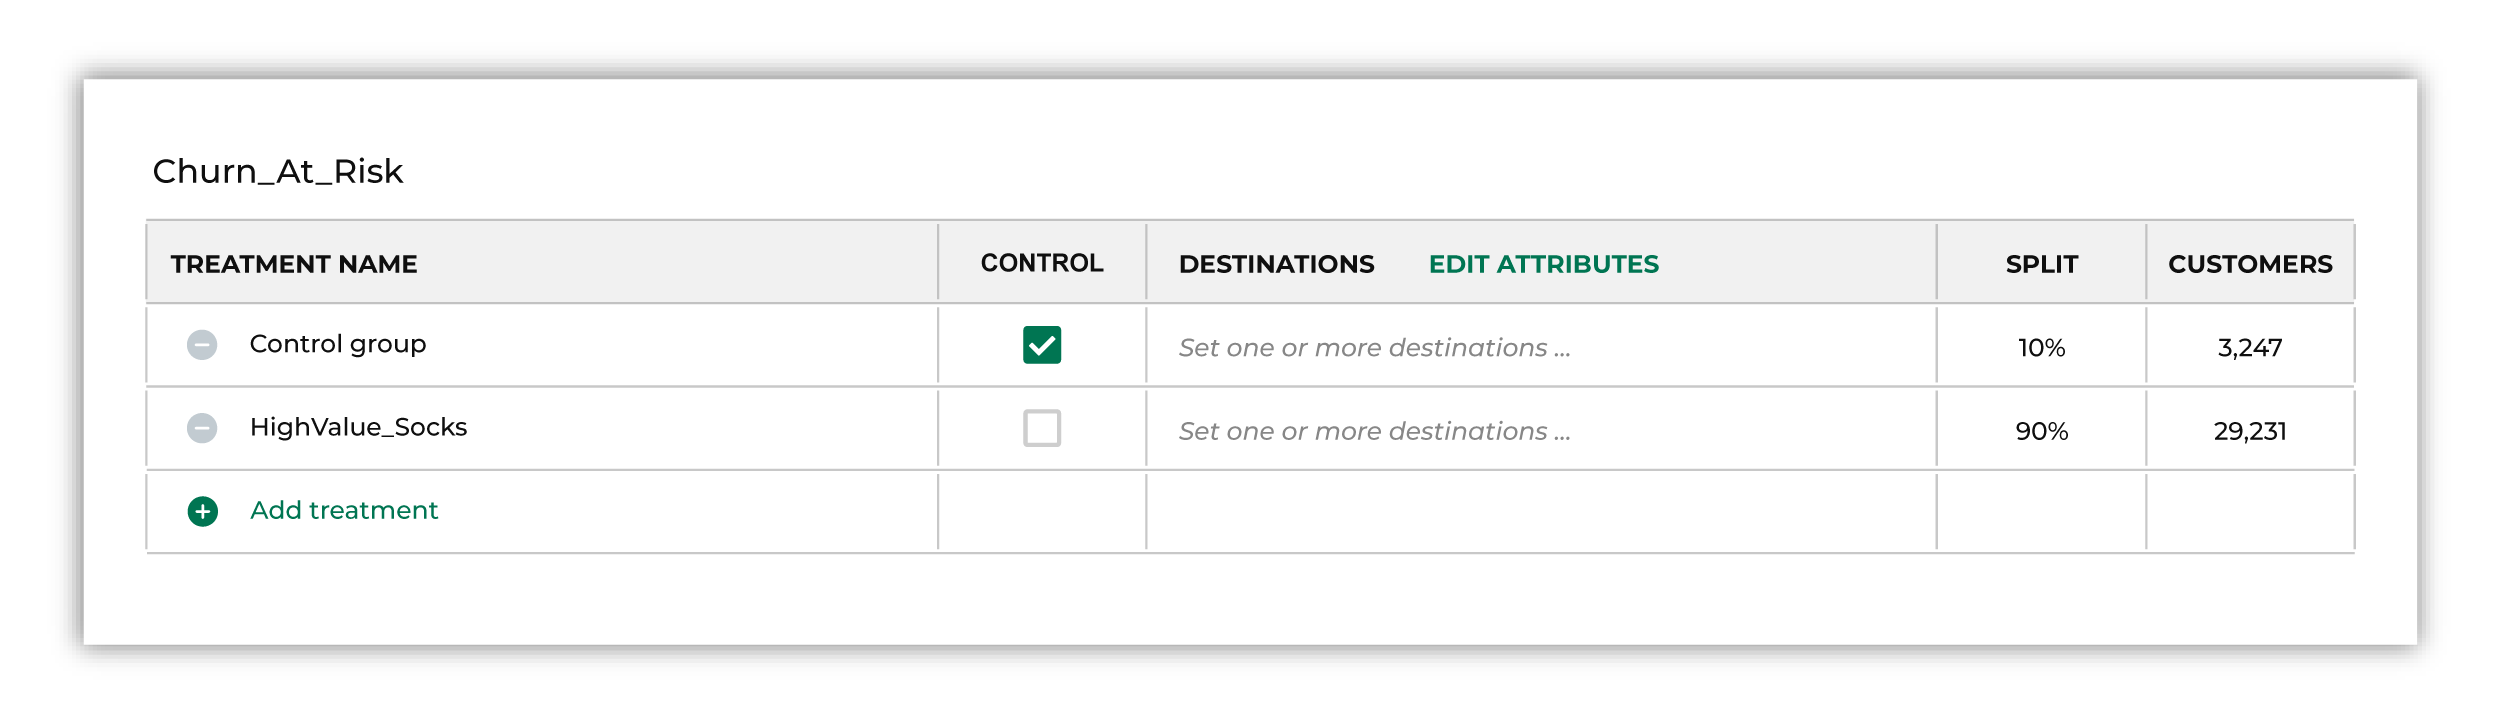
|

|
A campaign can be configured to be sent once or on a recurring basis. A campaign can be scheduled to send as soon as possible or at a time in the future. 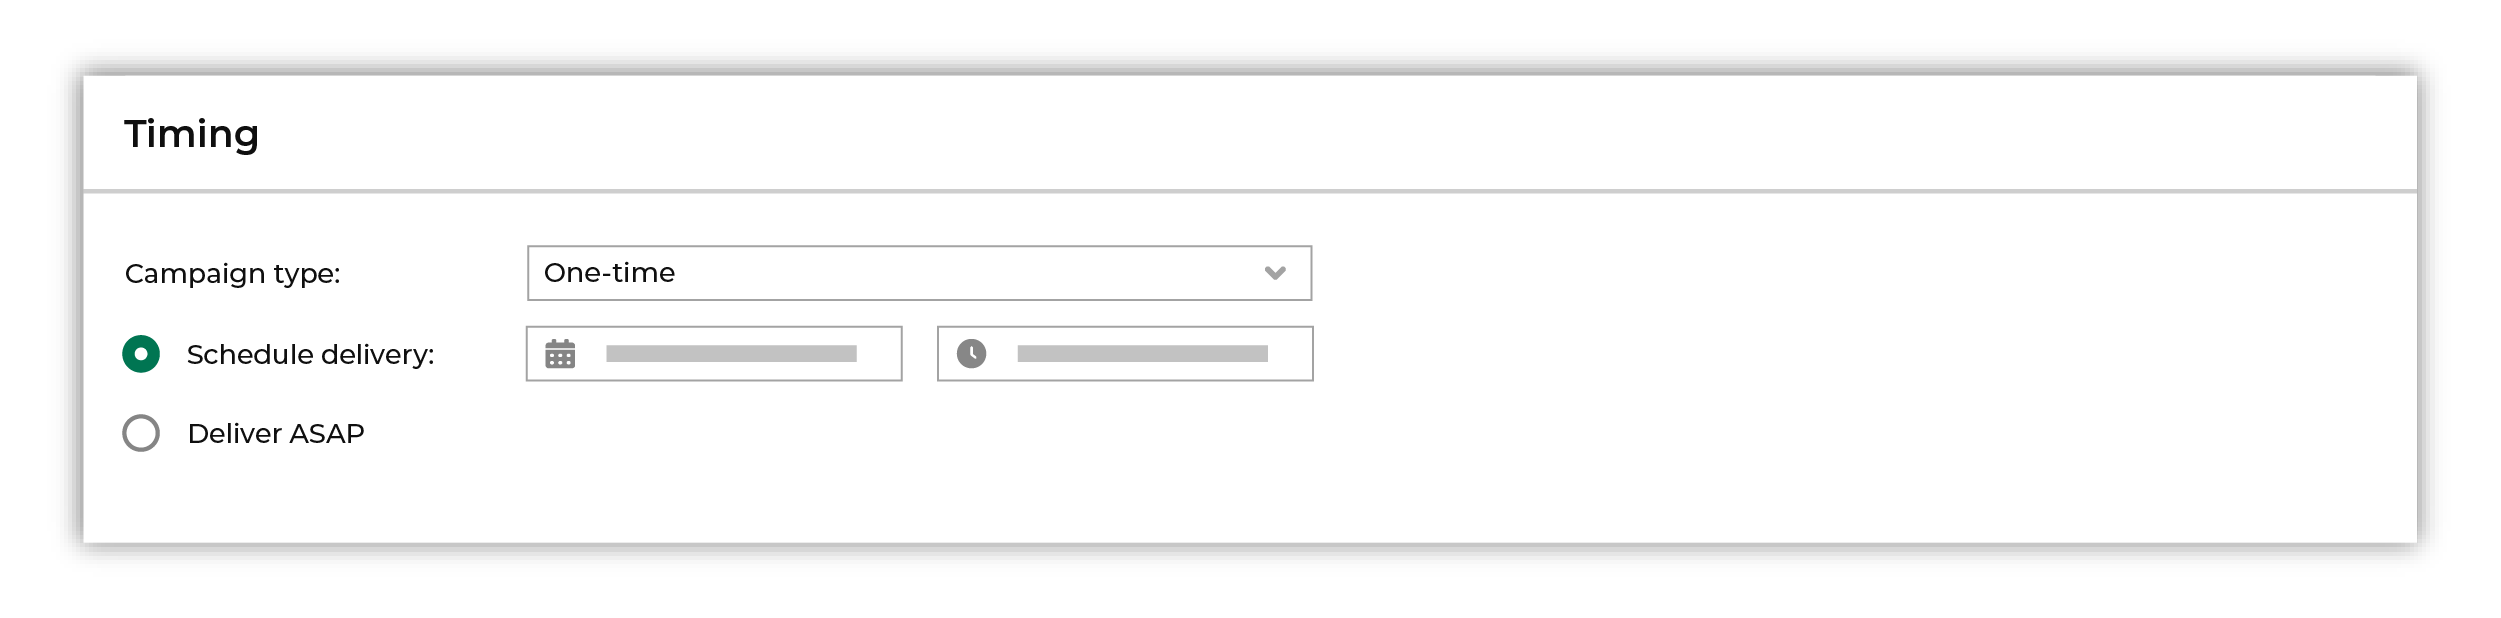
|

|
Enter the date on which you plan to launch your campaign. This date helps Amperity improve results tracking and campaign results measurement. 
How soon will audiences be available downstream? Amperity sends audiences to marketing applications that are configured for a campaign. Some marketing applications analyze the audiences, make optimizations, or build lookalike audiences, after which they are made available for marketing activities. Campaign launch timing should allow for the amount of time it takes for the audience to become available for marketing activity in the marketing application to which the audience was sent. This length of time can vary. Cloud storage solutions, such as Amazon S3, Azure Blob Storage, Google Cloud Storage, and many SFTP sites is often the fastest and audiences are available within 1 hour of delivery. Email service providers and other marketing automation platforms, such as ActiveCampaign, Braze, HubSpot, Klaviyo, and Salesforce Marketing Cloud should allow for 12-24 hours. Paid media platforms, such as Amazon Ads, Google Ads, Meta Ads Manager, The Trade Desk, Reddit Ads, Snapchat, and TikTok Ads Manager often require 24-48 hours. Campaigns can be configured to be refreshed as part of any scheduled workflow that is configured in Amperity. |

|
Activation activity is enabled by default for every campaign and keeps track of the activation states for customers who were activated by the campaign, including by sub-audience or treatment, by destination, how often and when. Click the Campaign test link in the top of the Campaign Editor to open the Campaign tests dialog box. Configure the number of records to use with the test, and then click Run test. This runs the campaign exactly the same as if it were run in a production workflow. A sample file is output that shows what the results of this campaign will look like downstream. When your campaign is ready, click the Schedule button in the top right corner of the Campaigns page. |
Campaign types
Amperity supports the following types of campaign workflows:
One-time campaigns
A one-time campaign represents a specific campaign message sent only once.
A one-time campaign can be configured to run in a similar manner as a recurring campaign, but with the purpose being to communicate messages to customers they should see only once. For example:
A welcome message to a customer who has joined a loyalty program.
A message to a customer who has signed up for a credit card.
Recurring campaigns
A recurring campaign automatically sends an updated or refreshed audience with a predefined campaign message and cadence for a list of recipients. For example, a state change, an accepted return, a change to loyalty status, or an alert based on credit card status.
A recurring campaign has the following components:
A state change that initiates a campaign message.
A segment that defines a list of customers to which the campaign message applies. This segment can be configured to limit the list to certain types of users, such as only business travelers or high-value customers.
A launch cadence that defines the frequency–daily, weekly, monthly, quarterly–at which the campaign messages are run.
Multichannel campaigns
A multichannel marketing campaign blends marketing strategies across channels like email, SMS, and paid media to offer customers a personalized experience, but with consistent messages, offers, and products across all channels.
A multichannel campaign defines combinations of sub-audiences and channels to define unique sets strategies, with each applied to a sub-audience.
A multichannel campaign has the following components:
A state change that initiates a campaign message.
A segment that defines the audience to which the multichannel campaign messages will be applied. This segment can be configured to limit the list to certain types of users, such as only business travelers or high-value customers.
The use of sub-audiences to partition the audience into a variety of campaign channels. Each sub-audience may be configured to have its own control group.
A launch cadence that defines the frequency–daily, weekly, monthly, quarterly–at which the campaign messages are run.
Campaign features
Campaigns have the following features:
Audience attributes
For many destinations for customer activation, you may configure the list of attributes, such as first name, last name, and state, that are sent for each sub-audience. Click the Edit attributes link to open the list of attributes that are available for each destination defined for the audience. Use the dropdown menu to select the destination if there is more than one.
Important
Some destinations only support sending specific attributes. Review the requirements for each destination to ensure that you do not attach unsupported attributes to the campaigns that you send.
You may append attributes that are available in any database table. Click the + Add attribute link, and then name the attribute, specify from which table that attribute is sourced, and then specify the name of that attribute as it is defined in that table.
Audiences
All campaigns start with an audience. Choose a segment from the Include dropdown list. The customers in that list will become the audience for this campaign.
Tip
When a campaign starts with an audience that is defined by a single segment, you can use the segment insights for that segment as a way to measure the performance of that audience over time.
Control groups
A control group is the percentage of an audience who do not receive communications related to a marketing campaign. Use control groups to establish a baseline against which you can measure the success of a campaign over time.
Note
A control group is a randomized sample of customers that is pulled from the original audience.
A campaign typically has a single control group, unless sub-audiences are defined within the campaign. Each sub-audience may have a control group.
Does a control group have consistent audience membership?
Amperity attempts to maintain (but does not guarantee) consistent audience membership for control groups that are associated with recurring campaigns.
When the audience size is unchanged across the campaigns that you send, the membership of the control group will be unchanged.
When the audience size changes, the size of the control group also changes. Amperity IDs are added to the control group when the audience size gets bigger and are removed when the audience size gets smaller.
Audience members that are added to a control group may have belonged to a treatment group on the previous send.
Audience members that are removed from the control group belong to a treatment group on the next send.
For example: A campaign is built using one segment, one control group, and one treatment group. The audience is refreshed weekly and has a static group of customers, but with small fluctuations in audience size.
Today the size of the audience for the segment is 1200 customers and the size of the control group is 20 percent, or 240 customers. The campaign is sent to 960 customers.
Next week the size of the audience is 1240, which means the size of the control group will be larger (248). The campaign is sent to 992 customers.
The following week the size of the audience is 1160, which means the size of the control group will be smaller (232). The campaign is sent to 928 customers.
What if a control group consistently has zero members?
When small audiences are configured with control group percentages below 10% it is possible for a control groups to have zero members. For small audiences that consistently see zero, or an unusual low percentage, adjust the size of the control group closer to 10%.
Default attributes
Default attributes are applied automatically when a destination is selected within a campaign.
Each default attribute is associated with a database and an activation ID. The list of tables from which attributes may be selected is filtered to match only those tables with a matching activation ID.
Configure default attributes for each combination of destination + activation ID that is used with campaigns. For example, configure default attributes for each of the following combinations:
Send to Braze from the C360 database for Loyalty ID.
Send to Braze from the C360 database for Customer ID.
Send to Meta Ads Manager from the C360 database for Customer ID. Map the Customer ID field to EXTERN_ID.
Send to The Trade Desk from the C360 database for email, which is sent as a UID2 token from Amperity.
To configure default attributes
Open the Activations page and select the Campaigns tab.
Click Settings.
On the Default attributes tab, click Add default attributes. This opens the Configure attributes dialog.
Under Configure attributes do the following:
Select a destination from the Destination dropdown.
Select a database from the Databases dropdown.
Select a configured activation ID from the Activation ID dropdown.
Under Default attributes click Add attribute. Select a table, and then choose an attribute.
After all default attributes are configured click Save.
Destinations
Destinations are the locations to which you sends the lists of customers that are associated with each treatment group within a sub-audience. You may send these lists to any destination that is configured for your tenant. You may send the same list to many destinations.
|
|
Add destinations to your campaign. This is done from within the campaign builder for each treatment group that is part of a sub-audience. You can assign more than one destination to each treatment group. The following sections show adding destinations for each of the “active”, “cooling down”, and “at risk” sub-audiences within the campaign. |
|
|
A specific set of journeys and messaging creatives are built out and are tailored for customers who fall into the “active” lifecycle status. “Active” customers is sent to the following channels:
Click the Destinations column, and then select a destination from the list. 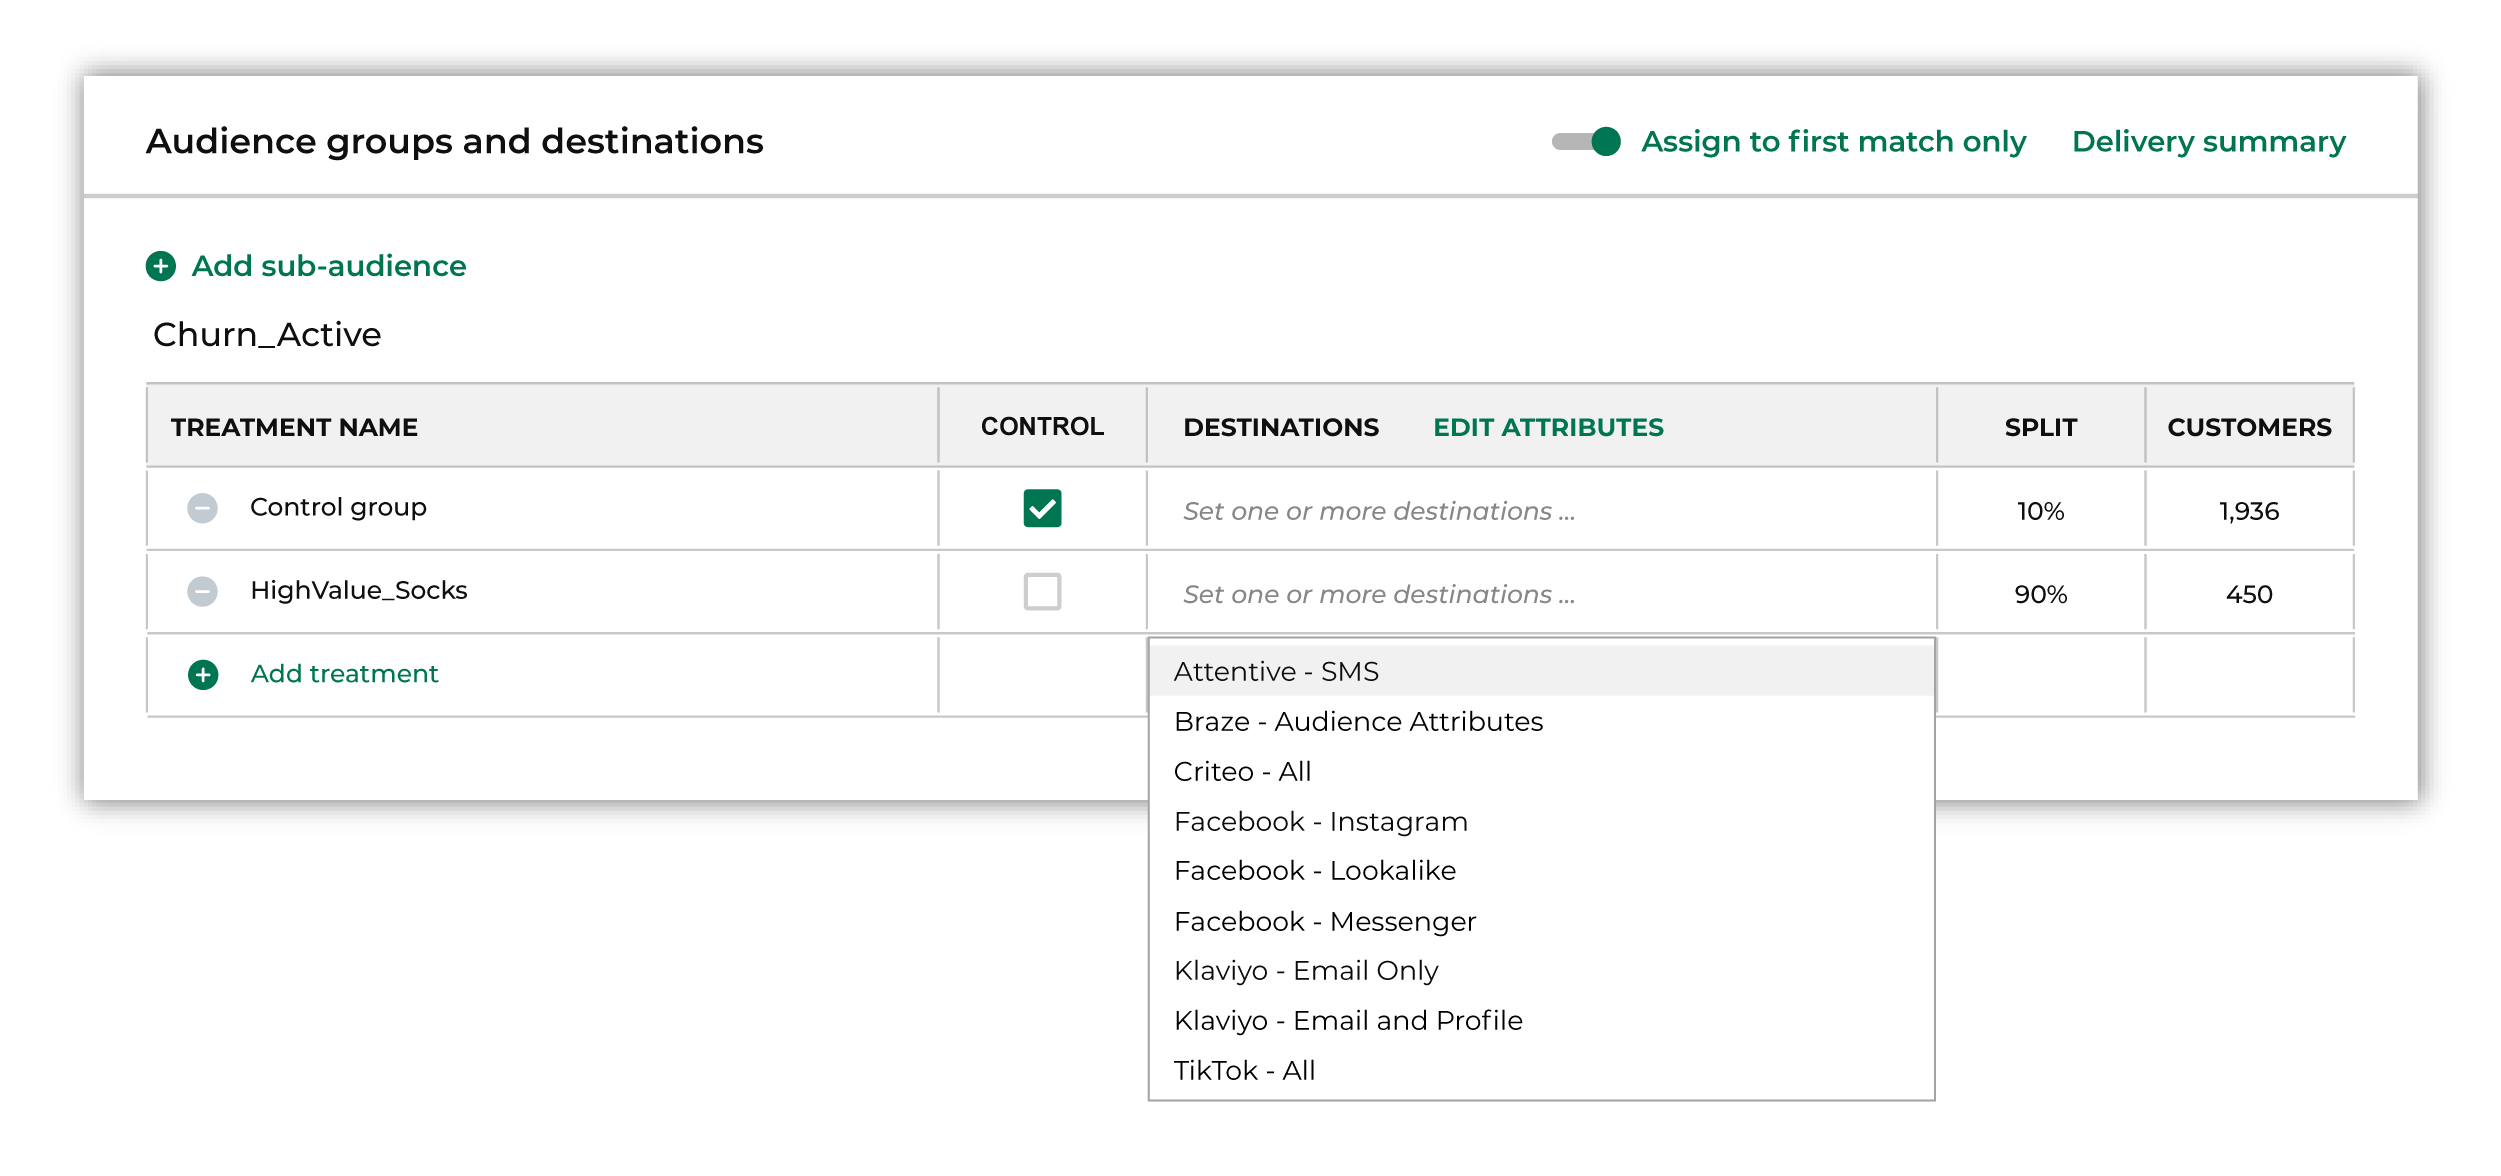
Do this for each destination to which you want to send this treatment group. 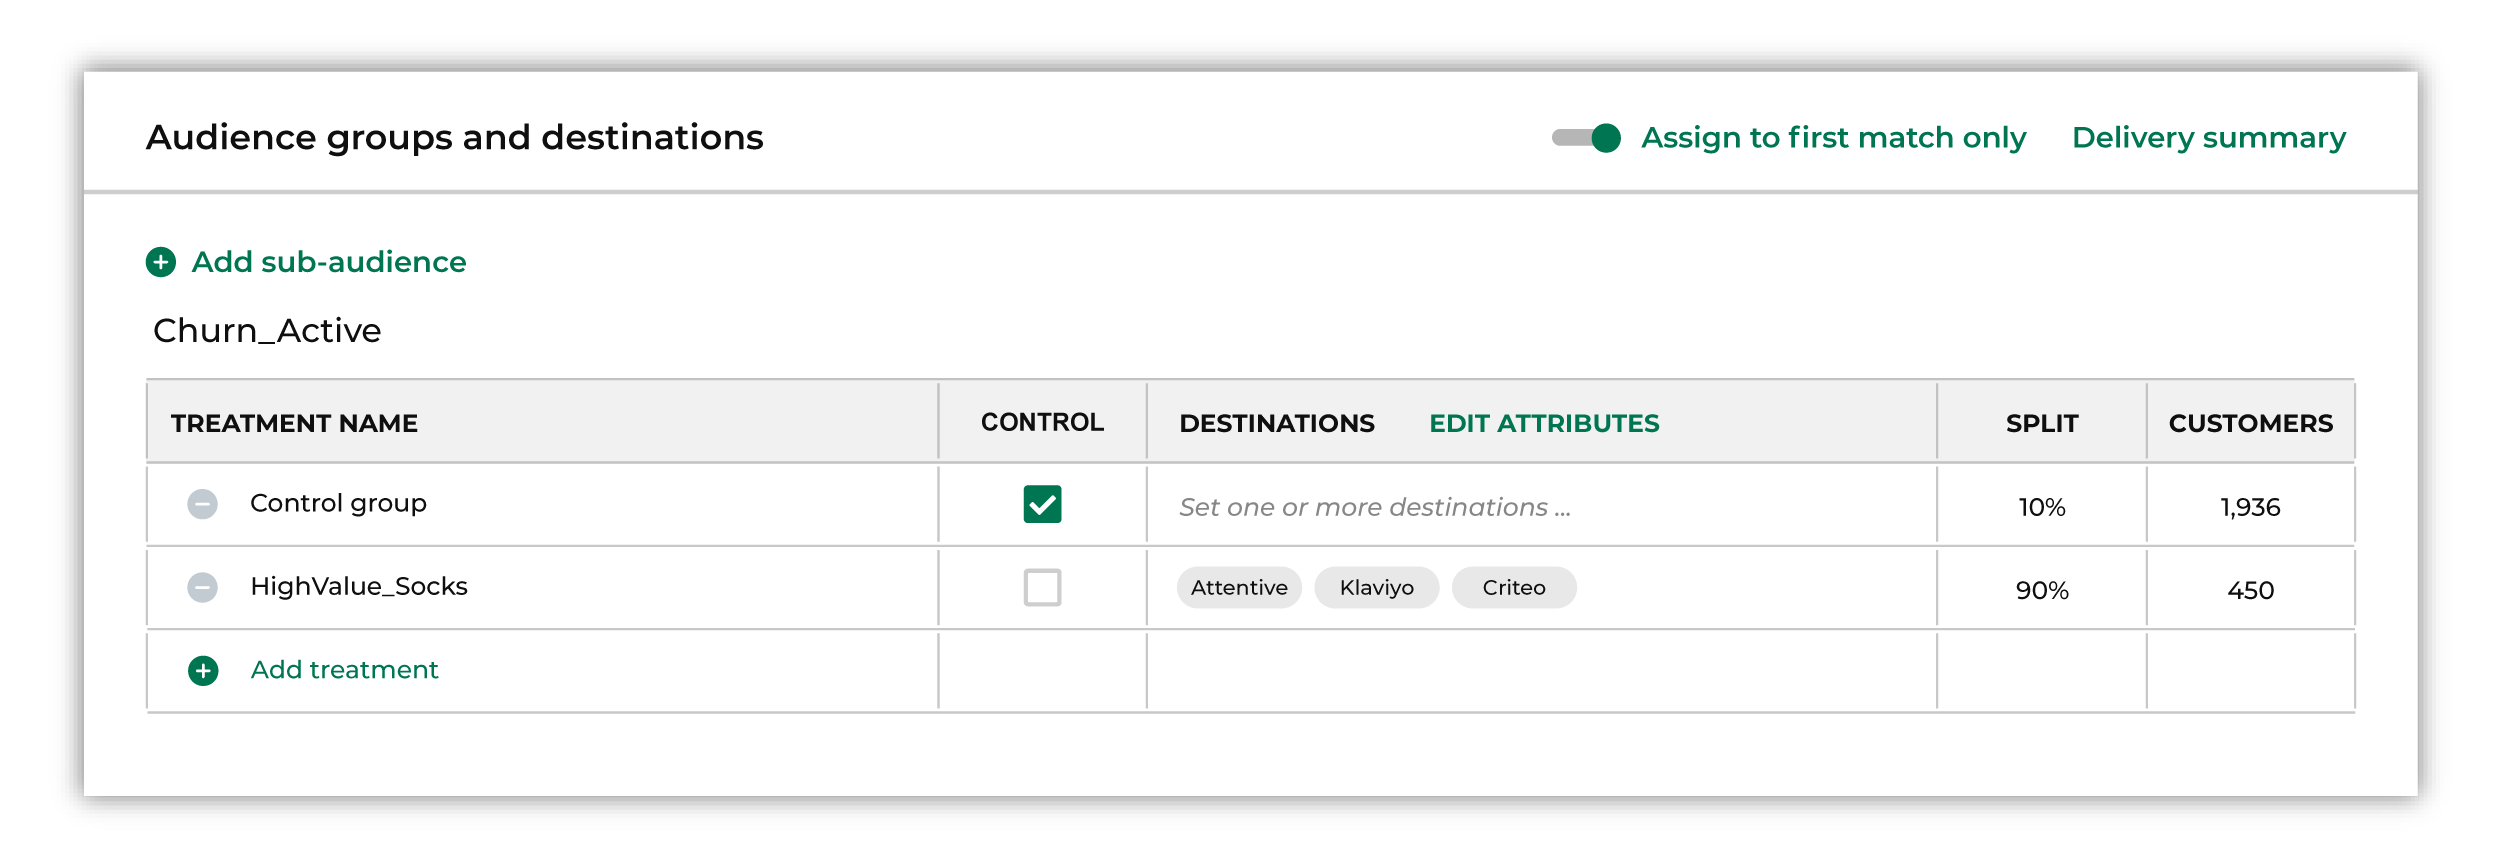
|
|
|
“Cooling down” customers are sent to the same channels as “active” customers, but journeys and messaging creatives will be tailored to the “cooling down” lifecycle status. Click the Destinations column, and then select a destination from the list. Do this for each destination to which you want to send this treatment group. 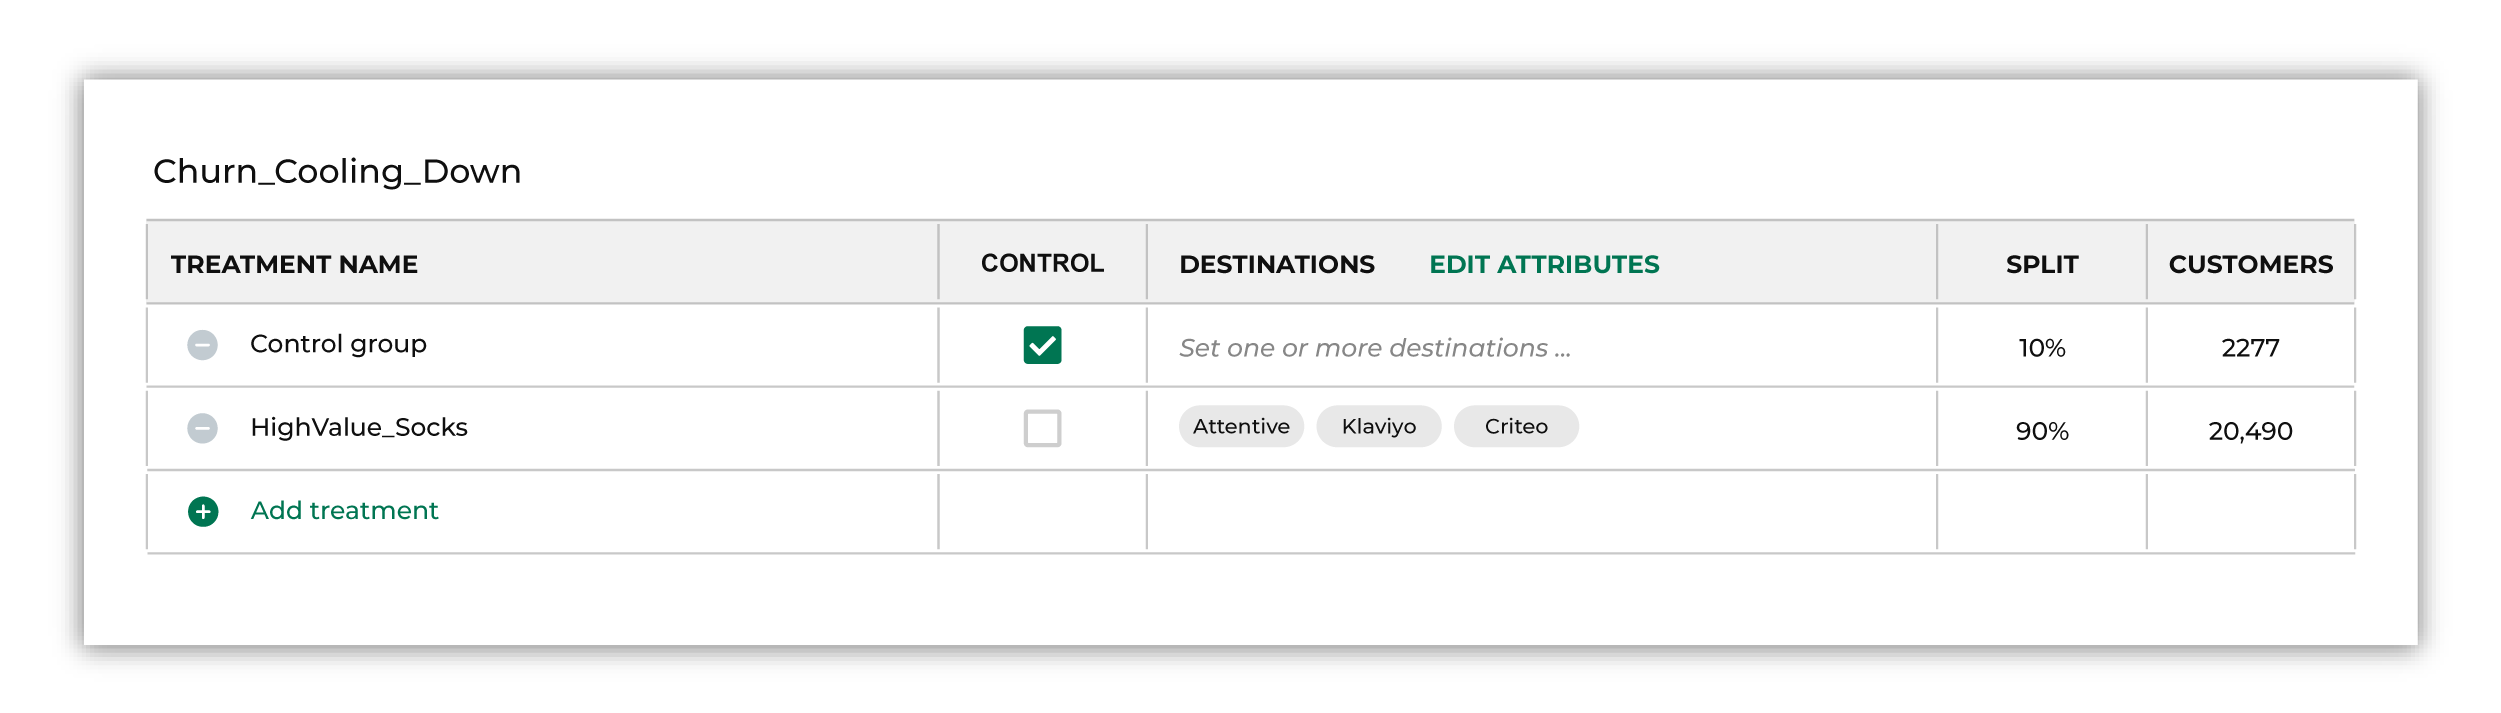
|
|
|
“At risk” high-value customers are sent to the same channels as “active” and “cooling down” customers and also to TikTok and Facebook. Journeys and messaging creatives will be tailored to the “at risk” lifecycle status, along with new channels for display advertising creatives that are tailored to customers who fall into the “at risk” lifecycle status. Click the Destinations column, and then select a destination from the list. Do this for each destination to which you want to send this treatment group. 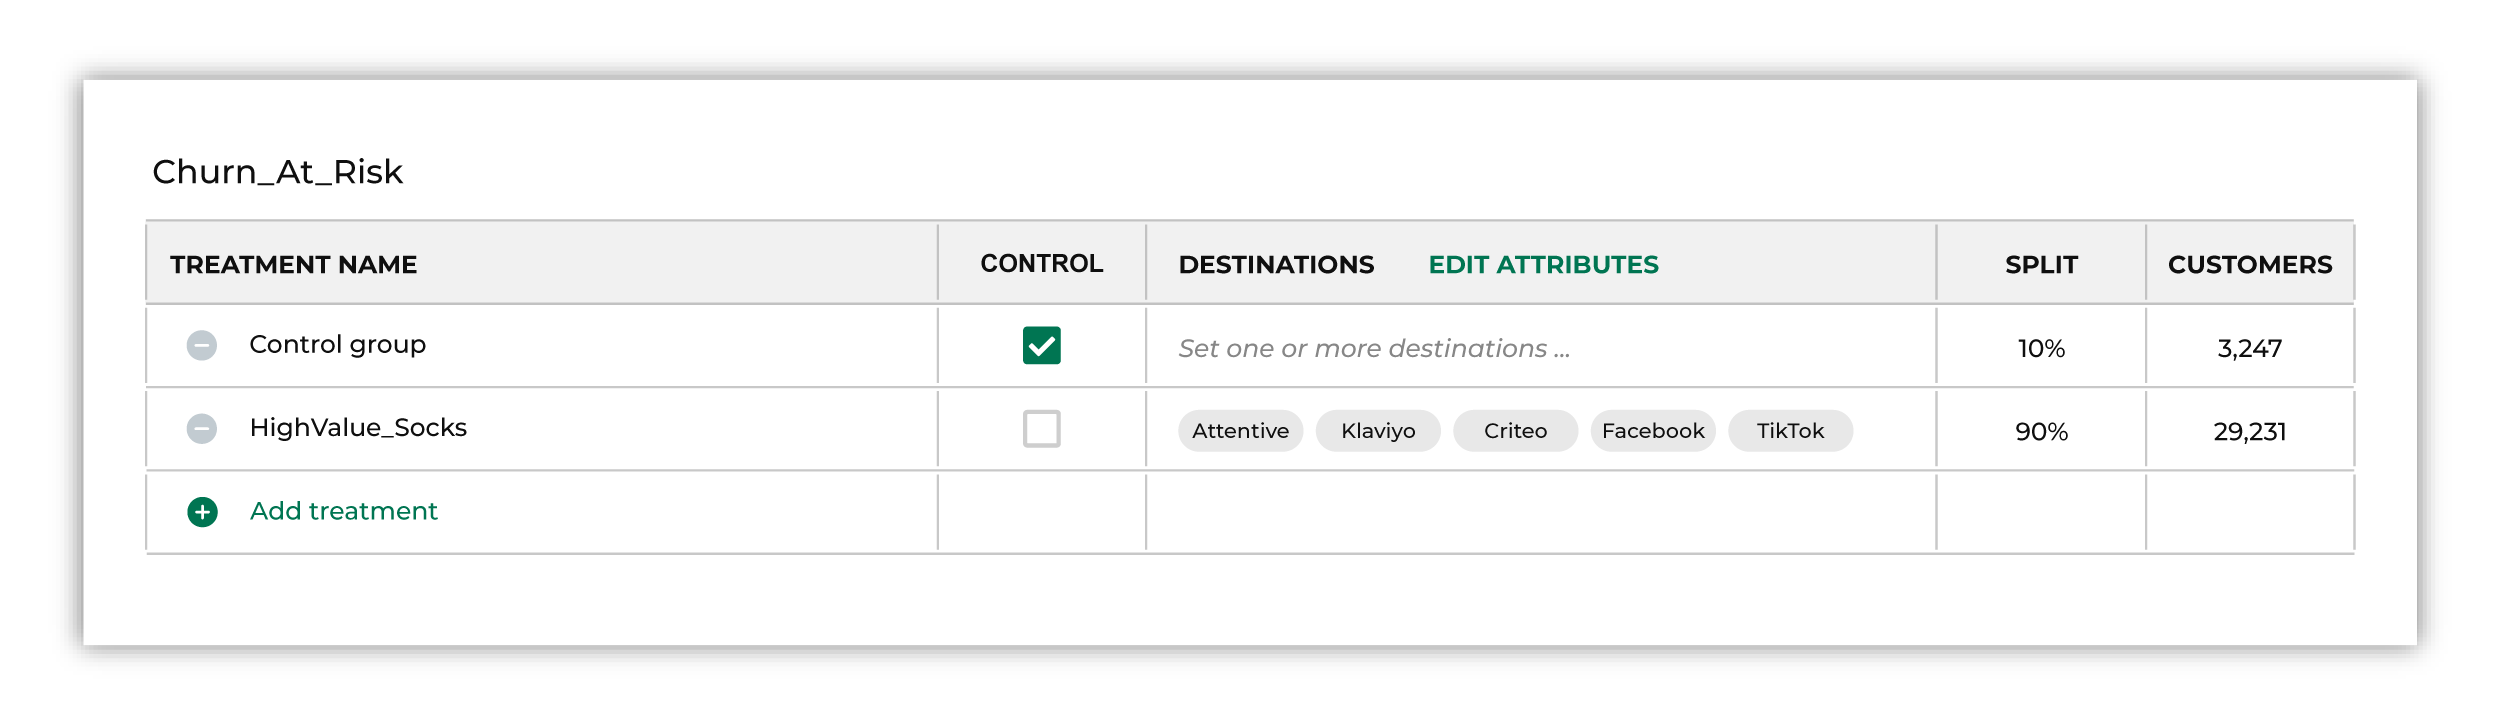
|
|
|
Each sub-audience that is configured for your campaign have at least one destination associated with it. For each destination that is configured you must specify the set of attributes that is sent from Amperity to that destination. Click the Edit Attributes link to open the attributes editor. From the dropdown select each of the destinations that has been configured for this sub-audience, and then select which attributes is sent to that destination. For example, if you are sending a treatment group to Attentive to support an SMS-based marketing campaign, you need to send a list of phone numbers from Amperity to Attentive. 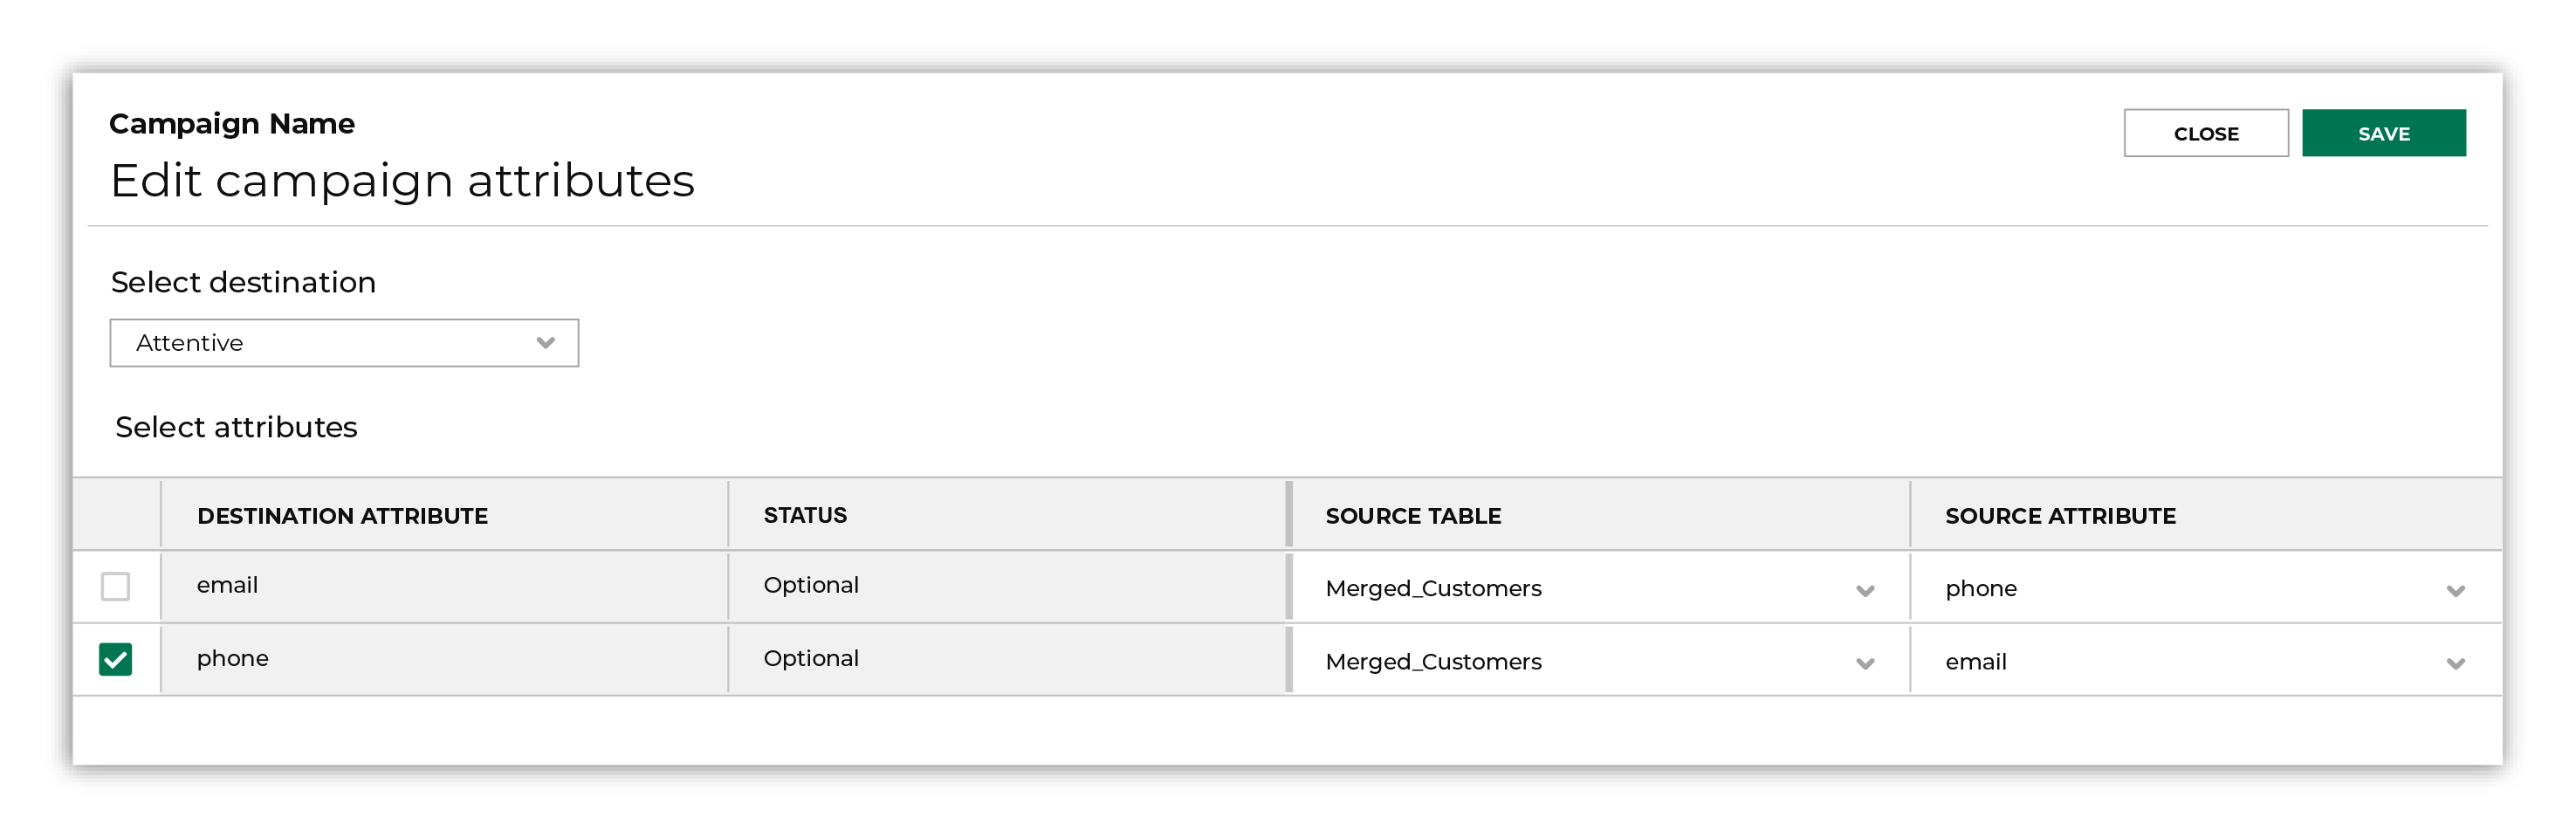
Enable the checkbox next to the phone attribute, and then leave the rest of the settings as they are. Why are both email and phone optional? Attentive requires that you send only one of those values and the value that you should select is the one that your organization is using within Attentive to build customer journeys and support your marketing campaigns. Tip You should use the Merged Customers table for sending customer PII data from Amperity. The Merged Customers table is your best source table and has the most accurate set of customer PII. Your Customer 360 table is built from the Merged Customers table. |
|
|
The attributes that are available from the Edit Attributes window varies, depending on the destination. Some destinations have strict naming requirements. Some destinations only allow specific fields to be sent. Some destinations allow only one or two attributes, whereas others have few restrictions. For example:
|
Exclusion lists
An exclusion list identifies customers who should not receive communications related to a campaign.
Sometimes campaigns need to exclude certain members of your audience. For example, a churn prevention campaign is often configured to exclude customers who have opted-out of SMS messaging or who have unsubscribed from an email list.
When you need to exclude audience members, choose one or more segments from the Exclude dropdown list. The customers in an exclusion list will be removed from the audience for this campaign.
Note
When you select many exclusion lists, audience members will be excluded when they belong to either list. This is the same behavior as when the OR operator is used in SQL. “Exclude customers from this audience when they belong to segment A OR segment B.”
Treatment groups
A treatment group is the percentage of an audience who receives communications related to a marketing campaign. A campaign may have more than one treatment group.
You may configure more than one treatment group for each audience and sub-audience within a campaign.
Note
Naming a treatment group with an underscore (_) as the first character will cause the campaign to fail.
Sub-audiences
A sub-audience is a list of customers who receive a specific communication related to a marketing campaign.
A sub-audience may define users by brand, most commonly purchased sub-brand, product affinity, product category, product type, or demographics.
Note
The limit for number of sub-audiences per campaign is 60.
Timing and launch dates
A campaign can be configured to be delivered once or on a recurring basis. The campaign delivery date is the time at which an audience is sent to configured destinations. A campaign can be scheduled to be sent at the time in the future be sent as soon as possible.
Enter the date on which you plan to launch your campaign. The campaign launch date represents the time at which the audience is expected to be available for marketing activity in the downstream marketing application. This date is used by Amperity for results tracking and campaign results measurement.
How soon will audiences be available downstream?
Amperity sends audiences to marketing applications that are configured for a campaign. Some marketing applications analyze the audiences, make optimizations, or build lookalike audiences, after which they are made available for marketing activities.
Campaign launch timing should allow for the amount of time it takes for the audience to become available for marketing activity in the marketing application to which the audience was sent.
This length of time can vary.
Cloud storage solutions, such as Amazon S3, Azure Blob Storage, Google Cloud Storage, and many SFTP sites is often the fastest and audiences are available within 1 hour of delivery.
Email service providers and other marketing automation platforms, such as ActiveCampaign, Braze, HubSpot, Klaviyo, and Salesforce Marketing Cloud should allow for 12-24 hours.
Paid media platforms, such as Amazon Ads, Google Ads, Meta Ads Manager, The Trade Desk, Reddit Ads, Snapchat, and TikTok Ads Manager often require 24-48 hours.
Campaigns can be configured to be refreshed as part of any scheduled workflow that is configured in Amperity.
Download recipients
Use the download recipients feature to download a list of recipients to view details about recipients in the list, including the Amperity ID and the Treatment ID.
Tip
Downloaded files can enable ad hoc workflows in any downstream tool that supports directly uploading or using CSV files. For example, marketing applications like Airship , Attentive , Bluecore , Braze , Facebook Ads , Iterable , Pinterest, Reddit Ads, and SendGrid all support directly uploading CSV files. Downloaded CSV files can be opened directly in Microsoft Excel and Google Sheets.
Email notifications
Email notifications will alert you when there is an issue with campaign delivery. For example, email notifications are sent when Facebook Ads is missing an external identifier or two-factor authorization is not enabled for Google Ads.
Email notifications will describe the issue and the steps that are required to resolve the issue, and provides a link to the Workflows page in Amperity.
Campaign results
Use campaign results feature to download and view one-time or recurring campaign results data, explore campaign results data, and measure performance.
Use this feature to define a performance measurement time period and then analyze these results for all sub-audience test groups across every single campaign data point. This includes the following data points:
Revenue metrics
Conversion rates
Order characteristics
Incremental lift
Tip
Amperity tracks the purchases of your customers in the audiences lists. The purchase information is based on purchasing behavior across channels.
If you make any changes to this information downstream, such as launching a campaign on a different date then the one you entered into Amperity, they is not reflected in Amperity.
Campaign results columns
You can finds details about the columns found in the campaign results download file in the table below.
Column name |
Data type |
Description |
|---|---|---|
Average Order Value |
Decimal |
The average dollar value per order made by purchasers during the campaign measurement period. Note This metric is calculated by total revenue divided by the recipients count for the specific treatment group or sub-audiences. |
Average Unit Revenue |
Decimal |
The average revenue per item purchased during the campaign measurement period. Note This is calculated as the total revenue divided by the total items. |
Campaign Name |
String |
The name the customer gives the campaign. |
Conversion Rate |
Decimal |
The percentage of unique customers (associated with Amperity IDs) who performed a desired outcome (transaction or other events) during the campaign measurement period. Note This metric indicates the rate of recipients converted to make a purchase as a result of the campaign. |
Conversion Rate Lift (Over Control) |
Decimal |
The percentage difference in conversion rate by the recipients group relative to the control group. Note This is calculated as the difference in the incremental conversion rate divided by the total control recipients. |
Delivery Date |
Datetime |
The delivery date on which campaign treatment groups/sub-audiences were sent out of Amperity. |
Incremental Conversion Rate (Over Control) |
Decimal |
Additional percentage of recipients converted in the treatment group relative to the control group during the campaign measurement period. Note This column appears as null if there is no control group. |
Incremental Revenue (Over Control) |
Decimal |
Additional revenue generated measured by the difference between total test revenue recipient and total control revenue per recipient and then multiply that by test recipients. Note This column appears as null if there is no control group. |
Incremental Revenue Per Recipient (Over Control) |
Decimal |
Additional revenue per recipient in the treatment group relative to the control audience during the campaign measurement period. Note This column appears as null if there is no control group. |
Is Control |
Boolean |
Indicates whether the treatment group is a control group. |
Items Per Order |
Integer |
The average number of items per order purchased during the campaign measurement period. |
Measurement End Date |
Datetime |
The end of the campaign measurement period, plus the number of days selected before that date. The date before all preceding transactions and events associated with outcomes of this campaign. Note By default, this end date is 7 days preceding the selected measurement start date. |
Measurement Start Date |
Datetime |
The start of the campaign measurement period. The date following all transactions and events associated with the outcomes of this campaign. Note By default, this is the launch date selected for the campaign in Amperity, but can be changed when downloaded. |
Orders Per Purchaser |
Integer |
The average number of orders per purchaser. Note This is calculated by total orders divided by the purchaser count. |
Purchaser Count |
Integer |
The number of unique customers (associated with Amperity IDs) in the recipients group/sub-audience who made a purchase during the campaign measurement period. |
Recipient Count |
Integer |
The total number of unique customers (associated with Amperity IDs) included in the treatment group/sub-audience. |
Revenue Per Recipient |
Decimal |
The amount of revenue per recipient in a campaign. Note This metric is calculated by total revenue divided by the recipients count for the specific treatment group or sub-audiences. |
Revenue Per Recipient Lift (Over Control) |
Decimal |
The percentage difference in revenue per recipient by the treatment group relative to the control group. Note This is calculated as the difference in the incremental revenue per recipient divided by the total control recipients. |
Standard Deviation Revenue |
Decimal |
The standard deviation (measure of variance) of revenue for each recipient in the treatment group/sub-audience who have received the campaign (associated with Amperity IDs). |
Sub-audience Name |
String |
The name the customer gives the sub-audience. |
Total Items |
Integer |
The total quantity of items ordered by unique customers (associated with Amperity IDs) in the recipients group/sub-audience during the campaign measurement period. |
Total Orders |
Integer |
The total number of purchase orders made by unique customers (associated with Amperity IDs) in the recipients group/sub-audience during the campaign measurement period. |
Total Revenue |
Decimal |
The total revenue associated with Amperity IDs in the treatment group/sub-audience, during the campaign measurement period. Note By default, the order_revenue field in the Unified Transactions table is calculated as gross revenue and the gross sales details are provided in the campaign results download file. |
Treatment ID |
String |
The numerical identifier Amperity assigns to the treatment group. |
Treatment Name |
String |
The name the customer gives the treatment group. |
Use cases
You can use campaign results to determine how to successfully reach out to their customers for the following reasons:
If your campaign message was effective at converting customers
Whether one offer or treatment worked better at converting customers
If a campaign drove incremental value
Driving a campaign
Once you have determined which channel to use for your campaign, you need to determine which is the most effective way to approach a campaign. For instance, if a you decide to send out an email campaign to your customers, you need to decide which type of email will be most effective. Does the email with the 10% offer bring in more customer orders or does the $10 off email offer give customers more incentive to make a purchase?
Amperity’s approach
Amperity creates a 360-degree view of your customers, which includes a complete transaction history. This process uses a stable identifier–the Amperity ID–to track customers even when their path to a purchase is non-linear.
An Amperity ID is a unique identifier assigned to a cluster of records within an identity graph. Each Amperity ID represents all of the records within a customer profile.
Amperity provides marketers with the following capabilities which gives them a 360 view of their customer’s behavior:
Compares more than one set of marketing data using the Amperity ID to determine if customer behavior has changed around a campaign.
Tracks customer behavior through transactional data and an Amperity ID associated with a campaign.
Automatically holds back a control group when a campaign is created to test whether a customer will buy something in a store or whether they received an email or not.
Tracks omnichannel behavior of customers targeted in the test group, as well as the behavior of customers in the control holdout group.
Compares the behavior of control customers to those who received the marketing treatment and calculates the incremental impact of the campaign.
Determines whether a customer–with an Amperity ID associated with a campaign–has made a purchase within a timeframe set by the marketer. For instance, if a customer were to shop online or in a store.
Tests within smaller sub-sets of customer groups to determine how certain components within a campaign affect customer behavior. For example, how was the 10 percent email offer received by customers compared to the $10 off email offer.
Uses people-based measurement to randomly assign customers to control and treatment groups, which gives you the ability to accurately measure the incremental effects of a campaign. To learn more about people-based measurement, refer to the People-based measurement topic.
Example
A marketer downloads campaign results for a campaign that they recently sent out. The the groups that were represented in these results are as follows:
Facebook Ads
Postcard
Email only (control group)
The marketer sees the following campaign results data in the .CSV file that they downloaded:
How many users were targeted in each group
When the campaign was launched
See how much revenue was generated per sub-group
See how revenue is broken down per user is
See at a high level how much each group spent.
In this case, the marketer can see that the Facebook Ads sub-group had more conversions than any of the other sub-groups. They can also see that the Facebook Ads sub-group also purchased more items than the other sub-groups.
Thus, the marketer can determine that the Facebook Ads channel is the best option for their marketing campaign.
How-tos
Tasks related to building campaigns in Amperity:
Add a sub-audience
You can add a sub-audience to a campaign on the Edit Campaign page.
How to add a sub-audience to a campaign
From the Campaigns page, in the Sub-audiences and Destinations section, click Add Sub-audience.
From the Source menu, select Create custom criteria.
From the Audience Builder window, To add these attributes to your segment, click Add condition.
From the Sources dropdown list, select a source.
From the Attributes dropdown list, select an attribute.
From the Operators dropdown list, select an operator.
To add these attributes to your segment, click Add condition to add more criteria.
When done setting your criteria, click Save.
The new sub-audience appears in the Sub-audiences and Destinations section.
Note
When you save your sub-audiences you will see recipient counts calculated. When you reorder your sub-audiences using drag and drop these counts are automatically updated.
Add a saved segment to a sub-audience
You can add a saved segment to a sub-audience in a campaign on the Edit Campaign page.
To add a saved segment to a sub-audience in a campaign
From the Edit Campaign page, click Add Sub-audience.
From the Source menu, click Saved segments.
From the Segments list, select one or more saved segments.
The saved segments appear in the Sub-audiences and Destinations section on the Edit Campaign page.
Add a custom attribute to a destination
You can add a custom attribute to a destination on the Edit attributes page.
To add a custom attribute to a destination
From the Edit attributes page, in the Source Table column, select a source table.
In the Source Attribute column, select a custom attribute.
Click Save.
Note
For the source table to appear in the Source Table column, it needs to appear in the segment editor and have a field with an Amperity ID.
Allocate customers to more than one sub-audience
You can allocate customers (Amperity IDs) to many sub-audiences in a campaign on the Edit Campaign page.
Note
Amperity defaults to allocating customers (Amperity IDs) to the first (mutually exclusive) sub-audience.
To allocate customers (Amperity IDs) many sub-audiences in a campaign
From the Edit Campaign page, in the Sub-audiences and Destinations section, switch the Assign to first match only toggle off.
Amperity will allocate your customers (Amperity IDs) to many sub-audiences in your campaign.
Build a sub-audience
You can build a sub-audience in a campaign on the Edit Campaign page.
To build a sub-audience in a campaign
From the Edit Campaign page, click Add Sub-audience.
From the Source menu, either select a table source or search for a table source in the search field.
From the Attribute menu, either select an attribute or search for an attribute in the search field.
From the Condition menu, select a condition.
From the value menu, either select a value or search for a value from the search field.
Add another attribute or section.
Select a destination from the menus in the Destinations column for each group.
Click Edit attributes to edit or add attributes.
Click Add Treatment to add a treatment group.
Note
You cannot edit a segment that is added as a sub-audience if it is built from a segment. To make changes to the segment, you need to edit it directly in the Segment Editor.
Bulk delete
You can bulk delete campaigns or folders on the Campaigns page.
To bulk delete campaigns or folders
From the Campaigns page, select the campaigns or folders to delete.
From the bottom of the page, click Delete.
Bulk move
You can bulk move campaigns or folders on the Campaigns page.
To bulk delete campaigns or folders
From the Campaigns page, select the campaigns or folders to move.
From the bottom of the page, click Move.
Define treatment groups
You can define treatment groups in a campaign on the Edit Campaign page.
To define treatment groups in a campaign
From the Edit Campaign page, in the All Remaining Recipients section, click Add treatment. The treatment group appears in the Group Name column.
In the Control column, select the checkbox associated with a control group.
Select a destination from the menus in the Destinations column for each group.
Click Edit attributes to edit or add attributes.
Select attributes
You can select attributes in a campaign on the Edit Campaign page.
To select attributes in a campaign
From the Edit Campaign page, click Add Sub-audience.
From the Source menu, either select a table source or search for a table source in the search field.
From the Attribute menu, either select an attribute or search for an attribute in the search field.
From the Condition menu, select a condition.
From the value menu, either select a value or search for a value in the search field.
Add another attribute or section.
When done, click Save.
Select a query source
You can select a query source on the Edit attributes page.
To select a query source
From the Edit attributes page, in the Sources column, click on a row.
In the Queries (Custom Tables), select a query source.
Click Save.
Select destination
You can select destinations in a campaign on the Edit Campaign page.
To select destinations in a campaign
From the Edit Campaign page, in the Sub-audiences and Destinations, select a destination from the Destinations column associated with a treatment group.
The destination appears in the Destinations column.
Apply exclusion list
You can apply an exclusion list in a campaign on the Edit Campaign page.
To apply an exclusion list in a campaign
From the Edit Campaign page, in the Sub-audiences and Destinations section, in the Control column, select the checkbox associated with a control group.
The selected control group will be excluded from the campaign.
Archive campaign
Use the archive feature for campaigns you have actively used, but you do not need anymore.
Note
This action deletes the campaign from your tenant. If you want to this campaign to be moved back into your tenant, contact Amperity support.
To archive a campaign
From the Campaigns page, open the menu for a campaign.
In the menu, click Archive.
Build audience
You can build an audience in a campaign on the Edit Campaign page.
To build an audience in a campaign
From the Edit Campaign page, in the Audience section, in the Include list, select the segments to include.
In the Exclude list, select the segments to exclude.
Note
The Exclude list is optional. Use the Exclude list to choose recipients to exclude from a campaign.
Tip
You can select up to 10 saved segments from the same database to build inclusions and exclusions for an audience.
The recipients group and control group appear in the All Recipients table in the Sub-audiences and Destinations section.
Choose activation ID
The activation ID that is used within a campaign is determined by the activation ID that is present in the segment that defines the starting audience for the campaign.
Additional segments that are used for inclusions and exclusions must have a matching activation ID.
Campaign audience counts are updated to reflect the count for records that match the activation ID.
The language that is used within the Campaign Editor is updated to match the friendly, singular, and plural names of the activation ID.
For example, the “Customers” column that is associated with audiences and sub-audiences is updated to “Email addresses” when the plural name is “email addresses” and the count of customers at the top of the Campaign Editor is updated to show “Total email addresses”.
Attributes that are useable within campaigns are limited to only attributes that are available from tables that match the activation ID.
Choose campaign type
You can choose a campaign type from the Edit Campaign page.
To choose a campaign type in a campaign
From the Edit Campaign page, in the Recipient List Delivery section, in the Campaign type list, select either One-time or Recurring from the list:
Configure default attributes
You can configure default attributes from the Campaigns page.
To configure the default attributes
From the Campaigns page, in the top-right corner of the page, click Default attributes.
From the Default attributes window, click Add default attributes.
From the Destination attributes window, select the database from the Database dropdown.
Select the destination from the Destination dropdown.
Click Add attribute.
Select the source from the dropdown.
Select the attribute from the dropdown.
Enter the destination attribute name in the field.
Click Save.
The new default attribute appears on the Default attributes window.
Configure a multichannel campaign
You you can configure a multichannel campaign on the Edit Campaign page.
How to configure a multichannel campaign
Give your campaign a name.
Choose the segment that represents the audience to use for this campaign.
Optional. Choose a segment that has a list of customers to exclude from this campaign.
Configure at least one control group/treatment group set for this campaign. Rename these groups as necessary.
A control group should be set to 10%, with the initial treatment group set to 90%. Click Add treatment to add more treatment groups. Rename them as necessary and adjust the percentages as appropriate.
For each treatment group (including the control group, if configured for this campaign), assign many destinations.
Note
A treatment group with many destinations sends data to all of the configured destinations.
Optional. Add one or more sub-audiences. Click Add Sub-audience to add more sets to this campaign, and then use the Audience Builder to define the criteria for each sub-audience.
Optional. Give each sub-audience a name.
Optional. Assign many destinations to each treatment group in a sub-audience.
Configure recipient list delivery. One-time campaigns you have two options: at a scheduled date and time in the future or as soon as possible.
Provide the campaign launch date. Amperity uses the campaign launch date to improve results tracking for campaigns.
Click Schedule to put this campaign into the queue.
Amperity will process the segments, and then send the results to the configured destinations. Allow for enough time for Amperity to complete this process before kicking off the campaign in the downstream system.
Configure a one-time campaign
You can configure a one-time campaign on the Edit Campaign page.
How to configure a one-time campaign
Give your campaign a name.
Choose the segment that represents the audience to use for this campaign.
Optional. Choose a segment that has a list of customers to exclude from this campaign.
Configure at least one control group/treatment group set for this campaign. Rename these groups as necessary.
A control group should be set to 10%, with the initial treatment group set to 90%. Click Add treatment to add more treatment groups. Rename them as necessary and adjust the percentages as appropriate.
For each treatment group (including the control group, if configured for this campaign), assign at least one destination. You may assign more than one.
Note
A treatment group with more than one configuration destination sends data to all of the configured destinations.
Optional. Add one or more sub-audiences. Click Add Sub-audience to add more sets to this campaign, and then use the Audience Builder to define the criteria for each sub-audience.
Optional. Give each sub-audience a name.
Optional. Assign at least one destination to each treatment group in a sub-audience.
Configure recipient list delivery. With one-time campaigns you have two options: at a scheduled date and time in the future or as soon as possible.
Provide the campaign launch date. Amperity uses the campaign launch date to improve results tracking for campaigns.
Click Schedule to put this campaign into the queue.
Amperity will process the segments, and then send the results to the configured destinations. Allow for enough time for Amperity to complete this process before kicking off the campaign in the downstream system.
Configure a recurring campaign
You you can configure a recurring campaign on the Edit Campaign page.
How to configure a recurring campaign
Give your campaign a name.
Choose the segment that represents the audience to use for this campaign.
Optional. Choose a segment that has a list of customers to exclude from this campaign.
Configure at least one control group/treatment group set for this campaign. Rename these groups as necessary.
A control group should be set to 10%, with the initial treatment group set to 90%. Click Add treatment to add more treatment groups. Rename them as necessary and adjust the percentages as appropriate.
For each treatment group (including the control group, if configured for this campaign), assign at least one destination. You may assign more than one.
Note
A treatment group with more than one configuration destination sends data to all of the configured destinations.
Optional. Add one or more sub-audiences. Click Add Sub-audience to add more sets to this campaign, and then use the Audience Builder to define the criteria for each sub-audience.
Optional. Give each sub-audience a name.
Optional. Assign at least one destination to each treatment group in a sub-audience.
Configure recipient list delivery. Recurring campaigns require a cadence (daily or weekly), a start date and time, and then an end date. The end date has three options: never, on a specific date, or after a specified number of occurrences.
Provide the campaign launch date. Amperity uses the campaign launch date to improve results tracking for campaigns.
Click Schedule to put this campaign into the queue.
Amperity will process the segments, and then send the results to the configured destinations. Allow for enough time for Amperity to complete this process before kicking off the campaign in the downstream system.
Copy campaign
You can reuse, build, and scale campaigns with ease by using an existing campaign as a template for building new ones.
To copy a campaign
From the Campaigns page, open the menu for a campaign.
Click Make a copy.
The Copy campaign dialog box opens. Enter the name of the new campaign, and then click Save.
On the Edit Campaign page, update the campaign configuration for the new campaign, and then click Save.
The new campaign appears on the Campaigns page.
Copy campaign ID
You can copy a campaign ID on the Campaigns page.
To copy a campaign ID
From the Campaigns page, open the menu for a campaign.
In the menu, click Copy ID.
Paste the campaign ID in the appropriate location.
Delete campaign
You can delete a campaign on the Campaigns page.
To delete a campaign
From the Campaigns page, open the menu for a campaign.
In the menu, click Delete.
The Delete Campaign dialog box opens. Click Confirm.
The campaign no longer appears on the Campaigns page.
Warning
You can only delete a scheduled or draft campaign. Once a campaign has been delivered you can only archive it.
Note
Amperity has the ability to recover a campaign that has been deleted.
Discard campaign
You can discard a campaign on the Edit Campaign page.
To discard a campaign
Use the Discard option to remove a campaign from Amperity. Verify that both upstream and downstream processes no longer depend on this campaign before discarding it.
From the Campaigns page, open a campaign, and then select Discard.
The Discard Campaign dialog box opens. Click Confirm.
Download campaign results
You can download a file that has a list of campaign results.
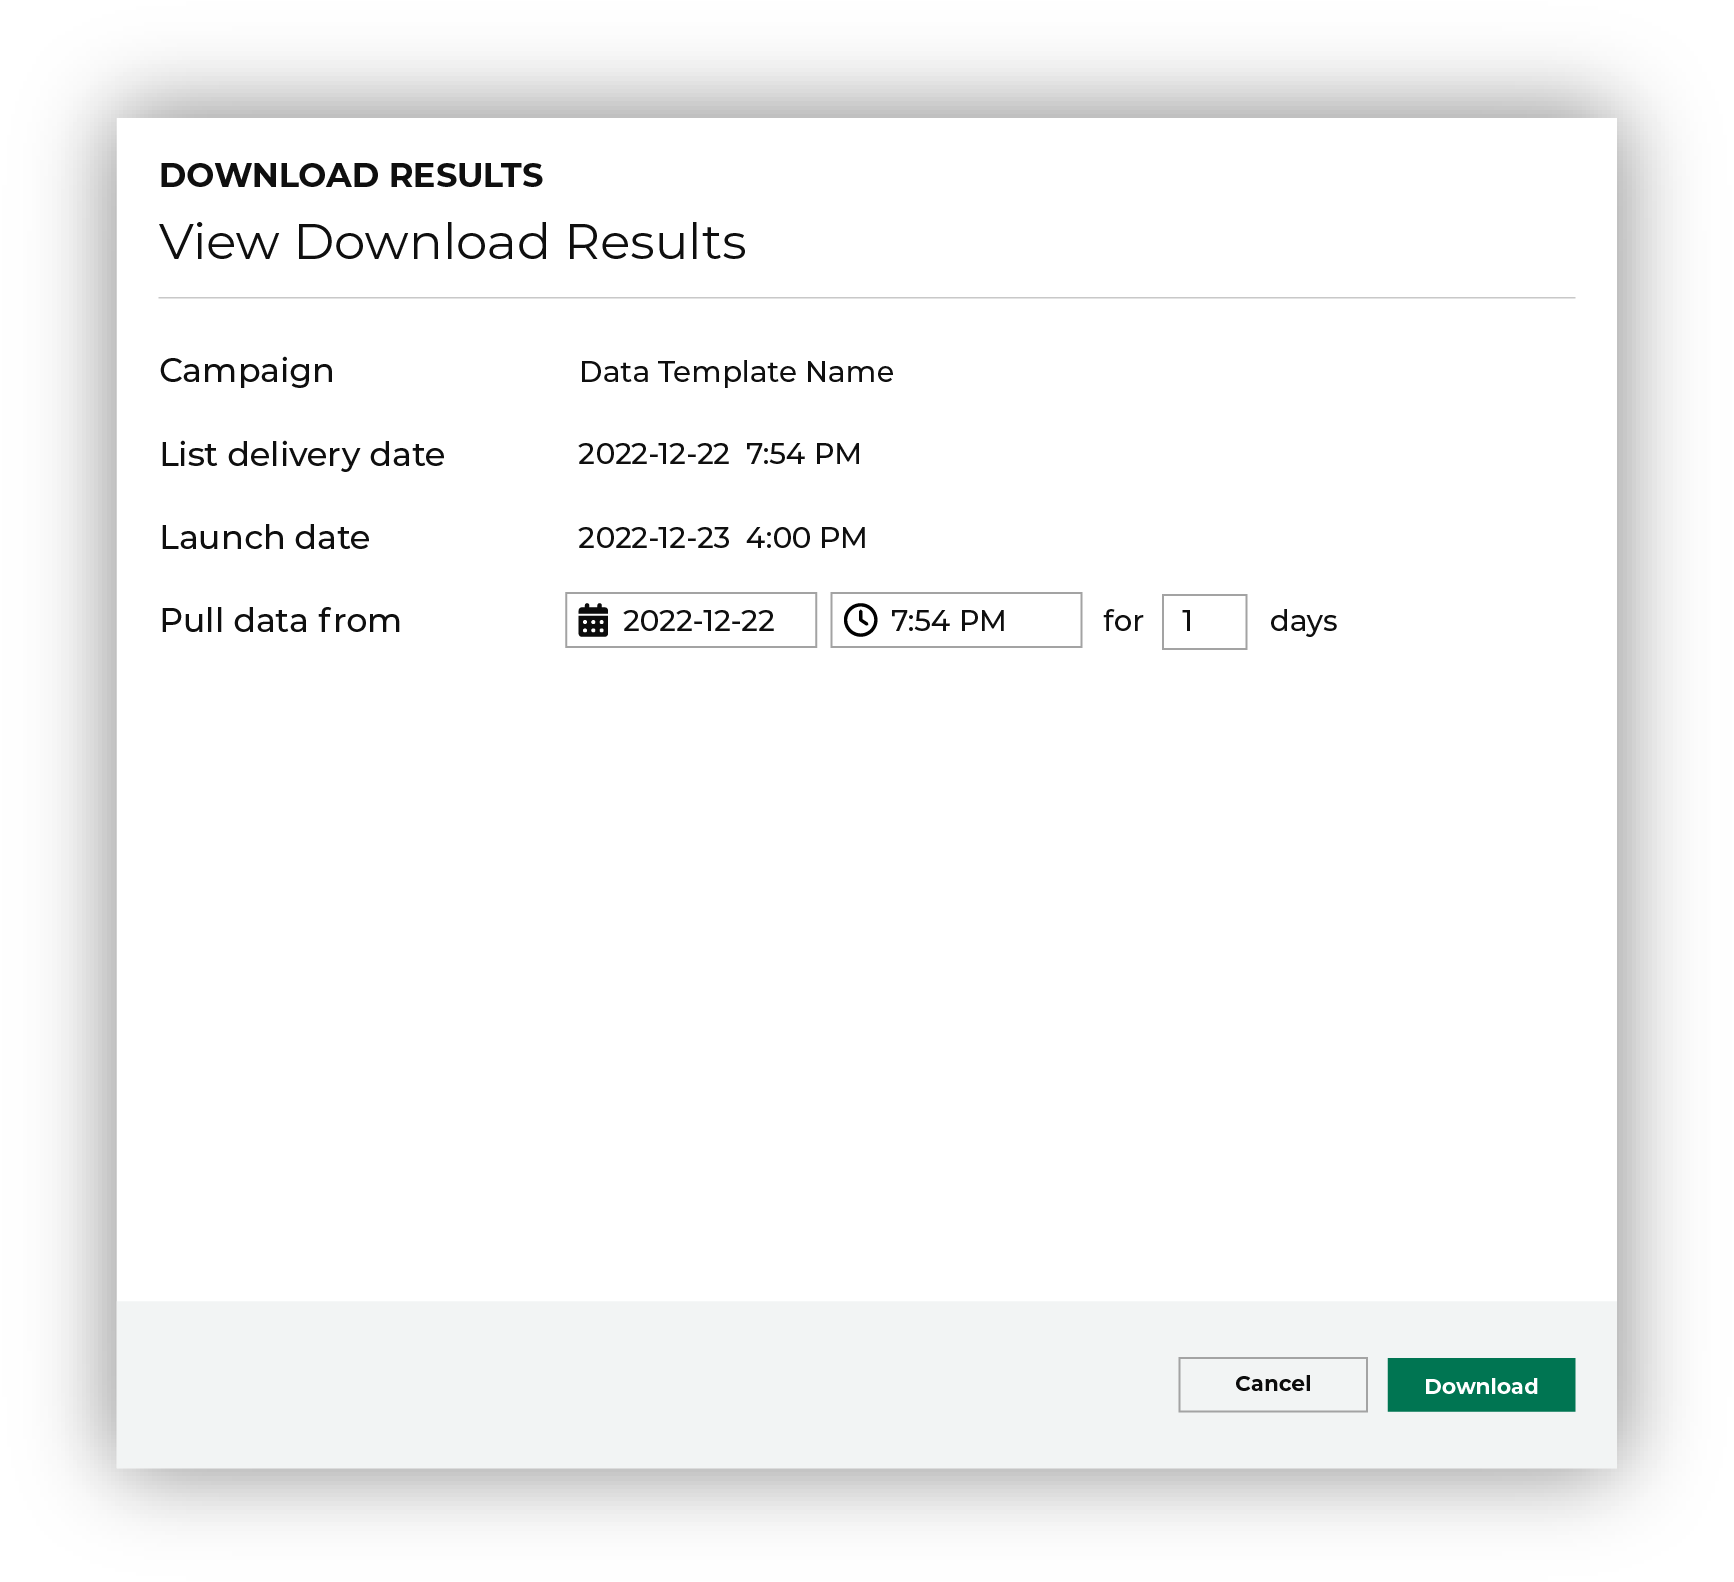
For example, a daily campaign has a launch date of March 7. From the Download results dialog, select “March 7” and 4 days. The downloaded file shows one row of data for each treatment group for every email address (as identified by the Amperity ID) that received the campaign on March 7-10.
To download campaign results
From the Campaigns page, choose a campaign, and then from the menu, choose Download results. This opens the Download results dialog.
Select the list delivery date.
Select the date range for which you want to pull data. The first is the date from which data should begin, and the second is an integer that represents the number of days for which results should be downloaded.
Click Download.
Download recipients
You can download a recipients list from a delivered campaign on the Campaigns page.
To download a recipients list
From the Campaigns page, open the menu for a delivered campaign.
In the menu, click Download Recipients.
On the Download Recipients window, select the recipient list from the Recipients list delivery date dropdown menu.
Click Download. An .CSV file downloads to your Downloads folder on your computer.
Open the .CSV file in a program and then view the recipients list.
Edit attribute
You can edit an attribute on the Edit Campaign page.
To an attribute
From the Edit Campaign page, in the Sub-audiences and Destinations section, click Edit Attribute.
In the Edit attributes window, make your changes, and then click Save.
Edit campaign
You can edit a draft, scheduled, or delivered campaign on the Campaigns page.
To edit a draft campaign
On the Campaigns page, open the menu for a campaign.
In the menu that appears, click Edit.
On the Edit Campaigns page, make your changes.
When done, click Schedule.
To edit a scheduled campaign
On the Campaigns page, open the menu for a campaign.
In the menu that appears, click Unschedule and Edit.
On the Unschedule and Edit dialog box, click Confirm.
On the Edit Campaigns page, make your changes.
When done, click Schedule.
To edit a delivered campaign
On the Campaigns page, click on a campaign.
On the View Campaign page, click Edit.
On the Edit Campaign page, make your changes.
When done, click Schedule.
Tip
After a campaign has been delivered, you can edit and reschedule the campaign for a future delivery.
Edit sub-audience
You can edit a sub-audience on the Edit Campaign page.
To edit a sub-audience
From the Edit Campaign page, in the Sub-audiences and Destinations section, click Edit to edit a sub-audience.
In the Audience Builder window, make your changes, and then click Save.
Enable activation states
Activation activity is enabled by default for every campaign and keeps track of the activation states for customers who were activated by the campaign, including by sub-audience or treatment, by destination, how often and when.
To disable Campaign Recipients tables
From the Campaigns page open a campaign.
De-select the Record to campaign recipients? checkbox at the bottom.
Filter campaigns
You can filter the list of campaigns that appear on the Campaigns page. Click Show filters to open the filter bar, and then select values from any combination of the following:
By cadence. Select One-time or Recurring.
By status. Select any combination of Delivered, Draft, Error, and Scheduled.
By destination. Select any combination of destinations that have been configured for your tenant.
By created by. Select any combination of users who created campaigns.
By last edited by. Select any combination of users who most recently edited campaigns.
By label. Select one or more labels to filter campaigns by organizational category.
Tip
Labels help organize journeys by grouping related items together. For example, use labels to:
Identify journey types: “Welcome series”, “Retention”, or “Winback”
Assign team ownership: “Marketing” or “Analytics”
Track status: “In review” or “Approved”
Indicate priority: “High priority” or “Evergreen”
Labels are created on the Settings page, in the Labels tab, by clicking Add label. Label naming conventions should:
Not exceed 35 characters
Contain only alphanumeric characters, hyphens, and underscores allowed
Not exceed 10 labels per journey
Use consistent prefixes for related labels. For example: “Q1-” or “Holiday-”
Note
When many labels are selected, journeys matching any selected labels are shown.
Note
When many labels are selected, campaigns matching any selected labels will be shown.
Organize campaigns
You can organize the campaigns shown in the Campaigns page:
Add folders
You can add a folder on the Campaigns page.
To add a folder
From the Campaigns page click Create folder.
From the Create Folder dialog box, enter the name for the folder.
Click Create.
The folder appears on the Campaigns page.
Add subfolders
Use the Create folder option in the menu to add up to three levels of subfolders. All folder names must be unique.
To add a subfolder
From the Campaigns page, open the menu for a folder, and then select Create folder. This opens the Create Folder window.
Enter the name for the folder.
Click Create.
Delete a campaign
You can delete a folder from the Campaigns page.
To move a segment
From the Campaigns page, open the menu for a folder, and then select Delete. This opens the Delete Folder dialog box.
Click Delete.
The folder no longer appears on the Campaigns page.
Move campaign
Use the Move option to move around and organize the list of folders and campaigns. Folders may be expanded (or collapsed) to view and hide the list of campaigns and subfolders contained within.
To move a segment
From the Campaigns page, open the menu for a campaign, and then select Move. This opens the Move campaign dialog box.
Select the name of an existing folder to which a campaign will be moved, and then click Move.
Hint
If the folder to which a campaign will be moved is not present in the list of folders, you can add it directly from the Move campaign dialog box. Click the + New folder link, type a name for the folder, and then select it.
Remove sub-audience
You can remove a sub-audience from the Edit Campaign page.
To remove a sub-audience
From the Edit Campaign page, in the Audience groups and destinations section, click Remove.
The sub-audience is removed from the Edit Campaign page.
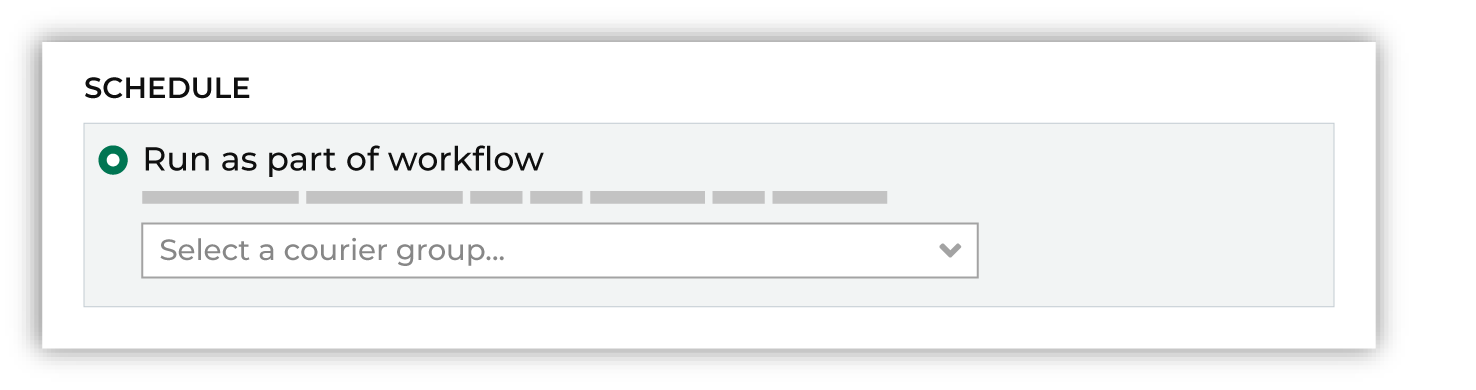
Run as part of a workflow
A recurring campaign can be configured to run as part of a scheduled workflow when the schedule is set to Run as part of workflow and an active courier group is selected from the dropdown menu.
Schedule campaign
You can schedule a campaign on the Edit Campaign page.
To schedule a campaign
From the Edit Campaign page, in the Recipient List Delivery section, click Schedule delivery.
The date field appears. Enter a date.
The time field appears. Enter a time.
Search campaigns
You can search for a campaign on the Campaigns page.
To search for a campaign
From the Campaigns page, on the top of the page, enter the search terms into the search field.
The search results appear on the Campaigns page.
Select destinations
You can select destinations on the Edit Campaign page.
To select a destination
From the Edit Campaign page, in the Sub-audiences and Destinations section, select a destination associated with a group from the Destinations column.
Send campaign metadata to destination
You can send campaign metadata, such as Amperity IDs and names associated with each audience group, to a destination on the Edit Campaign page.
To send a metadata to a destination
From the Edit Campaign page, in the Sub-audiences and Destinations section, click Edit attributes.
From the Edit attributes page, click Add attribute.
From the Sources column, select a source.
From the Source Attribute column, select a field.
When done, click Save.
Set campaign launch date
You can set a campaign launch date on the Edit Campaign page.
To set a campaign launch date
From the Edit Campaign page, in the Recipient List Delivery section, enter the amount of days in the Campaign launch date field.
Set delivery schedule
You can set a delivery schedule on the Edit Campaign page.
To set delivery schedule
From the Edit Campaign page, in the Recipient List Delivery section, either select Schedule delivery or Deliver as soon as possible from the menu.
Test a campaign
Click the Campaign test link in the top of the Campaign Editor to open the Campaign tests dialog box. Configure the number of records to use with the test, and then click Run test.
This runs the campaign exactly the same as if it were run in a production workflow. A sample file is output that shows what the results of this campaign will look like downstream.
A history of campaign tests is also available.
Unschedule a campaign
You can unschedule a campaign on the Campaigns page.
To unschedule a campaign
From the Campaigns page, open the menu for a scheduled campaign.
On the menu that appears, click Unschedule and edit.
The Unschedule and Edit dialog box appears. Click Confirm.
View campaign
You can view a campaign on the Campaigns page.
To view a campaign
From the Campaigns page, open the menu for a delivered campaign.
On the menu that appears, click View.
The Edit Campaign page appears displaying the campaign details.
View campaign history
You can view a campaign’s history on the Campaigns page.
To view a campaign’s history
From the Campaigns page, open the menu for a delivered campaign.
On the menu that appears, click History.
The Campaign History dialog box appears displaying the campaign’s history details.
View delivery summary
You can view a campaign on the View Campaign or Edit Campaign pages.
To view a delivery summary
From the Edit Campaign page, in the click Delivery summary.
The Preview List Delivery Details page appears displaying details associated with each destination.
View notifications
Notifications for the Campaigns page appear after Amperity processes the segments, and then sends the results to the configured destinations. Notifications typically indicate successful outcomes. Less often, notifications contain details for non-successful outcomes, such as failures related to upstream or downstream processes.
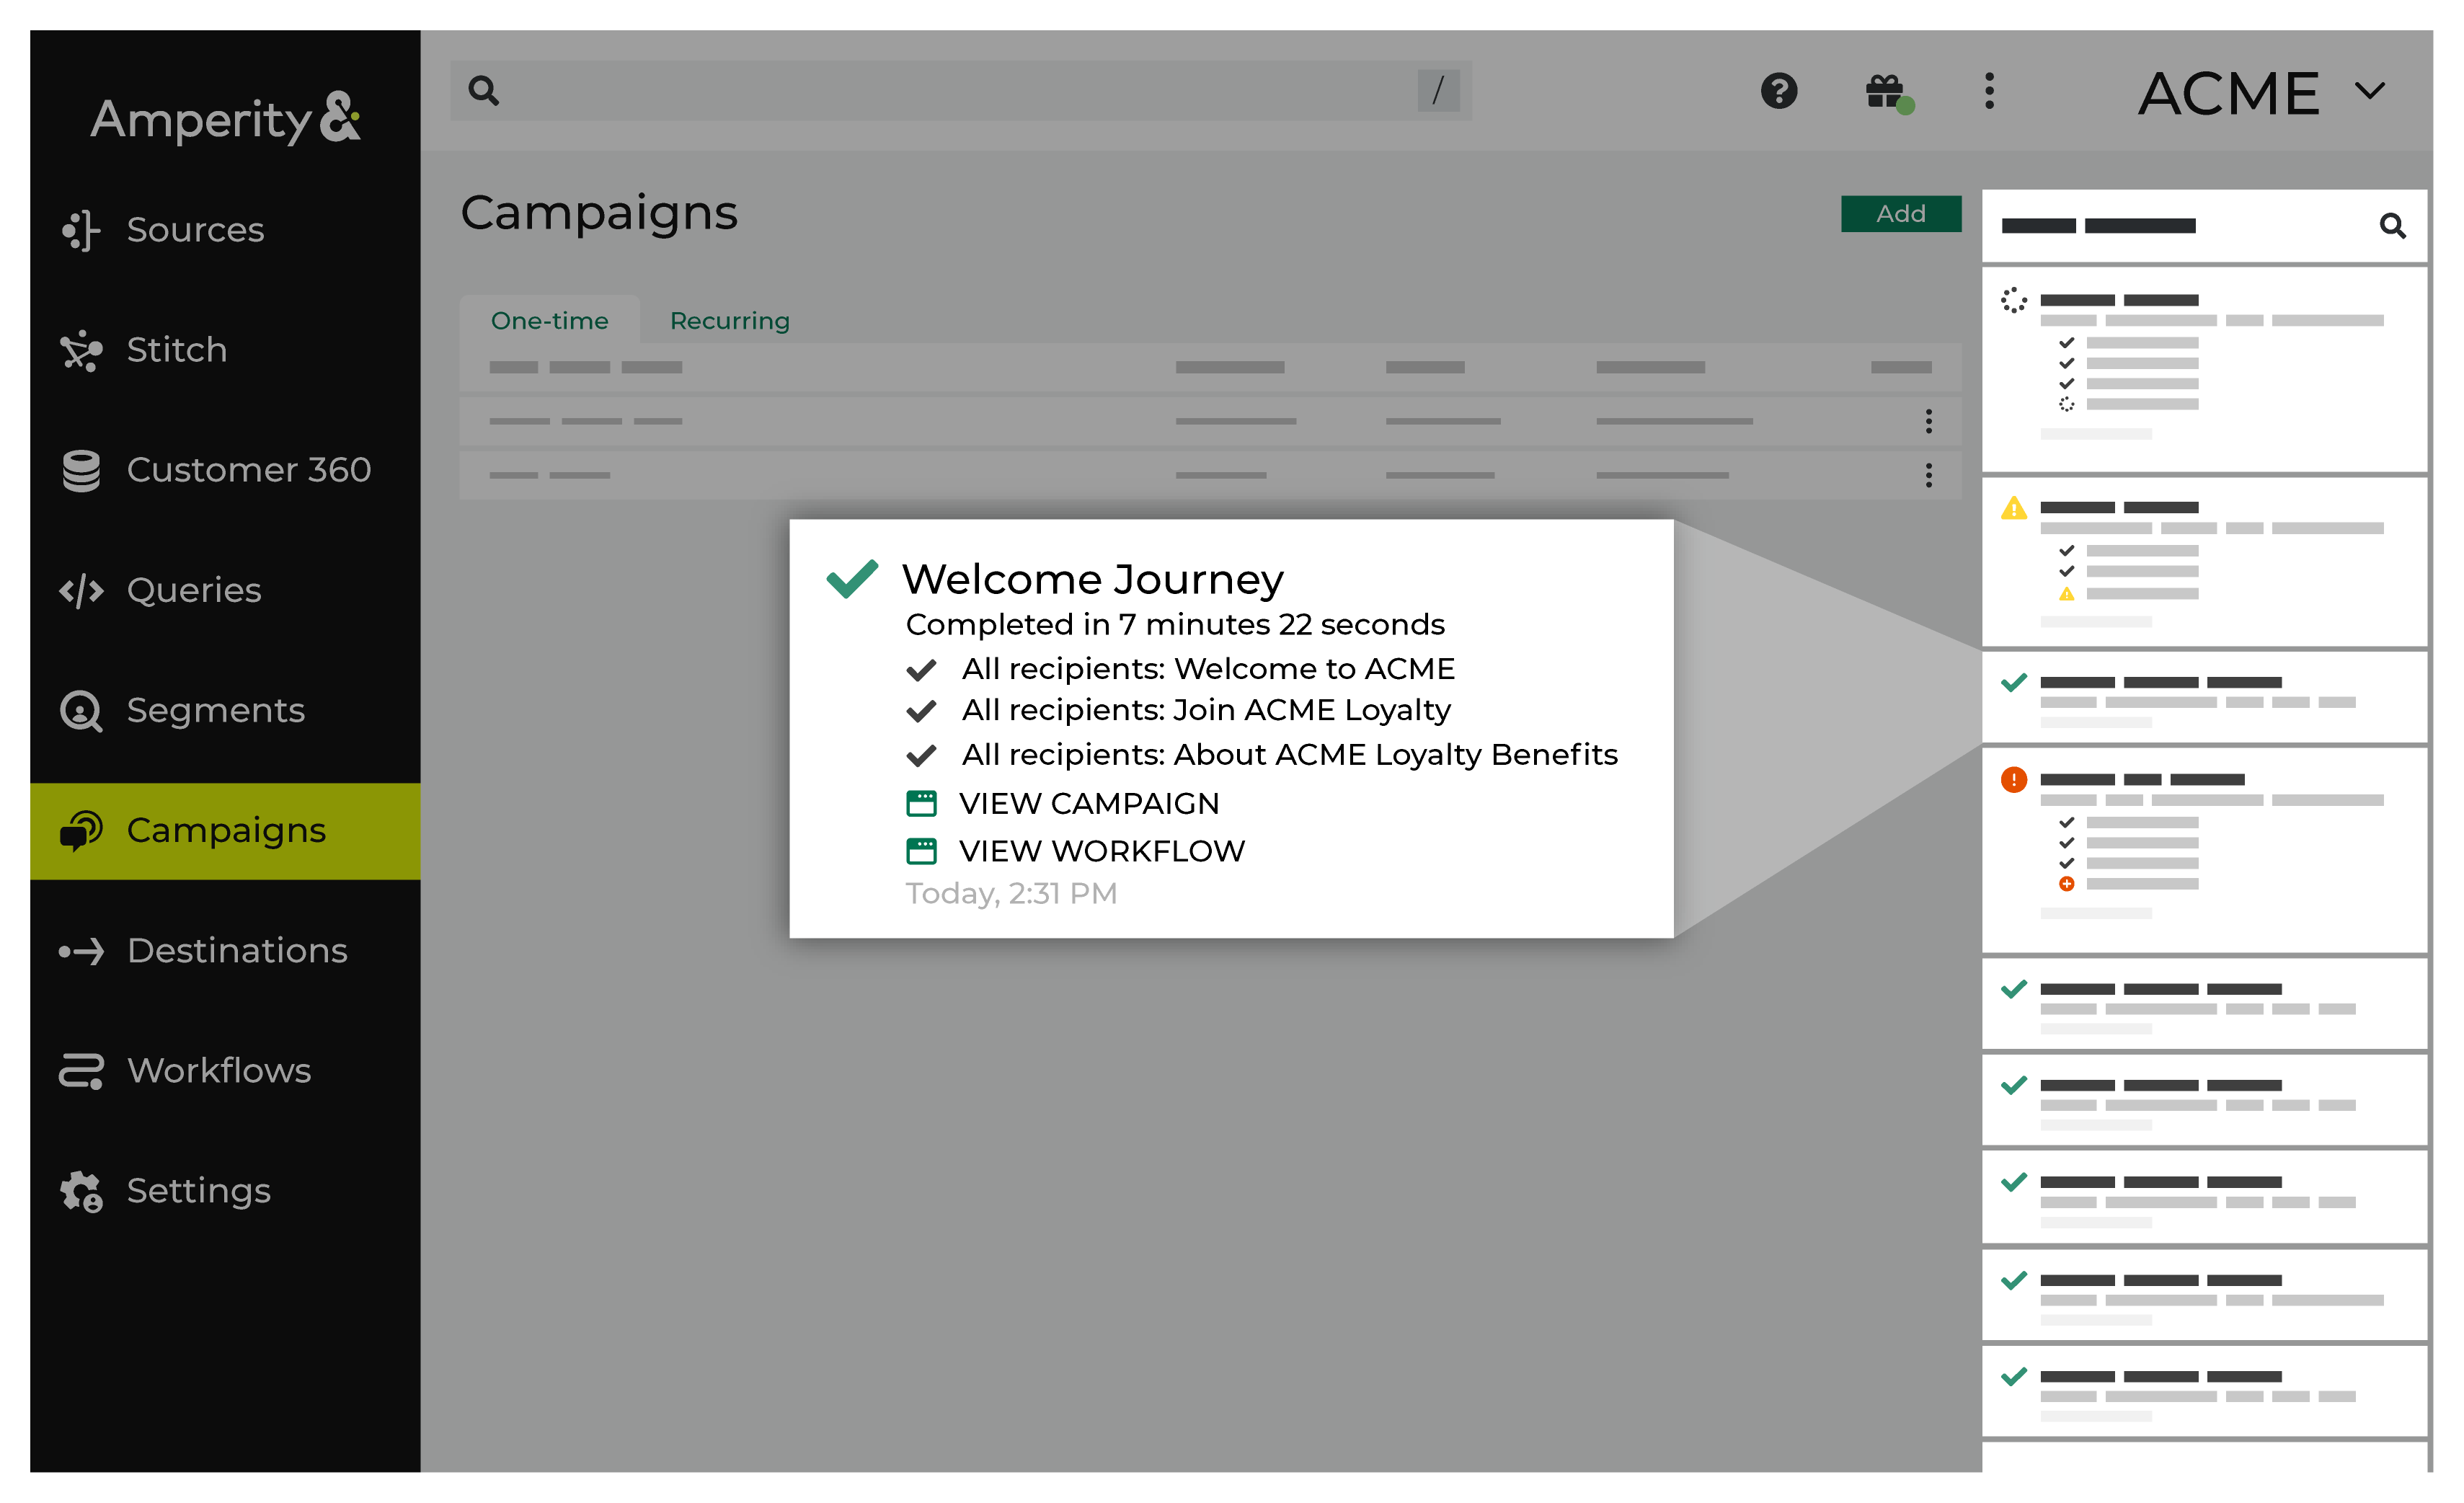
To view notifications
If a notification is about a non-successful outcome, the details for why and what happened can be found in the notification itself. Click More to view the full notification. Click View Workflow to open the workflow in the Workflows page.
In some cases viewing the log files may be helpful. In many cases, fix the root cause of the non-successful outcome, and then rerun the process manually. The Workflows page provides a set of workflow actions that you can initiate directly.
View recently edited campaigns
You can view your recently edited campaigns on the Campaigns page.
To view your recently edited campaigns
From the Campaigns page, on the top of the page, view your recently edited campaigns.
View workflow
You can access a workflow from the Campaigns page.
To view a workflow
From the Campaigns page, click View Workflow next to a notification in the notifications pane.
The Workflows page appears displaying task status details.