About Journeys
A journey is an automated sequence for connecting with customers across channels like email, paid media, SMS, and direct mail. Each step in a journey represents a decision point or action: send a message, wait for further customer engagement, or split the audience onto different paths.
By using Journeys, marketers can implement cross-channel strategies, improve targeting precision, and activate the right message at the right moment to drive better engagement and higher conversions.
Amperity Learning Lab
A journey is an automated sequence for connecting with customers across channels.
Open Learning Lab to learn more about how to automate multi-touch marketing with journeys . Registration is required.
How Journeys work
A journey starts with a defined audience that moves through a series of interactions based on criteria you specify, like customer behavior, attributes, or engagement history. The sequence can branch depending on what conditions you set, so that customers have a different experience depending on what actions they take.
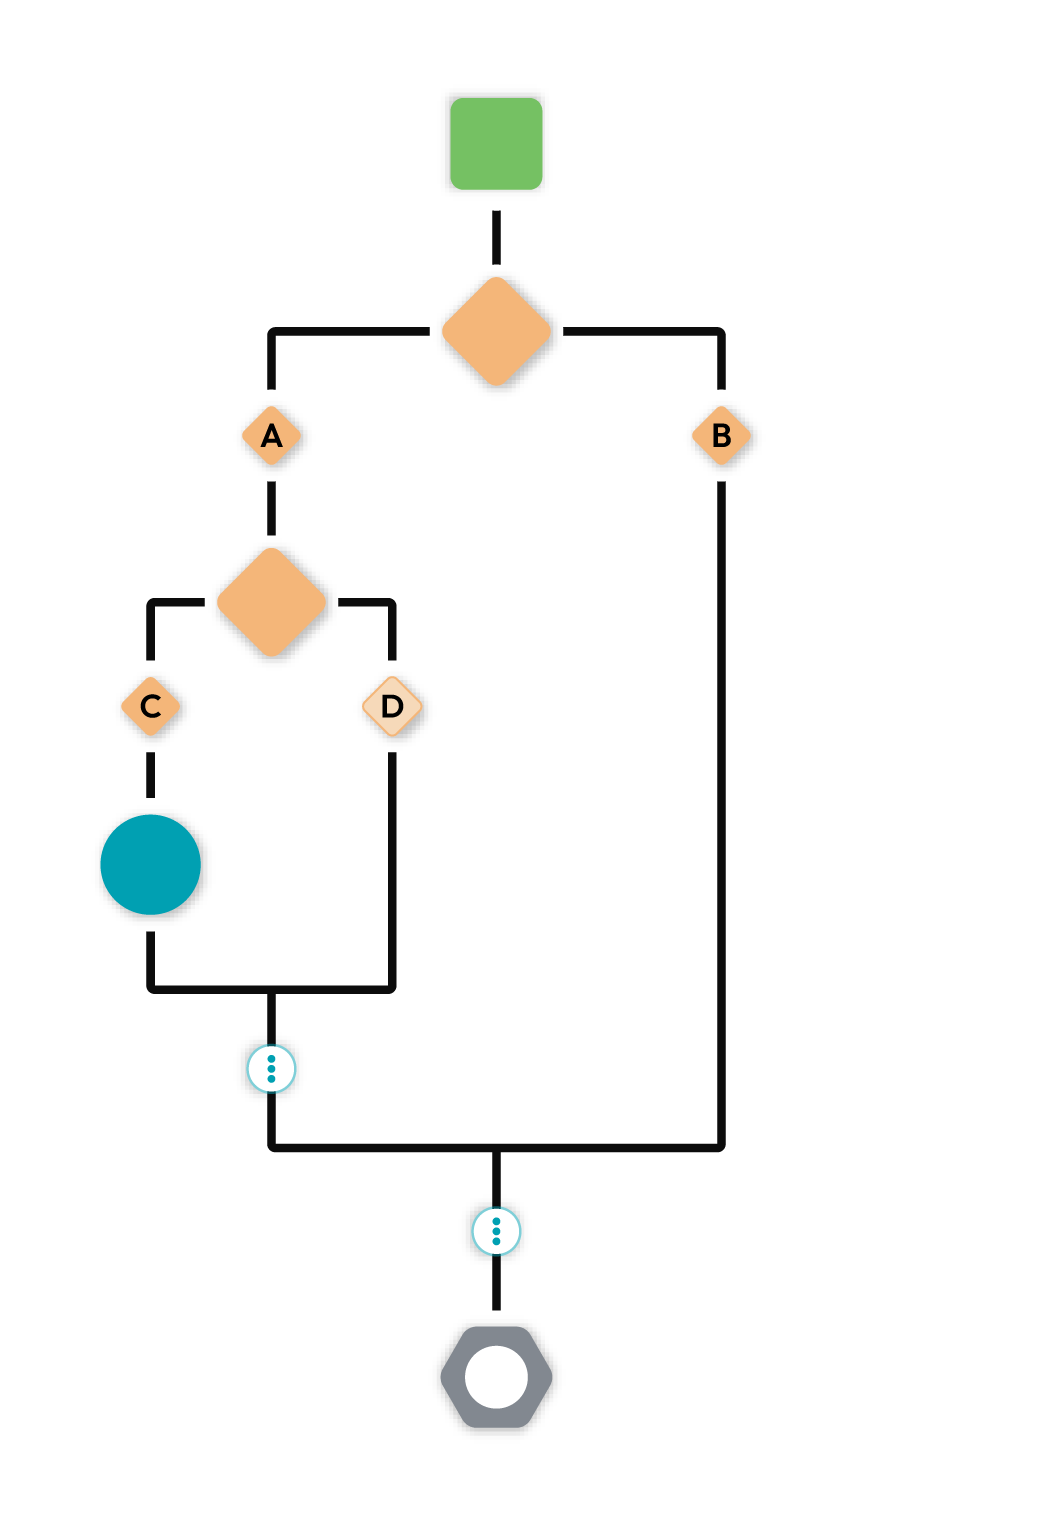
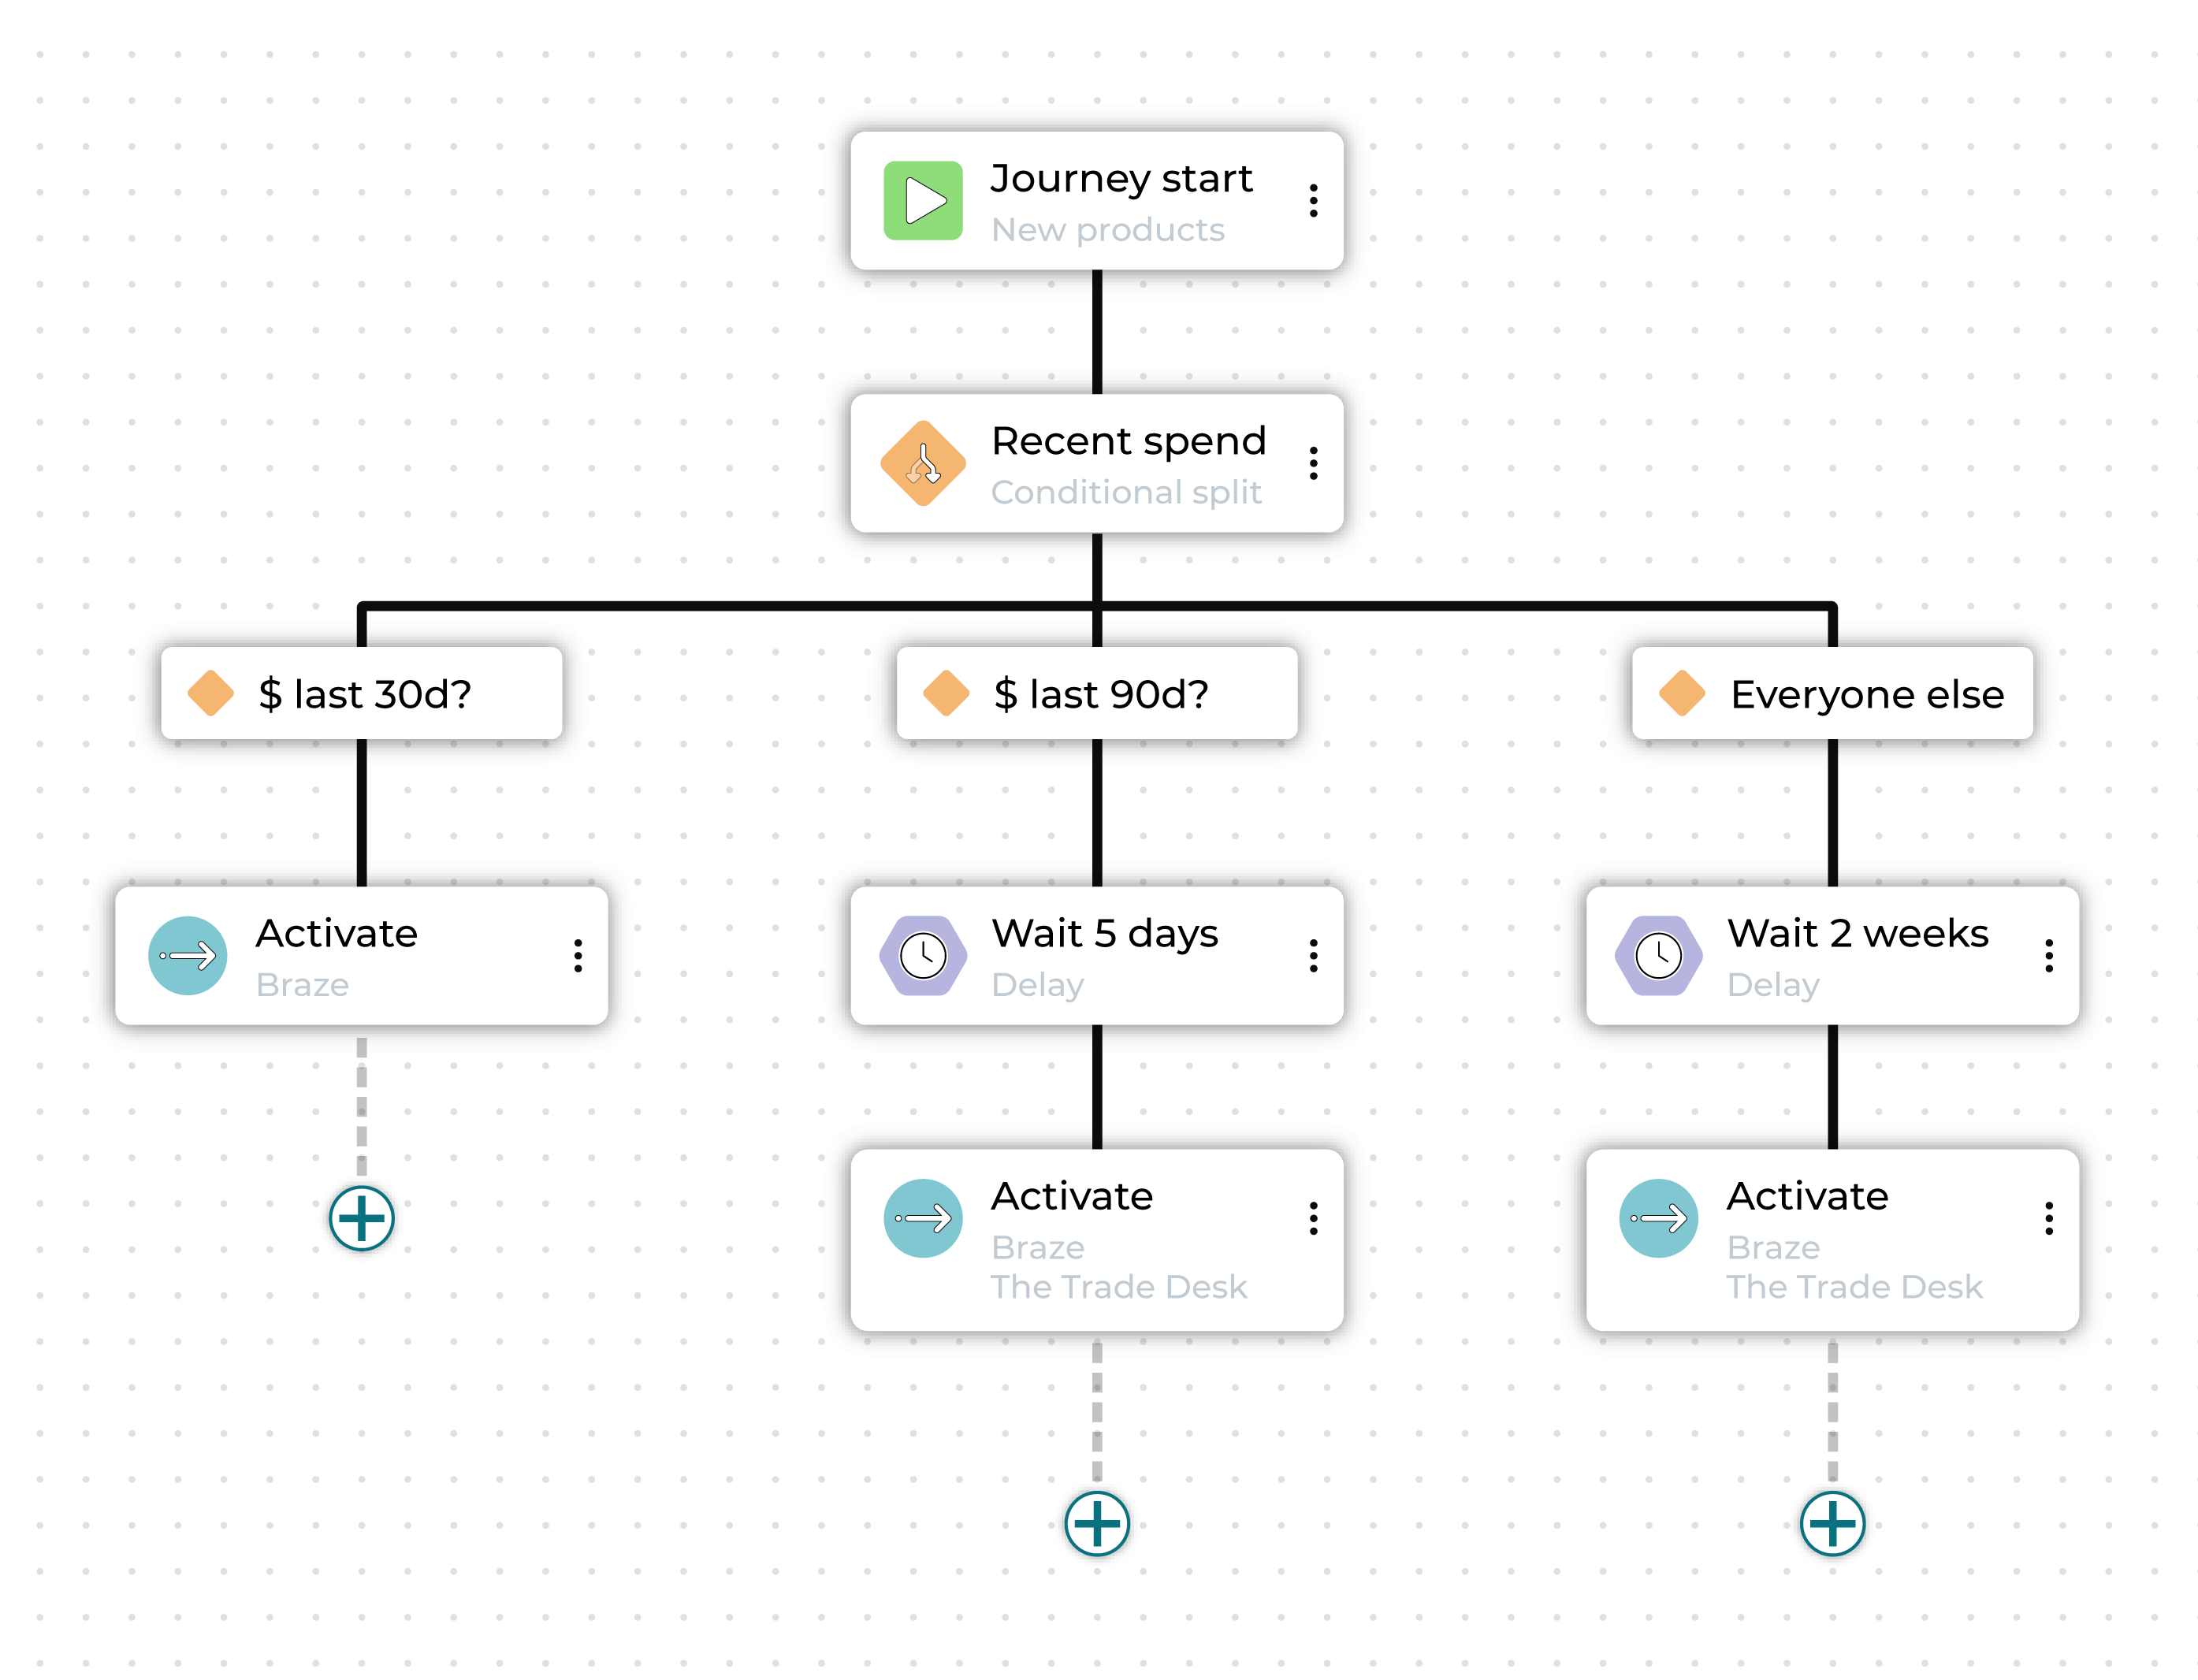
Here is an example of a built-out journey:
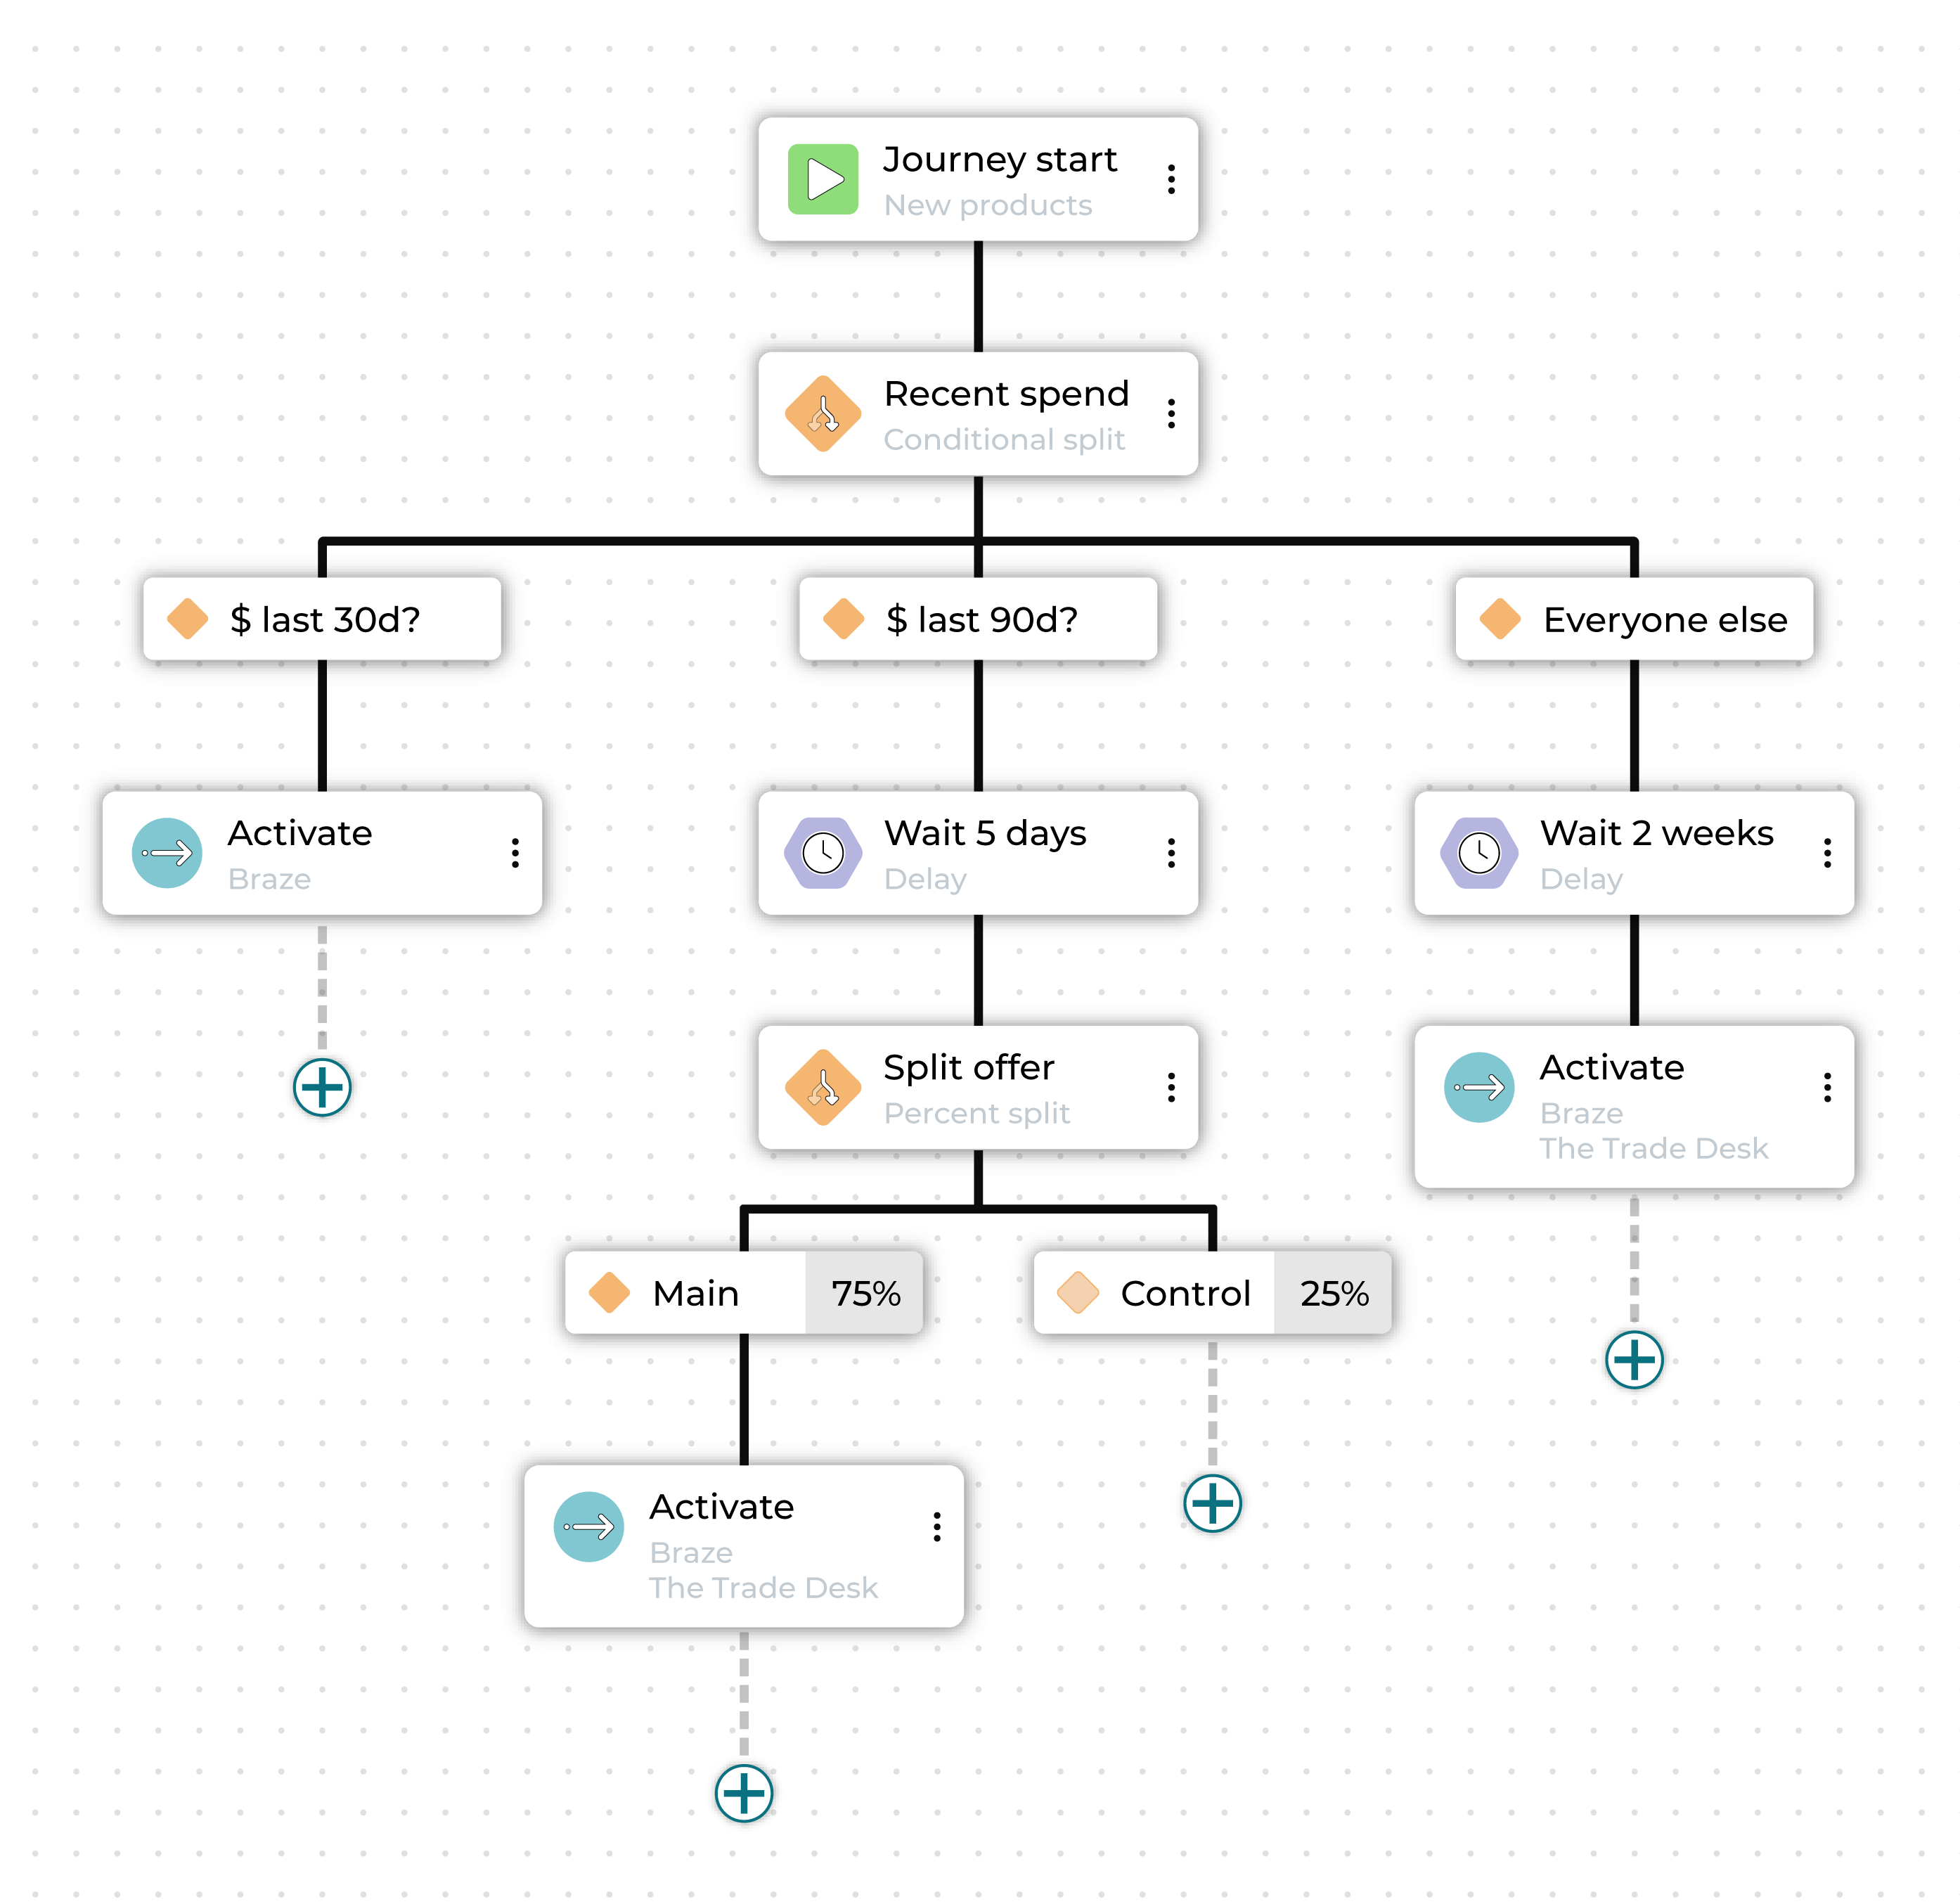
In this case, the marketer is offering high-value customers early access to new products before general release in two weeks. They start by creating an audience segment made up of customers in the top 10% of customer lifetime value.
The first step divides this audience into three sub-audiences: those who purchased in the last 1-30 days, those whose purchased in the last 31-90 days, and those whose most recent purchase was more than 90 days ago.
Each different audience is sent down a different path toward activation in a marketing channel.
The high-value customers who purchased most recently are contacted immediately, giving them exclusive early access.
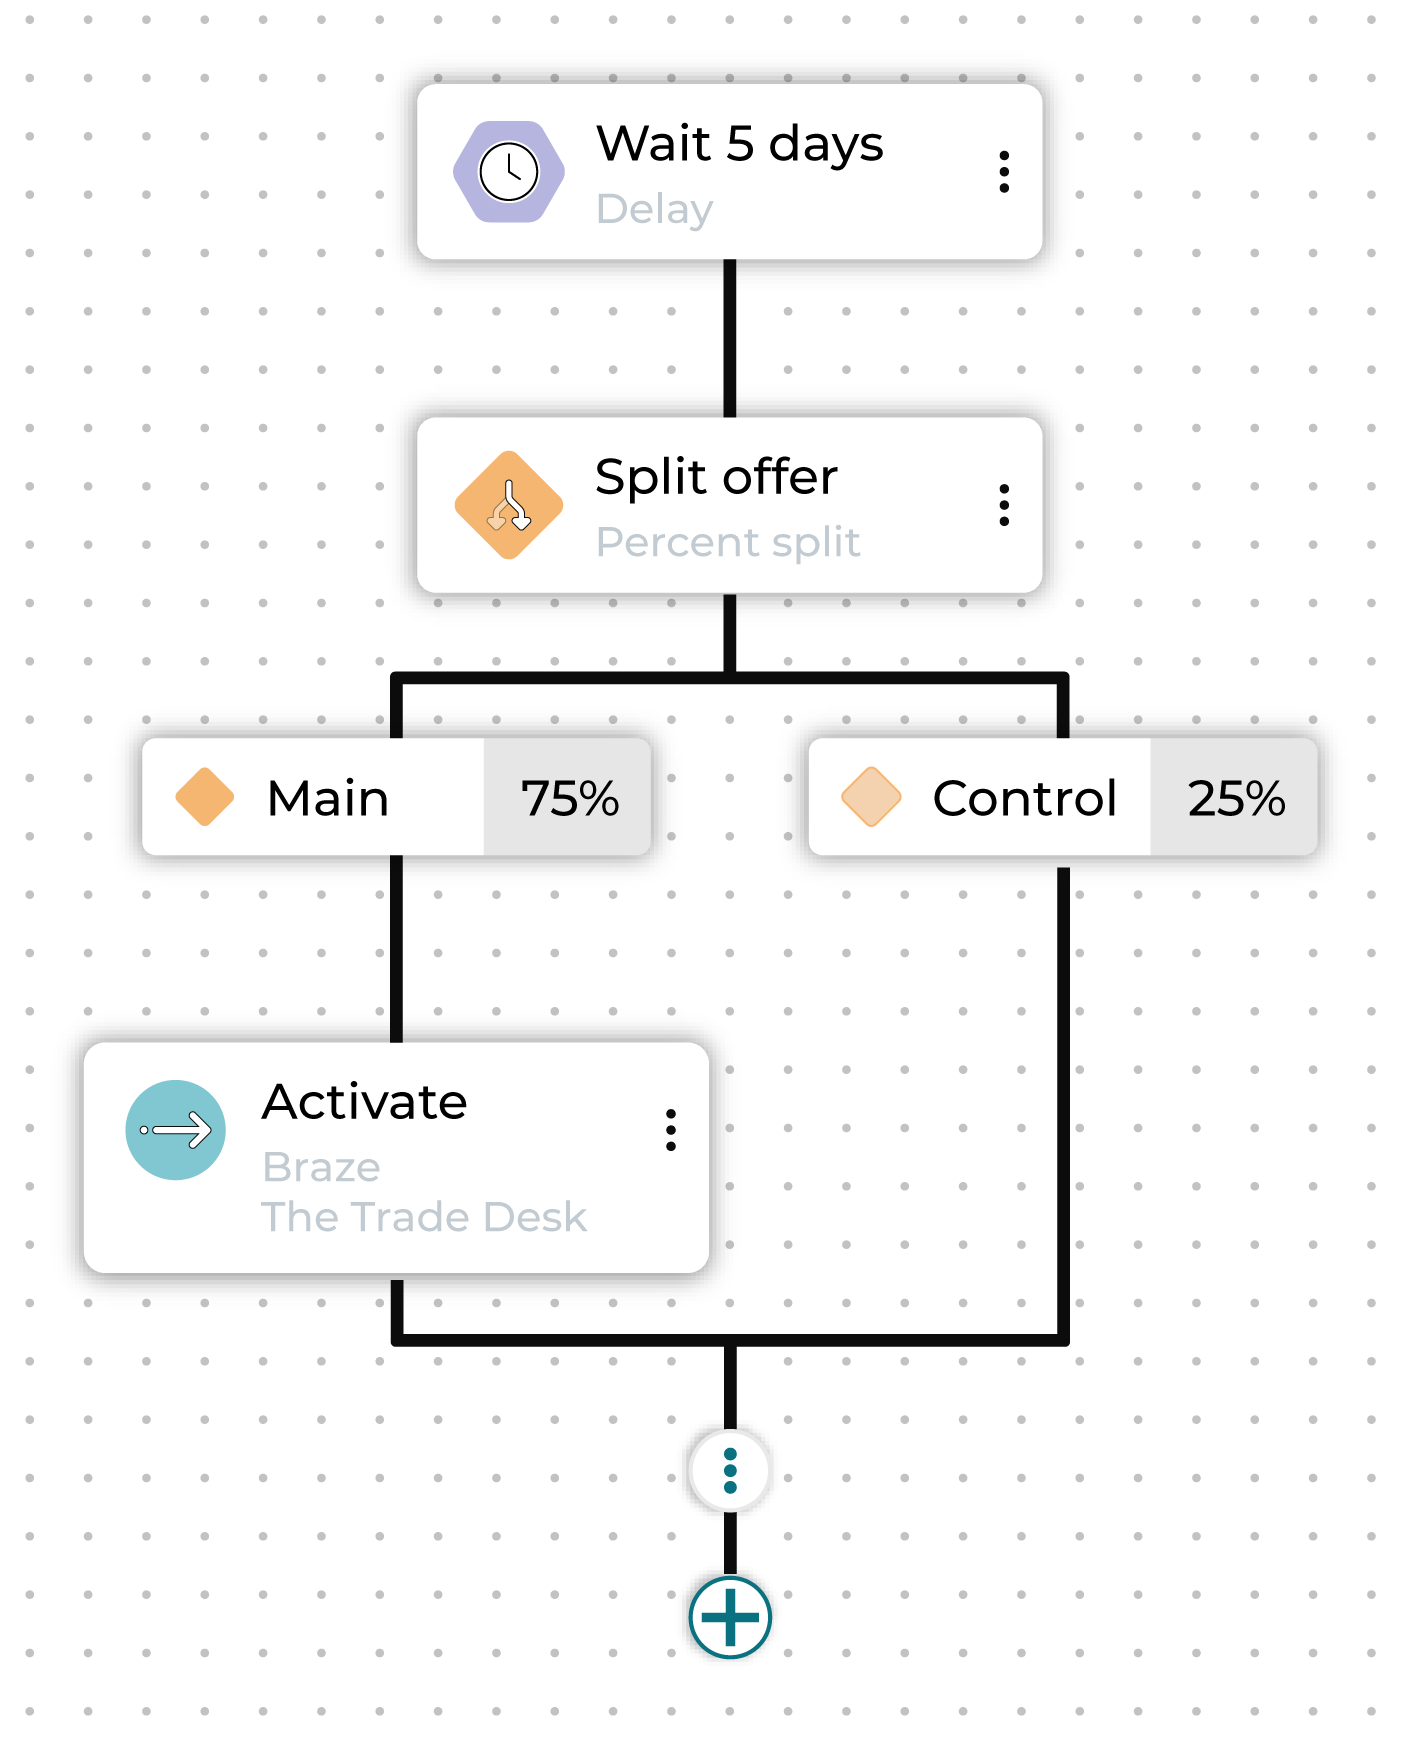
The high-value customers who purchased between 1 and 3 months ago are set for a delay followed by an activation, as a second wave of early access.
Additionally, this audience is further split, so that 75% receive a special promotion and 25% do not, to see how important an added incentive is for getting customers to purchase again.
Finally, the high-value customers who have not purchased in the last three months are contacted when the new products become available to make sure they are among the first to know.
The journey can be further built out beyond this, with additional splits based on whether or not customers purchase or how they engage with the communications they receive.
Journeys setup
Journeys require that segments are available and that at least one destination has been configured.
Access the Journeys Canvas by selecting Journeys at the top of the Activations page, and then click Create journey.
Name a journey
Enter a name in the Journey Name field.
A journey should be assigned a name that makes it easy to find and for other Amperity users to understand.
Tip
Use good naming patterns to ensure that you can always find your journeys in the various applications to which you sends them. The journey name will always appear in the filename that is sent to any destination.
Avoid duplication between journey and treatment group names.
Avoid using the names of destinations as journey names unless the journey is sent to only that destination.
Use a naming pattern that ensures the journey name works across every treatment group that is configured within any sub-audience.
If brand names or region names apply to all sub-audiences in the journey, consider using them within the journey name.
Some examples:
“Birthdays_Under_40”
“Acme_Churn”
“Churn_HighValue_Early”
“Socktown_High_AOV”
Who enters?
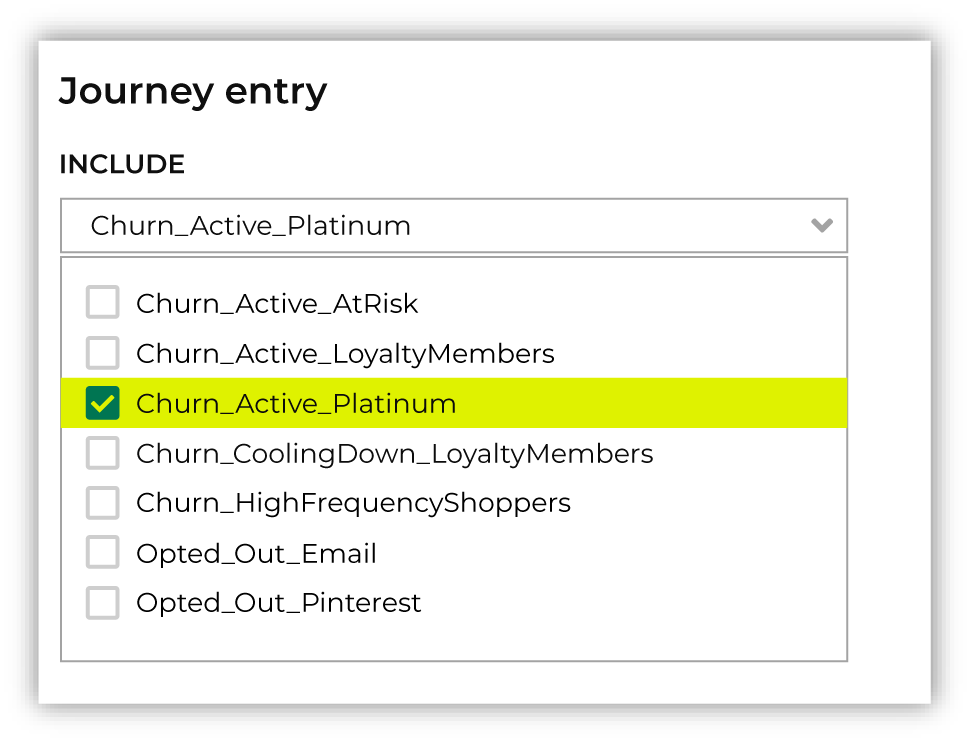
Every journey starts with an audience defined by one or more segments that determine which users enter this journey.
Choose one or more segments from the Select inclusion segments dropdown list. The customers in that list will become the audience for this campaign.
Note
When adding many inclusion segments, all segments are unioned, so a customer only needs to match one of the segments in the inclusion category to be considered part of it. You may add up to ten inclusion segments.
Important
Segment filtering by database
Each journey is associated with a specific database. This database is set automatically when you select your first inclusion segment.
Once that first inclusion segment is selected:
The journey is tied to the same database as that segment
Viability of the journey depends on the database functioning with no errors.
All other segments–whether inclusion, exlcusion, or exit–are filtered to only show segments from that database.
Similarly, the activation ID associated with the initial segment determines the activation ID for all other segments to ensure consistency across the journey. For example, if the initial segment activates based on email, then other segments will only include customers with valid email addresses.
To change the database associated with a journey, you must first remove all inclusion segments. Then, when you select a new first inclusion segment from a different database, the journey’s database updates accordingly.
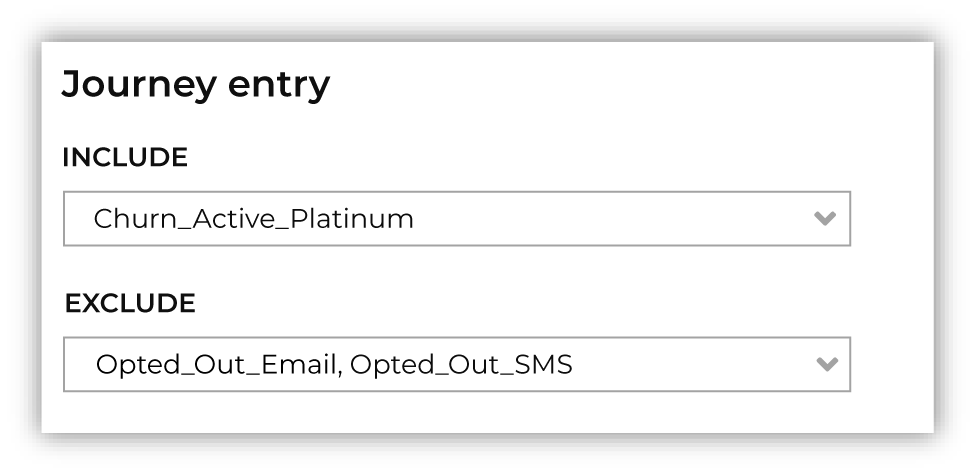
Who is excluded?
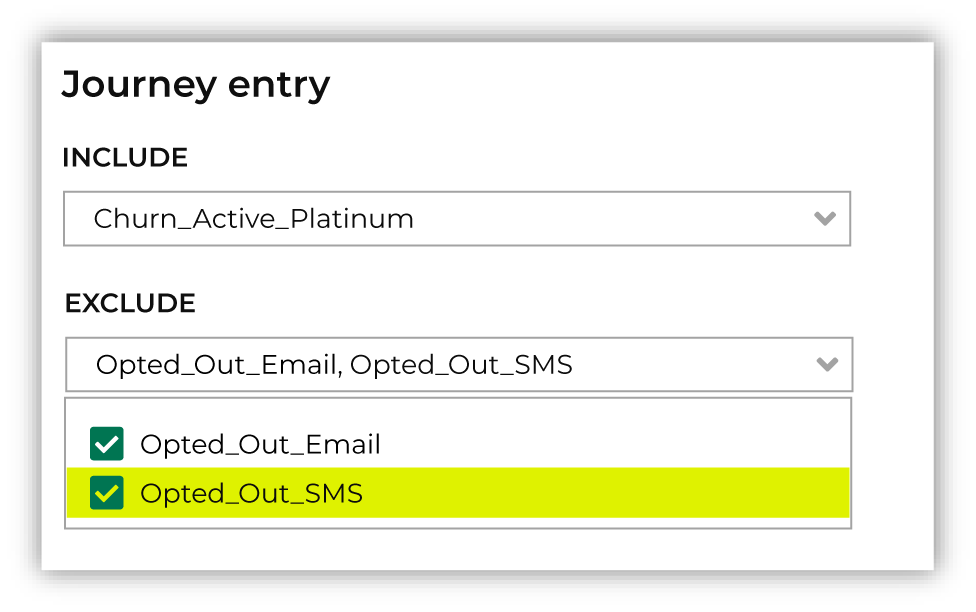
Sometimes a journey needs to exclude certain members of your audience. For example, a journey aimed at churn prevention often excludes customers who have opted-out of SMS messaging or who have unsubscribed from an email list.
When you need to exclude audience members, choose one or more segments from the Select exclusion segments dropdown list. The customers in an exclusion list will be removed from the audience for this journey.
Note
When adding many exclusion segments, all segments are unioned, so a customer only needs to match one of the segments in the exclusion category to be considered part of it. You may add up to ten exclusion segments.
Exit conditions
Some customers should exit a journey when a particular criterion has been fulfilled. For example:
The goal of a churn prevention campaign is to convince a customer to make a purchase. If a customer who is part of a churn prevention campaign makes a purchase they should be removed from the campaign.
An audience starts with customers who have opted in to receiving marketing messages from your brand. If a customer who is part of that journey later opts out they should be removed from the campaign.
Exit conditions are defined using a segment. One or more segments that define exit conditions may be added to a journey using the Select exit segments dropdown.

Note
When adding many exit condition segments, all segments are unioned, so a customer only needs to match one of the segments in the exit conditions category to be considered part of it. You may add up to ten exit condition segments.
Goal conditions
Set goals to track when customers included in the journey reach designated segments. This differs from an exit condition in that reaching a goal segment does not remove the customer from the journey. You can measure progress on specific business goals while the customer continues on the journey.
Goal conditions are defined using a segment. One or more segments that define goal conditions may be added to a journey using the Select goal segments dropdown.
Note
When adding many goal condition segments, all segments are unioned, so a customer only needs to match one of the segments in the goal conditions category to be considered part of it. You may add up to five goal condition segments.
Important
Journey goals require batch segments (SQL-based segments). Real-time segments are not supported for journey goals.
Allow re-entry?
If a journey is set to recur, you can allow the same customer to re-enter the journey on its next run if the customer has both previously exited the journey and once again qualifies for the inclusion segment.
Note
When a journey is set to run on a recurring schedule, only customers who have newly qualified for the inclusion segment since the last run will enter the journey.
For example, if the segment had 1,500 members at launch, all 1,500 would enter the journey.
On the next run, if the segment has grown to 1,700, only the 200 new members–those who joined the segment after the previous run–are guaranteed to be included.
If you have selected Allow re-entry customers who have previously exited the journey must re-qualify for the inclusion segment. For example, if the segment is based on a time window, such as “purchased in the last 7 days”, and they meet the criteria again, they can re-enter.
To prevent this, use an exclusion segment to filter out users who have already participated, or who meet other disqualifying conditions.
Journeys Canvas
After establishing the audience and starting conditions of the journey, you will be taken to the Journeys Canvas. This is the interface where you determine the steps of the journey and define how your brand will interact with customers at each step.
The following building blocks are available to users for creating journeys:
Important
Each node in a journey must have a name that is unique within that journey. If two nodes share a name (for example, two Activate nodes), they must be differentiated (for example, “Activate 1” and “Activate 2”).
About the Journeys AI Assistant
The Journeys AI Assistant is a generative AI feature within the Journeys Canvas. Use it to edit and personalize journeys with natural language.
Journey start
A start node displays the starting segments in a journey along with any exclusions.
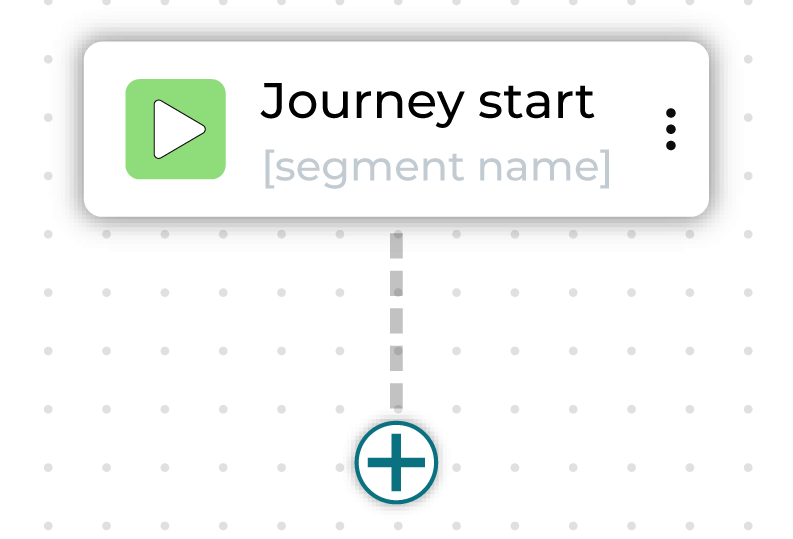
To edit inclusions, exclusions, or exit conditions, click on the Journey start node. Click the plus button underneath to add nodes to the journey.
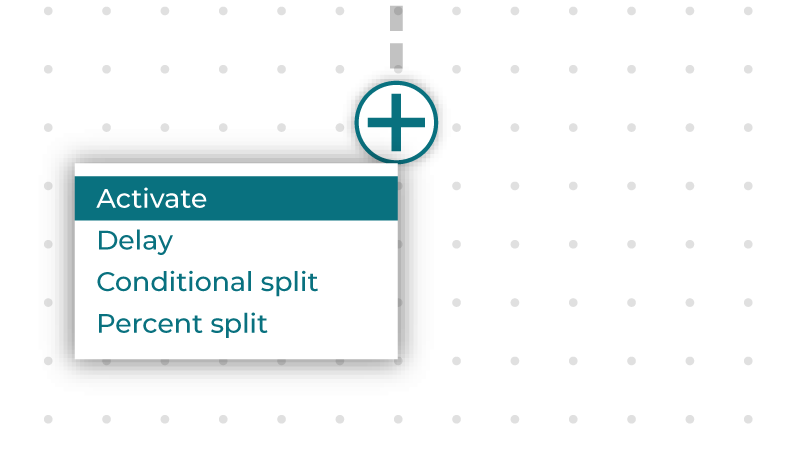
Activate
An activate node sends an audience to one or more destinations.
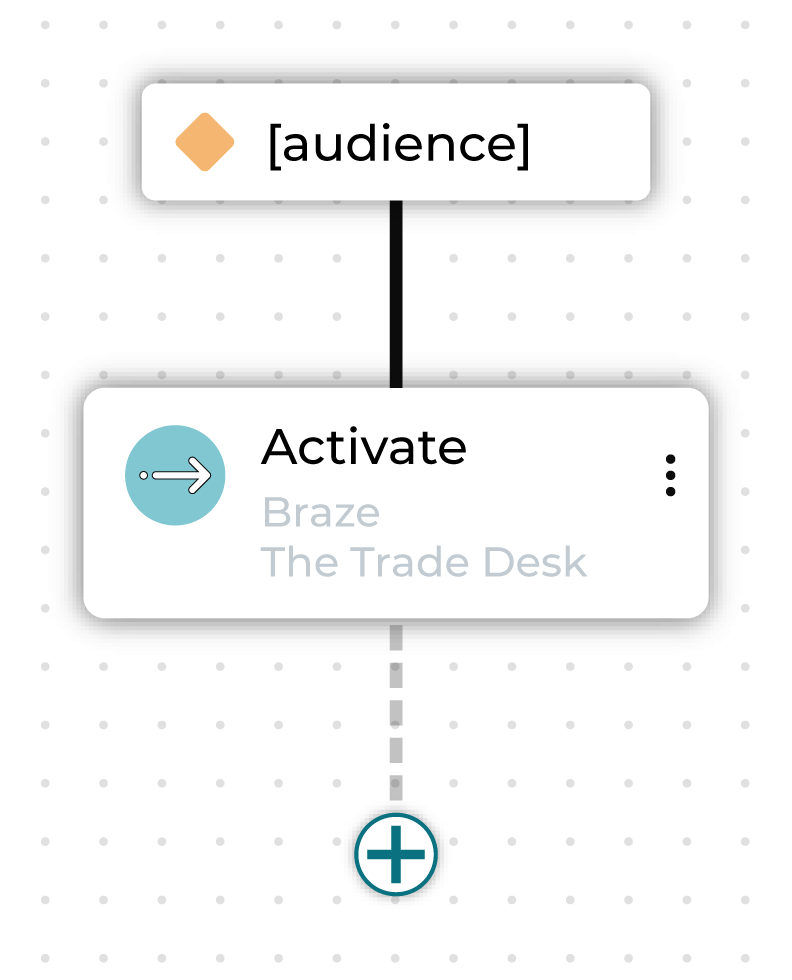
You can rename the activate node. Node names must be unique within a journey. For example, you cannot have many activate nodes named “Activate” but you can have “Activate 1”, “Activate 2”, and so on.
You can configure a single activation node to send to many destinations at once, and this is recommended for simplicity and efficiency.
Note
If you are activating to several destinations and each one uses different custom attributes, you will need to create a separate activation node for each destination to assign those attributes correctly.
Tip
Avoid activation file naming conflicts
Running a journey generates a file for every activation node. The filename is constructed using:
the journey name
the activation node name
If many activation nodes have the same filename, it will cause an error.
To avoid this error, make sure each activation node within a journey has a unique name. Renaming the node will automatically update the generated filename.
You can check an activation node’s path and file name in the Node configuration panel on the righthand side of the Journeys Canvas, under “Destination Summary”.
Delay
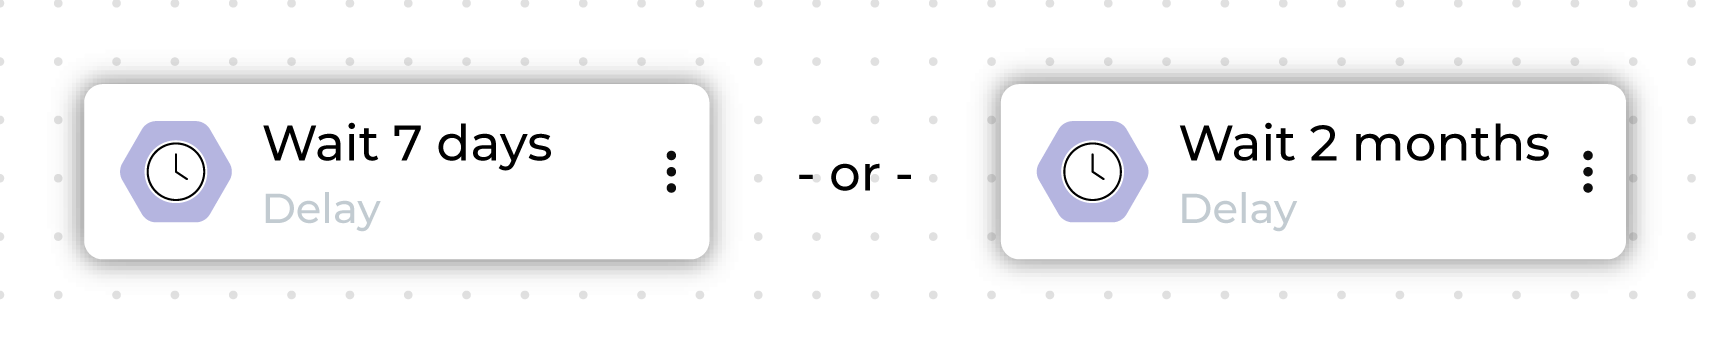
A delay node defines a minimum amount of time that customers must wait before moving to the next step in a journey.
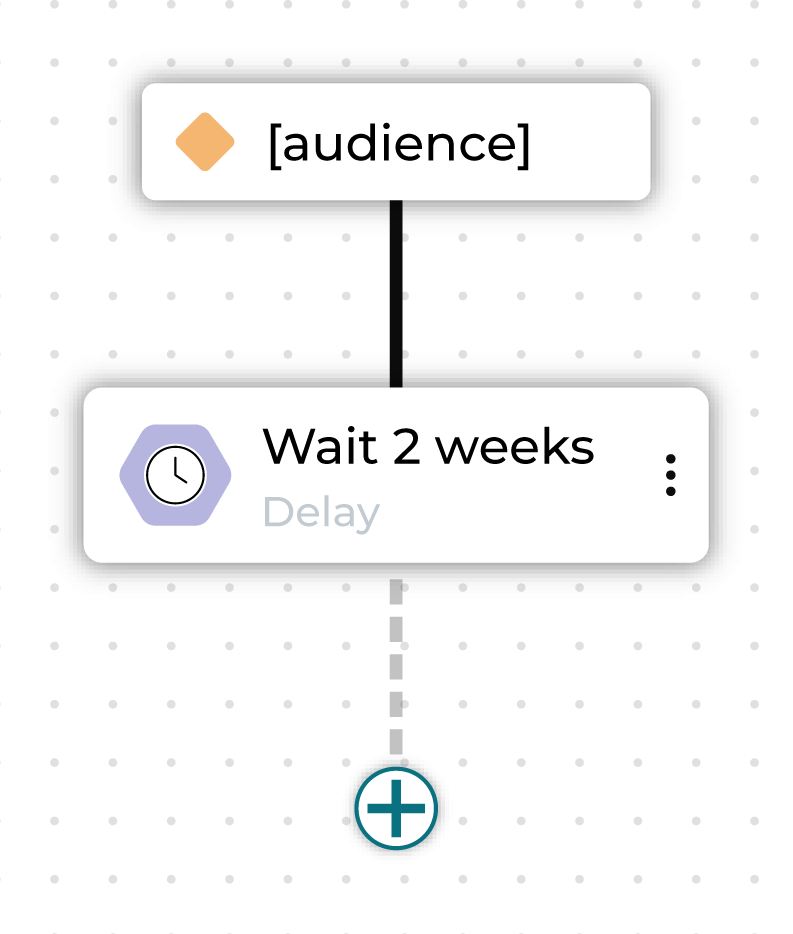
Choose a combination of an integer plus “days”, “weeks”, or “months” to designate how long to wait before the next step in the journey begins.
A delay is applied to a single parent node.
You can rename the delay node. Node names must be unique within a journey. For example, you cannot have many delay nodes named “Delay” but you can have “Delay 1”, “Delay 2”, and so on.
Important
Customers do not automatically move forward after the wait period ends. Progression only occurs the next time the journey runs.
For example, if a delay node is set to 3 days but the journey is scheduled to run weekly, customers will remain at the delay node until the next scheduled run, waiting up to 7 days.
If a journey is set to run only once, customers will not move beyond the delay node after it executes.
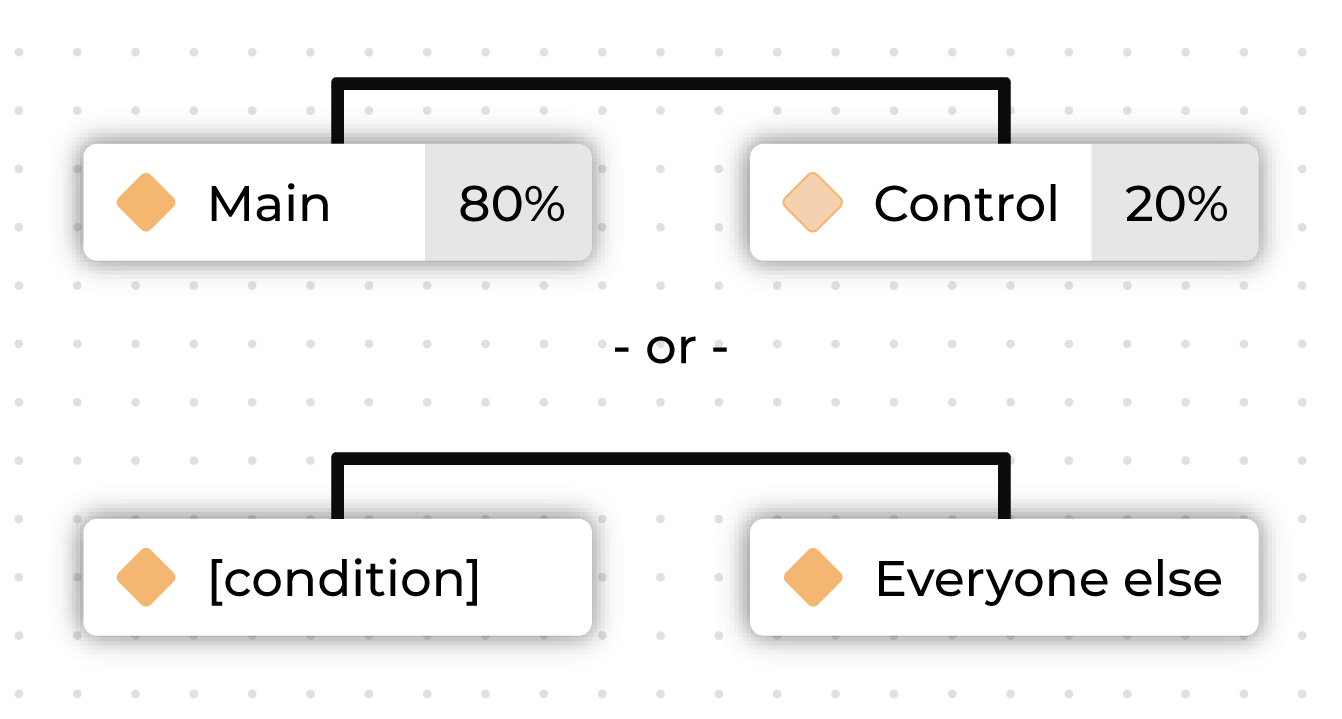
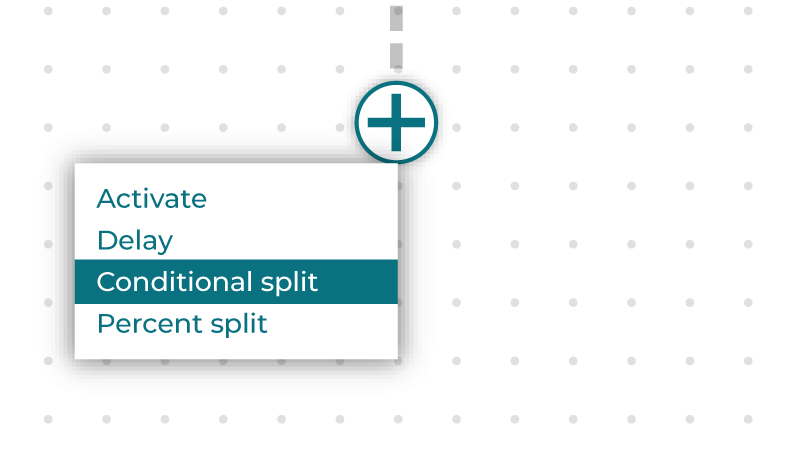
Conditional split
A conditional split node splits a journey into branching paths, where each path defines one or more segments.
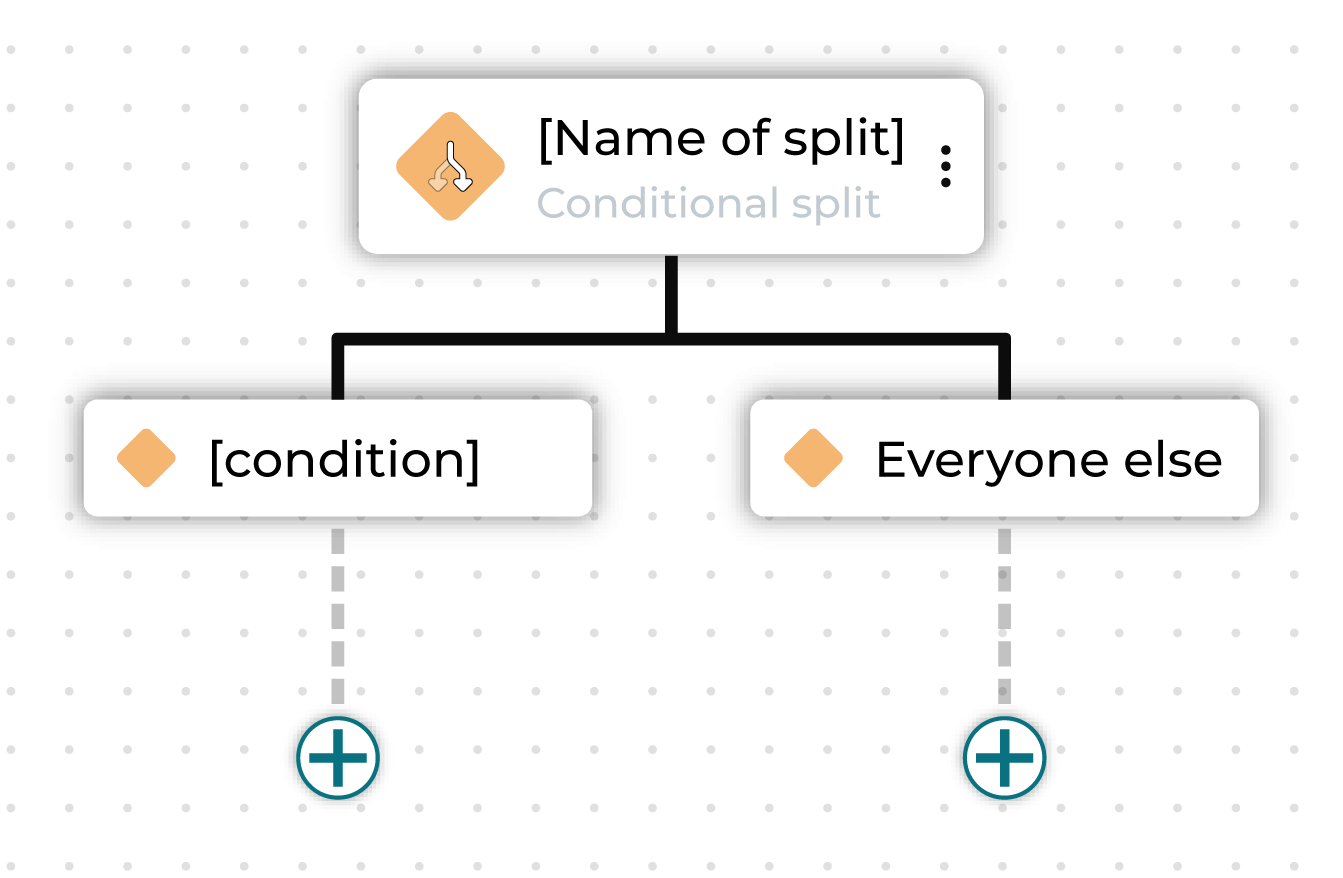
These segments may already exist or may be defined within this journey using custom criteria.
You can rename the conditional split node and rename the “Everyone else” sub-audience. Node names must be unique within a journey. For example, you cannot have many conditional split nodes named “Conditional Split” but you can have “Conditional Split 1”, “Conditional Split 2”, and so on.
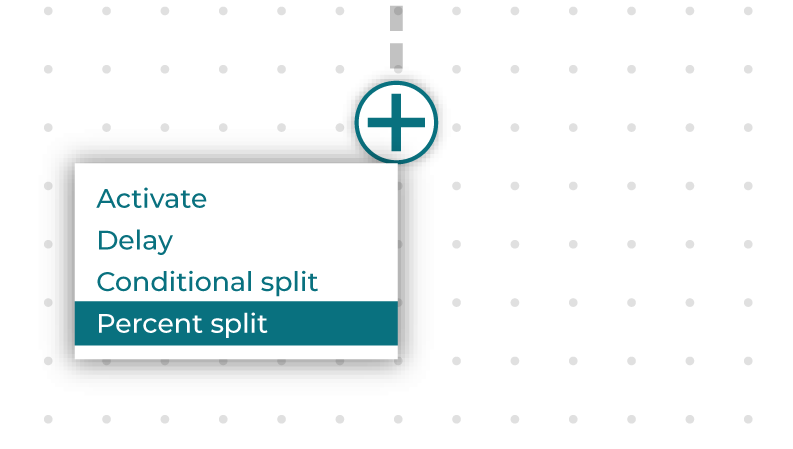
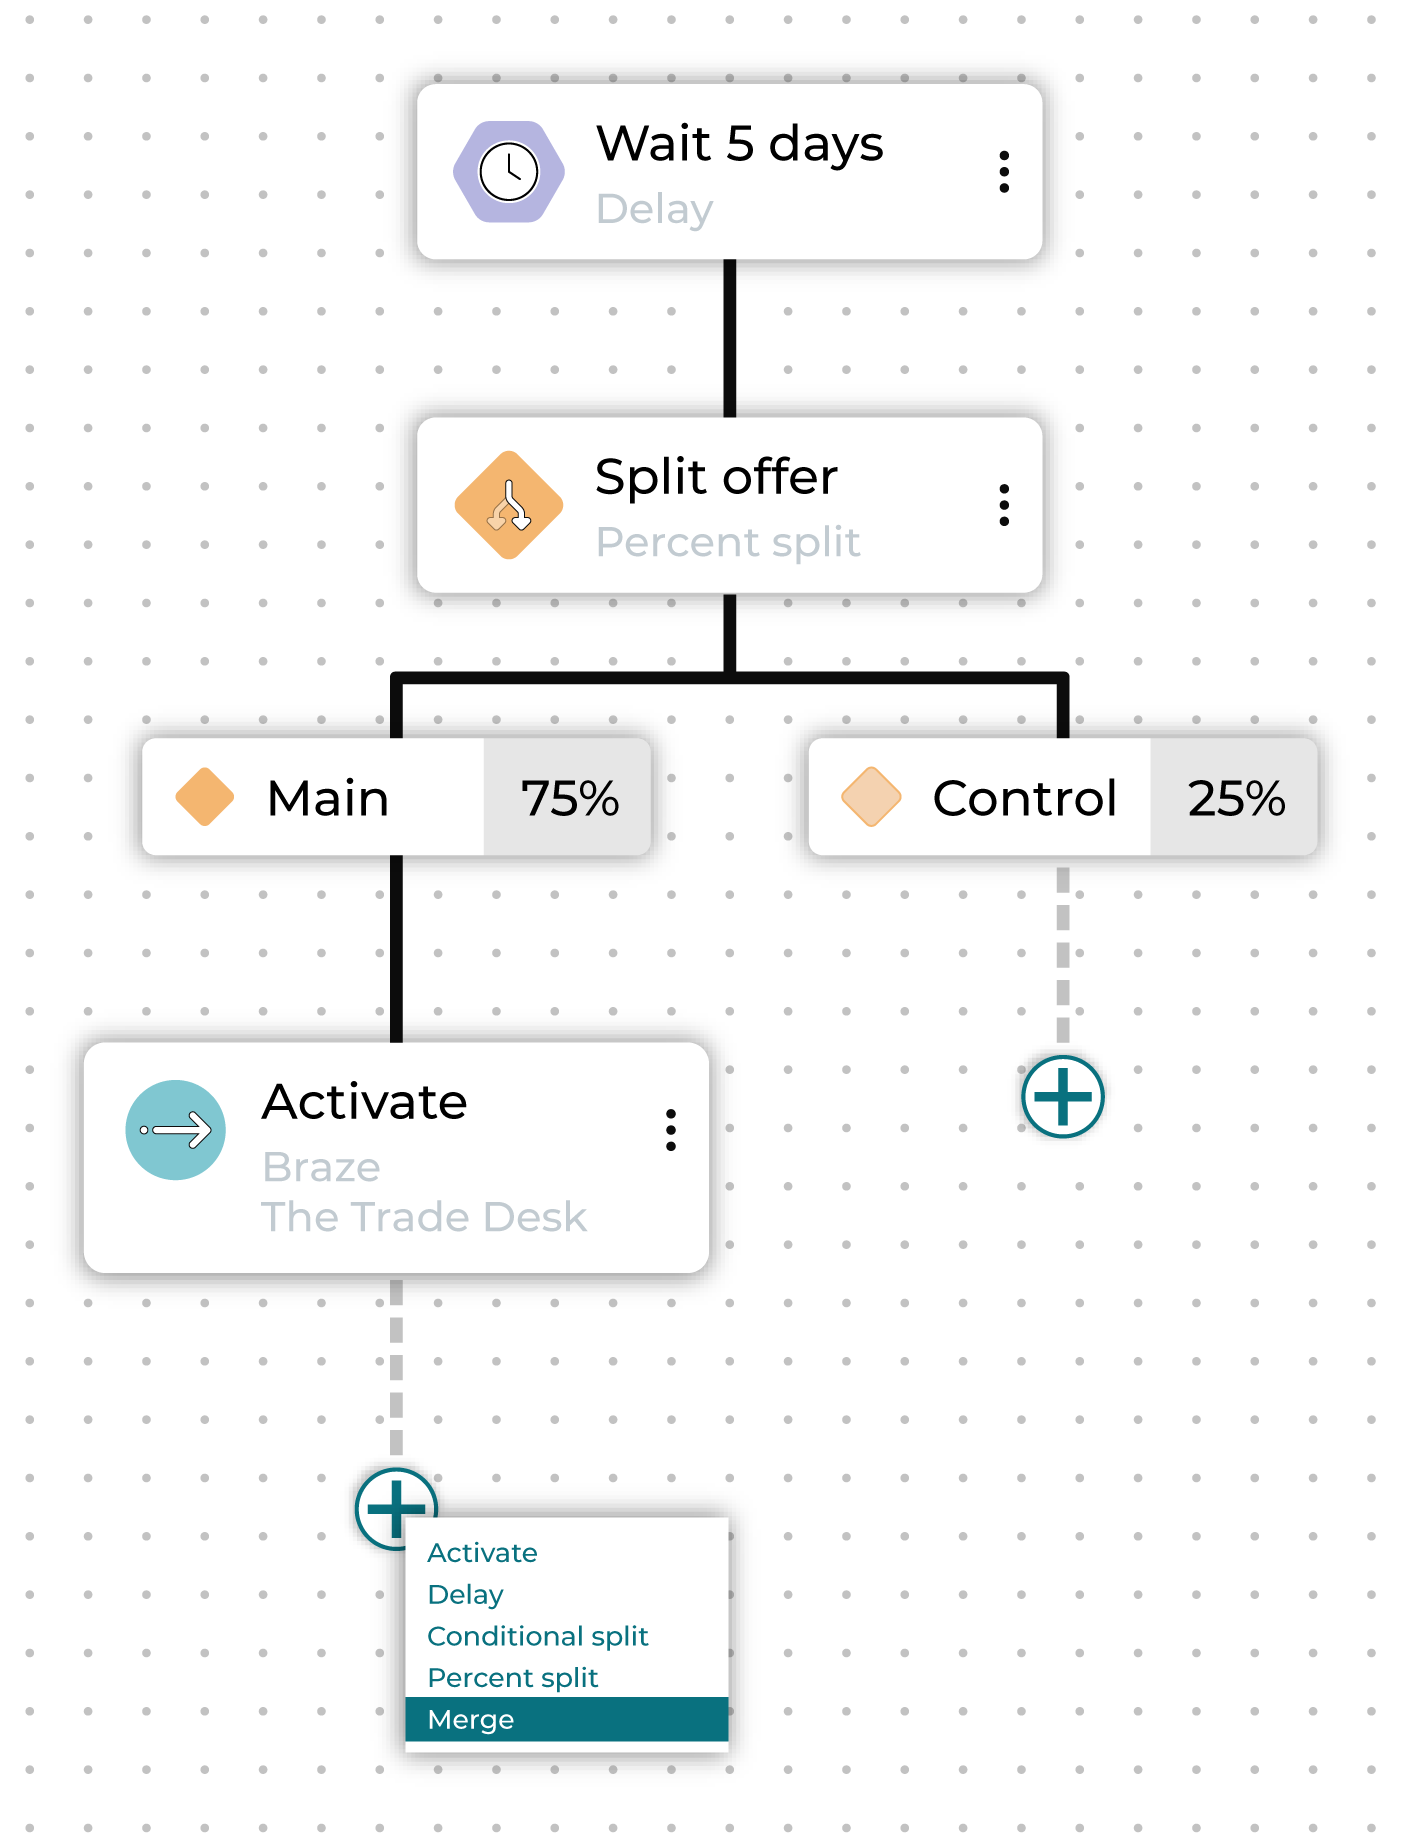
Percent split
A percent split node splits a journey into branching paths, where each path applies to a randomly selected percentage of the audience that entered the branch.
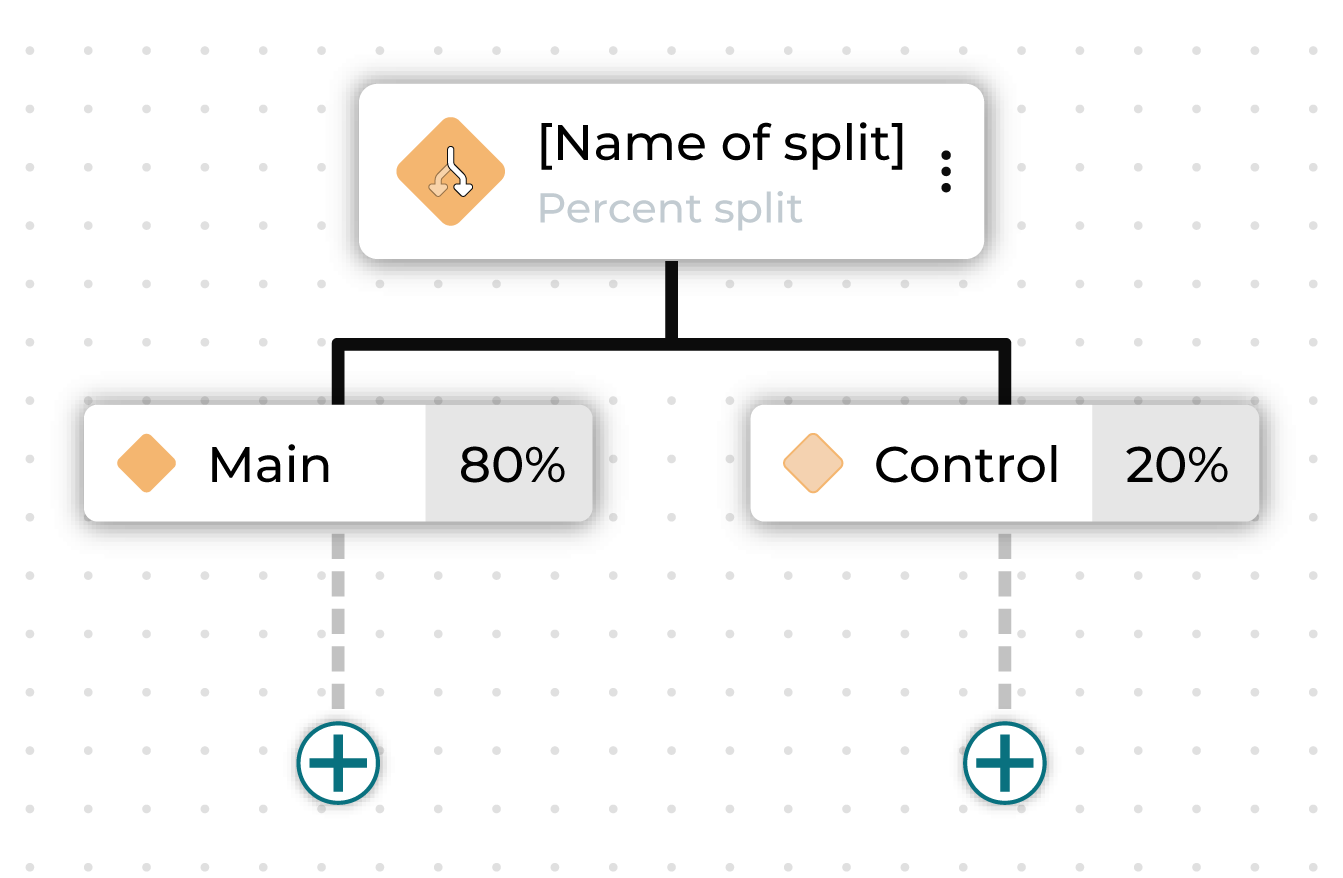
The percentage of all individual nodes under a percent split must add up to 100% of the audience, including the control group.
You can rename the percent split node and rename the individual paths. Node names must be unique within a journey. For example, you cannot have many percent split nodes named “Percent Split” but you can have “Percent Split 1”, “Percent Split 2”, and so on.
Individual split
An individual split node represents each path in a journey that defines a conditional or percent split.
Note
To edit sub-audiences conditions and naming, click into the parent node.
Merge
A merge joins together paths in a conditional split or percent split to ensure consistency and avoid the need to duplicate logic if the journey for both paths should be the same after the split.
Note
The option to merge only appears when you click the plus button below a split.
Note
If a journey ends on a merge, that merge is removed upon saving the journey because a closing merge does not result in any action.
Note
Merging an outer path will first merge the inner path.

Add a node
Click the plus button to add a node to the journey. May be one of “Activate”, “Delay”, “Conditional Split”, or “Percent Split.”
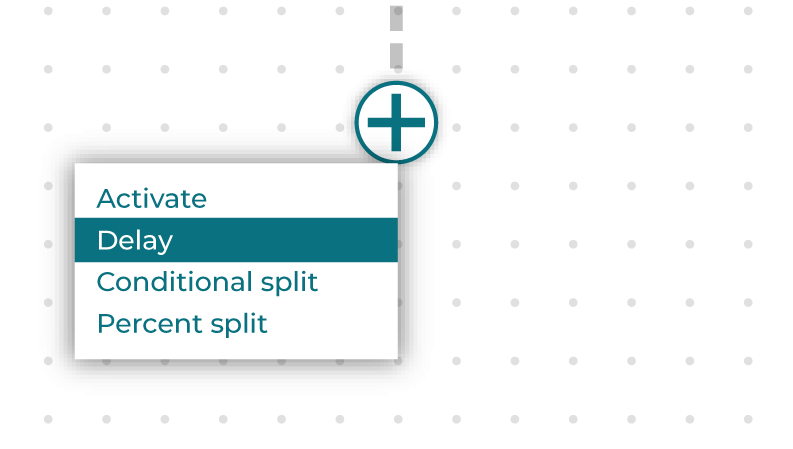
If the plus button is after a split node, there will also be the option to choose “Merge.”
Journeys measurement
Journeys measurement provides insight into performance by tracking milestones, measuring goal achievement, and calculating incremental lift on test versus control splits. Use journey goals and exit measurement to understand which paths drive the most conversions.
Journeys measurement helps you:
Track customer milestones including journey exits and goal achievements
Measure progress toward specific business goals without removing customers from the journey
Calculate path-specific goal achievement via percent-split testing
View metrics across many time windows (7, 30, and 90 days)
Export detailed journey travel logs for advanced analysis
Important
Journeys measurement requires batch segments (SQL-based segments). Real-time segments are not supported for journey measurement.
How measurement works
Journeys measurement uses two primary data structures to track customer progress:
Journey Travel Log (JTL) records every stage transition with enriched metadata including:
Journey and stage identifiers
Traveler entry and exit timestamps
Split path details (test group names, control flags)
Exit segment information when applicable
Milestones dashboard tracks significant events including:
Goal achievements (customers meeting success criteria after entering the journey; will not show customers already in the goal segment at the start fo the journey)
Exit events (customers leaving the journey)
Complete path reconstruction for each traveler
Time-based aggregations (all-time, 7-day, 30-day, 90-day windows)
Types of journey goals
Journey goals can be configured at two levels:
Journey-level goals Applied to the entire journey to track overall success metrics:
Track achievement regardless of path taken
Available in the Journey Goals card on the canvas
Maximum 5 goal segments per journey
Percent-split goals Applied to specific percent-split nodes for A/B testing:
Track achievement by split path (test vs control)
Enable incremental lift calculation
Available when configuring percent-split nodes
Maximum 2 goal segments per percent-split node
Important
The total number of goal segments across your entire journey (journey-level + all percent-split nodes) cannot exceed 10.
Milestones tracking
The milestones dashboard on the Journeys Canvas capture significant events as customers travel through your journey. The system automatically tracks:
Goal milestones Customer achieved a journey or split goal
Exit milestones Customer met exit criteria and left the journey
Milestone metrics
Metric |
Description |
|---|---|
All-time count |
Total milestone achievements since journey start |
Past 7 days |
Achievements in the last 7 days |
Past 30 days |
Achievements in the last 30 days |
Past 90 days |
Achievements in the last 90 days |
Median duration |
Median time in days from journey entry to milestone achievement |
Tip
Use time-windowed metrics to understand recent performance trends and seasonal patterns in goal achievement.
Percent-split testing
Percent-split nodes with goals configured enable A/B testing capabilities. Goals set for percent-split nodes only apply to customers passing through that node, rather than all customers in the journey.
Configuration requirements
One path must be designated as the control group
Other paths become test groups
Weights must sum to exactly 100%
Maximum 2 goal segments per split node
Must be configured before the journey begins to record goals
Path-specific metrics
The system tracks goal achievement by path, enabling calculation of:
Conversion count per path
Incremental lift (test vs control)
Time-windowed performance comparison
Path reconstruction showing exact journey taken
Tip
After accumulating data, review the path-specific metrics to determine which path performs better. Consider adjusting split percentages based on lift results.
Journey Travel Log
The Journey Travel Log (JTL) provides detailed tracking of every traveler’s journey with enriched metadata.
Travel log schema
Field |
Type |
Description |
|---|---|---|
entry_at |
Datetime |
When the traveler entered a given node |
event_id |
String |
Customer identifier, typically based on Amperity ID |
exit_segments |
String |
Pipe-separated list of exit segment names |
is_control |
Boolean |
For percent-splits: whether this is the control path |
is_remaining |
Boolean |
For conditional-splits: whether this is the last default path |
journey_id |
String |
ID of journey in URL (jny-xxx) |
journey_name |
String |
Name of journey |
journey_version |
String |
Journey version ID (jnv-xxx) |
mxs_ids |
String |
Pipe-separated list of exit segment IDs |
parent_id |
String |
ID of previous node customer passed through |
parent_name |
String |
Name of the parent node |
split_condition_name |
String |
Name of the split condition node corresponding with this path |
stage_id |
String |
Node ID (jnn-xxx) or lifecycle stage (start, complete, exit, orphan) |
stage_name |
String |
Name of node |
stage_type |
String |
Node type (activation, wait, merge, percent-split, conditional-split) |
test_group_name |
String |
For percent-splits: name of the test group |
Journey Travel Log export
Travel log data can be exported to external systems for advanced analysis:
Path reconstruction
Split performance analysis
Exit pattern identification
Time-to-goal calculations
Exporting automatically enriches metadata with node details, and includes exit information when applicable.
Only exports previously unsent entries (tracked via egress_sent_at).
Journey Travel Log export supports batch export to data warehouses.
Journeys use cases
To help you get started with journeys, Amperity provides example journeys of common and effective use cases. These examples show how to structure your canvas flow and how to use different channels to achieve specific business goals.
Note
These are hypothetical examples to give a sense of what is possible. Use them as inspiration or a starting point to structure a journey that fits your brand’s particular circumstances.
Example journeys use cases
Use Case |
Goal |
|---|---|
Turn a new subscriber or customer into an engaged participant by providing helpful, sequenced information. |
|
Convert users who started a purchase but did not finish. |
|
Drive immediate, high-margin revenue through personalized, time-sensitive offers. |
|
Convert recent browsers or product page viewers into purchasers. |
|
Increase Average Order Value (AOV) by recommending complementary products post-purchase. |
|
Drive revenue during key shopping periods using high-precision audience segmentation. |
|
Incentivize high-value customers who are close to the next tier to achieve that level. |
|
Convert website interest into an in-person appointment or service booking. |
|
Drive repeat purchases based on predicted product consumption cycles. |
|
Guide new account holders to full product adoption and usage. For example: depositing funds or setting up direct deposit. |
How-tos
Tasks related to building journeys in Amperity:
Add a journey
Follow this sequence when building a journey:

|
Open the Journeys canvas. This is available on the Activations page. Select the Journeys button on the top left and then click Create journey. Add a name for the journey. |
|
Define Audience, Exclusion, and Exit Conditions |
Use the Journey setup sidebar to define the audience.
Who enters?
Every journey starts with an audience defined by one or more segments that determine which users enter this journey.
Choose one or more segments from the Select inclusion segments dropdown list. The customers in that list will become the audience for this campaign.
Who is excluded?
Sometimes a journey needs to exclude certain members of your audience. For example, a journey aimed at churn prevention often excludes customers who have opted-out of SMS messaging or who have unsubscribed from an email list.
When you need to exclude audience members, choose one or more segments from the Select exclusion segments dropdown list. The customers in an exclusion list will be removed from the audience for this journey.
Set Exit Conditions
Some customers should exit a journey when a particular criterion has been fulfilled. For example:
The goal of a churn prevention campaign is to convince a customer to make a purchase. If a customer who is part of a churn prevention campaign makes a purchase they should be removed from the campaign.
An audience starts with customers who have opted in to receiving marketing messages from your brand. If a customer who is part of that journey later opts out they should be removed from the campaign.
Exit conditions are defined using a segment. One or more segments that define exit conditions may be added to a journey using the Select exit segments dropdown.
Note
When adding many exit condition segments, all segments are unioned, so a customer only needs to match one of the segments in the exit conditions category to be considered part of it. You may add up to ten exit condition segments.
Activate node
An activate node sends an audience to one or more destinations.
On the Journeys canvas, under an existing node, click the plus symbol and then choose Activate.
Name the activate node and then choose one or more destinations from the dropdown menu.

Delay node
A delay node defines a minimum amount of time that customers must wait before moving to the next step in a journey.
On the Journeys canvas, under an existing node, click the plus symbol and then choose Delay.
Name the delay node and then set the length of time.

Conditional split node
A conditional split node splits a journey into branching paths, where each path defines one or more segments.
On the Journeys canvas, under an existing node, click the plus symbol and then choose Conditional split.
Name the conditional split node and then add paths. For each path, define the sub-audience using a segment or custom criteria.

Percent split node
A percent split node splits a journey into branching paths, where each path applies to a randomly selected percentage of the audience that entered the branch.
On the Journeys canvas, under an existing node, click the plus symbol and then choose Percent split.
Name the percent split node and then add paths. For each path, define the percentages.
A control group is set to 10% by default. You may increase or decrease the size of the control group. Control groups use the concepts of people-based measurement to assign customers to control and treatment groups, which gives marketers the ability to accurately measure the incremental effects of a campaign.

A journey may use any combination of nodes to define the paths that your brand wants your customers to take.
For example:

When you are finished building the journey, click Save.
Add activate nodes
An activate node sends an audience to one or more destinations.
To add an Activate node to a journey
From the Journeys Canvas, select the plus symbol, and then choose Activate.
Configure the following settings:
Name Give the node a custom name or keep the “Activate” default name.
Destination Choose one or more destinations from the dropdown menu.
A summary of details is shown. Click the Attributes tab to review the list of attributes that are sent.
Add another destination Click the “Add another destination” link to add more destinations to the activation node.
Continue building the journey or, if finished, click Save.
Tip
You can add many destinations to a single activation node. However, if your destinations require different custom attributes, use separate activation nodes for each destination.
Add conditional split nodes
A conditional split node splits a journey into branching paths, where each path defines one or more segments.
To add a Conditional Split node to a journey
From the Journeys Canvas, select the plus symbol, and then choose Conditional split.
Configure the following settings:
Name Give the node a custom name or keep the “Conditional Split” default name.
Add new path Click the “Add new path” link to add paths for this split. Each path requires a sub-audience, which may be defined by a segment or by custom criteria.
Name of remaining audience Amperity uses “Everyone else” to name the audience for customers who do not belong to the segment or custom criteria for a path in this conditional split. You may keep the “Everyone else” default or may add a custom name.
Continue building the journey or, if finished, click Save.
Add delay nodes
A delay node defines a minimum amount of time that customers must wait before moving to the next step in a journey.
To add a Delay node to a journey
From the Journeys Canvas, select the plus symbol, and then choose Delay.

Configure the following settings:
Name Give the node a custom name or keep the “Delay” default name.
Set delay time Enter an integer and a unit of time to define length of time to wait before the next step in a journey begins
Continue building the journey or, if finished, click Save.
Important
Customers do not automatically move forward after the wait period ends. Progression only occurs the next time the journey runs.
For example, if a delay node is set to 3 days but the journey is scheduled to run weekly, customers will remain at the delay node until the next scheduled run, waiting up to 7 days.
If a journey is set to run only once, customers will not move beyond the delay node after it executes.
Add percent split nodes
A percent split node splits a journey into branching paths, where each path applies to a randomly selected percentage of the audience that entered the branch.
To add a Percent Split node to a journey
From the Journeys Canvas, select the plus symbol, and then choose Percent split.
Configure the following settings:
Name Give the node a custom name or keep the “Percent Split” default name.
Configure paths Choose a name and percentage for the treatment path, or keep the default name of “Main Group” and the value of 90%.
Click the “Add path” link to add more treatments. Each treatment should have a unique name and a percentage value.
Important
The percentages for all paths and the control group must add up to 100%.
Configure control group Choose a name and percentage for the control group, or keep the default name of “Control Group” and the value of 10%.
Tip
Uncheck “Include control” to disable the control group.
Continue building the journey or, if finished, click Save.
Allow re-entry
If a journey is set to recur, you can allow the same customer to re-enter the journey on its next run if the customer has both previously exited the journey and once again qualifies for the inclusion segment.
To allow re-entry into a journey
You can allow re-entry during the initial journey setup as well as toggle it on or off later.
From the Journeys Canvas, click into the Journey start node.
Click the Allow re-entry box.
Note
When a journey is set to run on a recurring schedule, only customers who have newly qualified for the inclusion segment since the last run will enter the journey.
For example, if the segment had 1,500 members at launch, all 1,500 would enter the journey.
On the next run, if the segment has grown to 1,700, only the 200 new members–those who joined the segment after the previous run–are guaranteed to be included.
If you have selected Allow re-entry customers who have previously exited the journey must re-qualify for the inclusion segment. For example, if the segment is based on a time window, such as “purchased in the last 7 days”, and they meet the criteria again, they can re-enter.
To prevent this, use an exclusion segment to filter out users who have already participated, or who meet other disqualifying conditions.
Delete node
Any node on the Journeys Canvas can be deleted. This action only deletes that node. All child nodes remain in the journey.
To delete a node from a journey
From the Journeys Canvas, click the icon on the node you wish to delete, then select Delete.
Continue building the journey or, if finished, click Save.
Edit existing node
The settings for nodes in a journey can be edited.
To edit node configuration
From the Journeys Canvas, select a node.
Open Node Configuration sidebar, and then make your changes.
Continue building the journey or, if finished, click Save.
Alternatively, clicking the Node configuration sidebar opens the configuration pane for the most recently edited node.
Edit destination attributes
The attributes that are sent to each destination that are configured for activation in a journey can be edited.
To edit destination attributes
From the Journeys Canvas, select an activation node.
Open the Node configuration sidebar. For each configuration destination, a list of attributes may be edited.
Select a destination from the Destination dropdown.
Open the Attributes panel. A list of attributes is shown with the field in Amperity on the left and the field that is sent to the destination on the right.
Click the Edit button to update the list of attributes that are sent to this destination.
When finished, click Save.
Note
If you have many destinations in a single activation node and your destinations require different custom attributes, use separate activation nodes for each destination.
Edit exit conditions
The exit criteria for a journey can be edited.
To edit exit conditions
From the Journeys Canvas, open the Journey setup sidebar.
Under Exit conditions use the dropdown menus to edit the segments that should exit the journey.
Edit starting audience
The starting audience for a journey can be edited.
To edit the starting audience
From the Journeys Canvas, open the Journey setup sidebar.
Under Journey entry use the dropdown menus to edit the included and excluded segments.
Fit Journeys Canvas to screen
You can re-center and resize the canvas so that you are able to see the whole journey at once.
To fit Journeys Canvas to screen
Click the broken square icon on the bottom left of the canvas.
Filter journeys
You can filter the list of journeys that appear on the Journeys page. Click Show filters to open the filter bar, and then select values from any combination of the following:
By status. Select any combination of Active, Draft, Paused, and Ended.
By created by. Select any combination of users who created journeys.
By label. Select one or more labels to filter journeys by organizational category.
Tip
Labels help organize journeys by grouping related items together. For example, use labels to:
Identify journey types: “Welcome series”, “Retention”, or “Winback”
Assign team ownership: “Marketing” or “Analytics”
Track status: “In review” or “Approved”
Indicate priority: “High priority” or “Evergreen”
Labels are created on the Settings page, in the Labels tab, by clicking Add label. Label naming conventions should:
Not exceed 35 characters
Contain only alphanumeric characters, hyphens, and underscores allowed
Not exceed 10 labels per journey
Use consistent prefixes for related labels. For example: “Q1-” or “Holiday-”
Note
When many labels are selected, journeys matching any selected labels are shown.
Measure journeys
You can configure and manage measurement for your journeys:
Define measurement segments
You can define customer segments in the Visual segment editor based on journey activity. Use these segments to see insights for any customers who participated in a journey, achieved a goal, or met exit criteria.
To define measurement segments
On the Segments page, click Create segment, or edit an existing segment.
On the Add condition dropdown, filter by Activation activity.
Select a journeys activation activity from Is in journey, Reached a goal in journey, or Exited a journey.
Use the dropdown to select the journey from which you want to create the segment.
Click on Filters to further edit criteria, then click Save.
When done editing your segment, click View.
Export travel log data
You can configure your journey to send travel log data to a destination for analysis.
To export travel log data
Configure journey with goals.
Open your journey in edit mode.
Click on the starting node.
In the Journey settings window, choose a travel log destination from the Select destination dropdown.
Run the journey to generate and send travel log entries to your destination.
Set journey-level goals
Goals set at the journey level apply to all customers in the journey as a way of tracking performance without exiting the customer from the journey. Customers can achieve many goals during their journey.
Journey-level goals may be set during the initial journey setup as well as added or modified later.
To configure journey-level goals
Designate up to five goal segments on the initial journey setup window from the Select goal segments dropdown.
If you skip designating goals during the initial setup and want to add them later:
Open your journey in edit mode.
Locate the milestones card on the upper-right of the Journeys Canvas.
Click Add a goal.
Select up to 5 batch segments that represent goal achievements.
Click Done.
Activate and run the journey to begin tracking.
Once you have designated at least one goal, you may add or modify goals:
Open your journey in edit mode.
Locate the milestones card on the upper-right of the Journeys Canvas.
Click the caret icon.
Click Modify goals.
Select up to 5 batch segments that represent goal achievements.
Click Done.
Activate and run the journey to begin tracking.
Set percent-split goals
You may add goals to percent-split nodes to run A/B testing. Goals set for percent-split nodes only apply to customers passing through that node, rather than all customers in the journey. You may set a maximum of two goals per percent-split.
To configure percent-split goals
In edit mode:
Add or select an existing percent-split node in your journey.
In the Node Configuration pane, add paths and choose whether to include a control group.
Configure the split percentages ensuring they sum to 100%.
Add up to 2 goal segments for this split from the Select goal segments dropdown.
If done editing, click Save.
View milestone metrics
You can view milestone metrics including goals and exits for any journey that has run at least once.
Metrics update after each journey run. Historical data is preserved for trend analysis.
To view milestone metrics
On the Journeys page, open a journey that has run at least once
Navigate to the milestones card on the upper-right of the Journeys Canvas
Review milestone counts by time window: All-time total, past 7 days, past 30 days, or past 90 days
Check median duration to understand time-to-goal
For split goals, compare path-specific counts
Click any metric to get more details
Merge a split path
A merge joins together paths in a conditional split or percent split to ensure consistency and avoid the need to duplicate logic if the journey for both paths should be the same after the split.
To merge a split path in a journey
From the Journeys Canvas, select the plus symbol in any path after a split node, and then choose Merge.
To delete the merge, click the icon that appears below the merged paths and select Delete merge.
Continue building the journey or, if finished, click Save.
Monitor status & resolve errors
You can monitor journey status and determine how to resolve errors on the Workflows page.
Go to the Workflows page at the top level of your Amperity tenant. If you are starting from within the Journeys Canvas you will need to exit by clicking the X on the upper left.
Locate the name of your journey and click in to monitor status and get guidance on resolving errors.
You may receive workflow alerts related to your journeys.
Alerts are sent when:
A failure occurs within a journey execution or within any of the journey nodes.
A user cancels an automatically launched workflow.
The journey succeeds, if configured. This is only available for campaigns run on a schedule. Subscribe to courier group success alerts if your campaign is configured to run after a courier group and you want to know when it succeeds.
The journey runtime exceeds a threshold, if configured.
Alerts on specific journeys are limited to failures only.
Move around Journeys Canvas
You can click and drag the canvas to navigate around and see or edit the different paths and nodes of your journey.
To move around the Journeys Canvas
Click and drag the journey using a mouse or a trackpad.
You may do this directly on the canvas or on the minimap in the lower right.
Organize journeys
A folder helps you organize the list of journeys on the Journeys page. You may add up to four levels of subfolders.
You can organize the journeys shown on the Journeys page:
Add folder
Folders may be expanded or collapsed to view and hide the list of journeys and subfolders contained within.
To add a folder
From the Journeys page click Create folder. This opens the Create folder dialog box.
Enter the name for the folder.
Click Save.
Alternately, you can click the icon for an existing journey to create a folder that will contain this journey.
Add subfolder
Use the Create folder option in the menu for an existing folder to add a subfolder. You may configure up to four levels of subfolders. All folder names must be unique.
To add a subfolder
On the Journeys page, open the menu for a folder or subfolder by clicking the icon, and then select Create folder. This opens the Create subfolder dialog box.
Enter the name for the subfolder.
Click Save.
Move journey
Use the Move option to move around and organize the list of folders and journeys. Folders may be expanded to view the list of journeys and subfolders contained within.
To move a journey
From the Journeys page, click the icon to open the menu for a journey, and then select Move. This opens the Move journey dialog box.
Select the name of an existing folder to which a journey will be moved, and then click Move.
Hint
If the folder to which a journey will be moved is not present in the list of folders, you can add it directly from the Move journey dialog box. Click the New folder link, type a name for the folder, and then select it.
Rename a journey
A journey should be assigned a name that makes it easy to find and for other users of Amperity to understand.
To rename a journey
From the Journeys Canvas, click into the text of the current journey name at the top.
Enter a new name.
Save a journey
Saving a journey initiates the workflow, allowing you to view results and return later to make additional edits.
To save a journey
From the Journeys Canvas, click the Save button in the top right.
Use the caret button to Save as.
Tip
Saving a journey takes you from Edit to View mode. In View mode, click Edit in the upper right to make further changes. Saving again takes you back to View mode.
Note
You can save a journey with validation errors as long as it is not scheduled to run. However, if saving the journey would result in it being scheduled, and validation errors are still present, you will not be able to save it until those errors are resolved.
Schedule a journey
A journey may be configured to run once, daily, weekly, monthly, or quarterly.
To schedule a journey
From the Journeys Canvas, click Edit schedule in the top navigation.
From the Recurrence dropdown menu choose one of the options: “once”, “every 3 hours”, “every 6 hours”, “twice daily”, “daily”, “weekly”, “monthly”, or “quarterly”.
Important
Delay nodes require the journey to run again to progress. For journeys set to run only once, customers will not move beyond delay nodes. Use recurring schedules to ensure customers continue through the journey after delay node wait periods.
Note
Once you have saved a journey, the Edit schedule option becomes View schedule. To make changes to the schedule, click Edit on the top right of the Journeys Canvas.
View journey participant numbers
In View mode on the Journeys Canvas you can see how many total people have moved through any journey that has run at least once and how many have moved through each node in the current run.
Nodes have icons and numbers, representing journey participants.
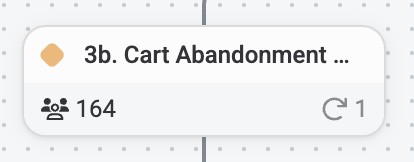
The people icon on the left displays how many total participants have moved through the journey across all runs to date.
The circular arrow on the right displays how many partipants have moved through that node on the current run, as of last evaluation.
A delay node have an additional icon.
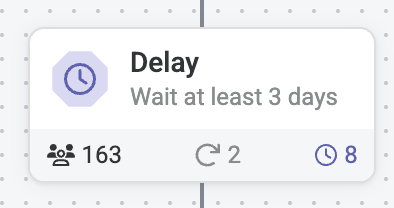
The clock icon displays the number of journey participants waiting at that node.
Tip
Once you have saved a journey, it defaults to View mode. To exit View mode and make changes, click Edit on the top right of the Journeys Canvas.
View node configuration
Open a node to view its configuration.
To view the configuration for a node
From the Journeys Canvas, select a node.
The current settings for a node are in the Node configuration sidebar.
Zoom in or out on the Journeys Canvas
You can zoom in and out on the Journeys Canvas.
To zoom in or out on the Journeys Canvas
Zoom by using the + / - buttons in the bottom left of the Journeys Canvas.
You may also pinch or expand on a trackpad, either on the canvas or on the minimap in the lower right.