How-tos
Tasks related to building segments in Amperity:
Add attribute from table
You can add attributes from a customer 360 database table to a segment on the Segment Editor.
To add an attribute from a table to a segment
From the Segment Editor, click Add condition.
Choose Attributes, and then select a table.
Choose an attribute from the table, and then define the criteria for the attribute.
Add comment to SQL segment
You can add comments to the query in a segment.
To add comments to a query
From the Segment Editor, click View SQL
On the Visual SQL window, click Convert to SQL segment.
On the Segment Editor, click Comment.
Move your cursor to where you want to add a comment. Enter your comments.
Click Activate.
Add conditions
Conditions are the fields in your data tables that your brand uses to create segments, define audiences, and build campaigns.
Add exclusions
You can add a list of customers to exclude from your segment.
To add an exclusion to a segment
From the Segments page, select Create segment. This opens the Segment Editor.
After you add conditions, click Add exclusions.
You can exclude customers by Purchase behavior, Attributes, or Customer lists.
Add purchase behaviors
Purchase behaviors are a feature of Amperity that are built on top of standard output for transactions (orders and items). Purchase behaviors require standardized product catalog field names to be present in your standard output for transactions.
Use purchase behaviors in segments to return a list of customers, and then filter that list of customers by any combination of brand, channel, individual items in your product catalog, and store.
Purchase behaviors are available for first purchase, has not purchased, has purchased, most frequent order, repeat purchase, and total value of orders.
You can add purchase behaviors to segments from the Segment Editor.
To add purchase behaviors to a segment
From the Segment Editor, click Add condition.
Open Purchase behaviors, and then select a purchase behavior attribute.
Define the criteria for the attribute.
Add sections
You can add sections to a segment on the Segment Editor
To add a section to a segment
From the Segment Editor, click Add section.
Click Add condition to add a set of conditions to the section.
Change baseline comparison
You can choose to compare additional segments to a segment of all customers or you can compare to the current segment.
To change the baseline comparison chart
From the Segments page, select a segment then click the Customers tab.
In the Comparing to field, choose All customers or choose This segment.
Change comparison date range
You can change the comparison date range on the Breakdown tab.
To change the date range of a comparison chart
From the Segments page, on the Breakdown tab, click the date range field.
Select a date range from the menu.
Change database source
You can change the database that a segment retrieves data from.
Note
Changing the database for a segment removes all the segment conditions and the resulting customer lists. It will also change any campaign that uses this segment.
To change the segment database source
From the Segments page, open the menu for a segment.
Click Edit.
On the right side of the Segment Editor under Database, pick a database.
Choose Clear segment.
Change insights date range
You can change the date range for all the insight details charts.
To change the date range for the insight details
From the Segments page, select a segment and then click the Breakdown tab.
On the right side of the page, choose a date range from the dropdown with date ranges.
View the updated dates on the horizontal axis of each insight chart.
Choose activation ID
You can configure a segment to use any activation ID that is configured in your tenant.
Tables and lists are limited to only those that contain a field that matches the selected activation ID.
For example, if the activation ID is “email_id” then only tables with a field named email_id will be available for use with segments or campaigns.
The language that is used within the Segment Editor is updated to match the friendly, singular, and plural names of the selected activation ID.
For example, the “Include customers with ALL of the following” statement is updated to “Include email addresses with ALL of the following” when the plural name is “email addresses”.
Segment insights are updated to only show the count for records that match the selected activation ID and the language is updatedf.
To choose an activation ID
Create a segment.
In the Segment Editor select an activation ID from the Activation ID dropdown. The language in the Segment Editor is updated to match the configured activation ID.
Build the rest of the segment as you would normally, and then click Save.
Choose AND or OR from toggle
When you add a condition, select either AND or OR on the toggle for the conditional operator.
Compare segment insights
You can compare segment by the following:
Purchasers percentage
Revenue percentage
Revenue/Purchaser
To update compare segments
From the Breakdown tab click the down arrow in the Compare by field.
Select one of the following options from the list:
% of Purchasers
% of Revenue
Revenue/Purchaser
Configure overlap chart
You can select one or more segments to compare in a chart.
To select a segment for a comparison chart
From the Segments page, select a segment and then click the Compare tab.
Under Segments click Select segment.
Choose one or more segments to compare and then click Compare.
Copy a column to the clipboard
You can copy a column of customer data to the clipboard so you can paste it in other applications.
To copy a column of customer data to the clipboard
From the Segments page, select a segment and then click the Customers tab.
Open the menu for a column.
Click Copy column to clipboard.
Copy a segment ID
You can copy a segment ID on the Segments page.
To copy a segment ID
From the Segments page, open the menu for a segment.
In the menu, click Copy ID.
Paste the segment ID in the appropriate location.
Copy a SQL Query
You can copy a SQL query from the Segment Editor.
To copy a SQL Query
From the Segment Editor, click View SQL
On the View SQL window, click Convert to SQL Segment.
On the Segment Editor, click Copy as SQL Query.
On the Copy as SQL Query window, click Copy as SQL Query.
When finished, click Activate.
Tip
To include customer matches, you can select the Include “Customer Matches” columns option.
Create a campaign
You can access the campaign editor from the Segments page.
To create a campaign
From the Segments page, select a segment.
Click Actions, and then click Create campaign.
The Segment Editor opens.
Custom segment metrics
You can define custom segment metrics for a given segment in the Summary tab:
Set custom segment metrics
You can set custom segment metrics for a given segment in the Summary tab.
To set custom segment metrics
From the Summary tab, click Add button at the bottom of the page. This opens the Custom chart dialog box.
Note
The Add button will not appear if there is already the maximum of ten custom segment metrics.
Set the metric title.
Use the “Type” dropdown menu to select the type of metric, either Bar chart or Number.
For a Bar chart, click Add attribute and use the dropdown menus to select first the source table and then the attribute.
For a Number, click Add attribute and use the dropdown menus to select first the source table and then the attribute. You must also use the dropdown menus to select a calculation type (sum, average, maximum, etc.) and a number format (integer, dollar amount, percentage, etc). You may optionally name the units being counted.
Once you have set all required fields, click Confirm.
Manage custom segment metrics
You can manage custom segment metrics for a given segment in the Summary tab.
To manage custom segment metrics
Click the icon on a custom segment metric tile to access options:
View SQL to view, but not edit, the SQL behind the query
View to open the Custom chart dialog box, where you can click Edit to adjust the parameters
Edit to go directly to editing the paramters
Delete to delete the custom segment metric
Customer lists
You can define a segment from customer lists in the Segment Editor:
Use query
You can add query results to a segment from the Segment Editor.
To add query results to a customer list
From the Segment Editor window, click Add condition.
Select Customer lists, and then choose Query.
In the Select query dialog, choose a query, and then click Confirm.
Use segment
You can add a segment to a segment from the Segment Editor.
To add a segment to a customer list
From the Segment Editor window, click Add condition.
Select Customer lists, and then choose Segment.
In the Select segment dialog, choose a query, and then click Confirm.
Use uploaded file
You can add data in uploaded files to a segment from the Segment Editor.
To add uploaded files to a customer list
From the Segment Editor window, click Add condition.
Select Customer lists, and then choose File upload.
In the Select file upload dialog, choose a query, and then click Confirm.
Create SQL segment in a folder
You can create a SQL segment from a folder on the Segments page.
To create a SQL segment in a folder
From the Segments page, open the menu for a folder.
Click Create SQL segment.
The SQL Segment Editor appears.
Create segment in a folder
You can create a visual segment from a folder on the Segments page.
To create a visual segment in a folder
From the Segments page, open the menu for a folder.
Click Create visual segment.
The visual Segment Editor appears.
Customize comparison charts
You can customize insights charts on the Breakdown tab.
To customize insights charts
From the Breakdown tab, in the Attributes breakdown section, click Customize.
On the Customize breakdown charts window, you can select up to 6 customer attributes, behavioral attributes, and default attributes. You can also uncheck default attributes that you do not want to use.
Once done updating the insights charts, click Apply.
The default charts are available to all users of the Breakdown tab.
Note
To reset the insight charts to the default charts, click Reset at the bottom of the Customize Insights Charts window.
Delete a segment
You can delete a segment from the Segments page.
To delete a segment
From the Segments page, open the menu for a segment.
In the menu, click Delete.
On the Delete Segment window, click Confirm.
Download segment
You can download segment results as a CSV file. The CSV format is supported by many applications, which makes the format a great way to test the potential of orchestrating segments for downstream applications and workflows.
Note
You cannot download the results of any segment that returns an error.
To download a segment as a CSV file
From the Segments page, open the menu for a segment, and then select a segment.
Click the Customers page.
Click Download.
A CSV file with a filename that is identical to the segment name is downloaded to your local machine.
Note
Sometimes CSV files with Japanese or other East Asian languages may not display the characters when uploaded to Microsoft Excel, even if the file has UTF-8 or UTF-16 character encoding. Try using an alternate character encoding, such as Shift JIS , to work around character encoding problems in Microsoft Excel .
Duplicate segment
You can duplicate a segment from the Segments page.
To duplicate a segment
From the Segments page, open the menu for a segment.
Click Duplicate.
On the Segment Editor, make your changes, and then click Save As. Add a name and choose where to save the segment.
Click Save.
Edit segment from Segments page
You can edit a segment from the Segments page.
To edit a segment
From the Segments page, open the menu for a segment.
Click Edit.
On the Segment Editor, make your changes, and then click Save.
Edit segment from Segment Editor
You can edit a segment from the Segment Editor.
To edit a segment from the Segment Editor
From the Segment Editor, click Actions.
Click Edit.
Make your changes and then click Save.
Expand a graph
You can expand graphs on the Breakdown tab.
To expand a graph
From the Breakdown tab, open the menu for a graph.
Click Expand.
The graph opens up in a window with more details.
Explore a segment copy
You can explore a copy of a saved segment on the Summary tab.
To explore a copy of a saved segment
From the Summary tab, click Explore a Copy.
From the Segment Editor, you can do one of the following:
Explore the saved segment attribute details
Add new attributes, conditions, and filters to the segment copy
When done, either click Save As to copy the saved segment, or click View to view the segment insights on the Summary tab, or click Cancel.
Filter segments
You can filter the list of segments that appear on the Segments page. Click Show filters to open the filter bar, and then select values from any combination of the following:
By status. Select any combination of Active and Draft.
By database. Select a database to show only segments associated with that database.
By created by. Select any combination of users who created segments.
By last edited by. Select any combination of users who most recently edited segments.
By label. Select one or more labels to filter segments by organizational category.
Tip
Labels help organize journeys by grouping related items together. For example, use labels to:
Identify journey types: “Welcome series”, “Retention”, or “Winback”
Assign team ownership: “Marketing” or “Analytics”
Track status: “In review” or “Approved”
Indicate priority: “High priority” or “Evergreen”
Labels are created on the Settings page, in the Labels tab, by clicking Add label. Label naming conventions should:
Not exceed 35 characters
Contain only alphanumeric characters, hyphens, and underscores allowed
Not exceed 10 labels per journey
Use consistent prefixes for related labels. For example: “Q1-” or “Holiday-”
Note
When many labels are selected, segments matching any selected labels will be shown.
Format a SQL segment
You can format a segment from the Segments page.
To format a segment
From the Segments page, open the menu for a segment.
Click Edit.
Click the Format button.
Manage tracked segments
A tracked segment appears as a metrics card on the Segments page. The metrics card shows a snapshot of the segment’s results and is updated daily. Enable up to fifteen tracked segments.
To enable tracked segments
From the Segments page, open a segment for editing.
Open the Insights pane and select Enable segment tracking.
New segment from intersection
You can create a new segment from the intersections of overlapping segments.
To create a new segment from intersections
From the Segments page, select a segment and then click the Compare tab.
Under Segments, choose Select segment to add more segments to compare.
In the Overlap tab, under Overlapping customers, choose New segment from intersection.
The visual Segment Editor appears.
Note
You can change the baseline comparison segment on the Metrics tab in the Comparing to field.
Organize segments
A folder helps you organize the list of segments in the Segments page. Add up to three levels of folders.
You can organize the segments shown in the Segments page:
Add folders
Folders may be expanded (or collapsed) to view and hide the list of segments and subfolders contained within.
To add a folder
From the Segments page click Create folder, and then select Add Folder. This opens the Create Folder dialog box.
Enter the name for the folder.
Click Create.
Add subfolders
Use the Create folder option in the menu to add up to three levels of subfolders. All folder names must be unique.
To add a subfolder
From the Segments page, open the menu for a folder, and then select Create folder. This opens the Create Folder window.
Enter the name for the folder.
Click Save.
Move segment
Use the Move option to move around and organize the list of folders and segments. Folders may be expanded (or collapsed) to view and hide the list of segments and subfolders contained within.
To move a segment
From the Segments page, open the menu for a segment, and then select Move. This opens the Move Segment dialog box.
Select the name of an existing folder to which a segment will be moved, and then click Move.
Hint
If the folder to which a segment will be moved is not present in the list of folders, you can add it directly from the Move Segment dialog box. Click the + New folder link, type a name for the folder, and then select it.
Save segment to a folder
You can save a segment into a folder from the Segment Editor.
To save a segment to a folder from the Segment Editor
From the Segment Editor, click Save as.
From the Save as a new segment window, enter the name in the Name field.
In the Location section, select the folder or subfolder.
Click Save.
Bulk delete segments
You can delete many segments from the Segments page.
To delete many segments
From the Segments page, select many segments.
On the bottom of the Segments page, click Delete.
On the Bulk Delete window, click Delete <#> Items.
Bulk move segments
You can move many segments to a folder from the Segments page.
To move many segments to a folder
From the Segments page, select many segments.
On the bottom of the Segments page, click Move.
On the Bulk Move window, select a folder.
Click Move.
Rename a segment
You can rename a segment from the Segments page.
To rename a segment
From the Segments page, open the menu for a segment.
Click Rename.
On the Rename segment window, enter a name.
Click Save.
From the Segment page, click Actions.
Click Rename.
Enter a name and then click Save.
Rerun a segment
You can rerun a segment from the Segments page.
To rerun a segment
From the Segments page, on the Customers page, click Rerun.
The system reruns the segment the customer data on the Customers page is updated.
Search segments
You can search for segments on the Segments page.
To search for a segment
On the top of the Segments page, enter the name of the segment into the search field.
Tip
Select the Also search segment content option to search segment content.
Select database
You can build a segment against any database that is visible from the Customer 360 page.
To select a database
From the Segments page, click Create segment, and then select Visual Segment. This opens the Segment Editor.
Under Database, select a database. The Customer 360 database is selected by default.
Build your segment against the list of tables that are available in that database.
Select many values
You can select many values from the Segment Editor.
To add attribute groups to a segment
From the Segment Editor, click Add condition.
Select a table or search for an attribute in the search field.
Select a condition.
In the field, search for or select values.
Tip
You can search for a value and then easily select all options in the list of values that appears by selecting the Select all checkbox.
Click Save.
When done adding criteria and sections, click Save to update the segment.
Set default charts
You can set default charts from the Segment Editor.
To set default charts
From the Segment Editor, click Actions.
In the list that appears, click Set default charts.
On the Set default breakdown charts window, you can either select up to 6 customer attributes or select up to 6 behavioral attributes.
Once done updating the default charts, click Save.
The default charts are available to all users of the Segments page.
Set recommended segments
Up to five segments may be configured to show in the list of recommended segments. (Ask your Amperity representative to configure the list of recommended segments for your tenant.)

|
From the Segments page, under Recommended segments, click Configure. 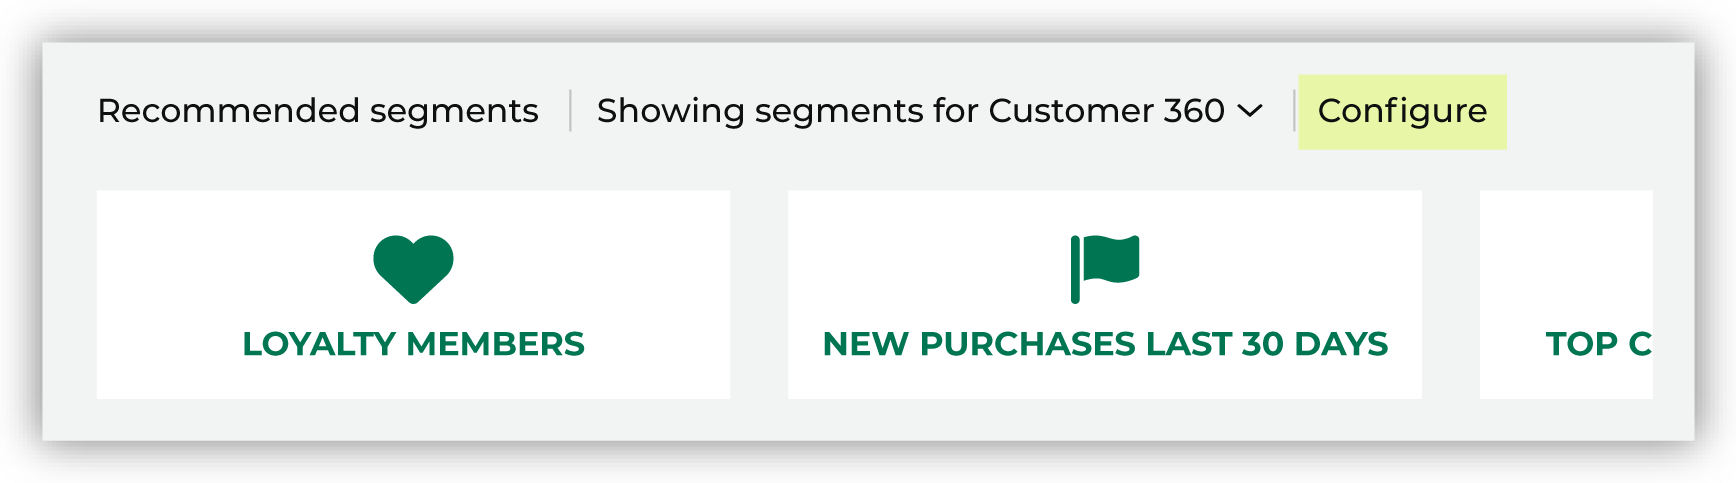
This opens the Configure recommended segments dialog box. For each recommended segment, use the dropdown list to choose a segment 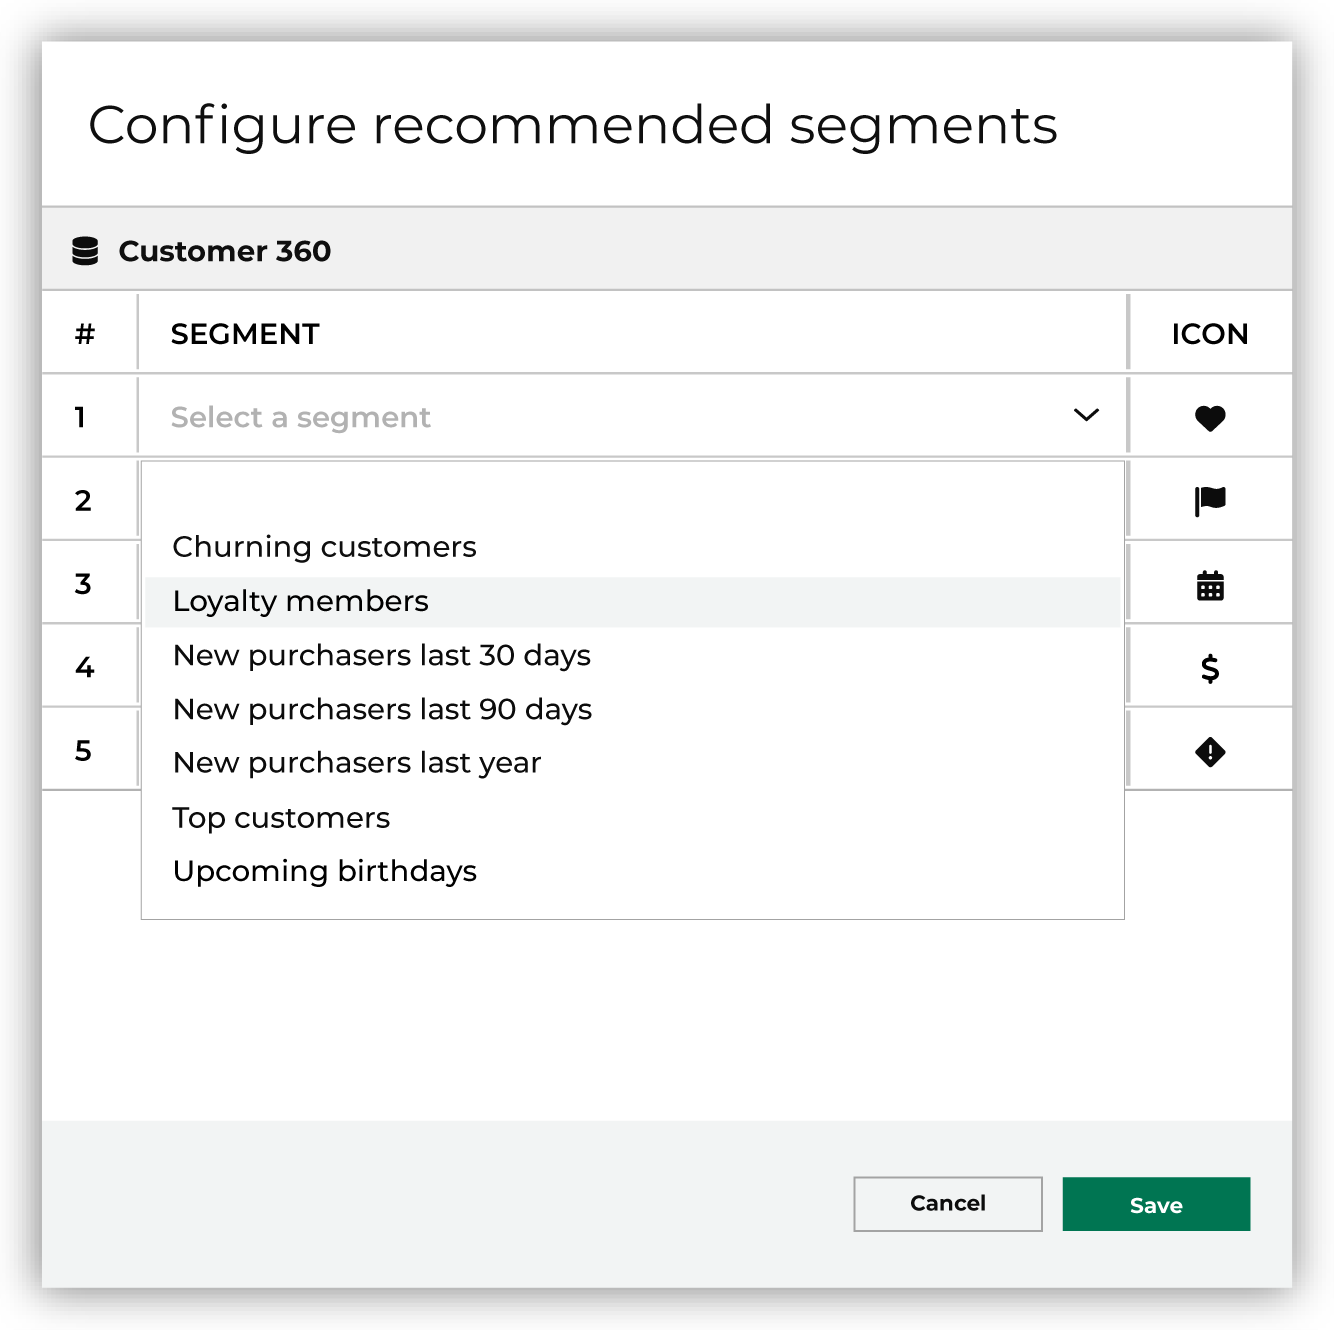
and then choose an icon. |

|
Up to five recommended segments may be configured. 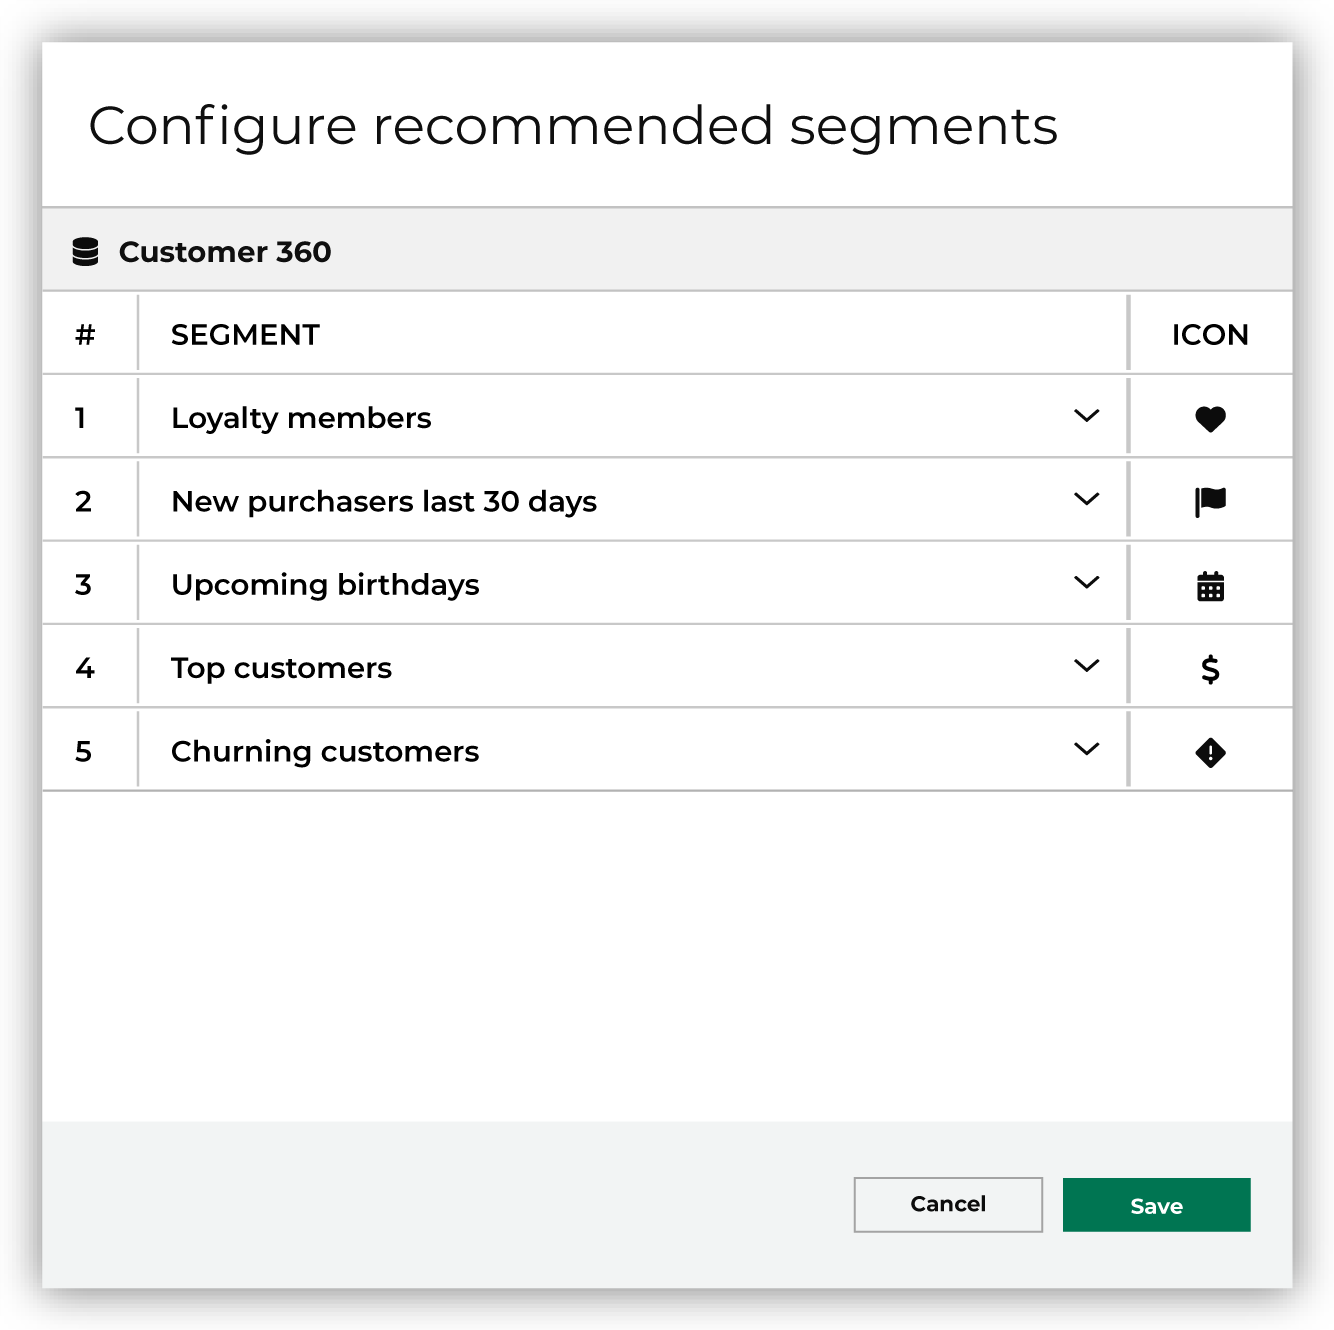
|

|
When your tenant has more than one database, you can select the list of recommended segments for each database. 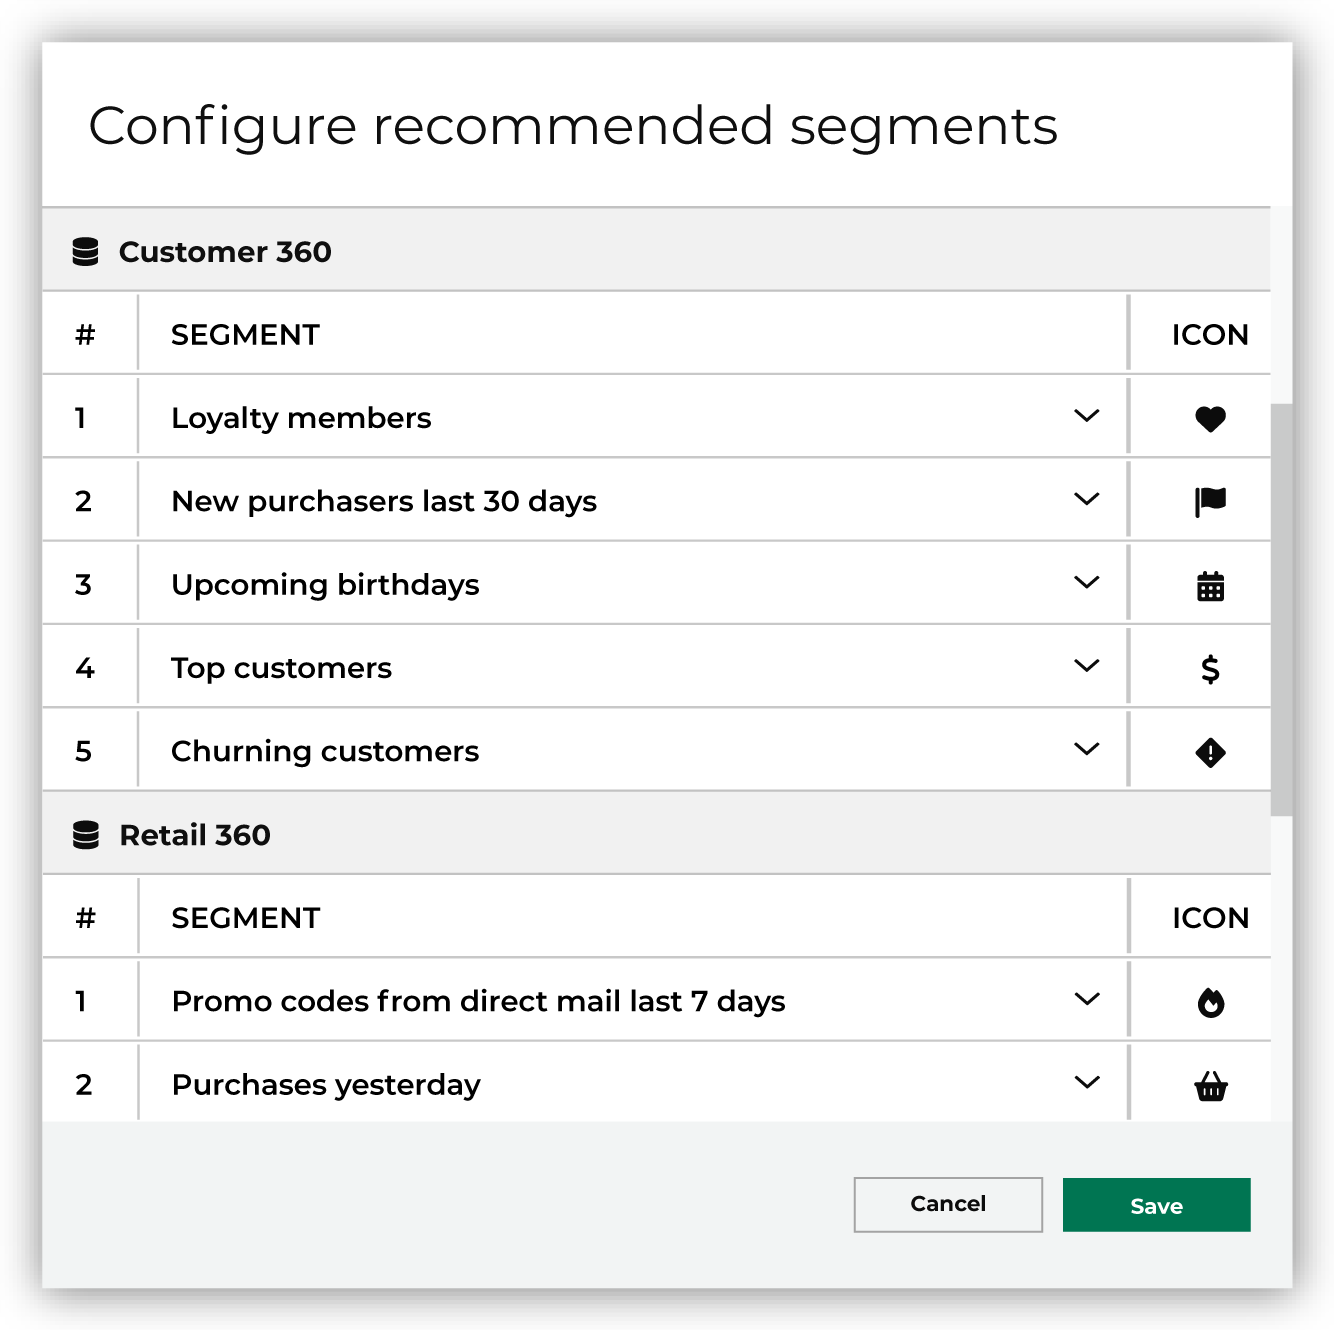
From the Segments page, you can switch between the lists of recommended segments by choosing a database from the “Showing segments for” dropdown. 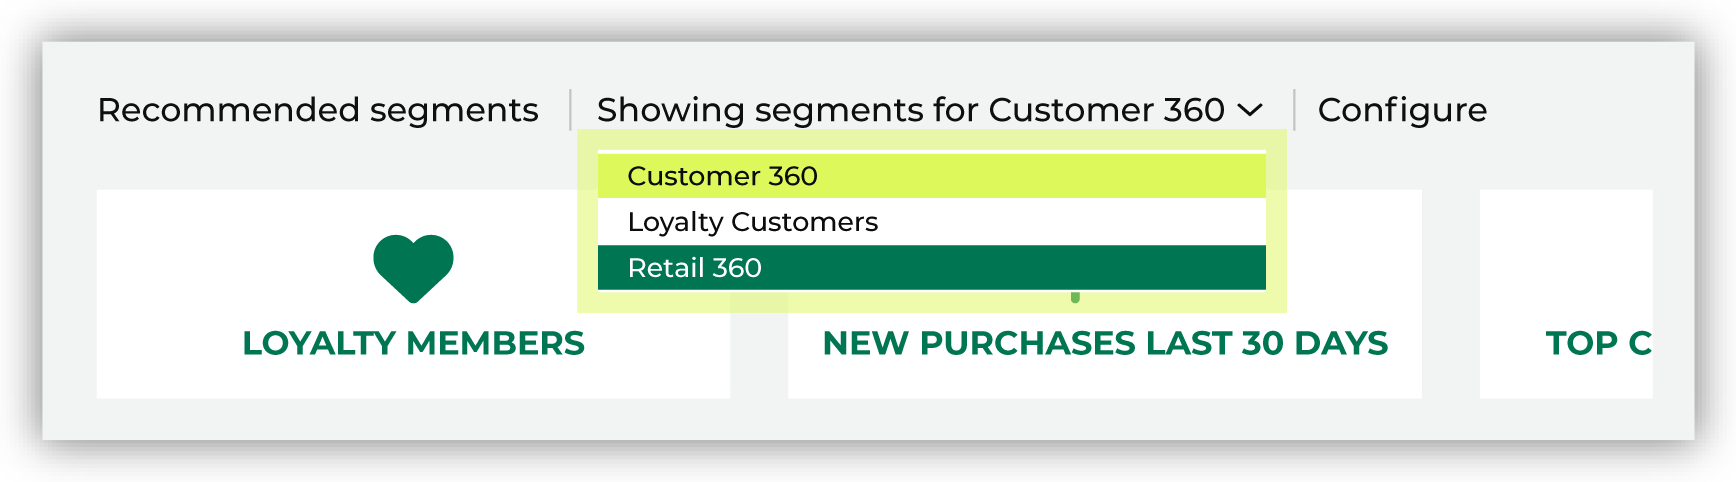
|
Show columns
You can view columns that are in the segment results from the Customers page in the segment viewer. This can be configured to show all columns from all tables or only columns from a specific table.
To show columns
From the Segments page, open the menu for a segment, and then select Edit. This opens the Segment Editor.
Click the Customers page.
Expand the Show [x] columns from [table] link.
Use the Show all columns and Show only the columns I choose options to configure which columns are shown.
Click Refresh to update the segment results to show the configured set of columns.
Show summary statistics
You can choose which summary statistics appear on the Summary tab.
To hide or display summary statistics
From the Summary tab, click Actions.
Select Summary settings.
In the Configure view dialog box, use the checkboxes to hide or display summary statistics.
Click Save.
Switch to SQL segment
You can switch a visual segment to a SQL segment.
To switch to a SQL segment
From the Segment Editor, open a segment.
In the Segment Editor, in the top right, click View SQL.
Click Convert to SQL Segment.
Use relative dates
A relative date is determined at the time a segment is run, where today is the day on which the segment is run. For example: yesterday, 30 days ago, 14 days ago, or 1 year ago.
To use relative dates for a segment
From the Segment Editor, click Add condition, and then choose an attribute with a date or datetime value.
Select the Use relative dates option, and then specify the relative dates that match the condition you selected. For example: “30 days ago”. A relative date is always in Coordinated Universal Time (UTC).
Click Refresh to validate the segment.
Click Save As.
Tip
To build a segment using relative dates, Amperity turns datetime fields into dates.
View a segment
You can view a segment on the Segments page.
To view a segment
From the Segments page, click on a segment.
The segment appears displaying a summary page with insight details.
View edit history
You can view information on the edit history for a segment from the Segments page.
To view the edit history for a segment
From the Segments page, open the menu for a segment.
Click Version History.
The Segment history window appears with informations about who edited the segment, the dates when the segment was edited, and the descriptions of what was edited.
View matching records
You can view matching records from a table from the Customers page on the Segments page.
To view matching records from a table
From the Segments page, on the Customers page, expand the Show [x] columns from [table] link.
Click in the Show matching records from field.
In the list that appears, select a table.
View overlap between segments
You can view and compare the overlap between segments.
To view the overlap between segments
From the Segments page, select a segment and then click the Compare tab.
The overlapping segments appear as a graph under the Overlap tab.
View SQL
Many sections of the Segments page use SQL queries to return the data that is shown for the segment. You can view the SQL for the following areas:
For attribute charts
You can view the SQL query that calculates the statistics in the segment attribute charts.
Note
You cannot edit the query.
To view the SQL for segment attribute charts
From the Segments page, select a segment and then click the Breakdown tab.
Open the menu for a customer or behavioral attributes chart.
Select View SQL. The query that calculates the values in the tree is shown.
For revenue tree
You can view the SQL query that calculates the statistics in the segment revenue tree.
Note
You cannot edit the query.
To view the SQL for segment revenue tree
From the Segments page, select a segment.
Under Revenue and Reachability, open the menu for the revenue tree.
Select View SQL. The query that calculates the values in the tree is shown.
For statistics
You can view the SQL for segment statistics on the Segments page in the Summary and Breakdown tabs.
To view the SQL for segment statistics on the Segments page
From the Segments page, on the either the Summary tab or the Breakdown tab, click the options icon on a segment data card.
Click View SQL.
The View SQL window appears with the query that calculates statistics for the segment.