Pull from Amazon Kinesis Data Firehose
Amazon Kinesis Data Firehose is a fully managed service for delivering real-time streaming data to Amazon S3.
Amperity can pull data from Amazon Kinesis Data Firehose via Amazon S3. A common scenario: a Firehose delivery stream is configured to send streaming data to an Amazon S3 bucket, generating numerous files with a consistent datestamp pattern appended to a generated file name. Kinesis Data Firehose can be a source for any number of file types and formats. Couriers can be configured to pull NDJSON files.
The steps that are required to pull streamed data to Amperity from Kinesis Data Firehose:
Get details
The Kinesis Data Firehose destination requires the following configuration details:

|
The name of the S3 bucket from which data is pulled to Amperity, which is also the bucket to which the Firehose delivery stream writes data. |
|
|
For cross-account role assumption you need the value for the Target Role ARN, which enables Amperity to access the customer-managed Amazon S3 bucket. Note The values for the Amperity Role ARN and the External ID fields are provided automatically. Review the following sample policy, and then add a similar policy to the customer-managed Amazon S3 bucket that allows Amperity access to the bucket. Add this policy as a trusted policy to the IAM role that is used to manage access to the customer-managed Amazon S3 bucket. The policy for the customer-managed Amazon S3 bucket is unique, but will be similar to: 1{
2 "Statement": [
3 {
4 "Sid": "AllowAmperityAccess",
5 "Effect": "Allow",
6 "Principal": {
7 "AWS": "arn:aws:iam::account:role/resource"
8 },
9 "Action": "sts:AssumeRole",
10 "Condition": {
11 "StringEquals": {
12 "sts:ExternalId": "01234567890123456789"
13 }
14 }
15 }
16 ]
17}
The value for the role ARN is similar to: arn:aws:iam::123456789012:role/prod/amperity-plugin
An external ID is an alphanumeric string of 2-1224 characters without spaces and may include the following symbols: plus (+), equal (=), comma (,), period (.), at (@), colon (:), forward slash (/), and hyphen (-). |
|
|
A list of objects by filename and file type in the S3 bucket to be sent to Amperity and a sample for each file to simplify feed creation. |
Configure Kinesis Data Firehose
Amazon Kinesis Data Firehose is a fully managed service for delivering real-time streaming data to Amazon S3.
You may configure any supported data producer to use Kinesis Data Firehose services to automatically send real-time streaming data to Kinesis Data Firehose, and then make that data available to Amperity. Amperity can be configured to pull batched real-time data from any Amazon S3 location. It is recommended to send this data to a customer-managed Amazon S3 bucket, and then configure Amperity to pull data from that bucket.
To configure Kinesis Data Firehose to send data to the Amperity S3 bucket
Create a cross-account role IAM role in the customer’s Amazon AWS account.
This role is required to grant Kinesis Data Firehose access to the Amazon S3 bucket that is part of the Amperity tenant. This role must have s3:PutObjectAcl configured as part of the list of allowed Kinesis Data Firehose actions.
Configure the bucket policy in the Amperity S3 bucket to allow the IAM role access to the Amperity S3 bucket.
Create a Kinesis Data Firehose delivery stream in the customer’s cloud infrastructure that uses this IAM role.
Configure the delivery stream to send data to the Amperity S3 bucket.
Configure applications to send data to the delivery stream.
Amperity requires data to be encrypted. This may be done with a policy on the Amperity S3 bucket that is configured by Amperity.
Record separators
Data records are delivered to Amazon S3 as an Amazon S3 object. If you need to ensure that individual records are available to Amperity in Kinesis Data Firehose, you need to configure the delivery stream to add a record separator at the end of each data record.
When using the Kinesis Data Firehose connector, which only accepts NDJSON files, you need to ensure that each data record is followed by a newline character.
Filename patterns
Recommended filename patterns include:
Using the YYYY/MM/DD/HH format when writing objects to Kinesis Data Firehose. This prefix creates a logical hierarchy in the bucket by year, then month, then date, and finally hour.
Using the default Kinesis Data Firehose object naming pattern that increments by 1 a random string at the end of the object’s filename.
Delivery frequency
The Kinesis Data Firehose buffer size and interval will determine the frequency of delivery . Incoming records will be concatenated based on the frequency of the delivery stream.
Warning
If data fails to deliver to Kinesis Data Firehose, Kinesis Data Firehose will retry for up to 24 hours. If data fails to deliver within 24 hours, the data will be lost, unless it is successfully delivered to a backup location. You can re-send data if it is backed up.
Delivery failures
Kinesis Data Firehose will retry for up to 24 hours. The maximum data storage time for Kinesis Data Firehose is 24 hours . Data will be lost if delivery does not succeed within 24 hours. Consider using a secondary Kinesis Data Firehose bucket as a backup for data that cannot be lost.
Note
Delivery retries may introduce duplicates.
Add data source and feed
Add a data source that pulls data from Kinesis Data Firehose.
Configure Amperity to pull one or more files, and then for each file review the settings, define the schema, activate the courier, and then run a manual workflow. Review the data that is added to the domain table.
To add a data source for an Amazon S3 bucket

|
Open the Sources page to configure Kinesis Data Firehose. Click the Add courier button to open the Add courier dialog box. 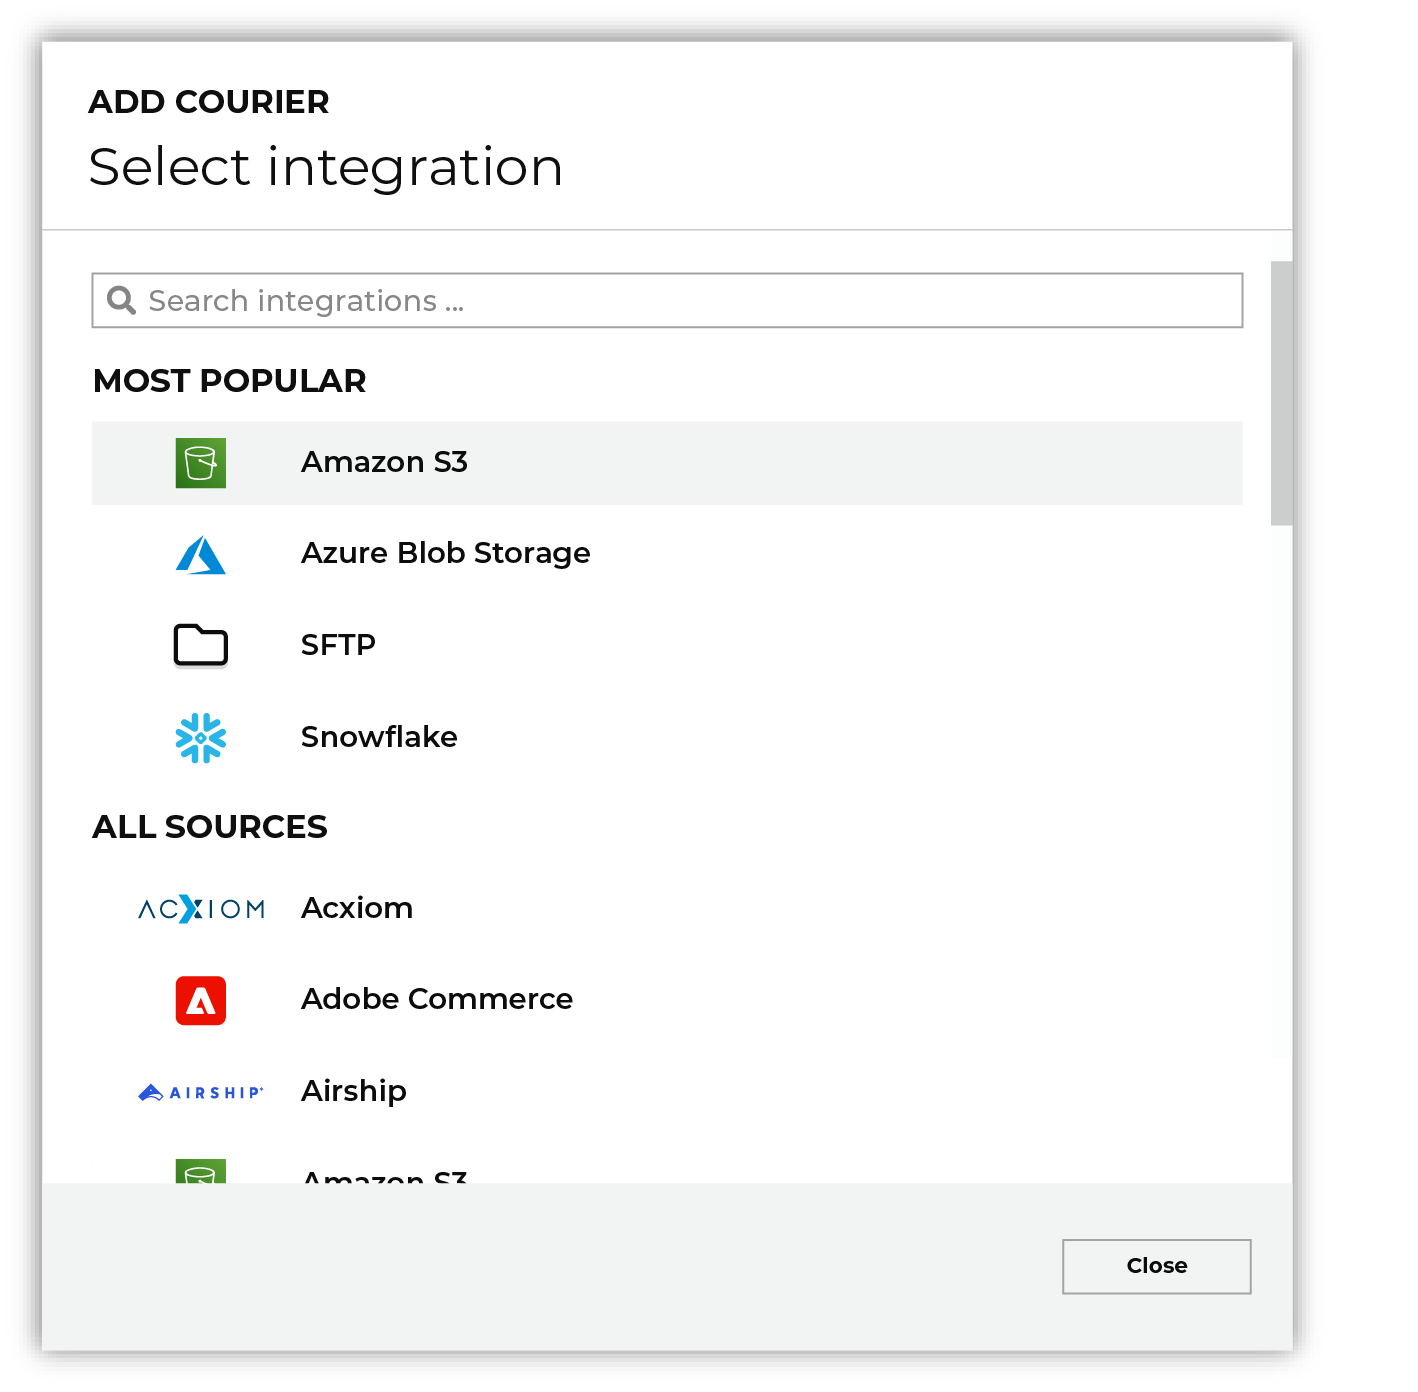
Select Kinesis Data Firehose. Do one of the following:
|
|
Credentials allow Amperity to connect to Kinesis Data Firehose and must exist before a courier can be configured to pull data from Kinesis Data Firehose. Select an existing credential from the Credential dropdown, and then click Continue. Tip A courier that has credentials that are configured correctly shows a “Connection successful” status, similar to: 
|
|
Select the file that is pulled to Amperity, either by browsing into storage and selecting it or by providing a filename pattern. 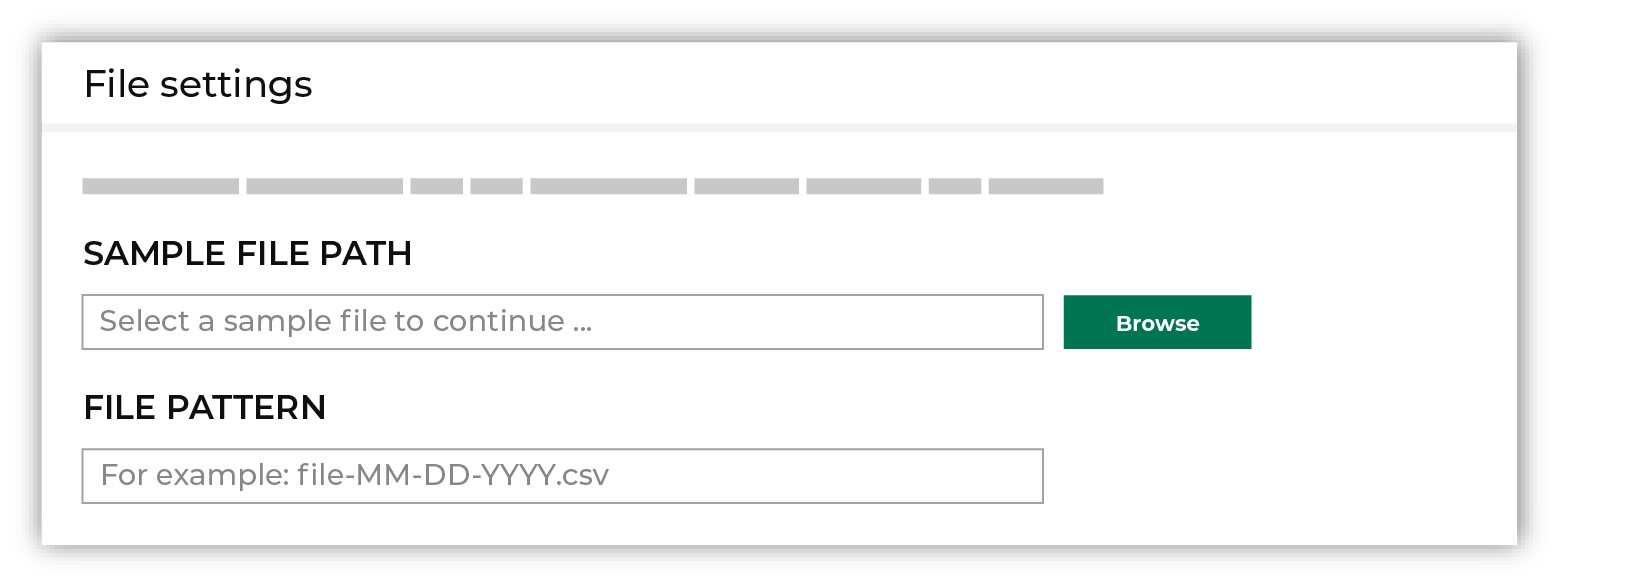
Click Browse to open the File browser. Select the file that is pulled to Amperity, and then click Accept. Use a filename pattern to define files that will be loaded on a recurring basis, but have small changes to the filename over time, such as having a datestamp appended to the filename. Note For a new data source, this file is also used as the sample file that is used to define the schema. For an existing data source, this file must match the schema that has already been defined. 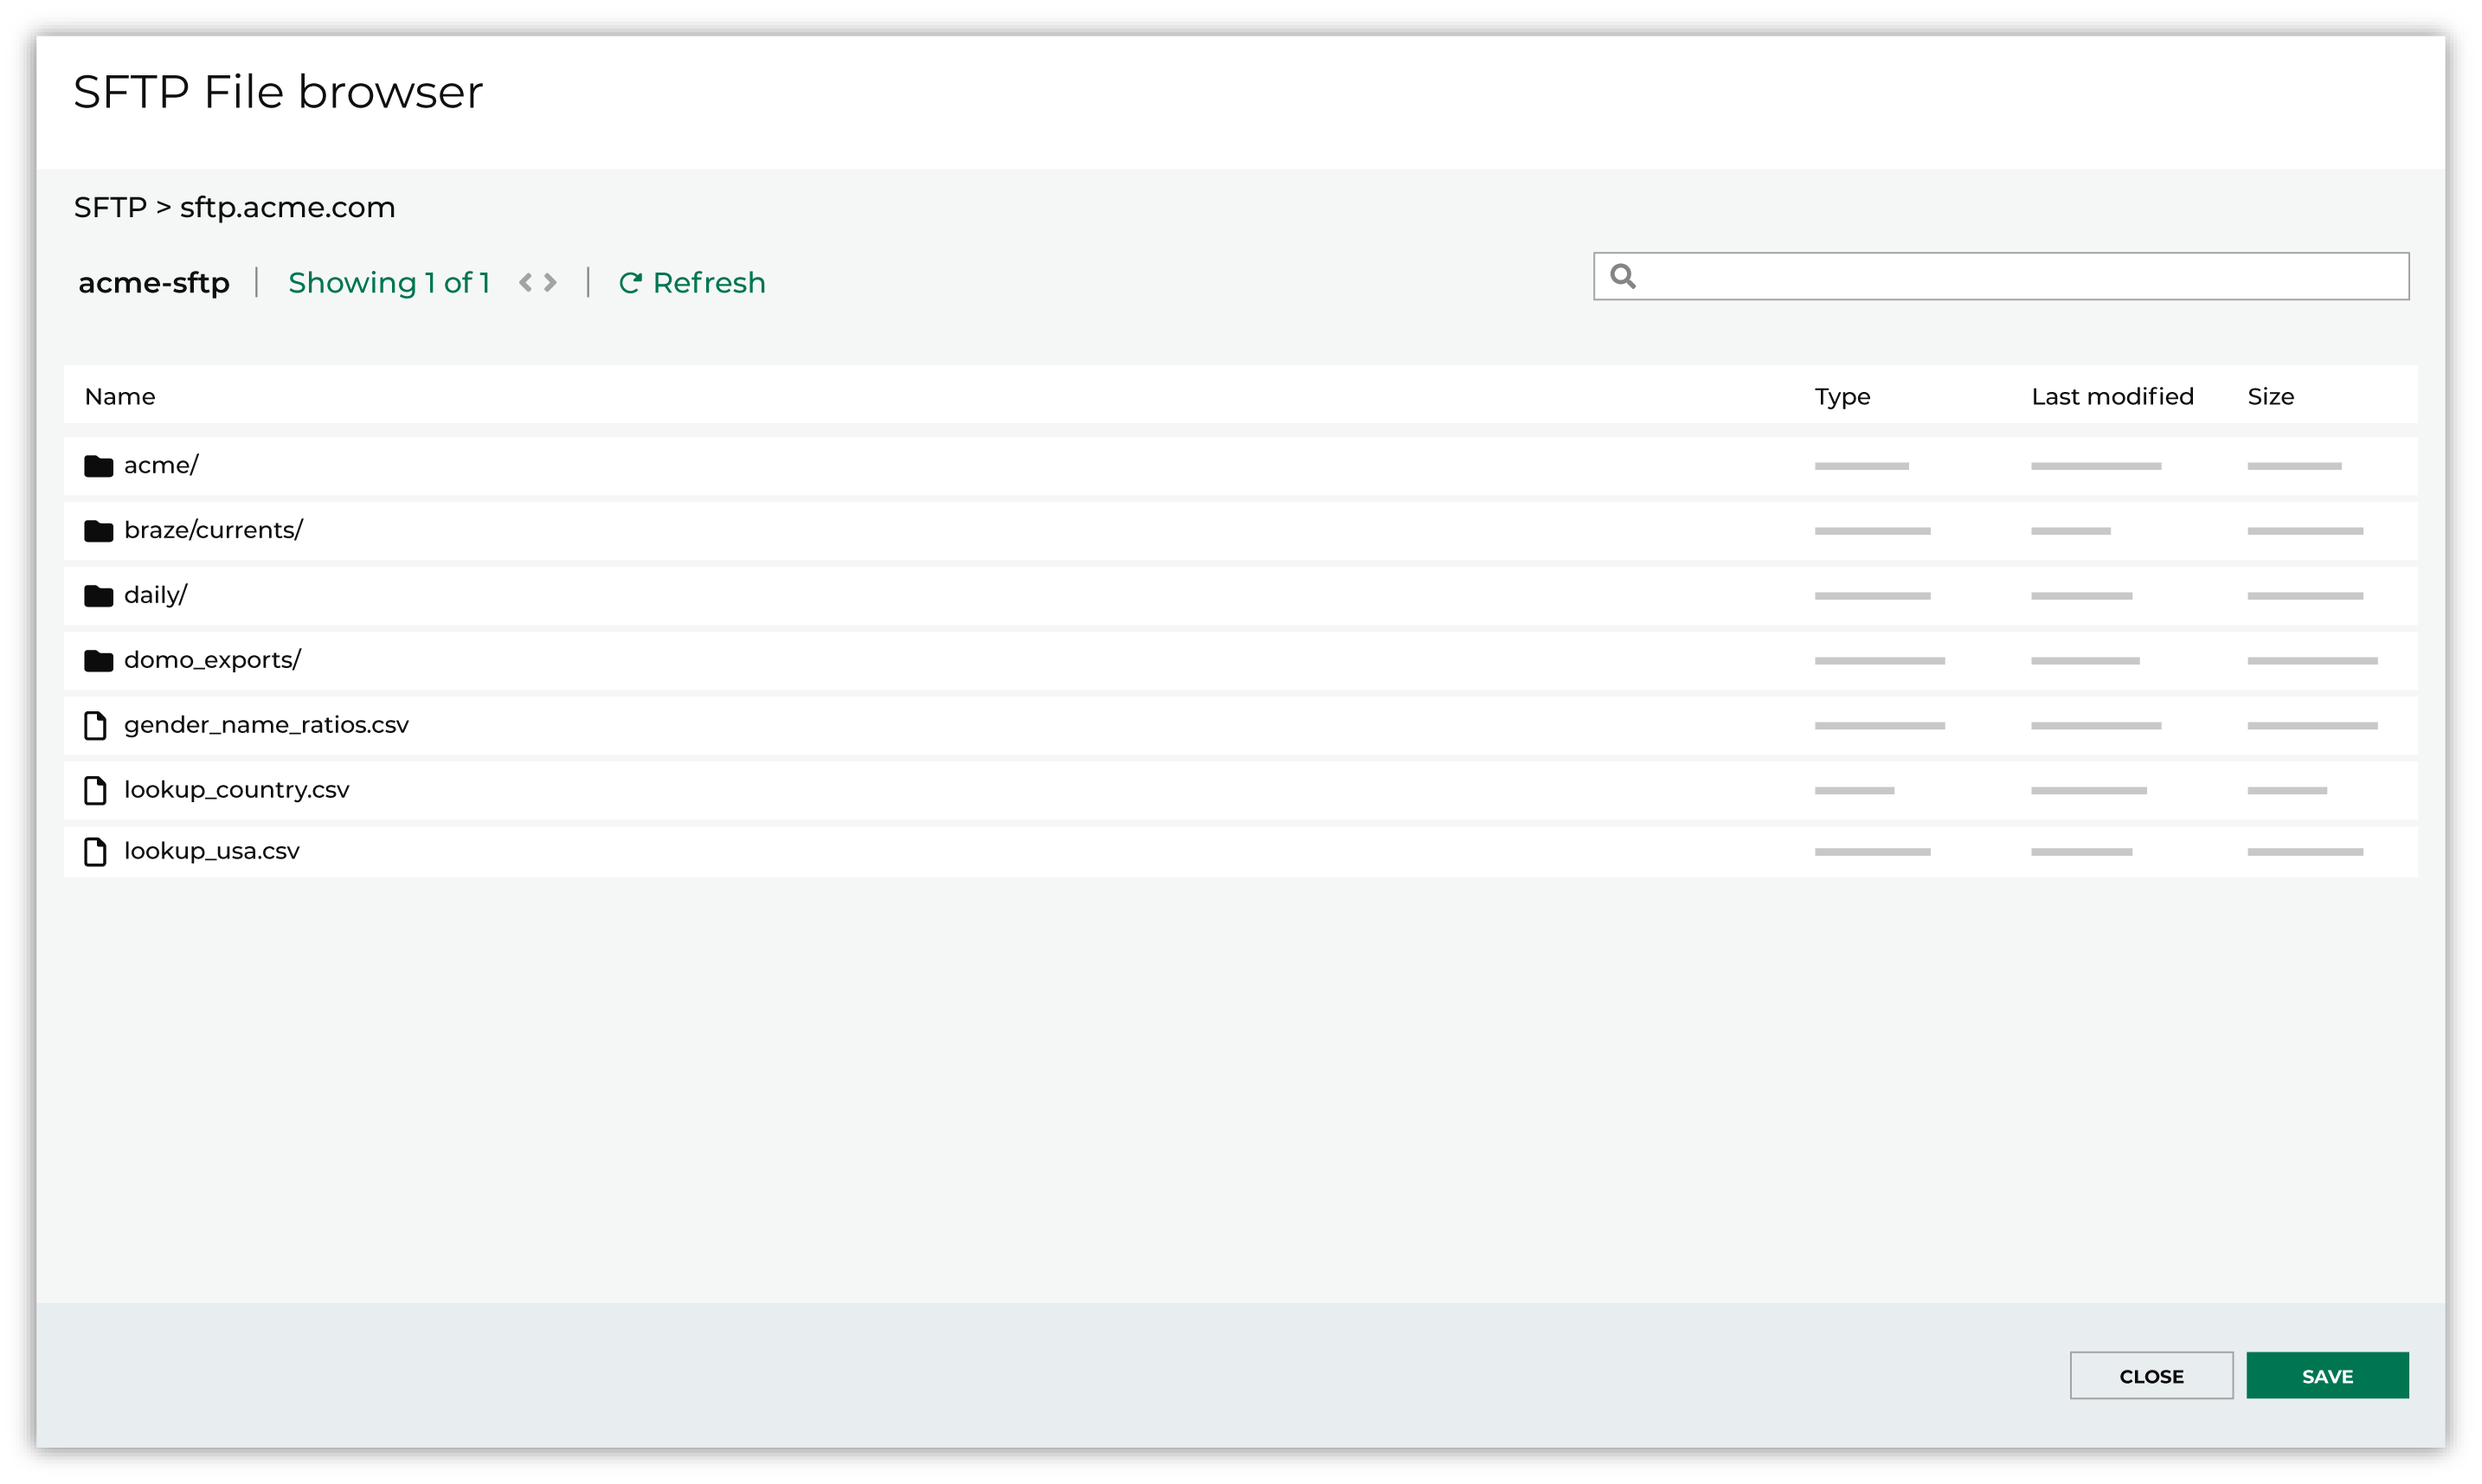
Use the PGP credential setting to specify the credentials to use for an encrypted file. 
|

|
Review the file. 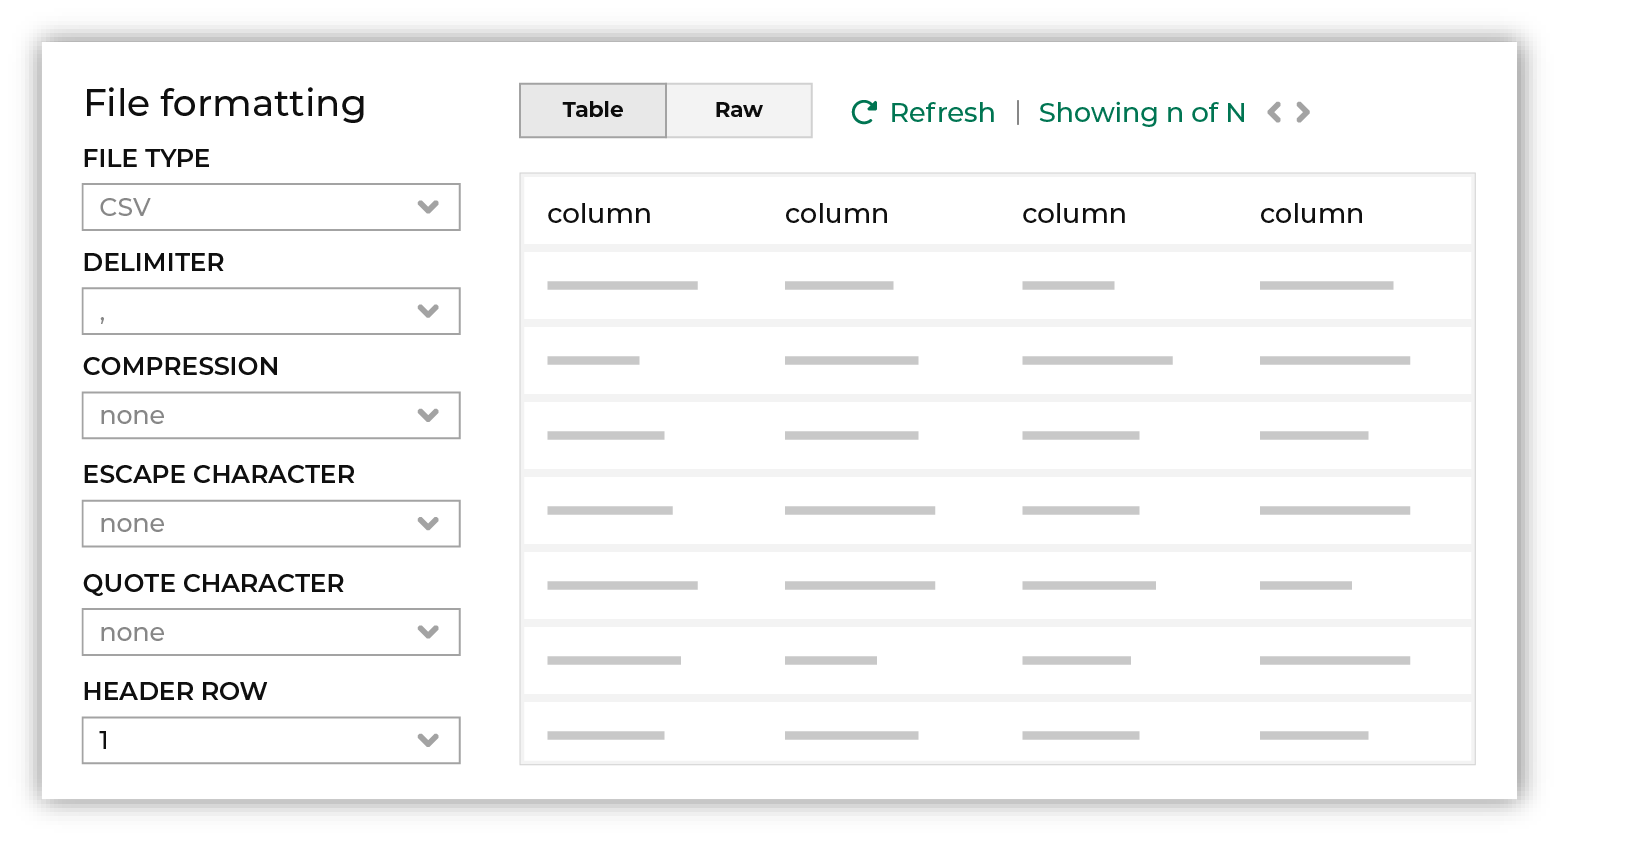
The contents of the file may be viewed as a table and in the raw format. Switch between these views using the Table and Raw buttons, and then click Refresh to view the file in that format. Note PGP encrypted files can be previewed. Apache Parquet PGP encrypted files must be less than 500 MB to be previewed. Amperity will infer formatting details, and then add these details to a series of settings located along the left side of the file view. File settings include:
Review the file, and then update these settings, if necessary. Note Amperity supports the following file types: Apache Avro, Apache Parquet, CSV, DSV, JSON, NDJSON, PSV, TSV, and XML. Refer to those reference pages for details about each of the individual file formats. Files that contain nested JSON (or “complex JSON”) or XML may require using the legacy courier configuration. |

|
Each file that is loaded to Amperity must have a defined schema, after which the data in the file is loaded into a domain table ready for use with workflows within Amperity. New feed To use a new data source, choose the Create new feed option, select an existing source from the Source dropdown or type the name of a new data source, and then enter the name of the feed. 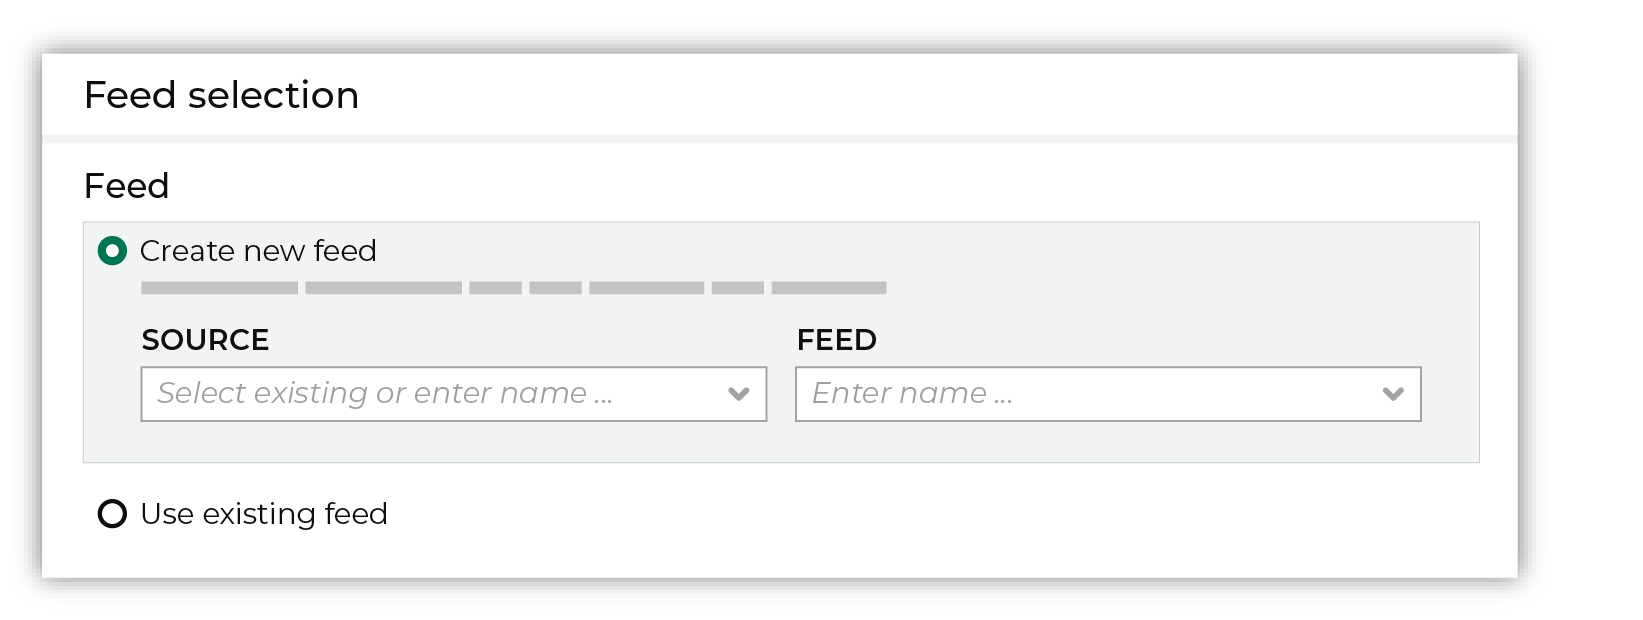
After you choose a load type and save the courier configuration, you will configure the feed using the data within the sample file. Existing feed To use an existing feed, choose the Use existing feed option to use an existing schema. 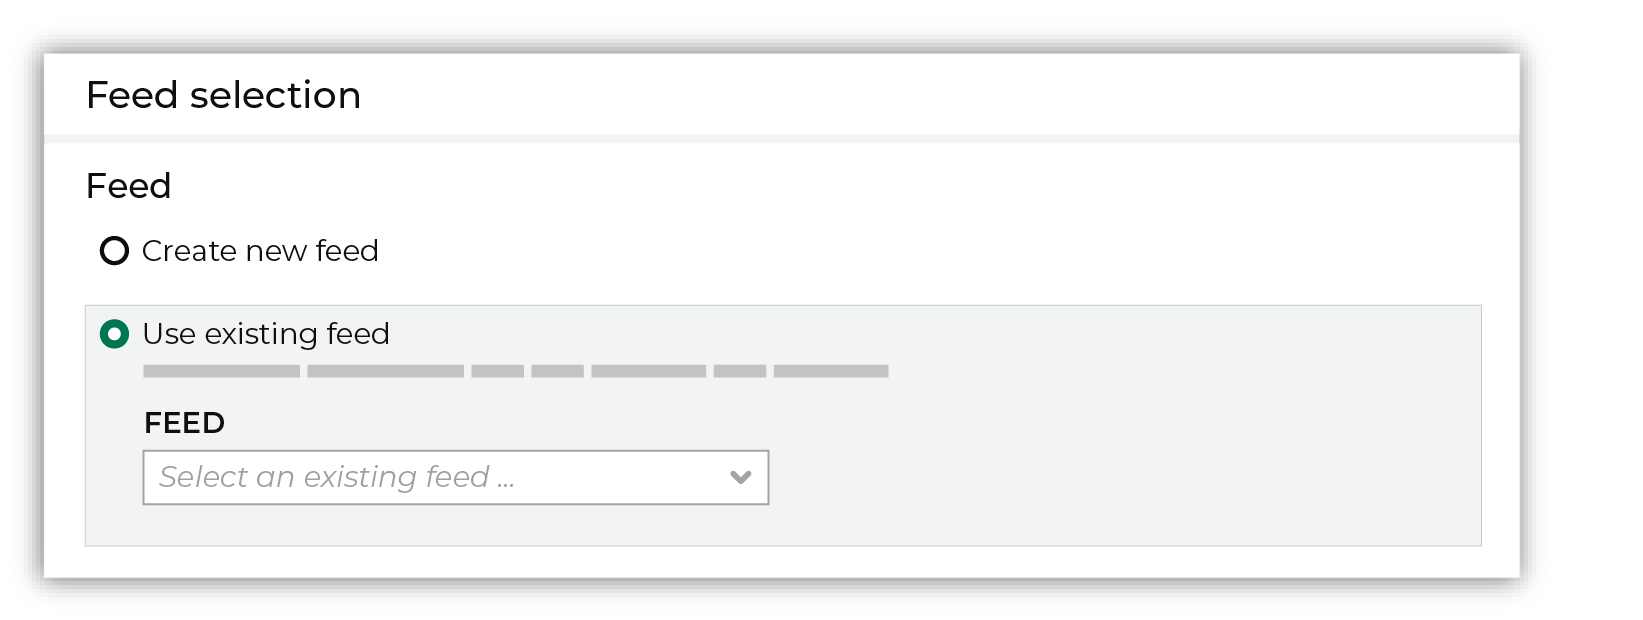
This option requires this file to match all of the feed-specific settings, such as incoming field names, field types, and primary keys. The data within the file may be different Pull data Define how Amperity will pull data from Kinesis Data Firehose and how it is loaded to a domain table. 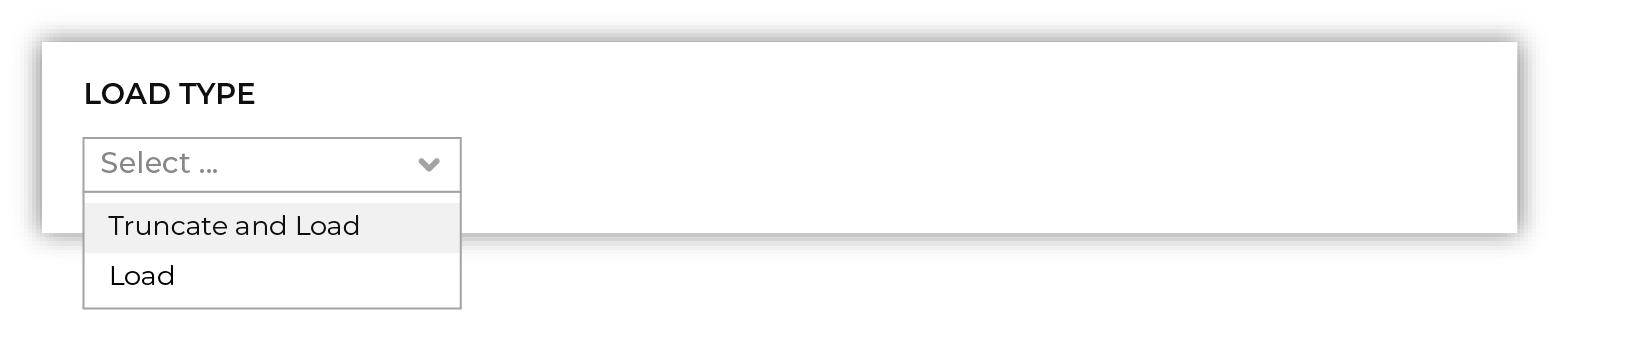
Use the Upsert option to use the selected file update existing records and insert records that do not exist. Use the Truncate and upsert option to delete all records in the existing table, and then insert records. Note When a file is loaded to a domain table using an existing file, the file that is loaded must have the same schema as the existing feed. The data in the file may be new. |

|
Use the feed editor to do all of the following:
When finished, click Activate. |
|
Find the courier related to the feed that was just activated, and then run it manually. On the Sources page, under Couriers, find the courier you want to run and then select Run from the actions menu. 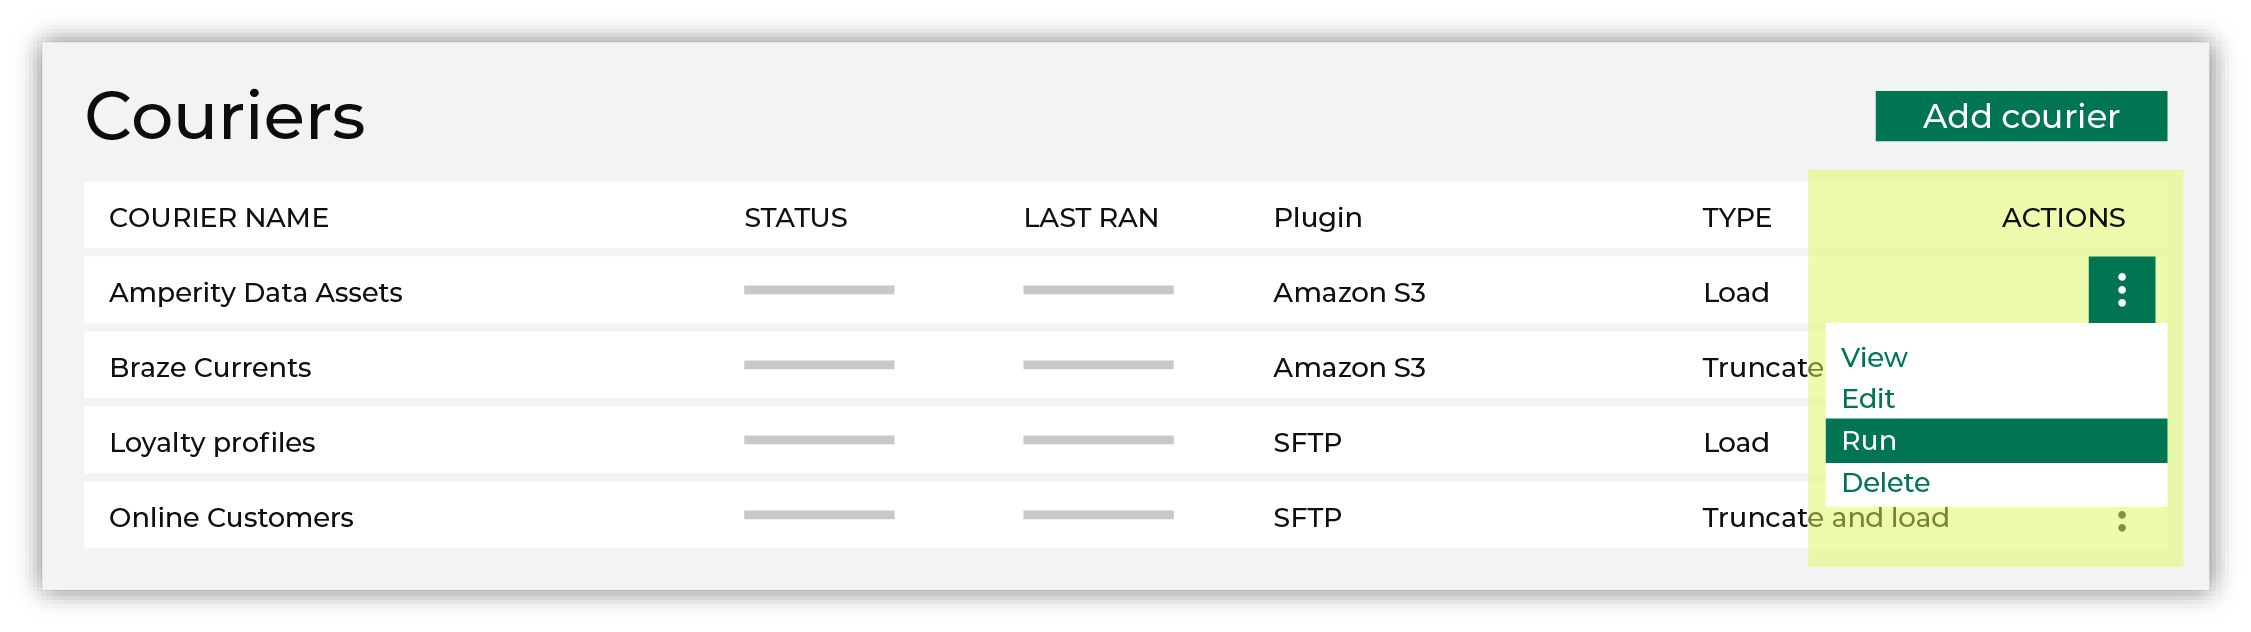
Select a date from the calendar picker that is before today, but after the date on which the file was added to the Kinesis Data Firehose file system. 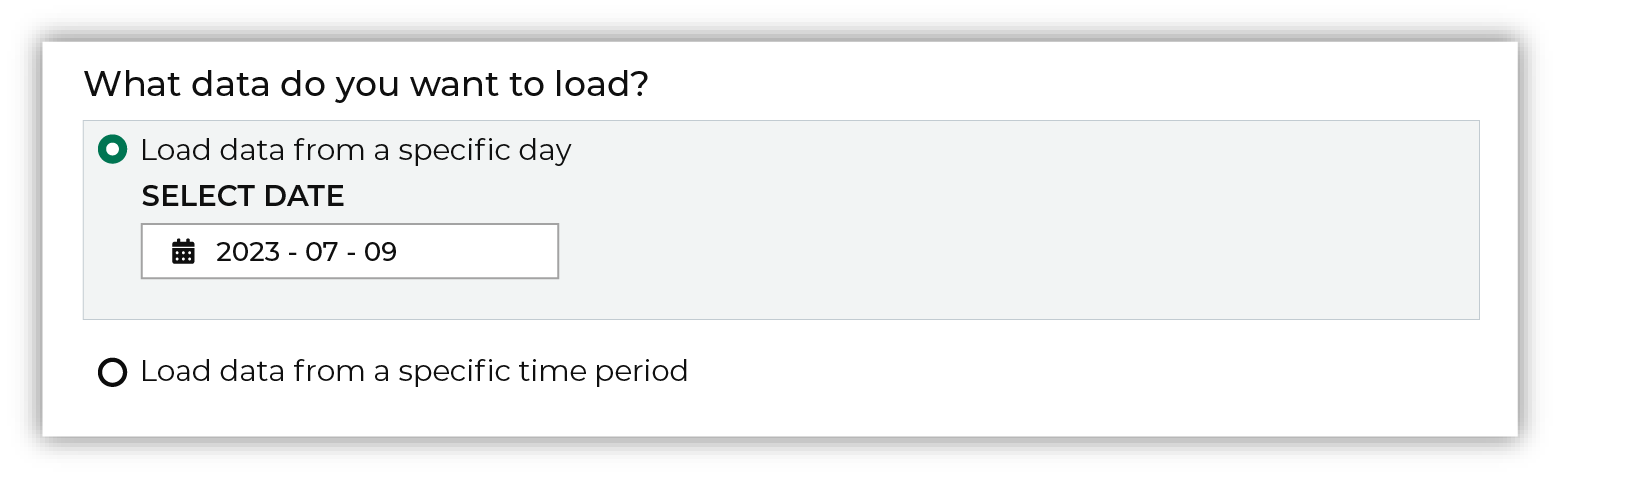
Leave the load options unselected, and then click Run. After the courier has run successfully, inspect the domain table that has the data that was loaded to Amperity. After you have verified that the data is correct, you may do any of the following:
|