Pull from Google Cloud Storage
Google Cloud Storage is an online file storage web service for storing and accessing data on Google Cloud Platform infrastructure.
The steps that are required to pull files in any supported format to Amperity from Google Cloud Storage:
Get details
Google Cloud Storage requires the following configuration details:
The name of the bucket in Cloud Storage.
A Cloud Storage service account key that is configured for the Storage Object Admin role.
A list of objects by filename and file type in the Cloud Storage bucket.
A sample for each file to simplify feed creation.
Filedrop recommendations
You may reference the following sections while configuring this data source:
Using credentials that allow Amperity to access, and then read data from this location
Adding an optional RSA key for public key credentials
Ensuring files are provided in a supported file format
Ensuring files are provided with the correct date format
Supporting the desired file compression and/or archive method
Encrypting files before they are added to the location using PGP encryption. An encryption key must be configured so that files can be decrypted by Amperity before loading them
Tip
Use SnapPass to securely share your organization’s credentials and encryption keys with your Amperity representative.
Options
The following sections describe optional ways to get data to Cloud Storage.
Dataflow, Pub/Sub
Dataflow is a fully managed service for transforming and enriching data using streaming or batch modes that are configured to use Pub/Sub to stream messages to Google Cloud Storage.
Note
Google Pub/Sub is a low-latency messaging service that streams data–including real-time–to Google Cloud Storage.
Service account
A service account must be configured to allow Amperity to pull data from the Cloud Storage bucket:
A service account key must be created, and then downloaded for use when configuring Amperity.
The Storage Object Admin role must be assigned to the service account.
Service account key
A service account key must be downloaded so that it may be used to configure the courier in Amperity.
To configure the service account key
Service account setup:
Open the Cloud Platform console.
Click IAM, and then Admin.
Click the name of the project that is associated with the Cloud Storage bucket from which Amperity will pull data.
Click Service Accounts, and then select Create Service Account.
In the Name field, give your service account a name. For example, “Amperity GCS Connection”.
In the Description field, enter a description that will remind you of the purpose of the role.
Click Create.
Important
Click Continue and skip every step that allows adding additional service account permissions. These permissions will be added directly to the bucket.
From the Service Accounts page, click the name of the service account that was created for Amperity.
Click Add Key, and then select Create new key.
Select the JSON key type, and then click Create.
The key is downloaded as a JSON file to your local computer. This key is required to connect Amperity to your Cloud Storage bucket. If necessary, provide this key to your Amperity representative using SnapPass.
SnapPass allows sharing secrets in a secure, ephemeral way. Input a single or multi-line secret, define how long someone has to view the secret, and then generate a single-use URL. Share the URL to share the secret.
Example
 1{
 2  "auth_provider_x509_cert_url": "https://www.googleapis.com/oauth2/v1/certs",
 3  "auth_uri": "https://accounts.google.com/o/oauth2/auth",
 4  "client_email": "<<GCS_BUCKET_NAME>>@<<GCS_PROJECT_ID>>.iam.gserviceaccount.com",
 5  "client_id": "redacted",
 6  "client_x509_cert_url": "https://www.googleapis.com/robot/v1/metadata/x509/<<GCS_BUCKET_NAME>>%40<<GCS_PROJECT_ID>>.iam.gserviceaccount.com",
 7  "private_key_id": "redacted",
 8  "private_key": "redacted",
 9  "project_id": "<<GCS_PROJECT_ID>>",
10  "token_uri": "https://oauth2.googleapis.com/token",
11  "type": "service_account"
12}
Service account role
The Storage Object Admin role must be assigned to the service account.
To configure the service account role
Open the Cloud Platform console.
Click Storage, and then Browser.
Click the name of the bucket from which Amperity will pull data.
Click the Permissions tab, and then click Add.
Enter the email address of the Cloud Storage service account.
Under Role, choose Storage Object Admin.
Important
Amperity requires the Storage Object Admin role for the courier that is assigned to pull data from Cloud Storage.
Click Save.
Add data source and feed
Add a data source that pulls data from Google Cloud Storage.
Configure Amperity to pull one or more files, and then for each file review the settings, define the schema, activate the courier, and then run a manual workflow. Review the data that is added to the domain table.
To add a data source for an Amazon S3 bucket

|
Open the Sources page to configure Google Cloud Storage. Click the Add courier button to open the Add courier dialog box. Select Google Cloud Storage. Do one of the following:
|
|
Credentials allow Amperity to connect to Google Cloud Storage and must exist before a courier can be configured to pull data from Google Cloud Storage. Select an existing credential from the Credential dropdown, and then click Continue. Tip A courier that has credentials that are configured correctly shows a “Connection successful” status, similar to: 
|
|
Select the file that is pulled to Amperity, either by browsing into storage and selecting it or by providing a filename pattern. 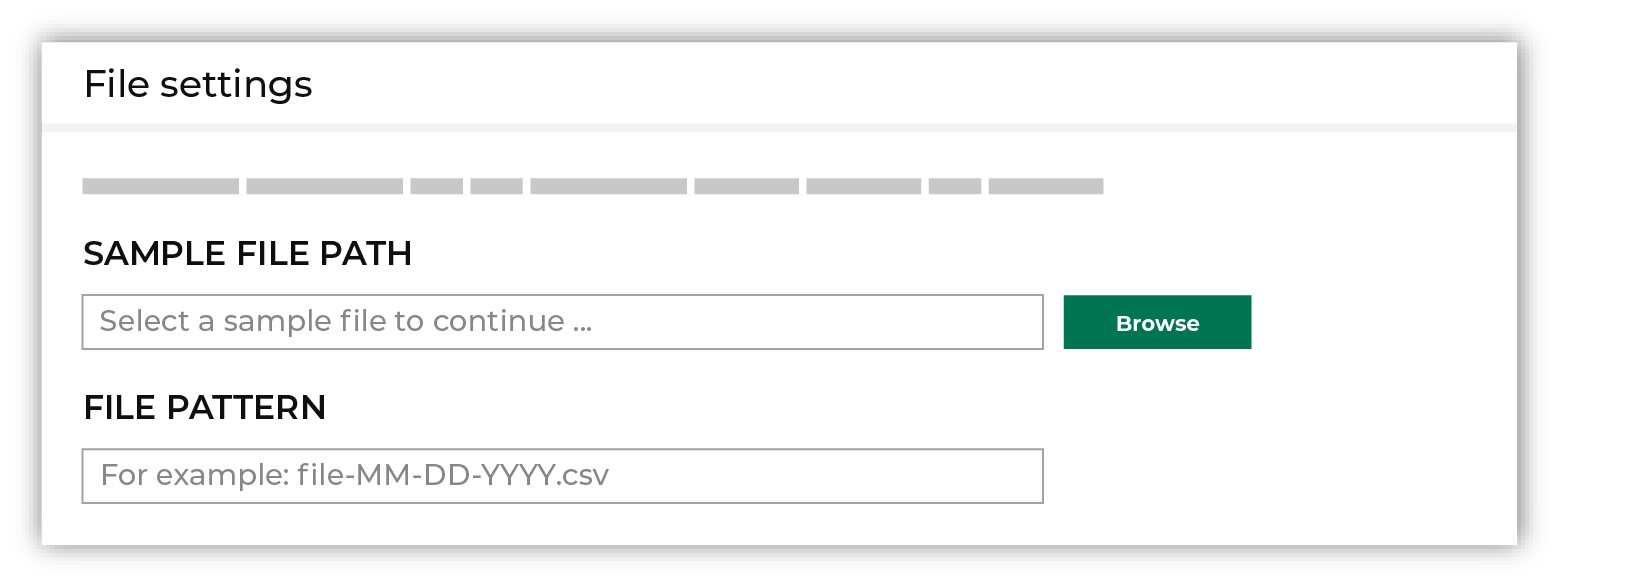
Click Browse to open the File browser. Select the file that is pulled to Amperity, and then click Accept. Use a filename pattern to define files that will be loaded on a recurring basis, but have small changes to the filename over time, such as having a datestamp appended to the filename. Note For a new data source, this file is also used as the sample file that is used to define the schema. For an existing data source, this file must match the schema that has already been defined. 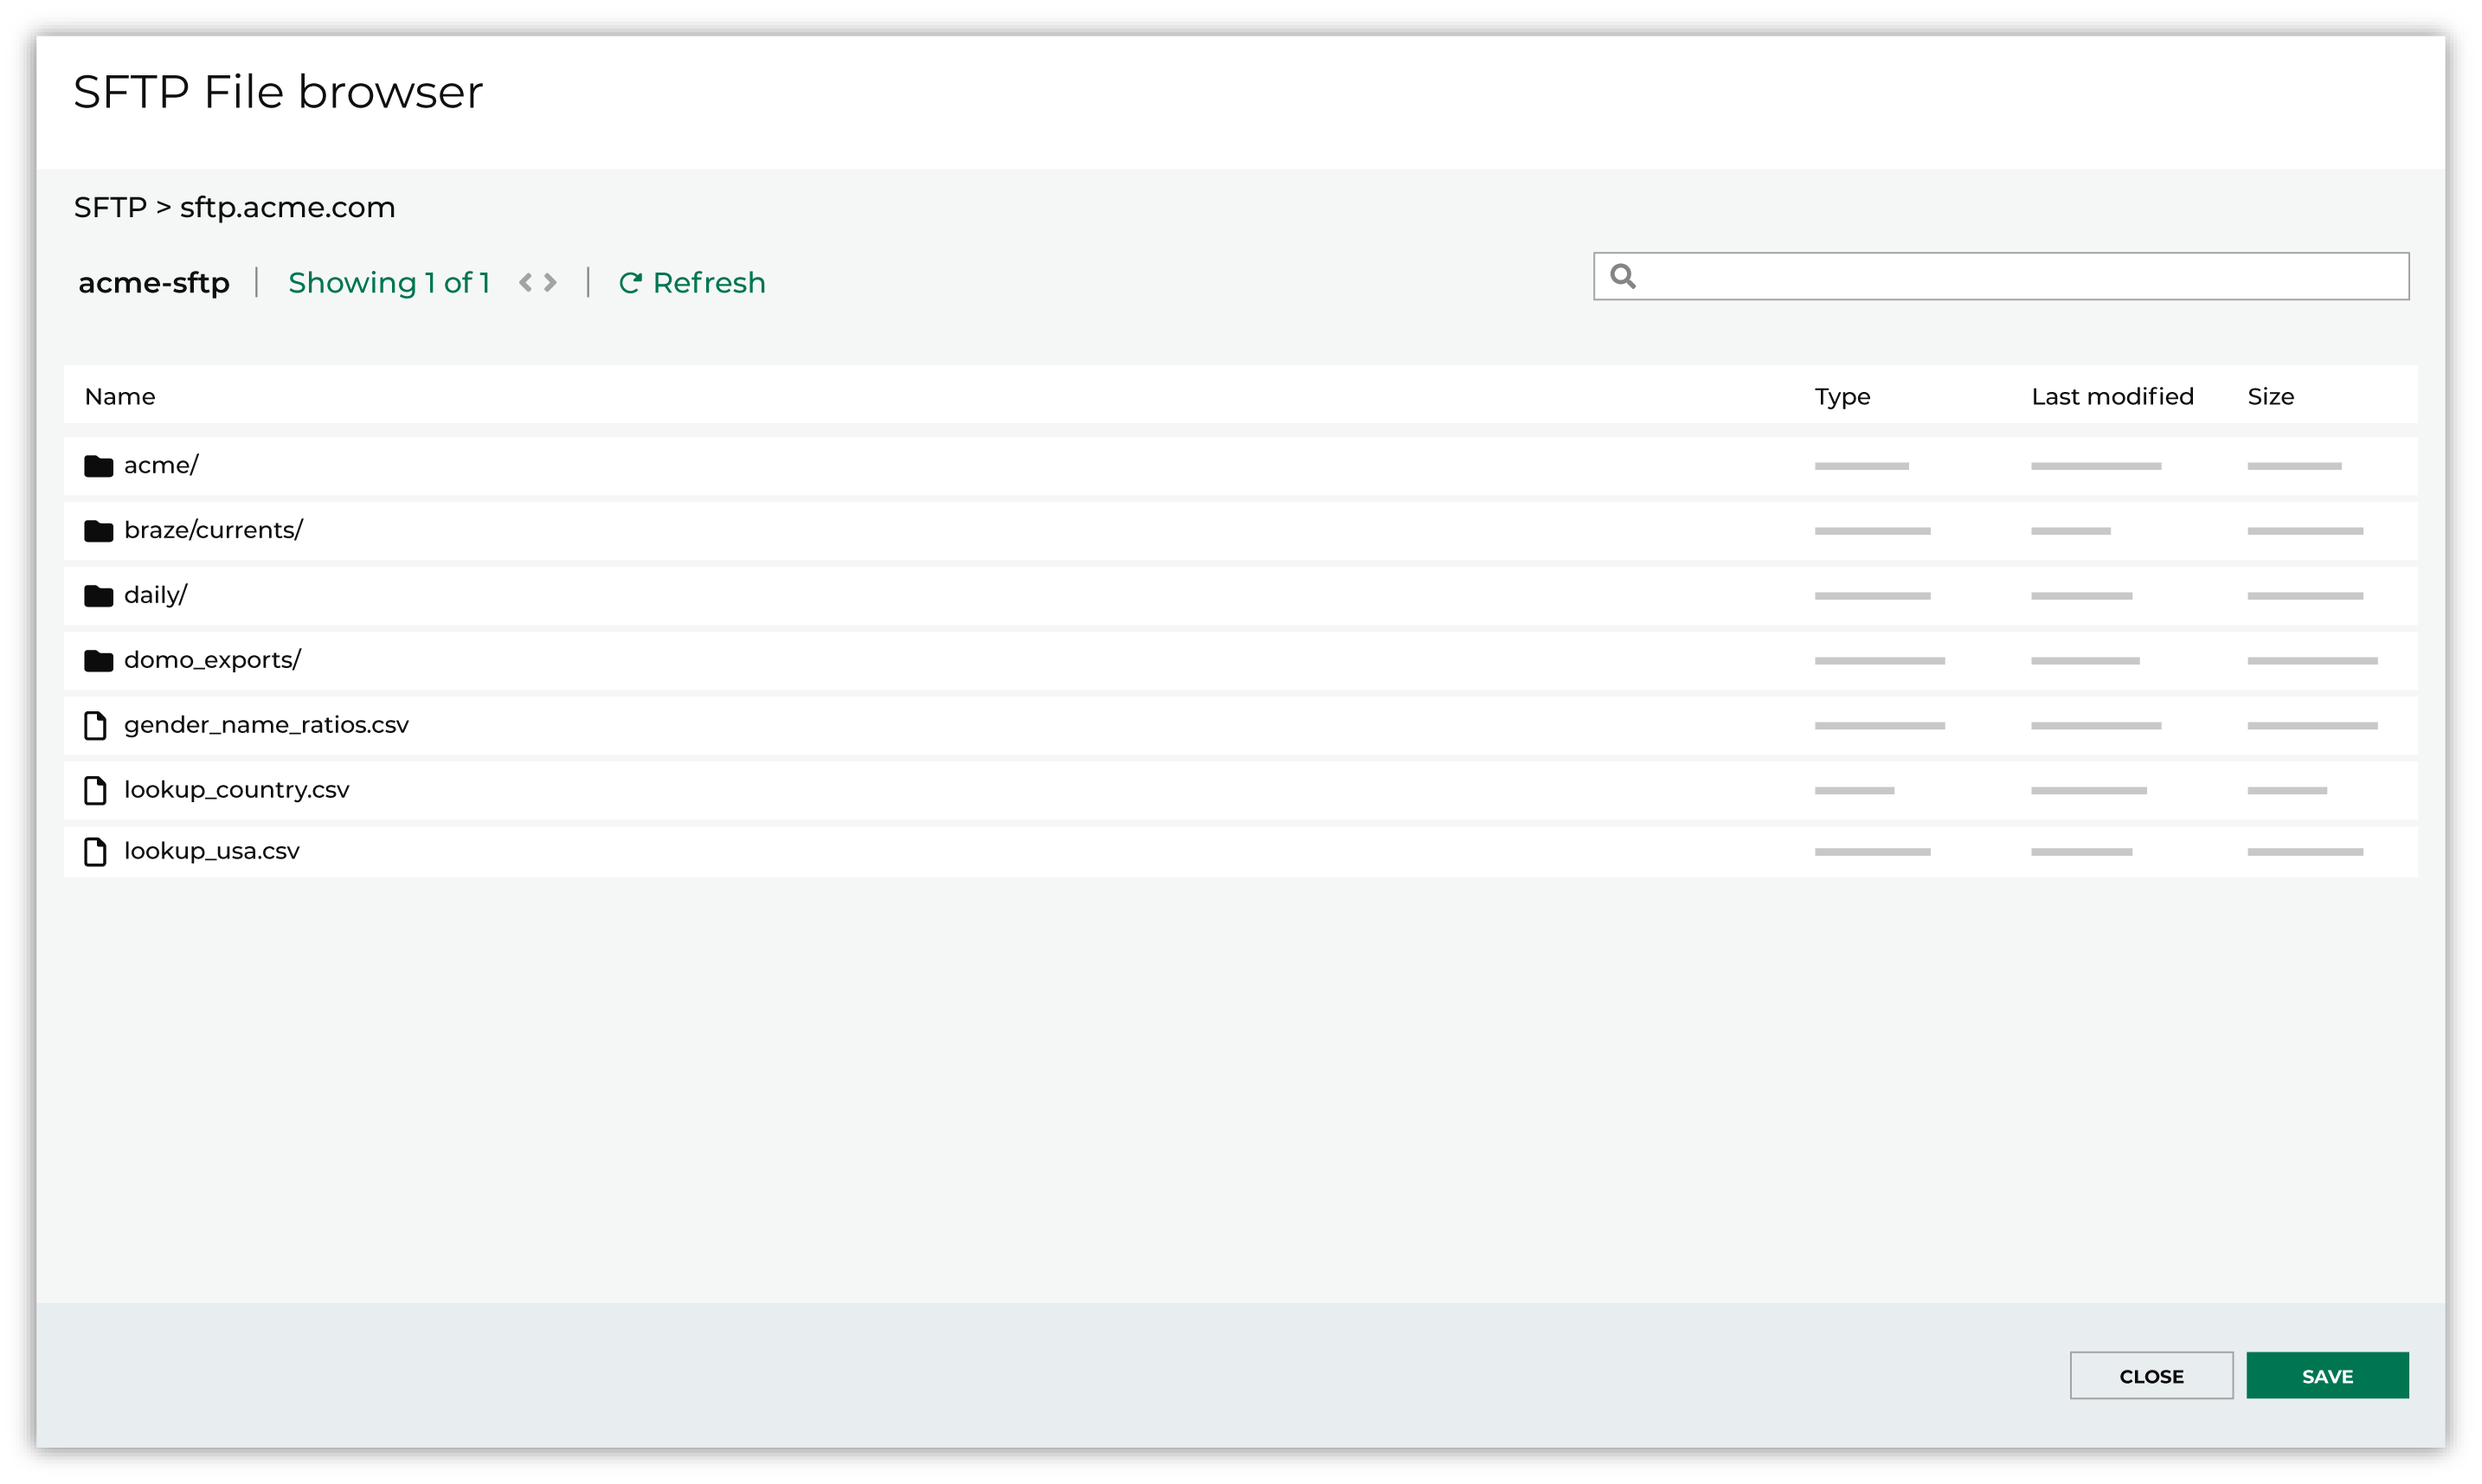
Use the PGP credential setting to specify the credentials to use for an encrypted file. 
|

|
Review the file. 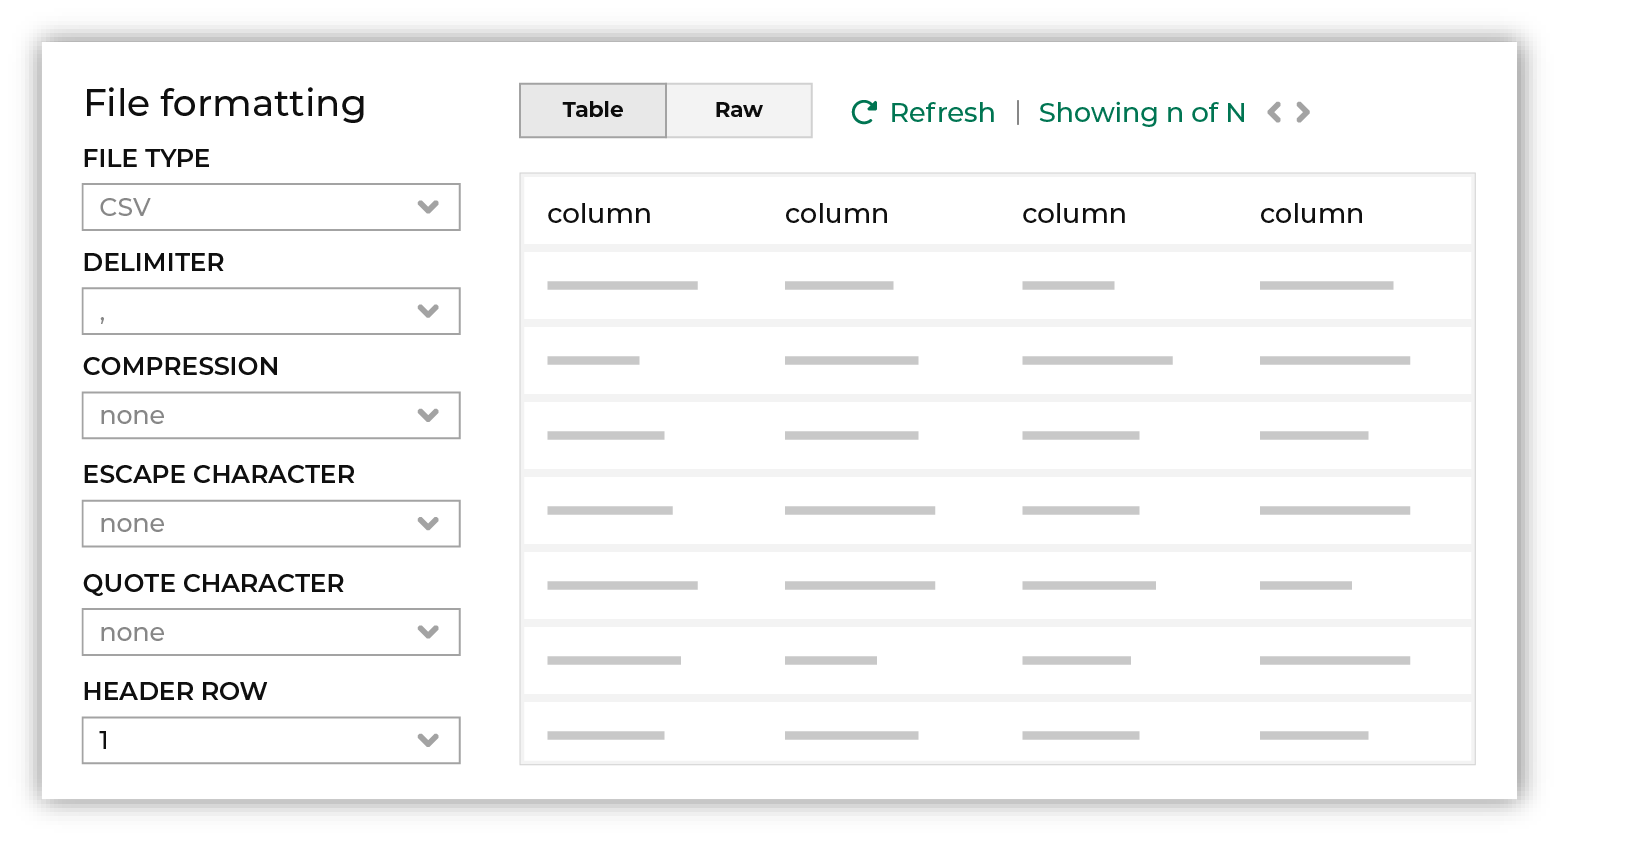
The contents of the file may be viewed as a table and in the raw format. Switch between these views using the Table and Raw buttons, and then click Refresh to view the file in that format. Note PGP encrypted files can be previewed. Apache Parquet PGP encrypted files must be less than 500 MB to be previewed. Amperity will infer formatting details, and then add these details to a series of settings located along the left side of the file view. File settings include:
Review the file, and then update these settings, if necessary. Note Amperity supports the following file types: Apache Avro, Apache Parquet, CSV, DSV, JSON, NDJSON, PSV, TSV, and XML. Refer to those reference pages for details about each of the individual file formats. Files that contain nested JSON (or “complex JSON”) or XML may require using the legacy courier configuration. |

|
Each file that is loaded to Amperity must have a defined schema, after which the data in the file is loaded into a domain table ready for use with workflows within Amperity. New feed To use a new data source, choose the Create new feed option, select an existing source from the Source dropdown or type the name of a new data source, and then enter the name of the feed. 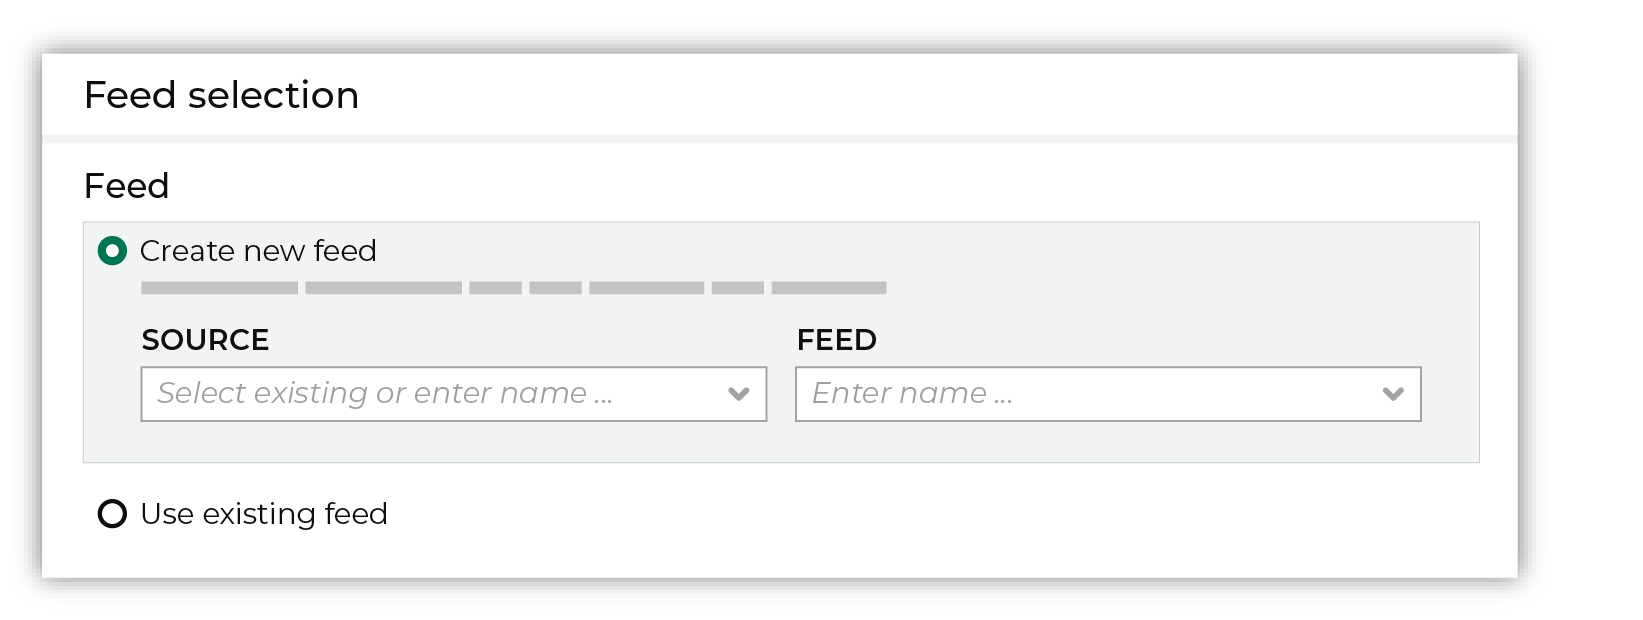
After you choose a load type and save the courier configuration, you will configure the feed using the data within the sample file. Existing feed To use an existing feed, choose the Use existing feed option to use an existing schema. 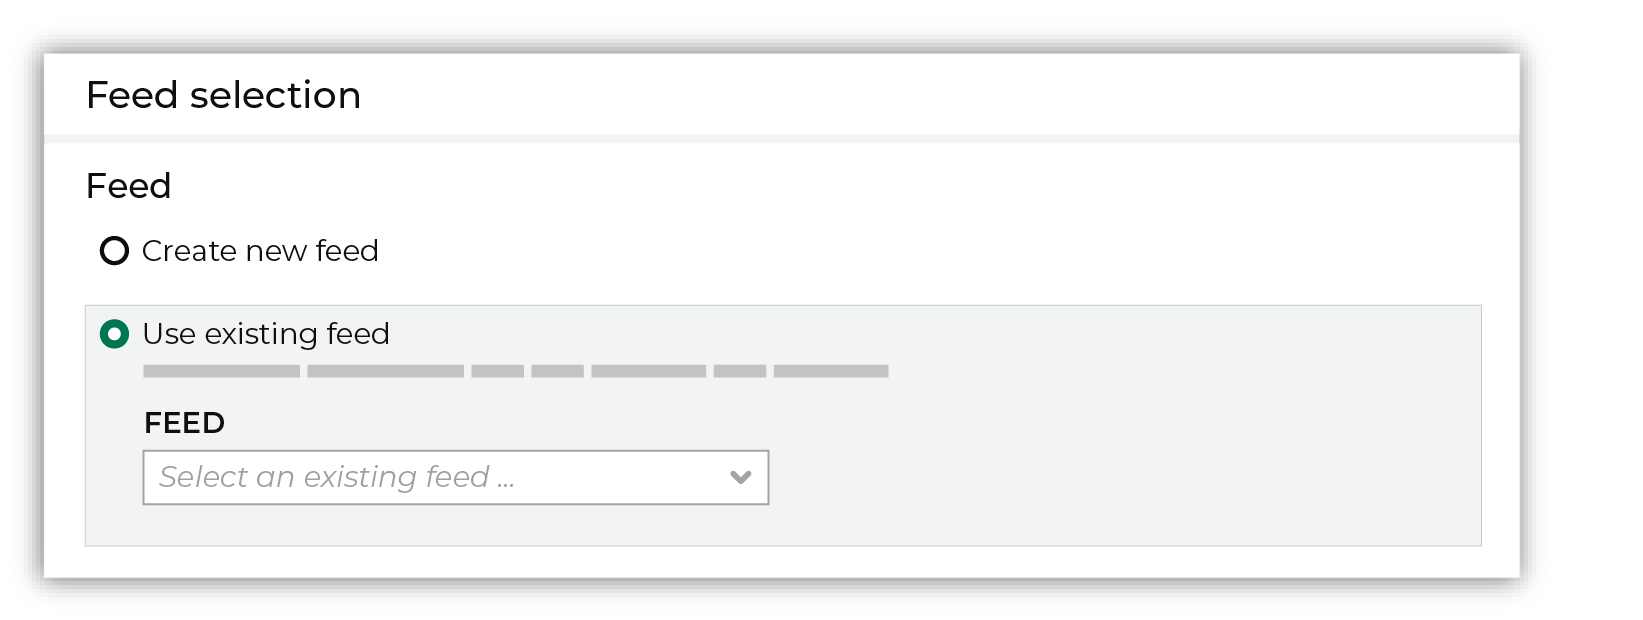
This option requires this file to match all of the feed-specific settings, such as incoming field names, field types, and primary keys. The data within the file may be different Pull data Define how Amperity will pull data from Google Cloud Storage and how it is loaded to a domain table. 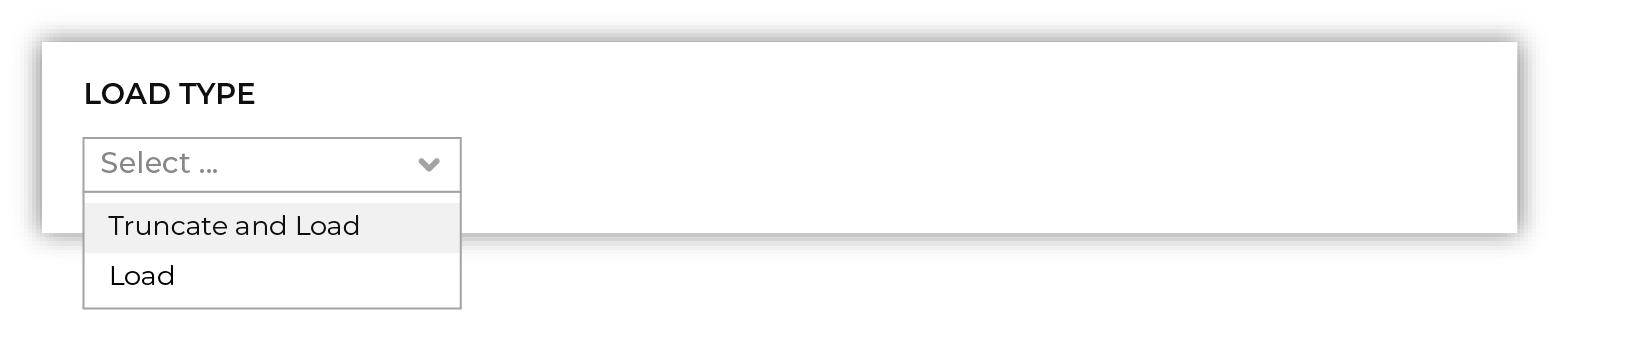
Use the Upsert option to use the selected file update existing records and insert records that do not exist. Use the Truncate and upsert option to delete all records in the existing table, and then insert records. Note When a file is loaded to a domain table using an existing file, the file that is loaded must have the same schema as the existing feed. The data in the file may be new. |

|
Use the feed editor to do all of the following:
When finished, click Activate. |
|
Find the courier related to the feed that was just activated, and then run it manually. On the Sources page, under Couriers, find the courier you want to run and then select Run from the actions menu. 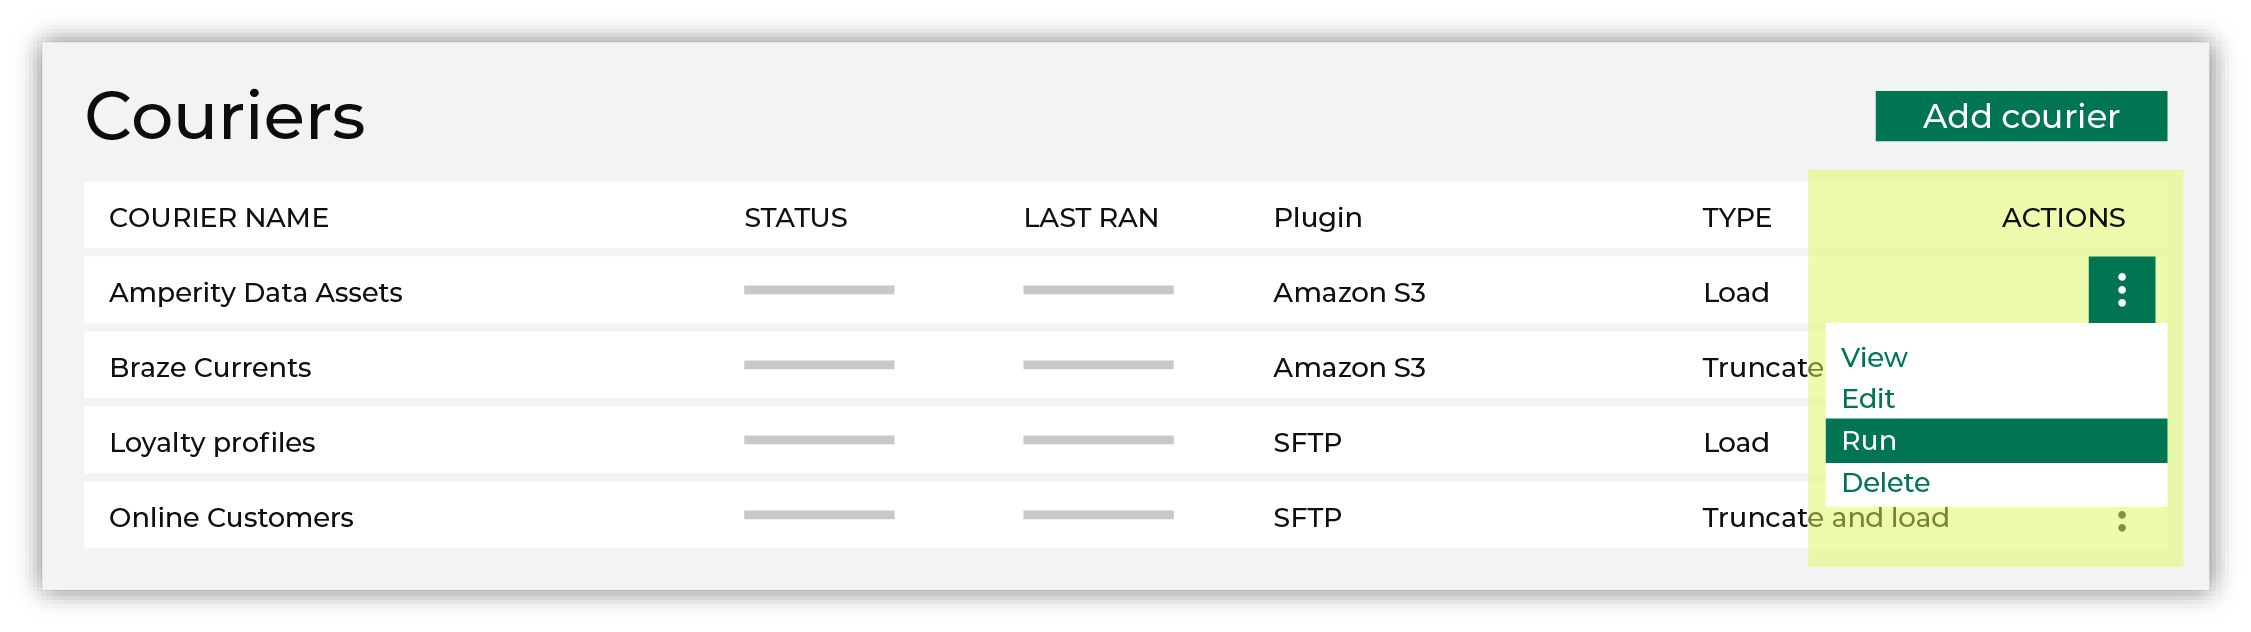
Select a date from the calendar picker that is before today, but after the date on which the file was added to the Google Cloud Storage file system. 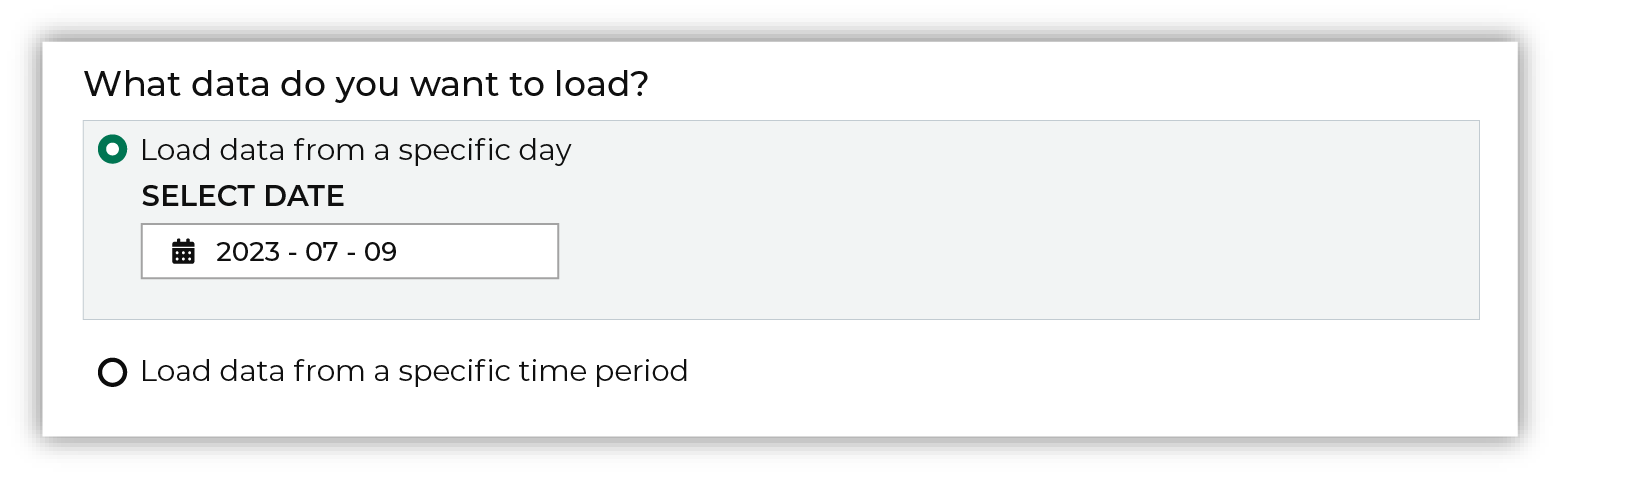
Leave the load options unselected, and then click Run. After the courier has run successfully, inspect the domain table that has the data that was loaded to Amperity. After you have verified that the data is correct, you may do any of the following:
|
Workflow actions
A workflow will occasionally show an error that describes what prevented a workflow from completing successfully. These first appear as alerts in the notifications pane. The alert describes the error, and then links to the Workflows tab.
Open the Workflows page to review a list of workflow actions, choose an action to resolve the workflow error, and then follow the steps that are shown.
|
|
You may receive a notifications error for a configured Google Cloud Storage data source. This appears as an alert in the notifications pane on the Destinations tab. 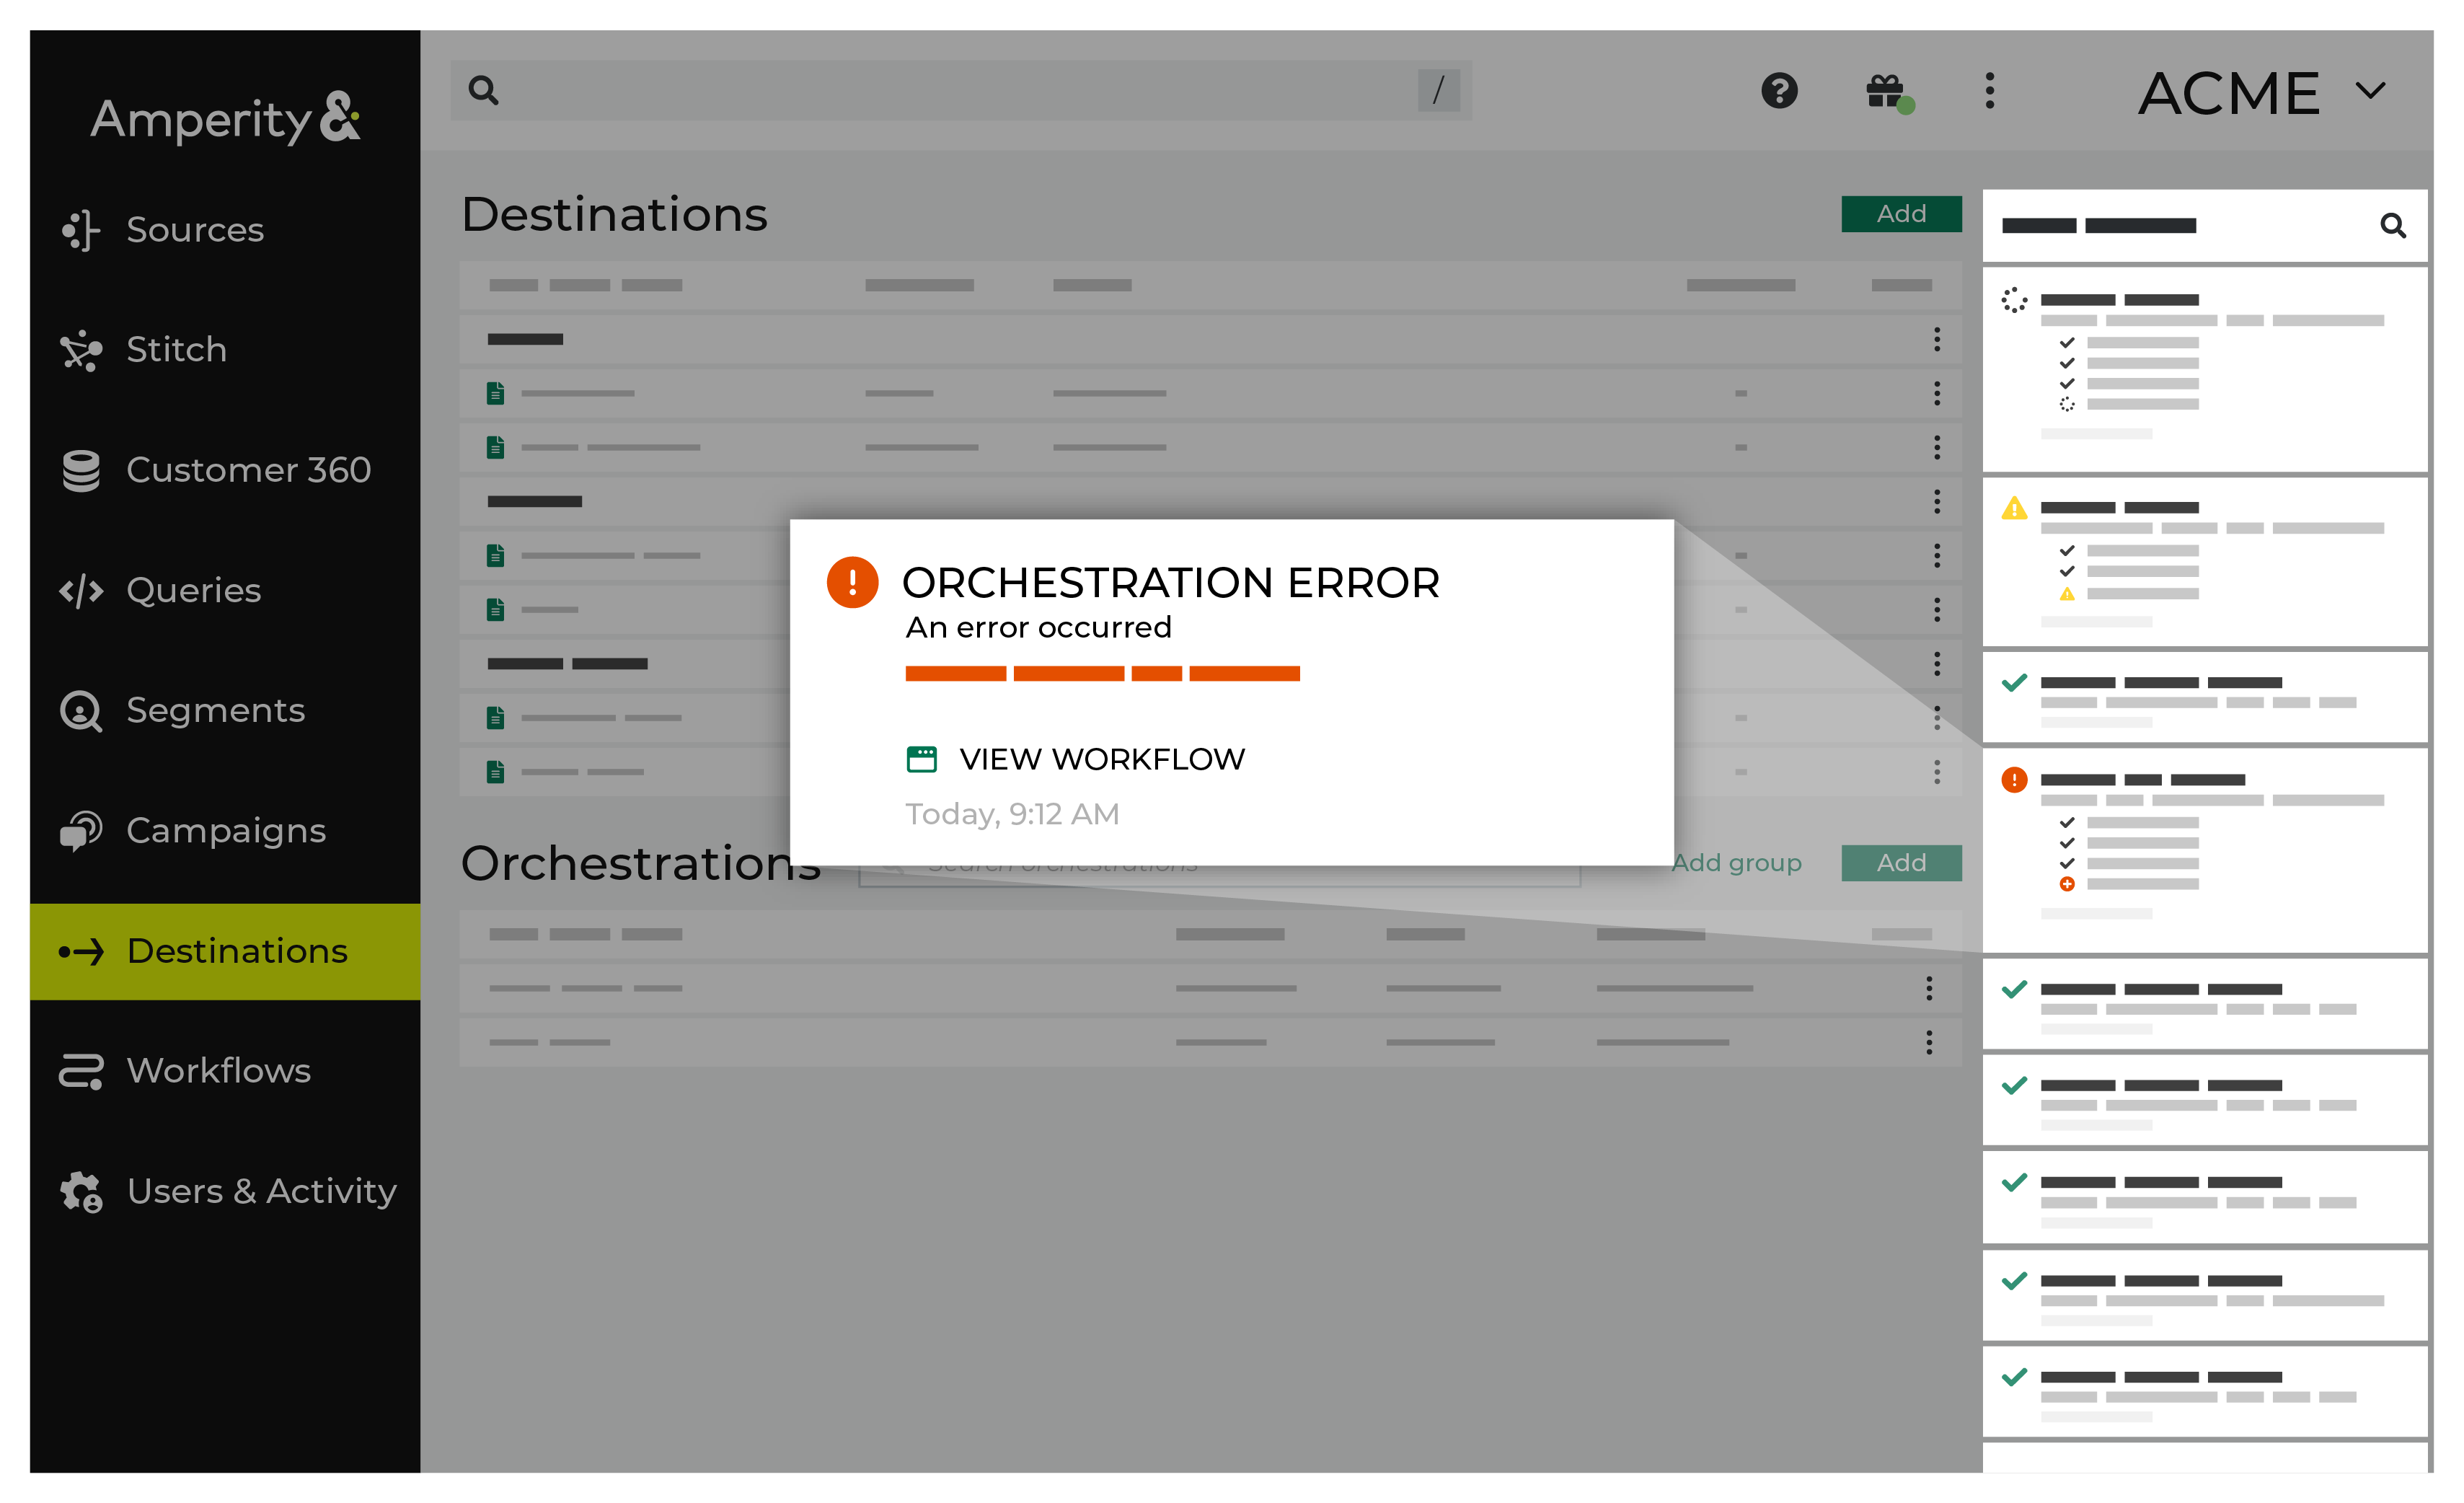
If you receive a notification error, review the details, and then click the View Workflow link to open this notification error in the Workflows page. |
|
|
On the Workflows page, review the individual steps to determine which steps have errors that require your attention, and then click Show Resolutions to review the list of workflow actions generated for this error. 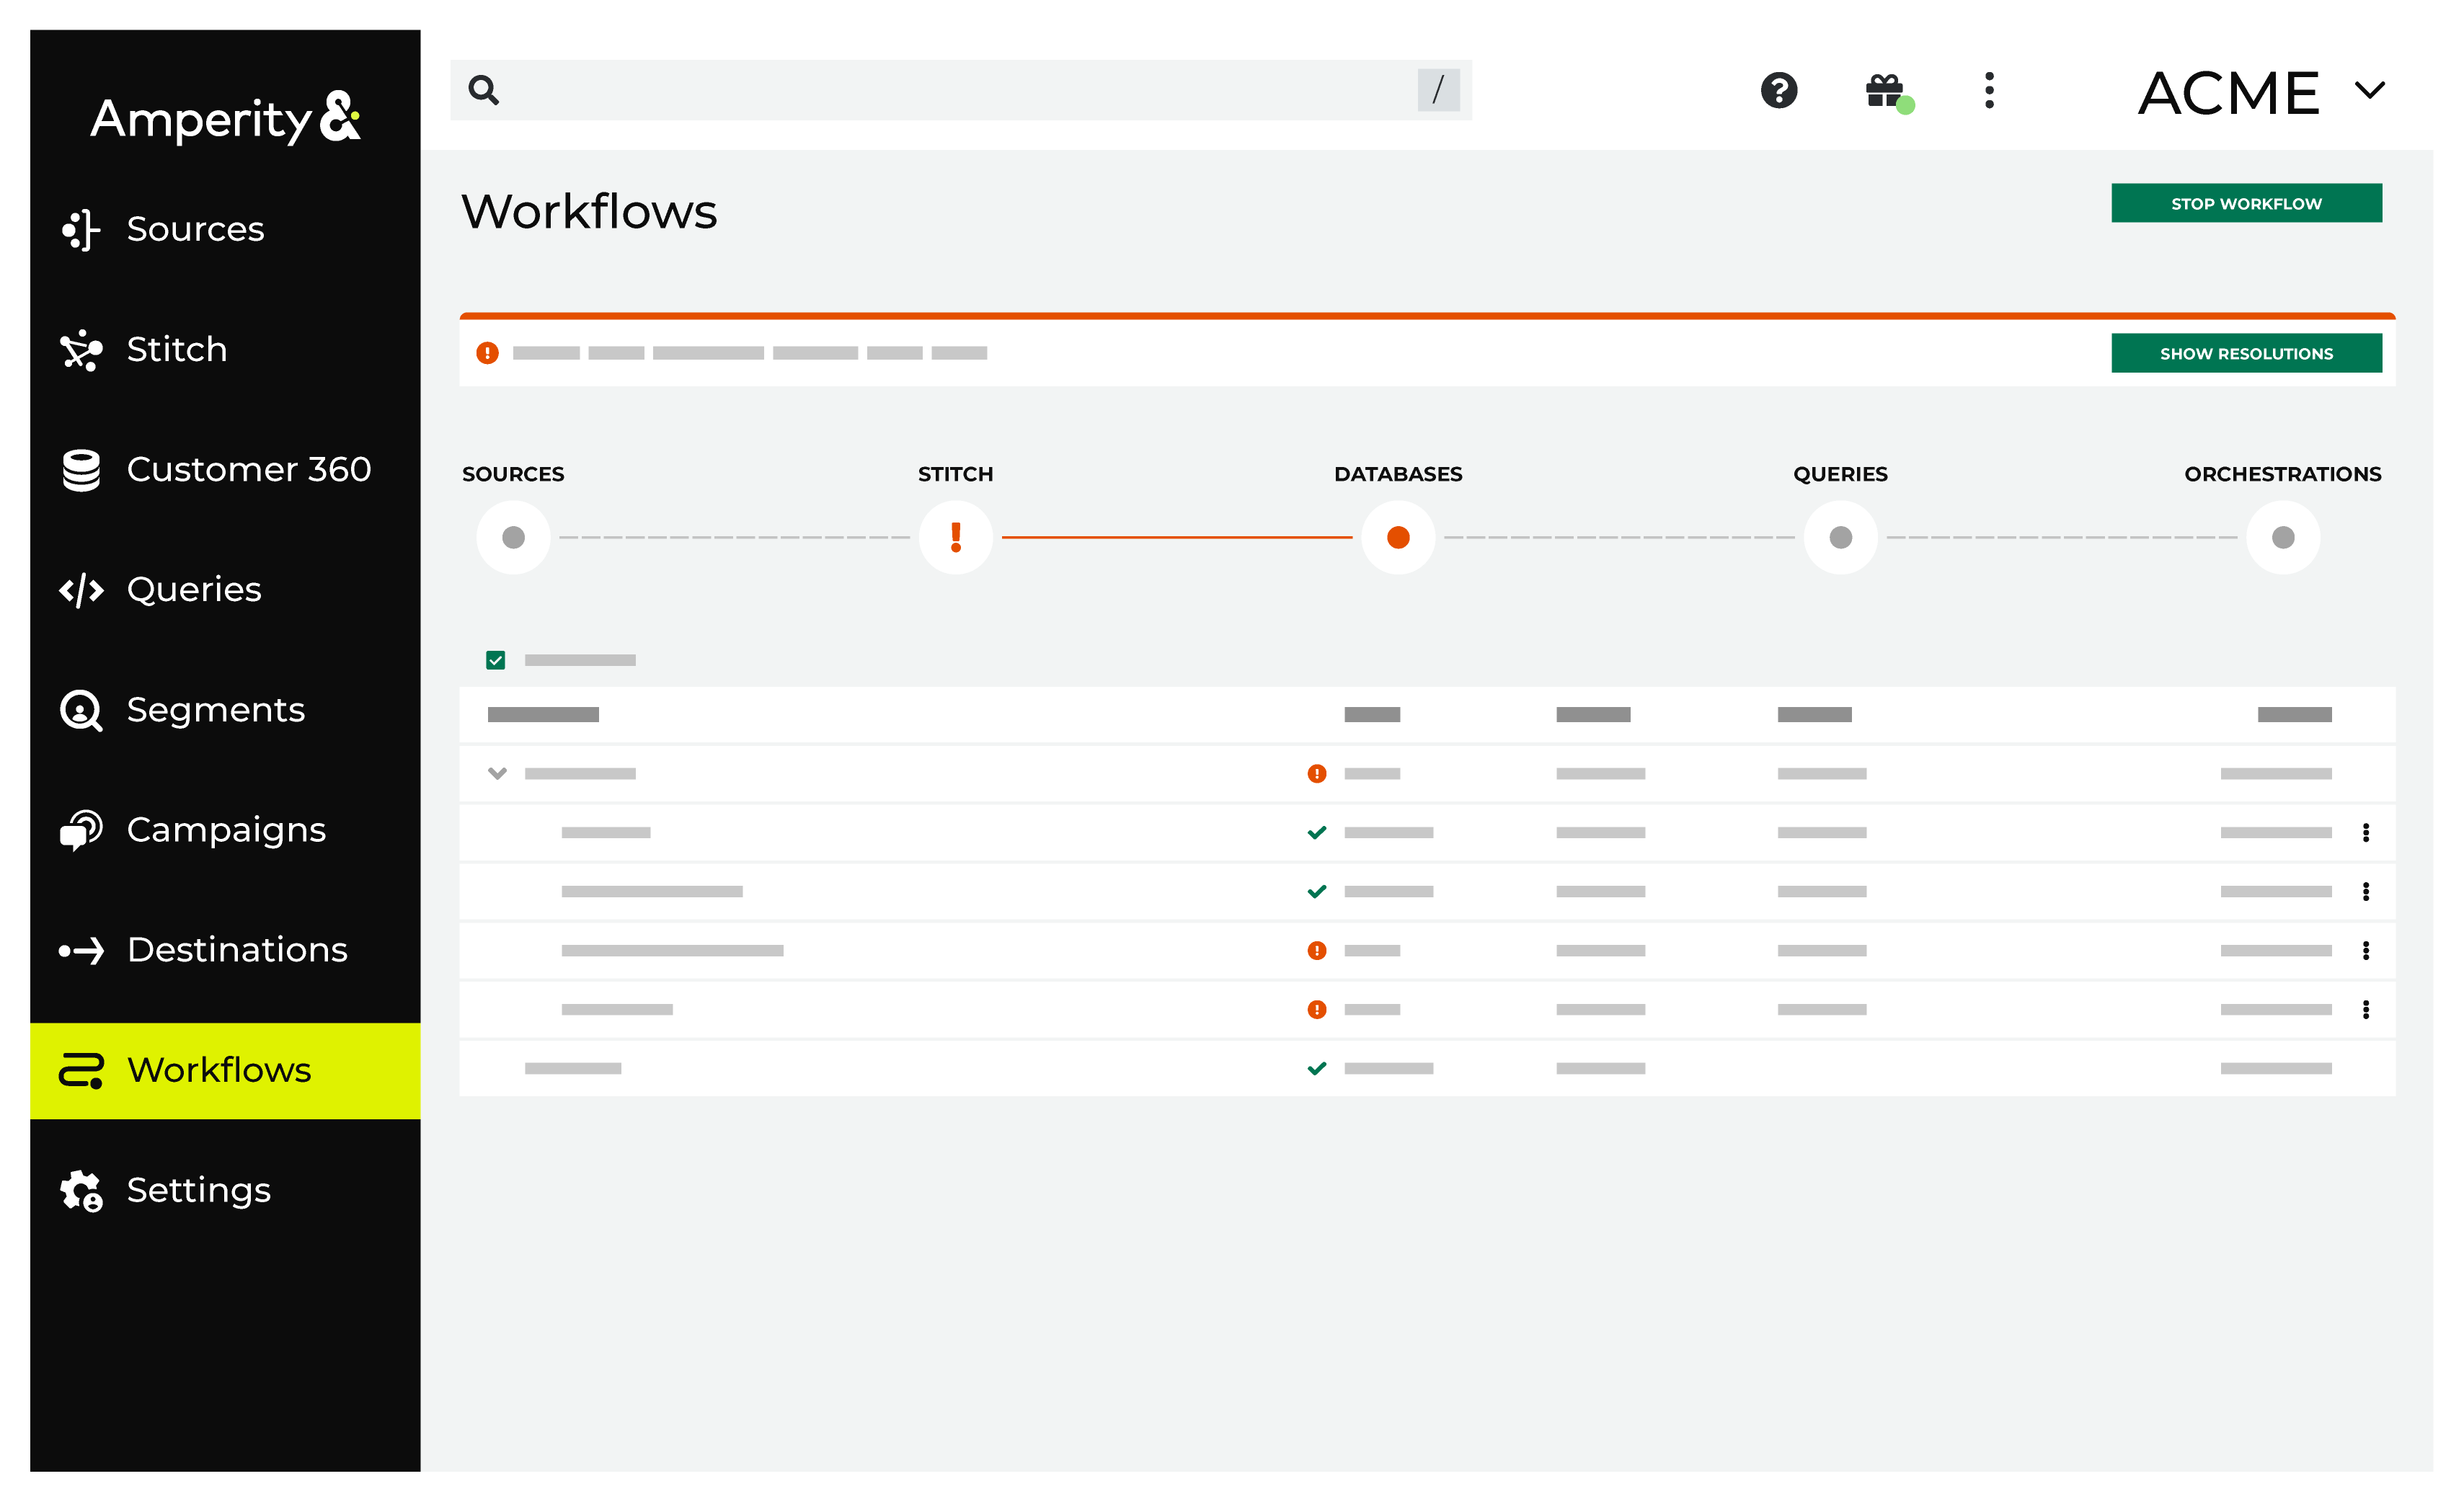
|
|
|
A list of individual workflow actions are shown. Review the list to identify which action you should take. 
Some workflow actions are common across workflows and will often be available, such as retrying a specific task within a workflow or restarting a workflow. These types of actions can often resolve an error. In certain cases, actions are specific and are shown when certain conditions exist in your tenant. These types of actions typically must be resolved and may require steps that must be done upstream or downstream from your Amperity workflow. Amperity provides a series of workflow actions that can help resolve specific issues that may arise with Google Cloud Storage, including: |
|
|
Select a workflow action from the list of actions, and then review the steps for resolving that error. 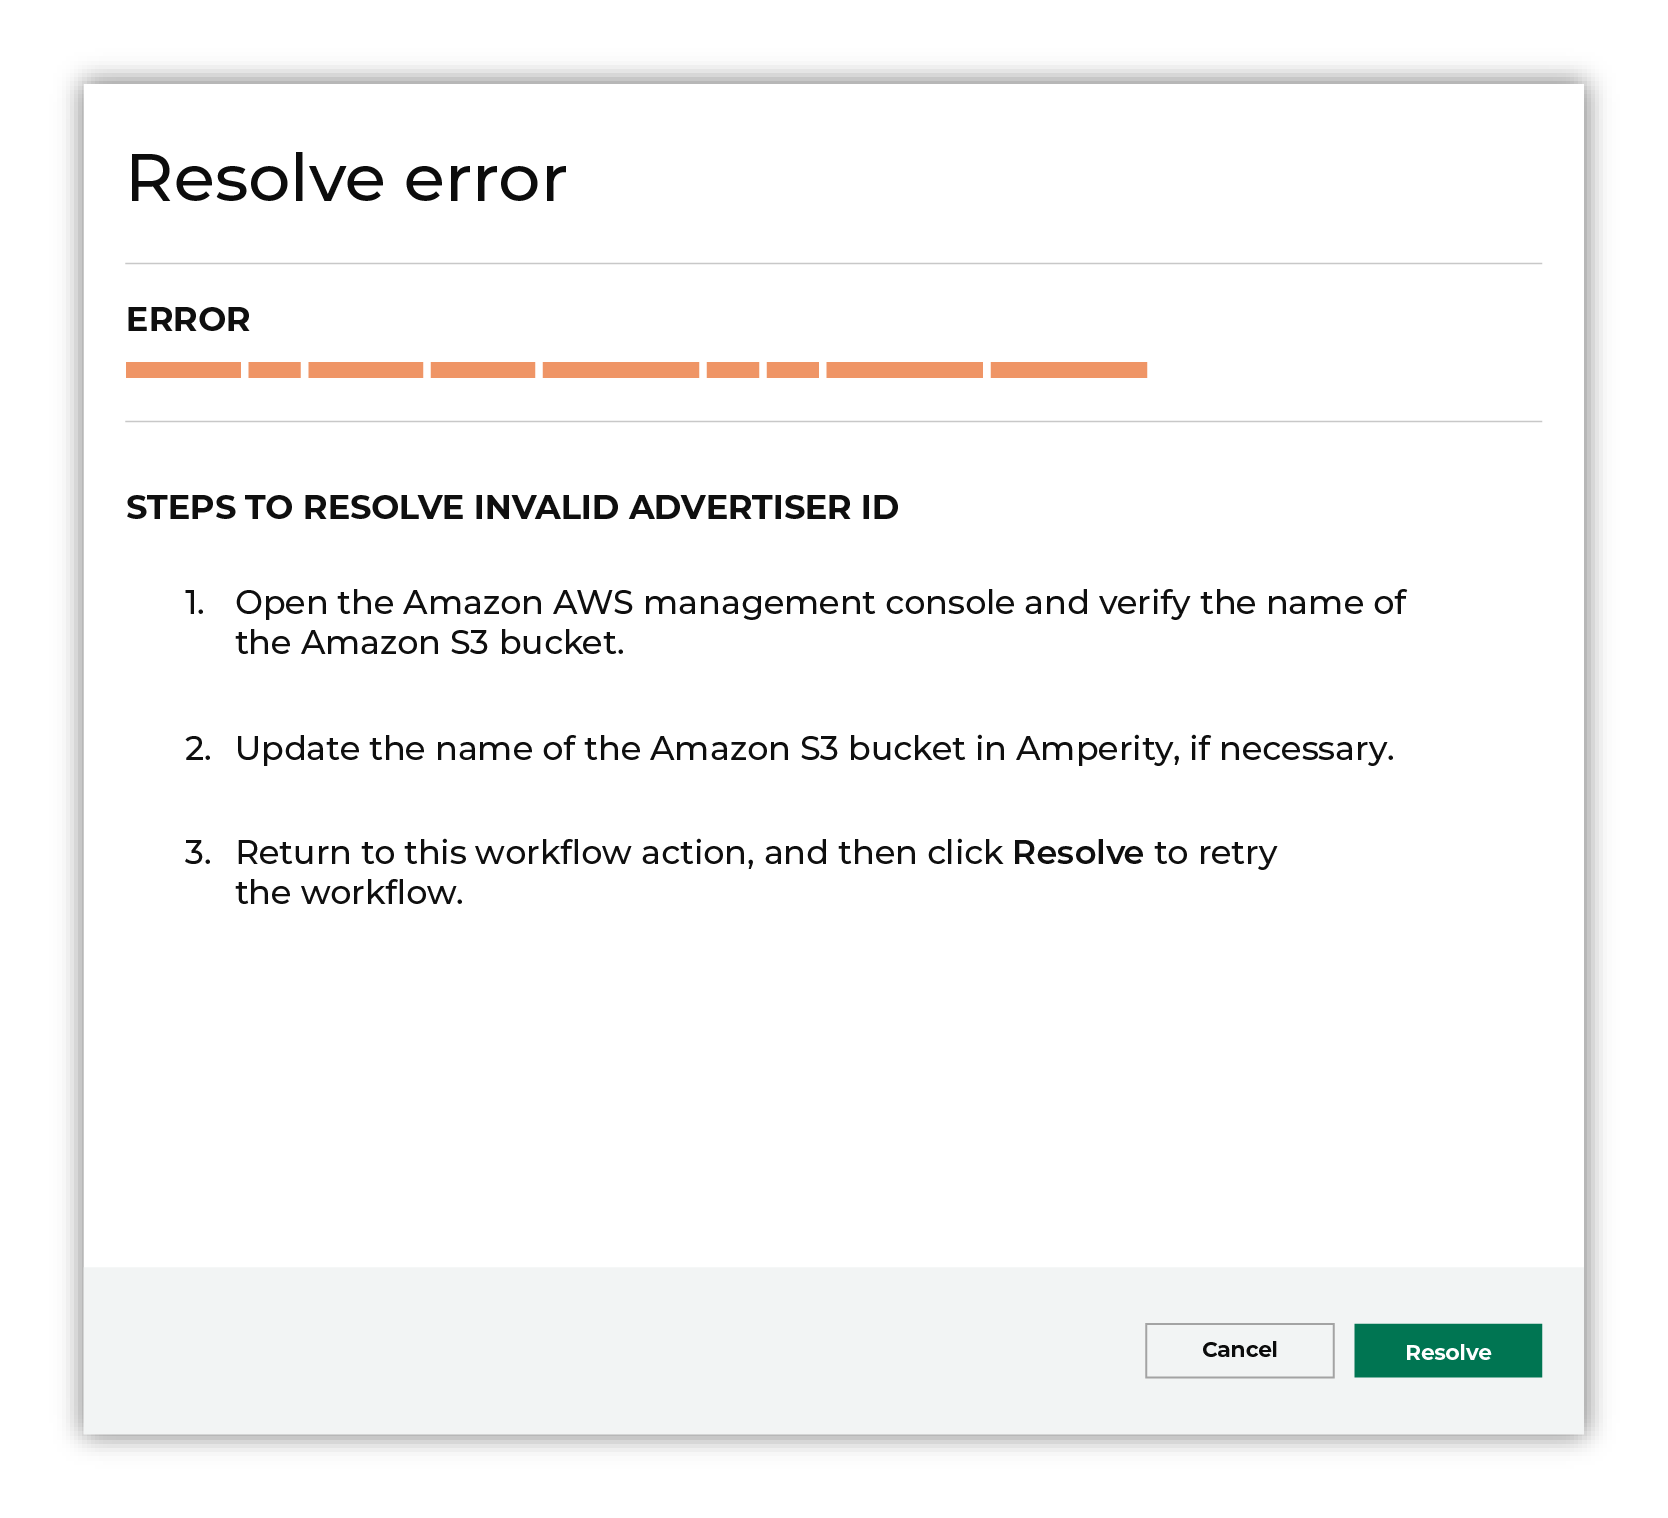
After you have completed the steps in the workflow action, click Continue to rerun the workflow. |
Bad archive
Sometimes the contents of an archive are corrupted and cannot be loaded to Amperity.
To resolve this error, do the following.
Upload a new file to Amperity.
After the file to the workflow action, and then click Resolve to retry this workflow.
Invalid credentials
The credentials that are defined in Amperity are invalid.
To resolve this error, verify that the credentials required by this workflow are valid.
Open the Credentials page.
Review the details for the credentials used with this workflow. Update the credentials for Google Cloud Storage if required.
Return to the workflow action, and then click Resolve to retry this workflow.
Missing file
An archive that does not contain a file that is expected to be within an archive will return a workflow error. Amperity will be unable to complete the workflow until the issue is resolved.
To resolve this error, do the following.
Add the required file to the archive.
or
Update the configuration for the courier that is attempting to load the missing file to not require that file.
After the file is added to the archive or removed from the courier configuration, click Resolve to retry this workflow.
PGP error
A workflow action is created when a file cannot be decrypted using the provided PGP key.
To resolve this error, verify the PGP key.
Open the Sources page.
Review the details for the PGP key.
If the PGP key is correct, verify that the file associated with this workflow error is encrypted using the correct PGP key. If necessary, upload a new file.
Return to the workflow action, and then click Resolve to retry this workflow.
Unable to decompress archive
An archive that cannot be decompressed will return a workflow error. Amperity will be unable to complete the workflow until the issue is resolved.
This issue may be shown when the name of the archive does not match the name of the configured archive or when Amperity is attempting to decompress a file and not an archive. In some cases, the contents of the archive file may be the reason why Amperity is unable to decompress the archive.
To resolve this error, do the following.
Verify the configuration for the archive, and then verify the contents of the archive.
Update the configuration, if neccessary. For example, when Amperity is attempting to decompress a file, update the configuration to specify a file and not an archive.
In some cases, re-loading the archive to the location from which Amperity is attempting to pull the archive is necessary.
Return to the workflow action, and then click Resolve to retry this workflow.