About file uploads
Use file uploads from the Customer 360 and Queries pages to upload CSV files to a database. Uploaded files are accessible as tables from the Queries page and can be made available as audiences from the Segments page.
When making files available in the segment editor, you can choose how the file matches to customer records:
Activation ID Choose a column in the file that exactly matches one of your configured activation IDs. Files configured this way can be used in segments that use the selected activation ID.
Legacy match Select an email column to join on the Merged Customers table and return the Amperity ID. Files configured this way can only be used in segments that use the Amperity ID (not segments using a different activation ID).
Uploaded files belong to the database to which they are uploaded, but are not refreshed by scheduled workflows or included within customer profiles. Uploaded files cannot be referenced by database tables.
If the data in an uploaded file should be part of a scheduled workflow or included within customer profiles, upload the CSV file using a feed, apply semantic tags or foreign keys, and then make the uploaded file available to Stitch workflows.
Important
Files uploaded to a sandbox are copied to your production tenant when the sandbox is promoted. Files uploaded to production are copied to a sandbox and are available after the database is refreshed in the sandbox.
File uploads use cases
Upload CSV files to a database to support ad hoc use cases. For example:
Upload a recently acquired anonymous list of customers
Upload a list of customers who have signed up using a form
Upload a reference file, and then access it from the Queries page
Upload a list of customers who completed a survey, and then include those customers in a segment
Important
CSV files uploaded for use with segments must identify either:
A column that matches one of your configured activation IDs (for activation ID matching), or
A column containing valid email addresses (for legacy matching via the Merged Customers table)
Segment matching options
When uploading a file and selecting Make available in segment editor, you must choose a matching method:
Activation ID
Use activation ID matching when your uploaded file has a column that corresponds to one of your tenant’s configured activation IDs.
From the Configure File window, select Make available in segment editor.
Select Activation ID.
From the dropdown, choose a column in your file that exactly matches one of your configured activation IDs.
Files configured with activation ID matching can be used in segments that use the selected activation ID. For example, if your file has a column of email addresses that match your email activation ID, you can use this file in segments activated on email.
Legacy match
Use legacy matching when you want to associate customers in your uploaded file with their Amperity customer profiles using email addresses.
From the Configure File window, select Make available in segment editor.
Select Legacy match.
From the Email Column dropdown, select the column in your file that has email addresses.
Legacy matching joins the email column in your uploaded file to the Merged Customers table and returns the corresponding Amperity ID. Files configured with legacy matching can only be used in segments that use the Amperity ID.
Note
Legacy match is recommended when you want to preserve the existing behavior of matching uploaded files to customer profiles via email and using the results in Amperity ID-based segments.
SQL use case example
Upload a list of customers to include or exclude from an audience by building a query against file uploads that returns the Amperity ID.
The following example shows SQL in the Query Editor that returns a series of values from an uploaded file, joins those values to the Merged Customers table using the email column in both tables, and then returns a list of Amperity IDs.
Note
This is not required for uploaded files that contain an email column. For more complex use cases, a query that is made available to segments must return a list unique by Amperity ID.
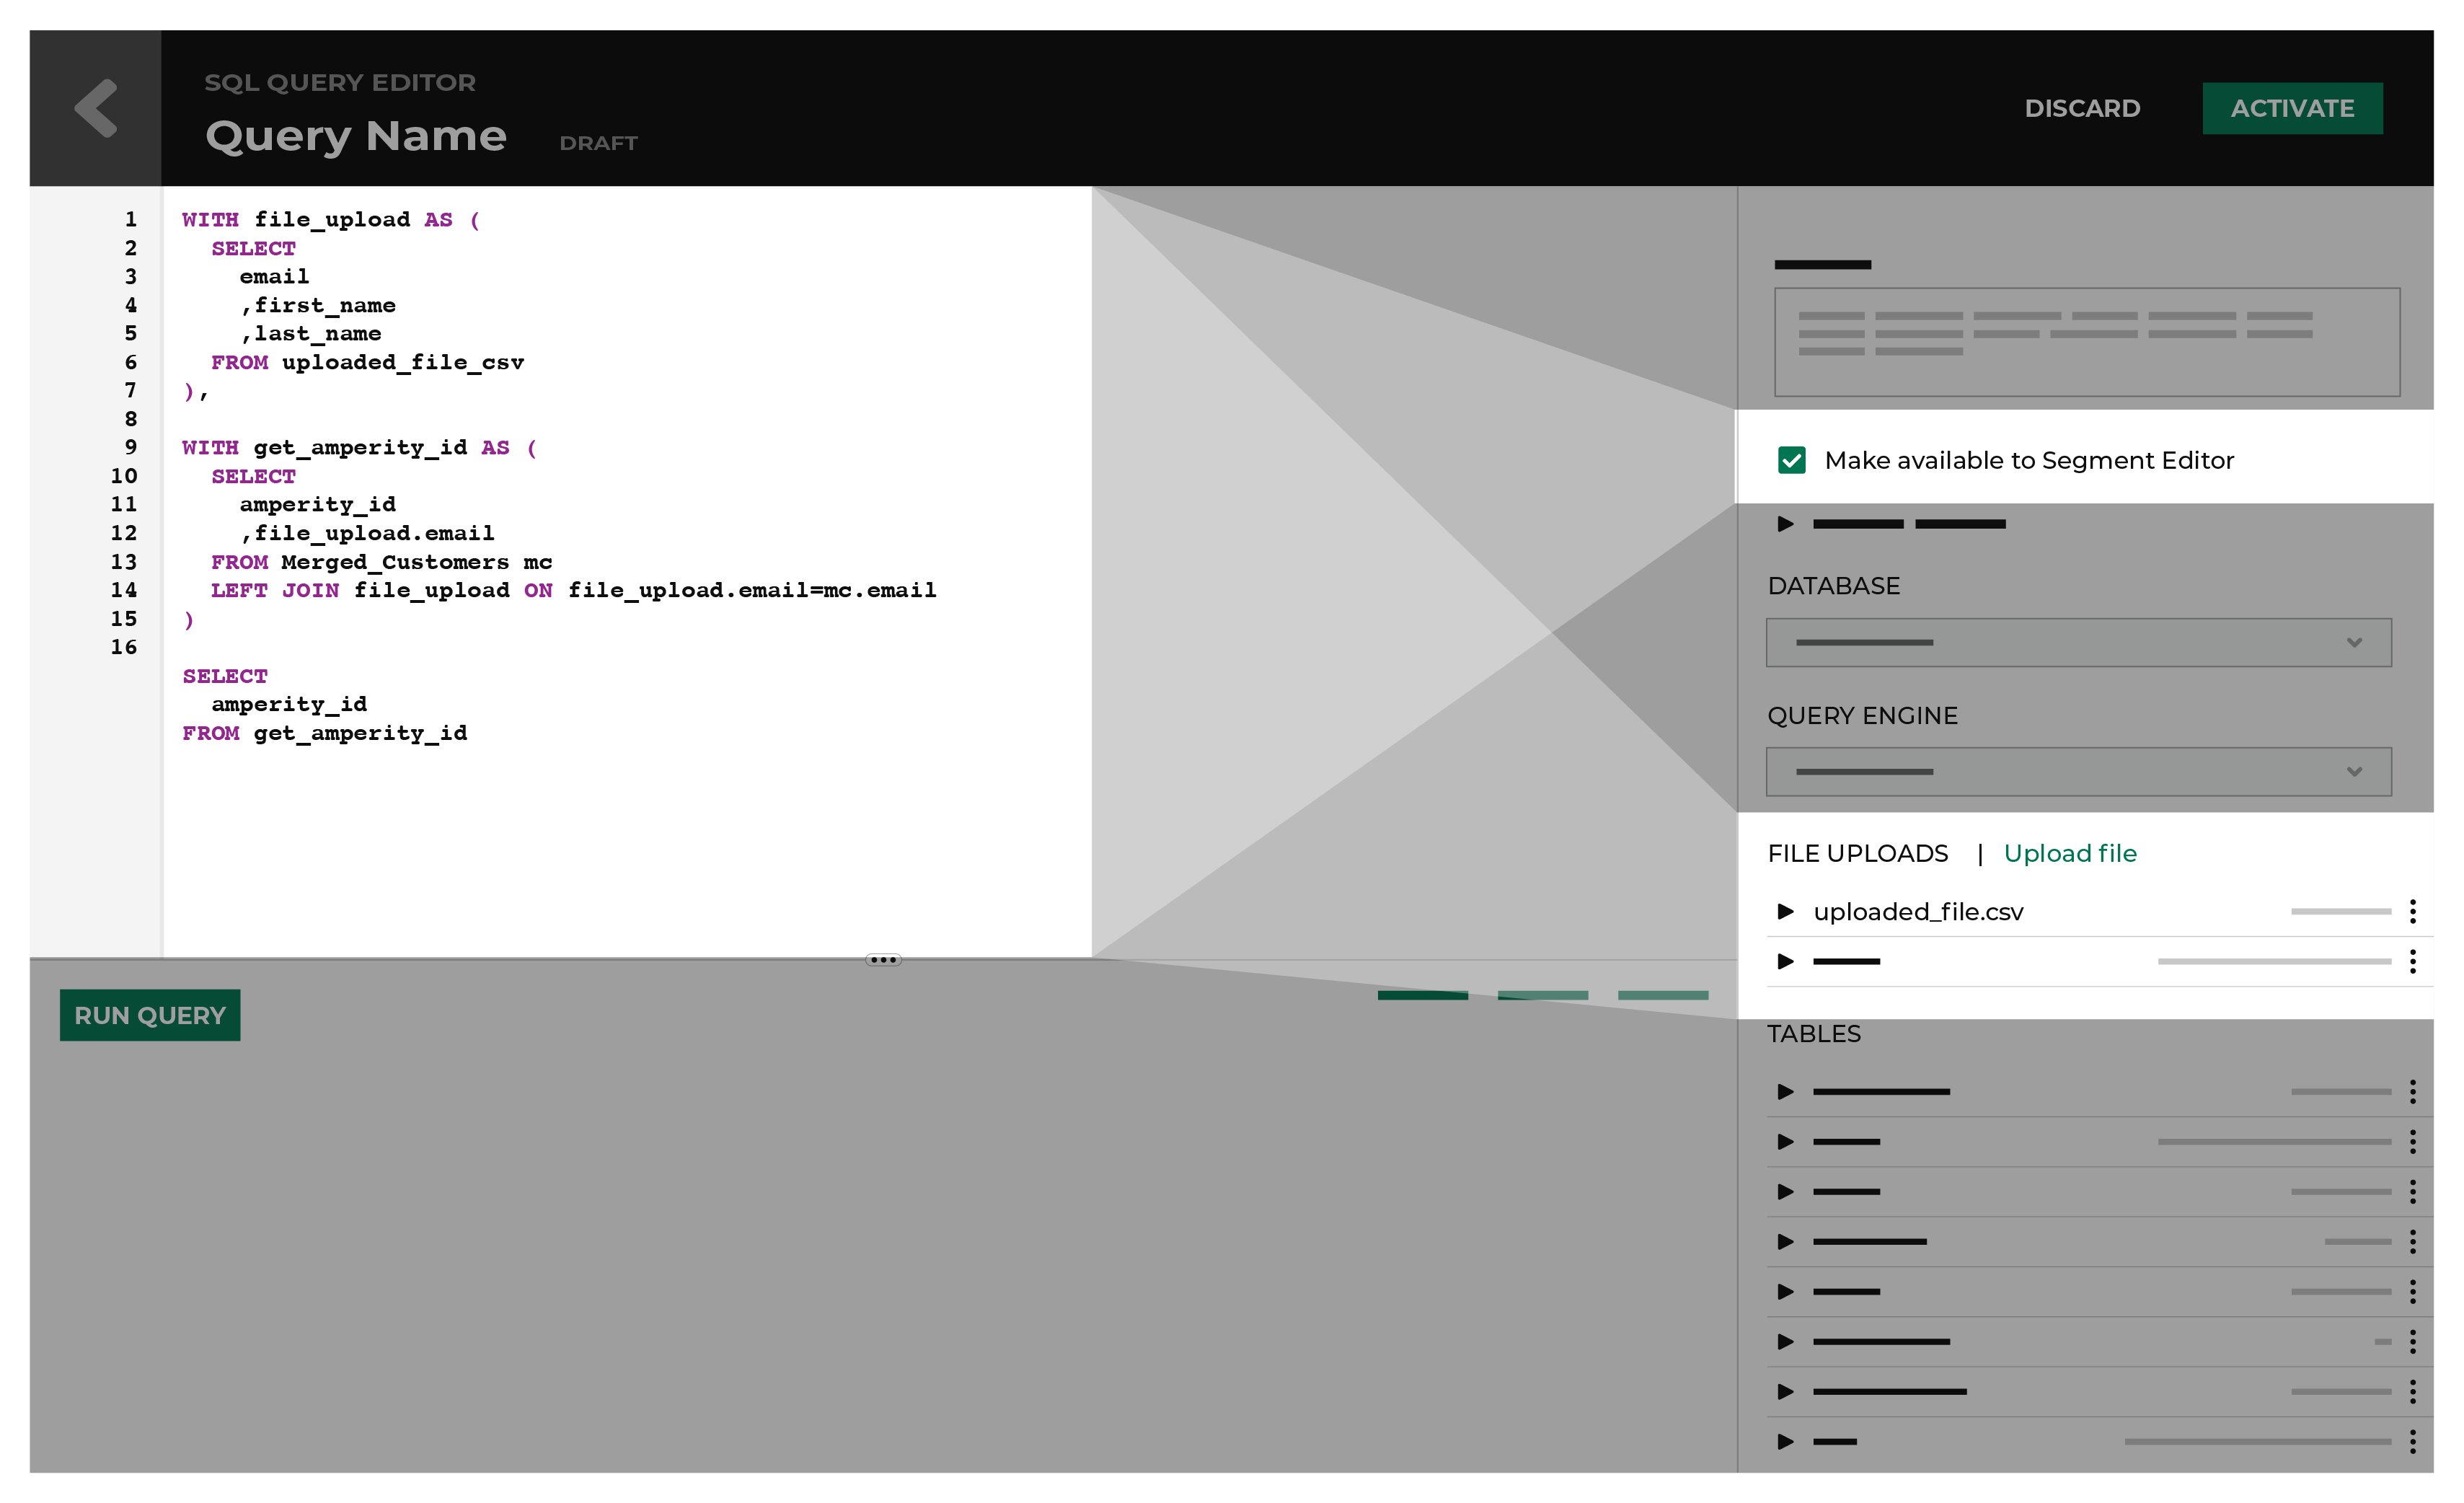
 1WITH file_upload AS (
 2   SELECT
 3     email
 4     ,first_name
 5     ,last_name
 6   FROM uploaded_file_csv
 7 ),
 8
 9 WITH get_amperity_id AS (
10   SELECT
11     amperity_id
12     ,file_upload.email
13   FROM Merged_Customers mc
14   LEFT JOIN file_upload ON file_upload.email=mc.email
15 )
16
17 SELECT
18   amperity_id
19 FROM get_amperity_id
Example inbound request
The following example shows a inbound request for a customer list in the form of a CSV file:
1customer,email
2John Doe,john.doe@abc.com
3Jane Doe,jane.doe@abc.com
4John Smith,john.smith@abc.com
5Jane Smith,jane.smith@abc.com
6Jim Johns,jim.johns@abc.com
Query output
The following examples show how to use file uploads from the Segment Editor and from the Campaigns page:
Create a complex view of customers on the Segments page by adding a query output to a segment
Create a custom join logic from an uploaded customer list for further segmentation in the Segment Editor and on the Campaigns page
Note
Queries made available for segments can reference any uploaded files within the database to which they are associated.
How-tos
Tasks related to uploading CSV files and adding query outputs to segments in Amperity.
Add lists
You can add a customer list or source to the Segments page and the Campaigns page.
Add a query output to a segment
You can add a query output to a segment from the Segment Editor.
To add a query output to a segment
From the Segment Editor window, click Add Attribute.
From the Source menu, either select a table source or search for a table source in the search field.
From the Attribute menu, either select an attribute or search for an attribute in the search field.
From the Condition menu, select a condition.
From the value menu, either select a value or search for a value in the search field.
Click Add List.
From the Condition list, select Is a member of.
From the Customer Lists list, in the Queries section, select a query output.
Note
To delete a segment associated with a query output, you need to first delete the query output before being able to delete the segment.
Click Save As.
The data appears on the Segments page.
Note
In order for an uploaded file to appear in the Segment Editor, you must configure it with one of the following matching methods:
Activation ID The file has a column that matches one of your configured activation IDs. The file can be used in segments using that activation ID.
Legacy match The file has an email column that joins to the Merged Customers table to return the Amperity ID. The file can only be used in segments using the Amperity ID.
Select a query source
You can select a query source from the Campaigns page.
To select a query source
From the Edit attributes page, in the Sources column, click on a row.
In the Queries (Custom Tables), select a query source.
Click Save.
Note
To delete an audience associated with a query output, you must first delete the uploaded file before deleting the segment.
Add an uploaded file to a segment
You can add an uploaded file to a segment from the Segment Editor.
Note
It may take up to 10 minutes for your file to upload and you can only upload one file per tenant at a time.
Warning
Uploaded CSV files are limited to 50 MB.
To add an uploaded file to a segment
From the Segment Editor window, click Add Attribute.
From the Source menu, either select a table source or search for a table source in the search field.
From the Attribute menu, either select an attribute or search for an attribute in the search field.
From the Condition menu, select a condition.
From the value menu, either select a value or search for a value in the search field.
Click Add List.
From the Condition list, select Is a member of.
From the Customer Lists list, in the File Uploads section, select an uploaded file output.
Note
To delete a segment associated with a query output, you must first delete the uploaded file before being able to delete the segment.
Click Save As.
The data appears on the Segments page.
View uploaded files
You can view a list of uploaded files on the Segment Editor.
To view uploaded files
From the Segment Editor window, click Add List.
From the Condition list, select Is a member of.
From the Customer Lists list, in the File Uploads section, view a list of uploaded files.
Delete an uploaded file
You can delete an uploaded file.
From the Queries or Segments, open the actions menu for an uploaded file, and then select Delete.
Click Delete to confirm that you want to delete the file upload.
Upload CSV file
You can upload a CSV file in Amperity to use on the Queries, Segments, and Campaigns pages.
Note
When you upload a file to Amperity, the system writes a table from the data contained in that file. The table is then layered on top of a database at the queries layer.
Amperity does not enforce a time constraint on how long uploaded files can remain in the database.
Multi-brand databases
A file is uploaded to a single database. When your tenant is configured for multi-brand databases, and an uploaded file must be available to more than one database, upload the CSV file to each database.
Upload via the Customer 360 page
You can upload a CSV file the Customer 360 page.
To upload a CSV file via the Customer 360 page
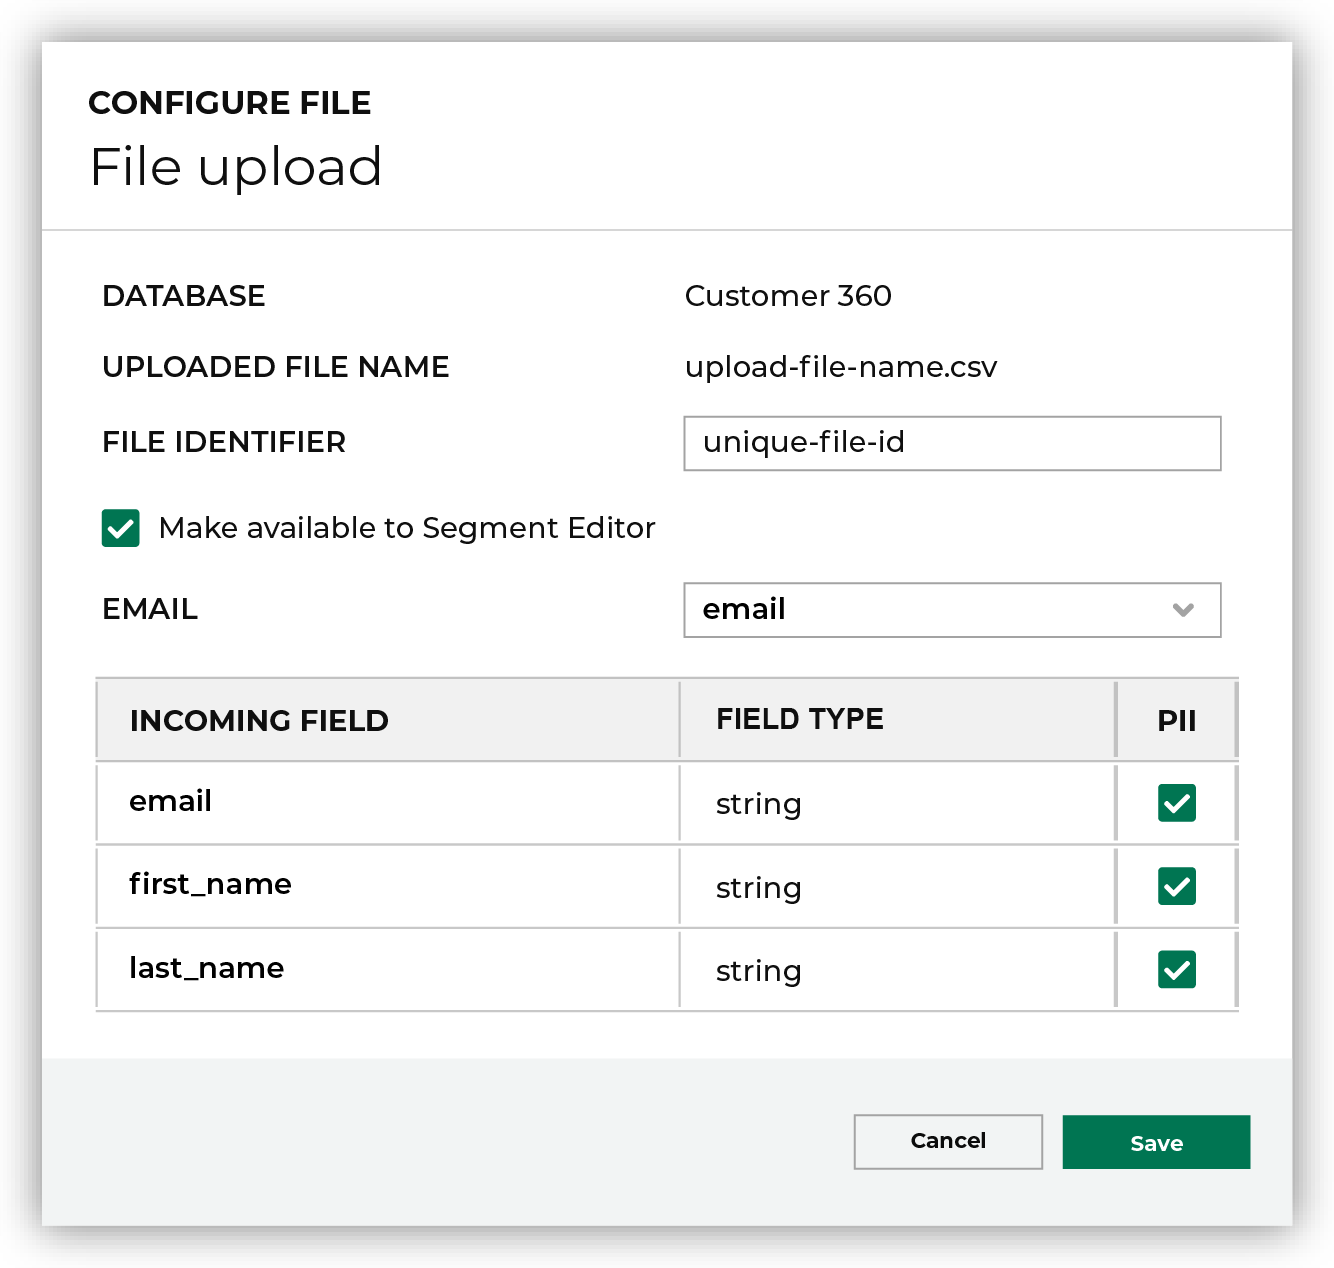
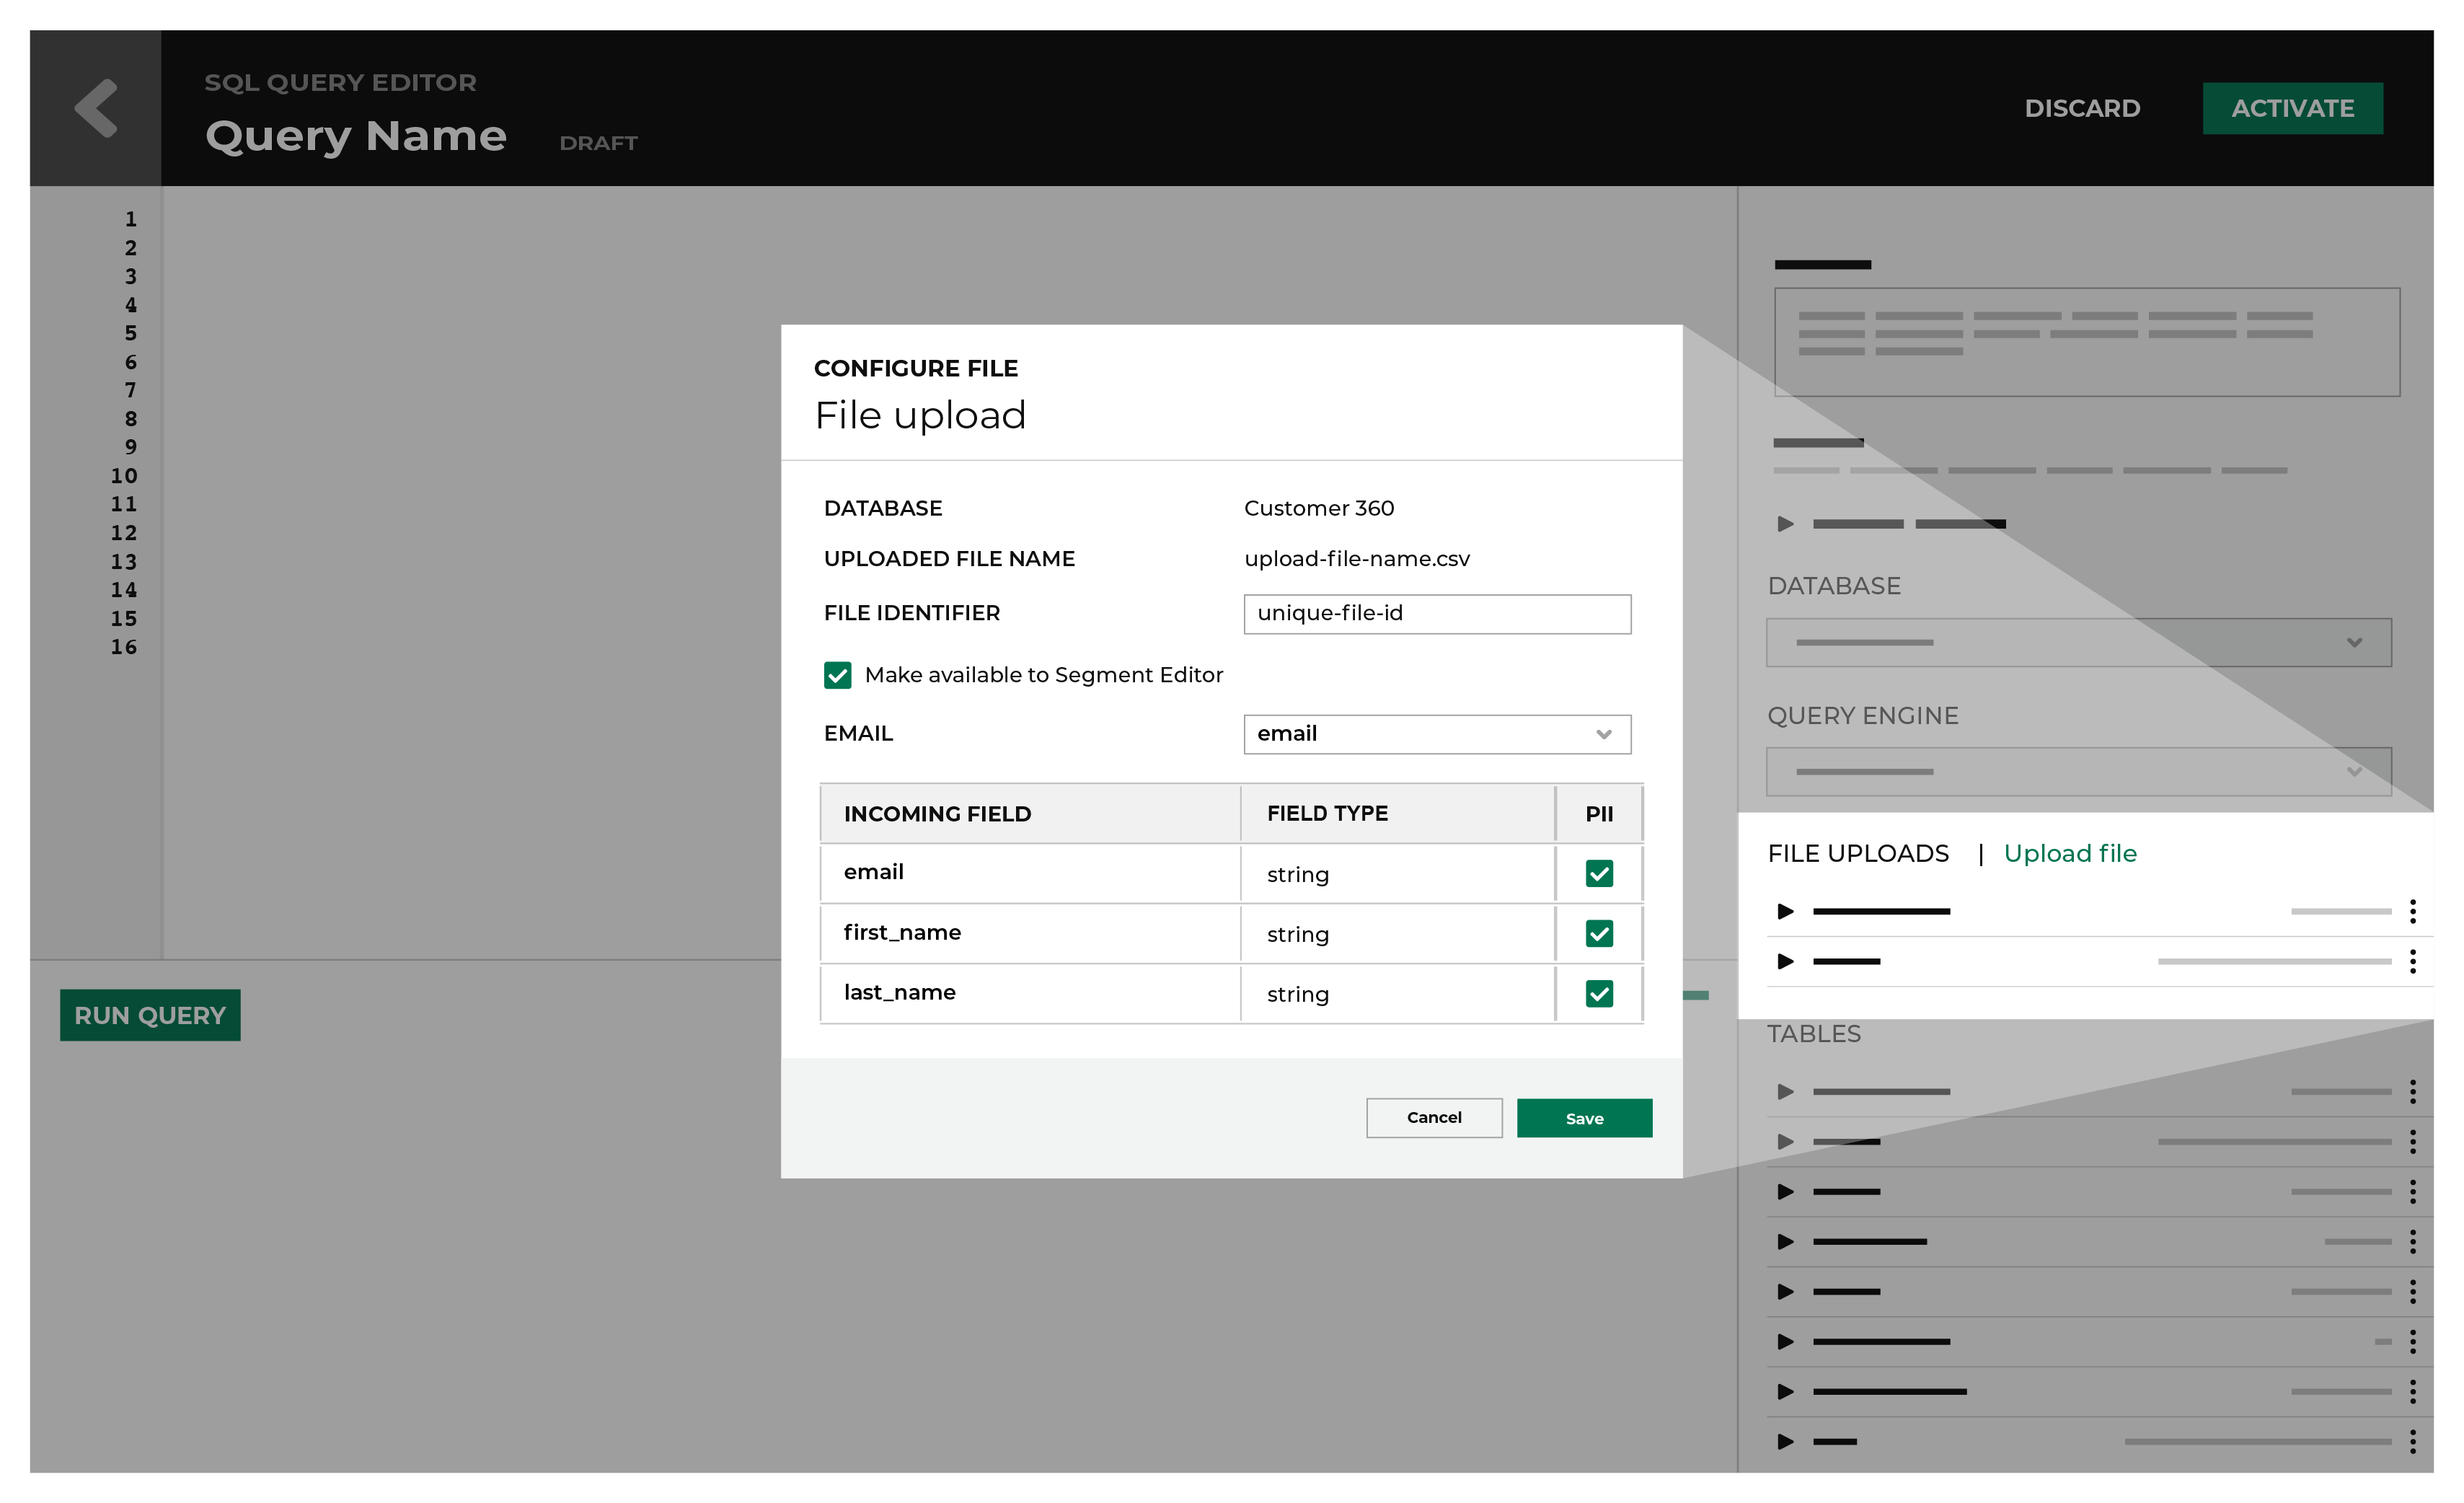
From the Customer 360 page, on a C360 table, click on the more options button.
From the Configure File window, drag and drop a file in the window or click the window to browse for files on your computer.
Wait a few moments for the file to upload.
In the File Identifier field, select a file.
Select Make available in segment editor.
Choose a matching method: Select Activation ID and choose a column that matches one of your configured activation IDs OR select Legacy match and choose an email column to join on the Merged Customers table.
Click Save.
Note
In order for the uploaded customer list to appear on the Segment Editor, you need to add the Amperity ID field as a column or add the email field as a column to the CSV file.
Upload via the Query editor
You can upload a CSV file from the Query Editor page.
Note
When you upload a CSV file from the Query Editor and then discard the query, it will automatically associate the contact information in the uploaded file to Amperity IDs.
To upload a file via the Query Editor
From the Queries page, click on a query.
From the Query Editor, in the Query Details section on the right-side of the page, click Upload Files in the File Uploads section.
From the Configure File window, drag and drop a file in the window or click the window to browse for files on your computer.
Wait a few moments for the file to upload.
In the File Identifier field, select a file.
Select Make available in Segment Editor.
Choose a matching method: Select Activation ID and choose a column that matches one of your configured activation IDs OR select Legacy match and choose an email column to join on the Merged Customers table.
Click Save.
Note
The uploaded file is not added as a table to your database.
Warning
Only upload CSV files on the Query Editor if you are going to add additional SQL to your query.
View uploaded files
You can view a list of uploaded files on the SQL Query Editor.
To view uploaded files
From the SQL Query Editor, in the File Uploads section, view a list of uploaded files.