About databases
Build databases against unified customer profiles built by Amperity to help your brand better understand your customers. Use Spark SQL to build any type of database that your brand requires, including customer 360-focused databases with complete customer profiles to fuel your brand’s marketing activity and quality-focused databases that help your brand’s data experts better understand each of your customer’s unique profiles.
The Customer 360 page provides:
Visibility into the data that is behind your brand’s customer profiles and interactions along with access to the Data Explorer, from which you can explore your brand’s unified customer data
Access to building and managing databases
Visibility into what comprises your brand’s set of standard core tables–building blocks for all of your brand’s databases–and access to building and managing custom core tables
Amperity Learning Lab
Build databases from unified customer profiles to help your brand better understand your customers.
Open Learning Lab to learn more about multi-database implementation best practices . Registration is required.
Customer profiles
Customer profile details are pulled from the Customer 360 table that is located in your brand’s primary customer 360 database. Customer profile details include:
Names (first name, last name), email address, physical address, phone numbers
Transaction details (first purchases, last purchases, total purchases, etc.)
Other custom profile values that are unique to your company
These details can be accessed from the Profile tab on the Customer 360 page.
The Profiles tab shows the date on which the primary customer 360 database was last updated, how long it took to complete the update, and the number of customer profiles in the database.

Each customer profile is a collection of common attributes, transaction attributes, and other custom values that are unique to each customer’s data set. These details are summarized on the Customer 360 page under Customer Profile.
About profile attributes
Personally identifiable information (PII) is any data that could identify a specific individual. PII data includes details like names, addresses, email addresses, and other profile attributes. PII data sometimes includes attributes like a loyalty number, customer relationship management (CRM) system identifiers, or foreign keys in customer data.
PII profile attributes commonly available as part of the customer profile include:
Icon |
Attribute Name |
Description |
|---|---|---|
|
First Name |
The first name connected with a customer. |
|
Last Name |
The last name connected with a customer. |
|
The email address connected with a customer. A customer may have more than one email address. |
|
|
Phone |
The phone number connected with a customer. A customer may have more than one phone number. |
|
Address |
The address connected with the location of a customer, such as “123 Main Street”. |
|
City |
The city connected with the location of a customer. |
|
State |
The state or province connected with the location of a customer. |
|
Zip Code |
The ZIP code or postal code connected with the location of a customer. |
|
Birthdate |
The date of birth connected with a customer. |
|
Gender |
The gender connected with a customer. |
Note
The profile attribute names that are shown in the profile attributes section are the same strings that were entered as friendly names when creating the Customer 360 database table in the primary customer 360 database.
These strings will default to the same as the field name if not specified as friendly names, including lowercase strings and underscores. The list of profile attributes will also depend on the SQL query that is used to create the Merged Customers table.
Refresh customer profile icons
Profile icons are shown on the Profiles tab in the Customer 360 page. Use profile icons to assign a visual element to important fields in the customer profile.
You can refresh these icons by updating the icons that are configured in the Customer 360 table for the database that is configured as the primary customer 360 database for your tenant.
Open the Customer 360 table, and then select the icon to show for the customer profile attribute from the Icon column on the Configure and save page within the Database Editor. Profile icons are applied automatically, but you may configure them when building or editing the Customer 360 table.
To apply icons to a field
Open the Customer 360 table in the database editor.
Click Next.
Click the icon or empty space in the Icon column to open the Select an Icon dialog box, after which you can choose an icon or search for additional icons on the Font Awesome website.
You may use many icons in the Font Awesome library.
Icon identifiers start with
fa-, and then a unique string. For example:fa-homeforfa-starforfa-project-diagramfor
Icons are available in four styles:
Use
farfor regularUse
fasfor solidUse
falfor lightUse
fadfor duotone
Use a style prefix in front of an icon identifier to apply that style. For example:
far fa-homefor a regular icon orfas fa-homefor a solid icon.Click Refresh Semantics to apply the a default icon to all profile attributes.
Click Save.
Databases
Use the Databases tab on the Customer 360 page to define any number of individual databases. Each database have its own collection of tables and attributes. Some databases may be configured as “customer 360” databases, and then others may be configured as a “Stitch QA” database or a custom database to support any of your brand’s use cases.
Flexible merge rules
Some customer data platforms require using an inflexible merge rule across many fields, which results in lower quality data across your customer 360 profile. This problem is magnified when that inflexible merge rule must also be applied to many databases.
Amperity combines the use of flexible merge rules with a patented system that allows many databases to exist within the same tenant. This ensures that:
Merge rules are 100% configurable
Each field can have its own merge rule
Each database can have its own set of merge rules
Each tenant can support a variety of merge rules to meet all of the requirements for any individual use case
For example, data sources from call centers, online transactions, and email platforms may contain slightly different sets of customer profile data.
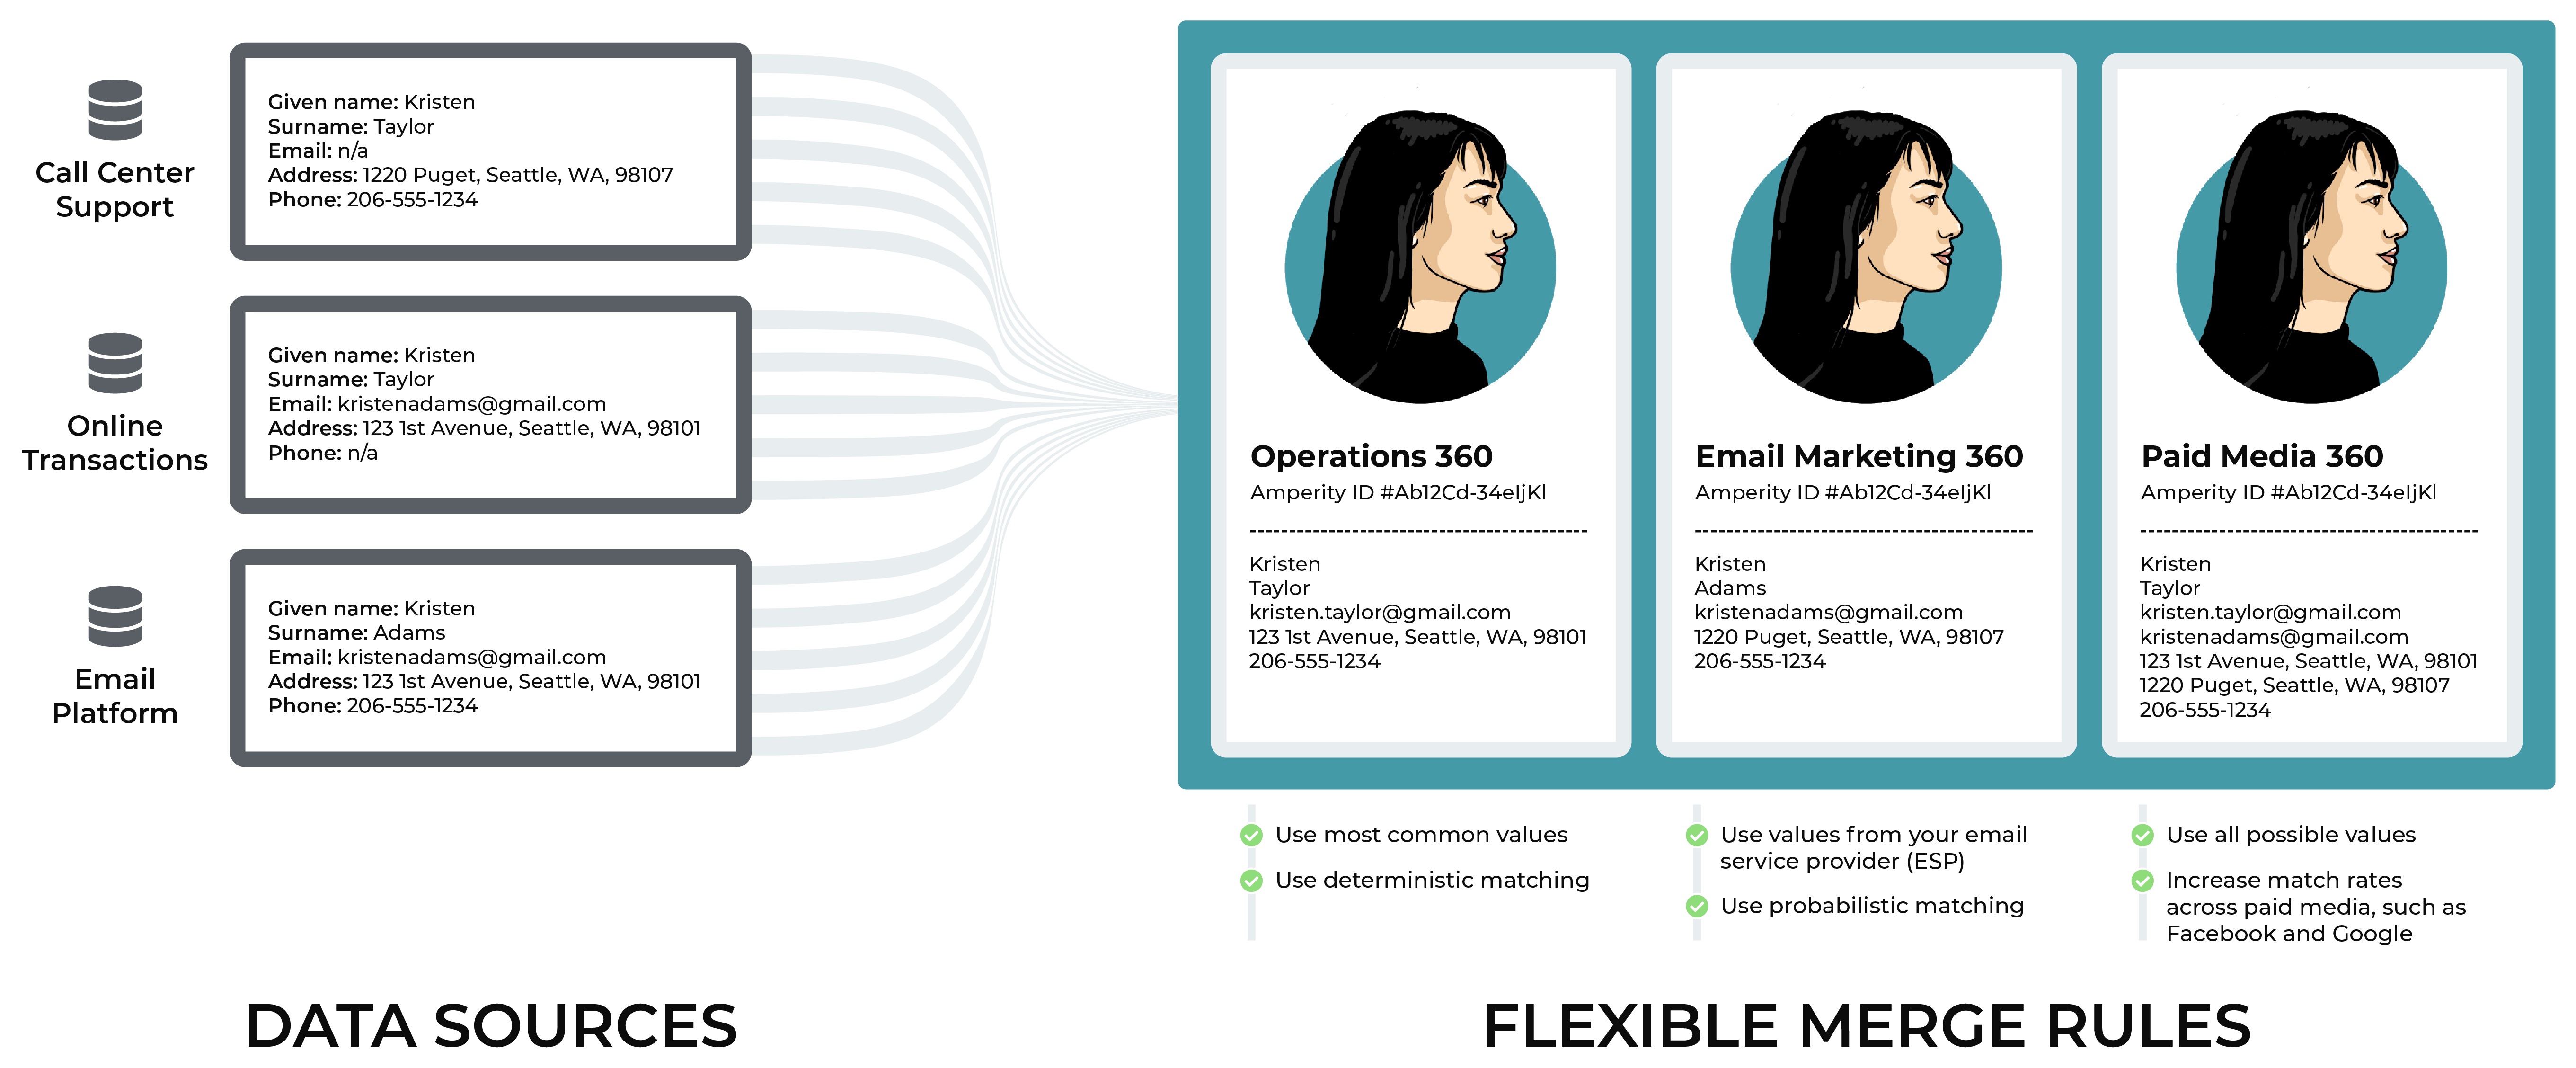
After loading this data to Amperity and assigning the Amperity ID to each of your customers, you can use flexible merge rules to support many customer 360 databases.
Your operations teams can combine prioritizing the most common values for each customer with deterministic matching
Your email marketing team can combine prioritizing customer profile values from your email platform with probabilistic matching
Your paid media team can combine all possible values to improve match rates on platforms like Google Ads and Facebook
Ask your Amperity implementation team for recommendations and best practices for how you can configure flexible merge rules to support all of your use cases.
Database types
Databases belong to one of the following types:
Customer 360 database
A customer 360 database has customer profiles that are tied to all of their interactions with your company or brand. You may configure Amperity to support many customer 360 databases.
For example: a customer 360 database that has all customer profiles and all interactions, and then a customer 360 database for each specific brand in your company’s brand portfolio.
Note
A customer 360 database has specific requirements on tables that must be included within that database.
Some of these tables are added as standard core tables, such as Unified Itemized Transactions, while others, such as Merged Customers, Unified Transactions, and Customer 360 must be configured within each customer 360 database.
Other use cases may require additional tables, such as for email engagement or predictive modeling.
Tables that are requred by a customer 360 database include:
Your brand can extend a customer 360 database to support additional use cases, such as behavioral data, clickstream, website events, email events and responses, campaign responses, and advertising performance.
Empty database
An empty database is not built from a template and does not contain any tables, as a starting point. Use an empty database to build tables to support any of your brand’s non-customer 360 use cases.
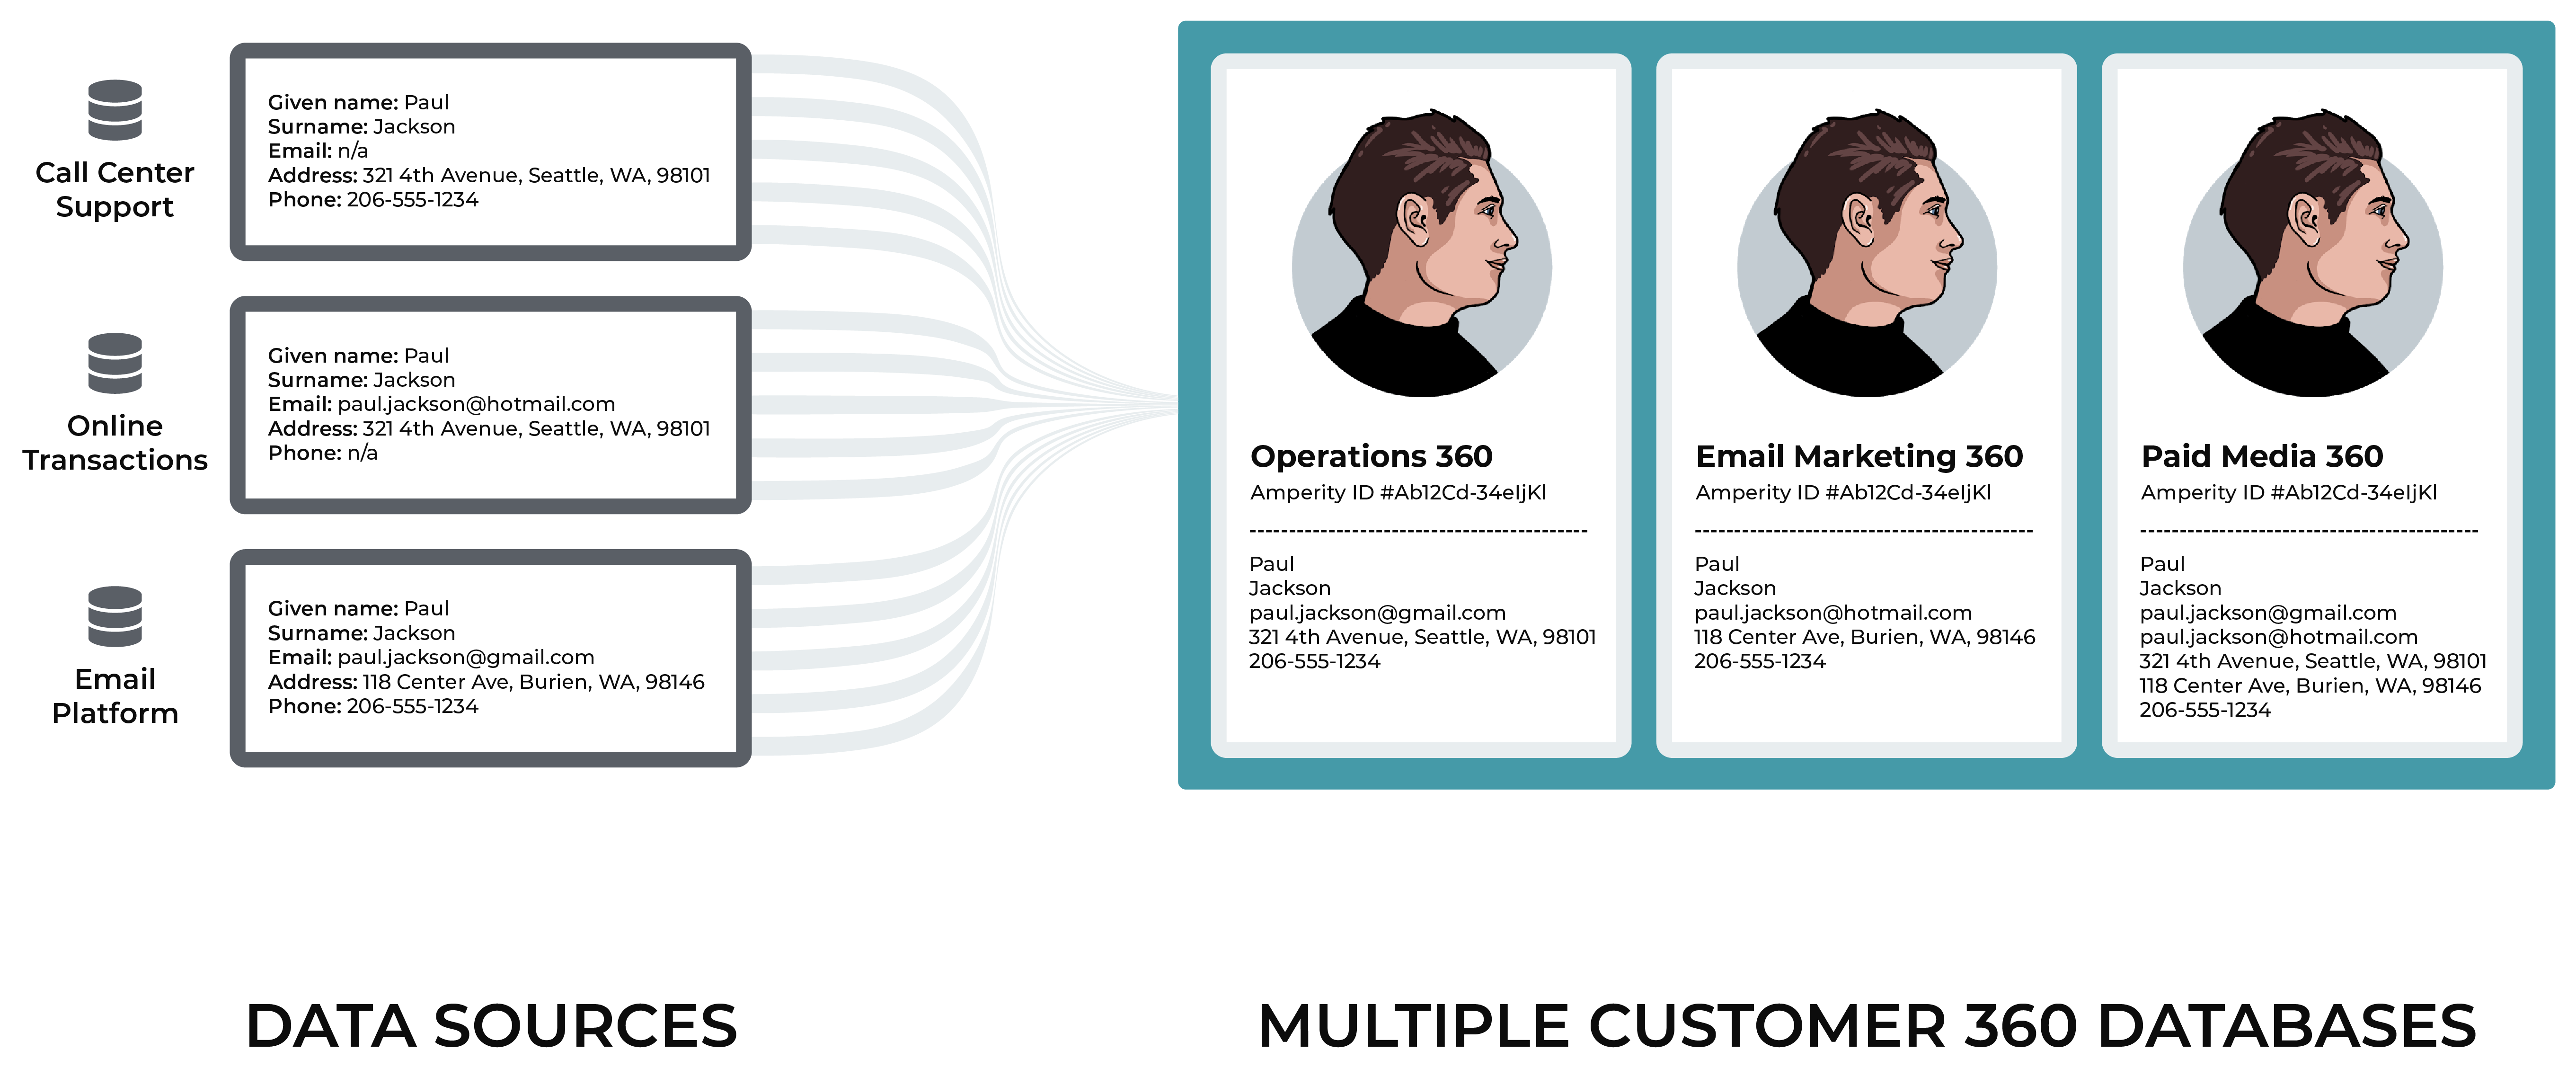
Multiple customer 360 databases
You may configure more than one database to be a customer 360 database. Each database has its own set of standard tables, and then each may be configured to have its own combination of standard core tables or domain tables that are added as passthrough tables.
Passthrough database
A passthrough database has all stitched domain tables and all non-stitched domain tables passed through into a standalone database.
Stitch QA database
A Stitch QA database has a series of Amperity-generated tables that can be used to validate the Amperity ID assignment to customer profiles.
Use the Stitch QA database template to build a Stitch QA database for your tenant.
Database table types
Database tables belong to one of the following broad categories:
Custom SQL
A custom SQL table uses Spark SQL and a SELECT statement to reference any core table, domain table, or database table, including tables that represent files that were uploaded to that database.
Tip
You can use a SQL template with custom SQL tables as a starting point for certain types of tables that are required by Amperity customer 360 databases.
Select a template from the Apply template dropdown. Most templates require some configuration and all templates may be extended for your brand’s use cases.
Passthrough
A passthrough table allows a domain table to be used within the Amperity database layer. A passthrough uses a stitched domain table when it is available.
Visual templates
Use a visual template to build database tables without writing SQL. The visual template interface shows only the configurable components within a database table.
Database how-tos
Databases
Tables
Core tables
Core tables normalize the foundation for databases built from the results of the Amperity identity resolution process. Use any core table with any database.

Core tables have the following types:
Standard core tables
Standard core tables contain the results of the identity resolution process for your tenant.
Standard core tables belong to one of the following broad categories:
Stitched domain tables |
A stitched domain table exists for each domain table with:
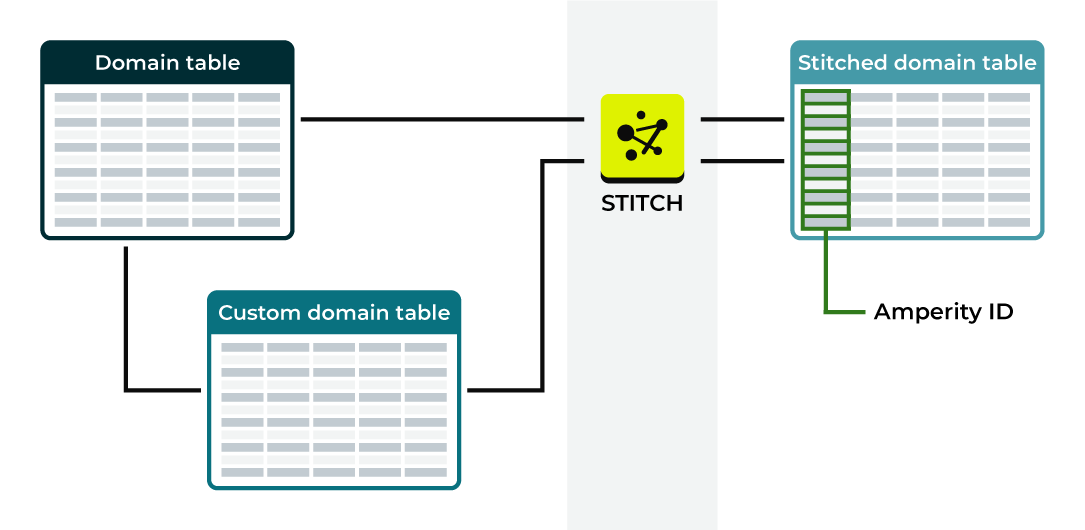
Stitched versions of domain tables have an added column for the Amperity ID and replace the source domain table within Amperity for all downstream use cases, but are otherwise identical to the source domain table. |
Unified tables |
Stitch generates a series of tables that unify your brand’s customer profiles, transactions, and interactions. Rows of records in unified tables are unique by Amperity ID. The collection of unified tables that is generated within your tenant depends on the types of semantic tags that were applied to feeds and custom domain tables in the Sources tab. |
Stitch QA tables |
Stitch generates a series of Stitch QA. Use these tables in a dedicated database to review the quality of the identity resolution process and understand how the Amperity ID gets assigned to each customer profile. Some Stitch QA tables are required by databases that are configured as customer 360 databases. Most are only available from databases that are configured as a Stitch QA database. |
Custom core tables
A custom core table built using Spark SQL and may reference one or more core tables or domain tables. Use custom core tables to extend the normalized foundation to support use cases beyond what the set of standard core tables offers.
Core table how-tos
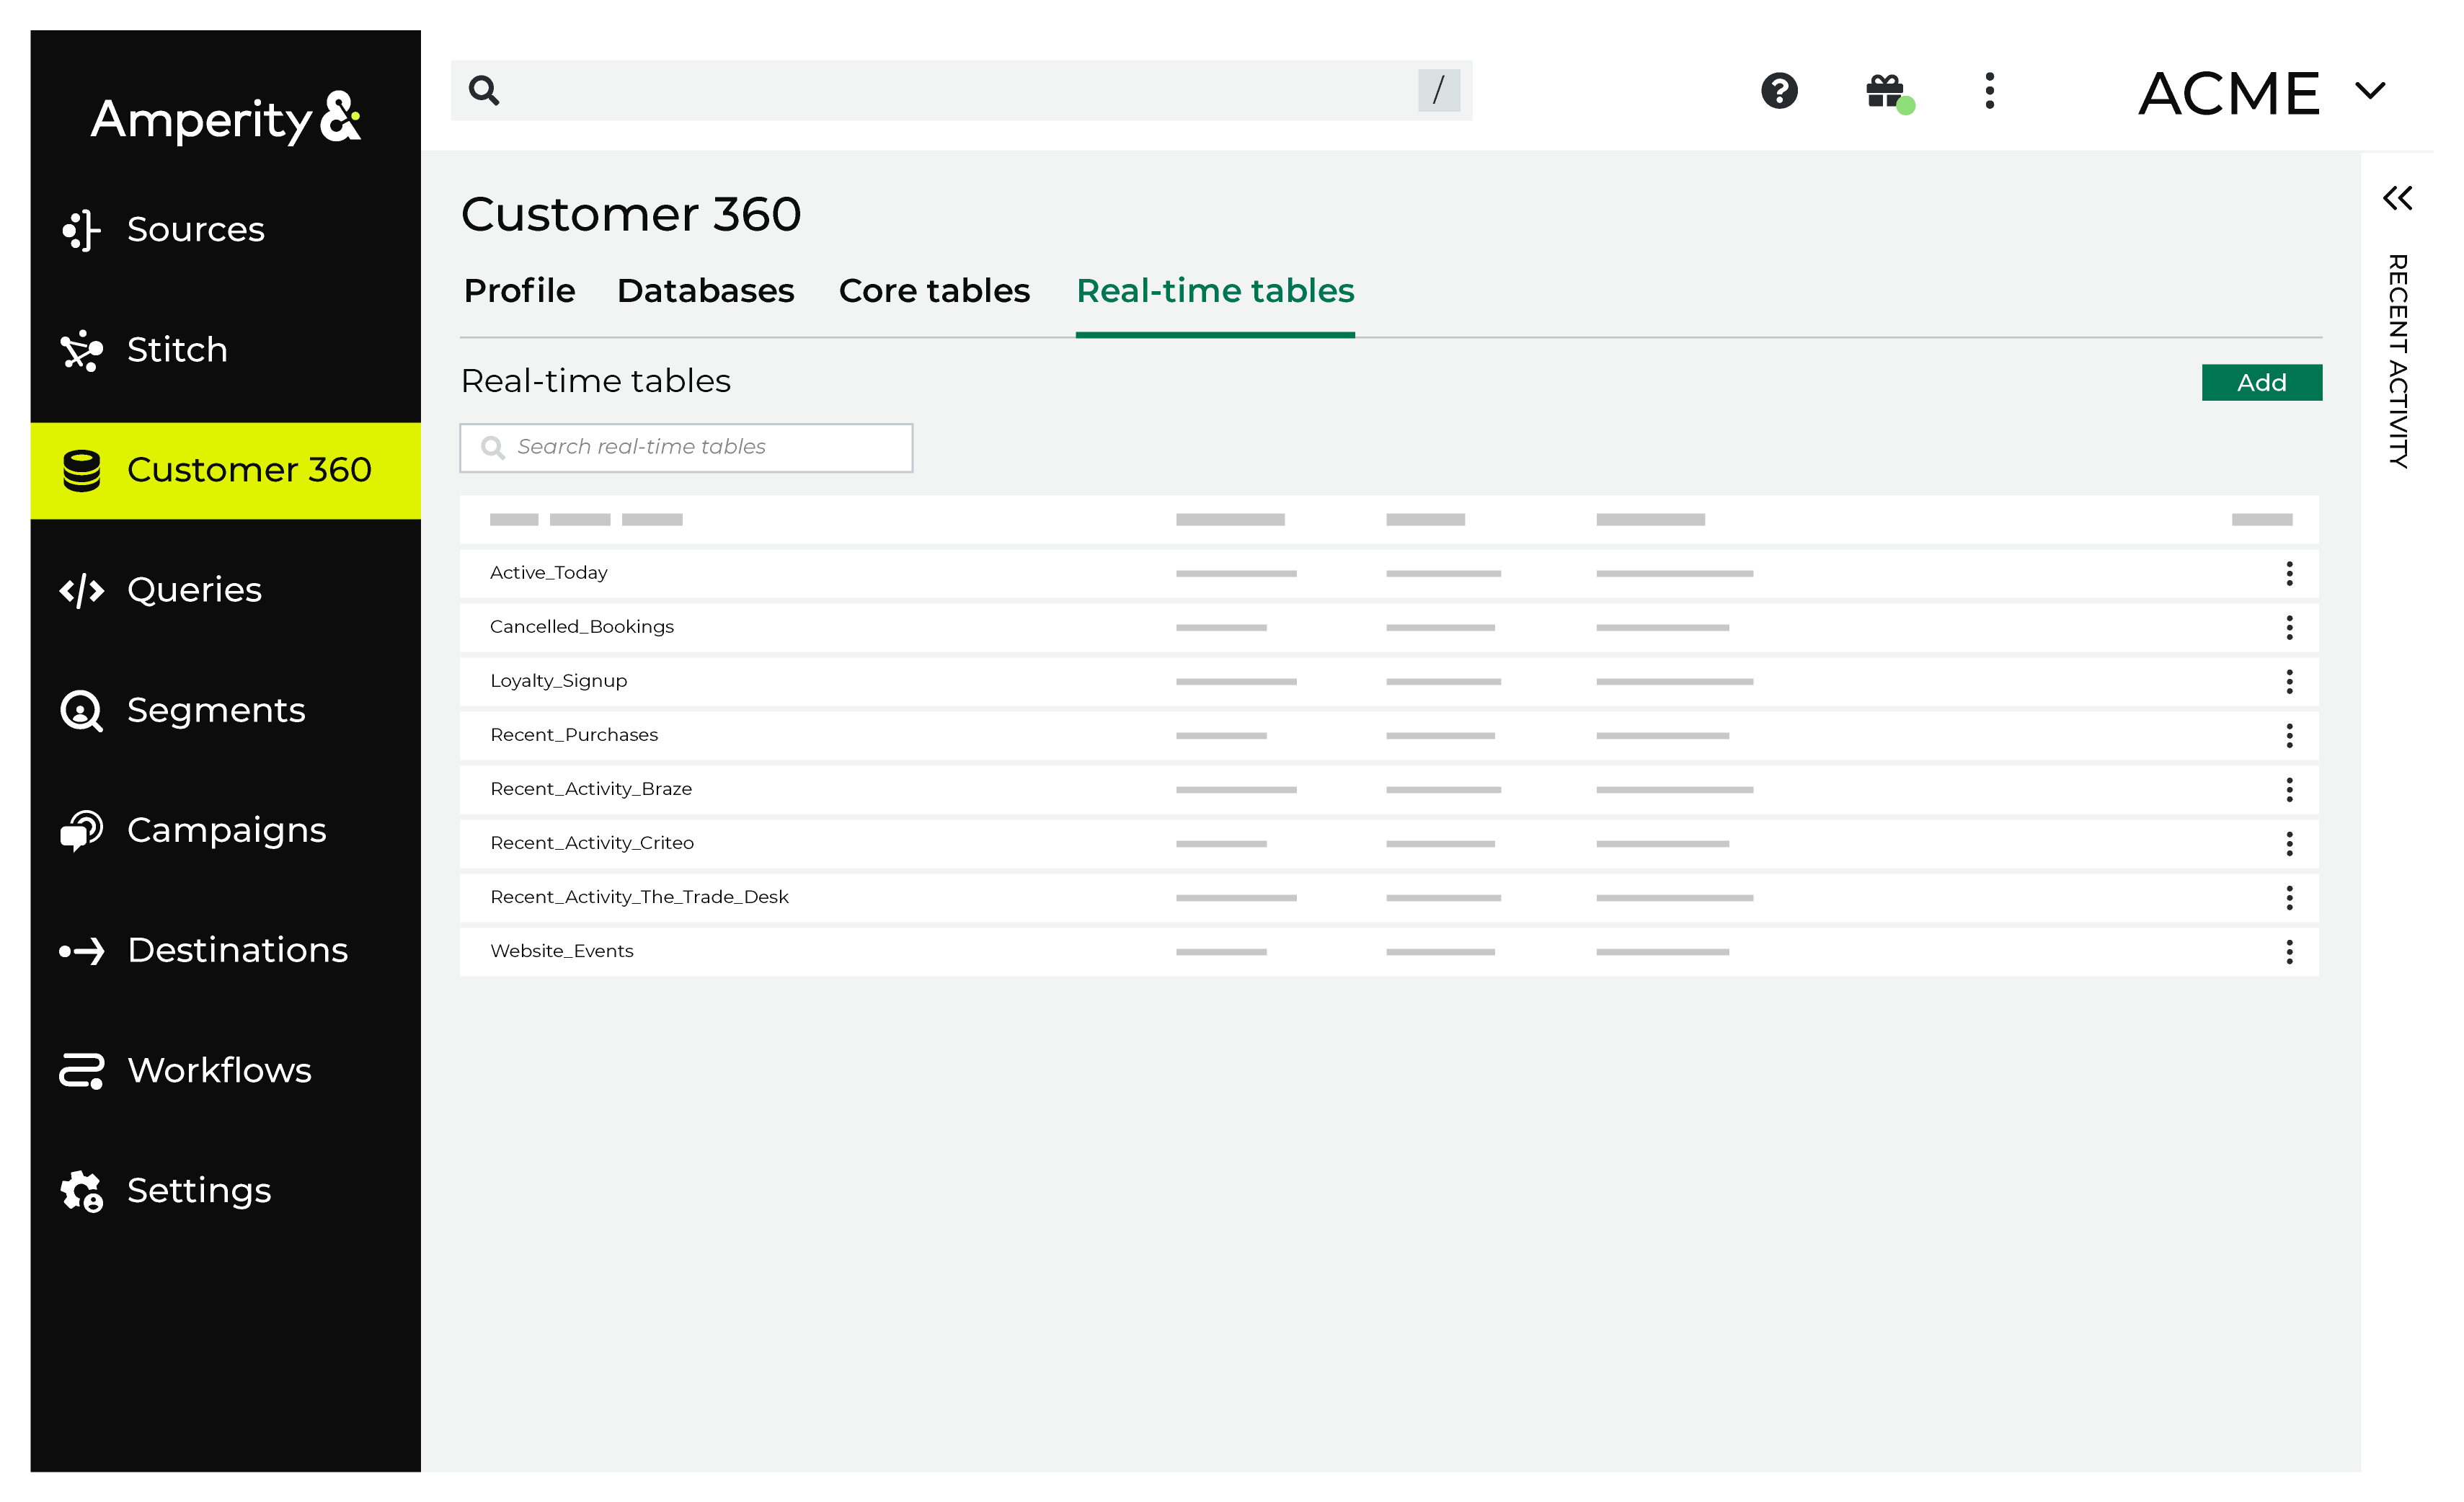
Real time tables
Real-time tables contain the data that is streamed to Amperity. Real-time tables are available alongside customer profiles in your brand’s customer 360 database. Real-time tables complement the daily batch process that is used to build and maintain complete and durable customer profiles over longer timeframes by enabling use cases that require the use of data that is updated more frequently.
Tasks related to managing real-time tables in Amperity:
Add real-time table
A real-time table collects data that is streamed to Amperity, and then makes that streamed data available to databases and queries. Use the Real-time tables tab on the Databases page to manage real-time tables.
To add a real-time table
Open the Customer 360 page, and then select the Real-time tables tab.
Click Add table.
In the Create real-time table dialog, do the following:
Give the real-time table a name. Use a naming convention that associates the real-time table with its related streaming endpoint, and then identifies the type of data in the real-time table or the use case.
Define the schema for the real-time table. Each field in the schema must exist in the list of fields that are streamed to Amperity by the streaming endpoint that is associated with this table. The field names in the real-time table must match the fields that are defined for the streamed endpoint. Refer to the feed associated with the streamed endpoint to
Note
The schema for every real-time table has two additional fields: received_at (the time at which data arrived at the streaming endpoint) and written_at (the time at which data was written to the real-time table).
Choose the data format for streaming data to the real-time table: “JSON” or “XML”. If “XML” is selected a Row tag must be specified, which must identify a single row of XML data.
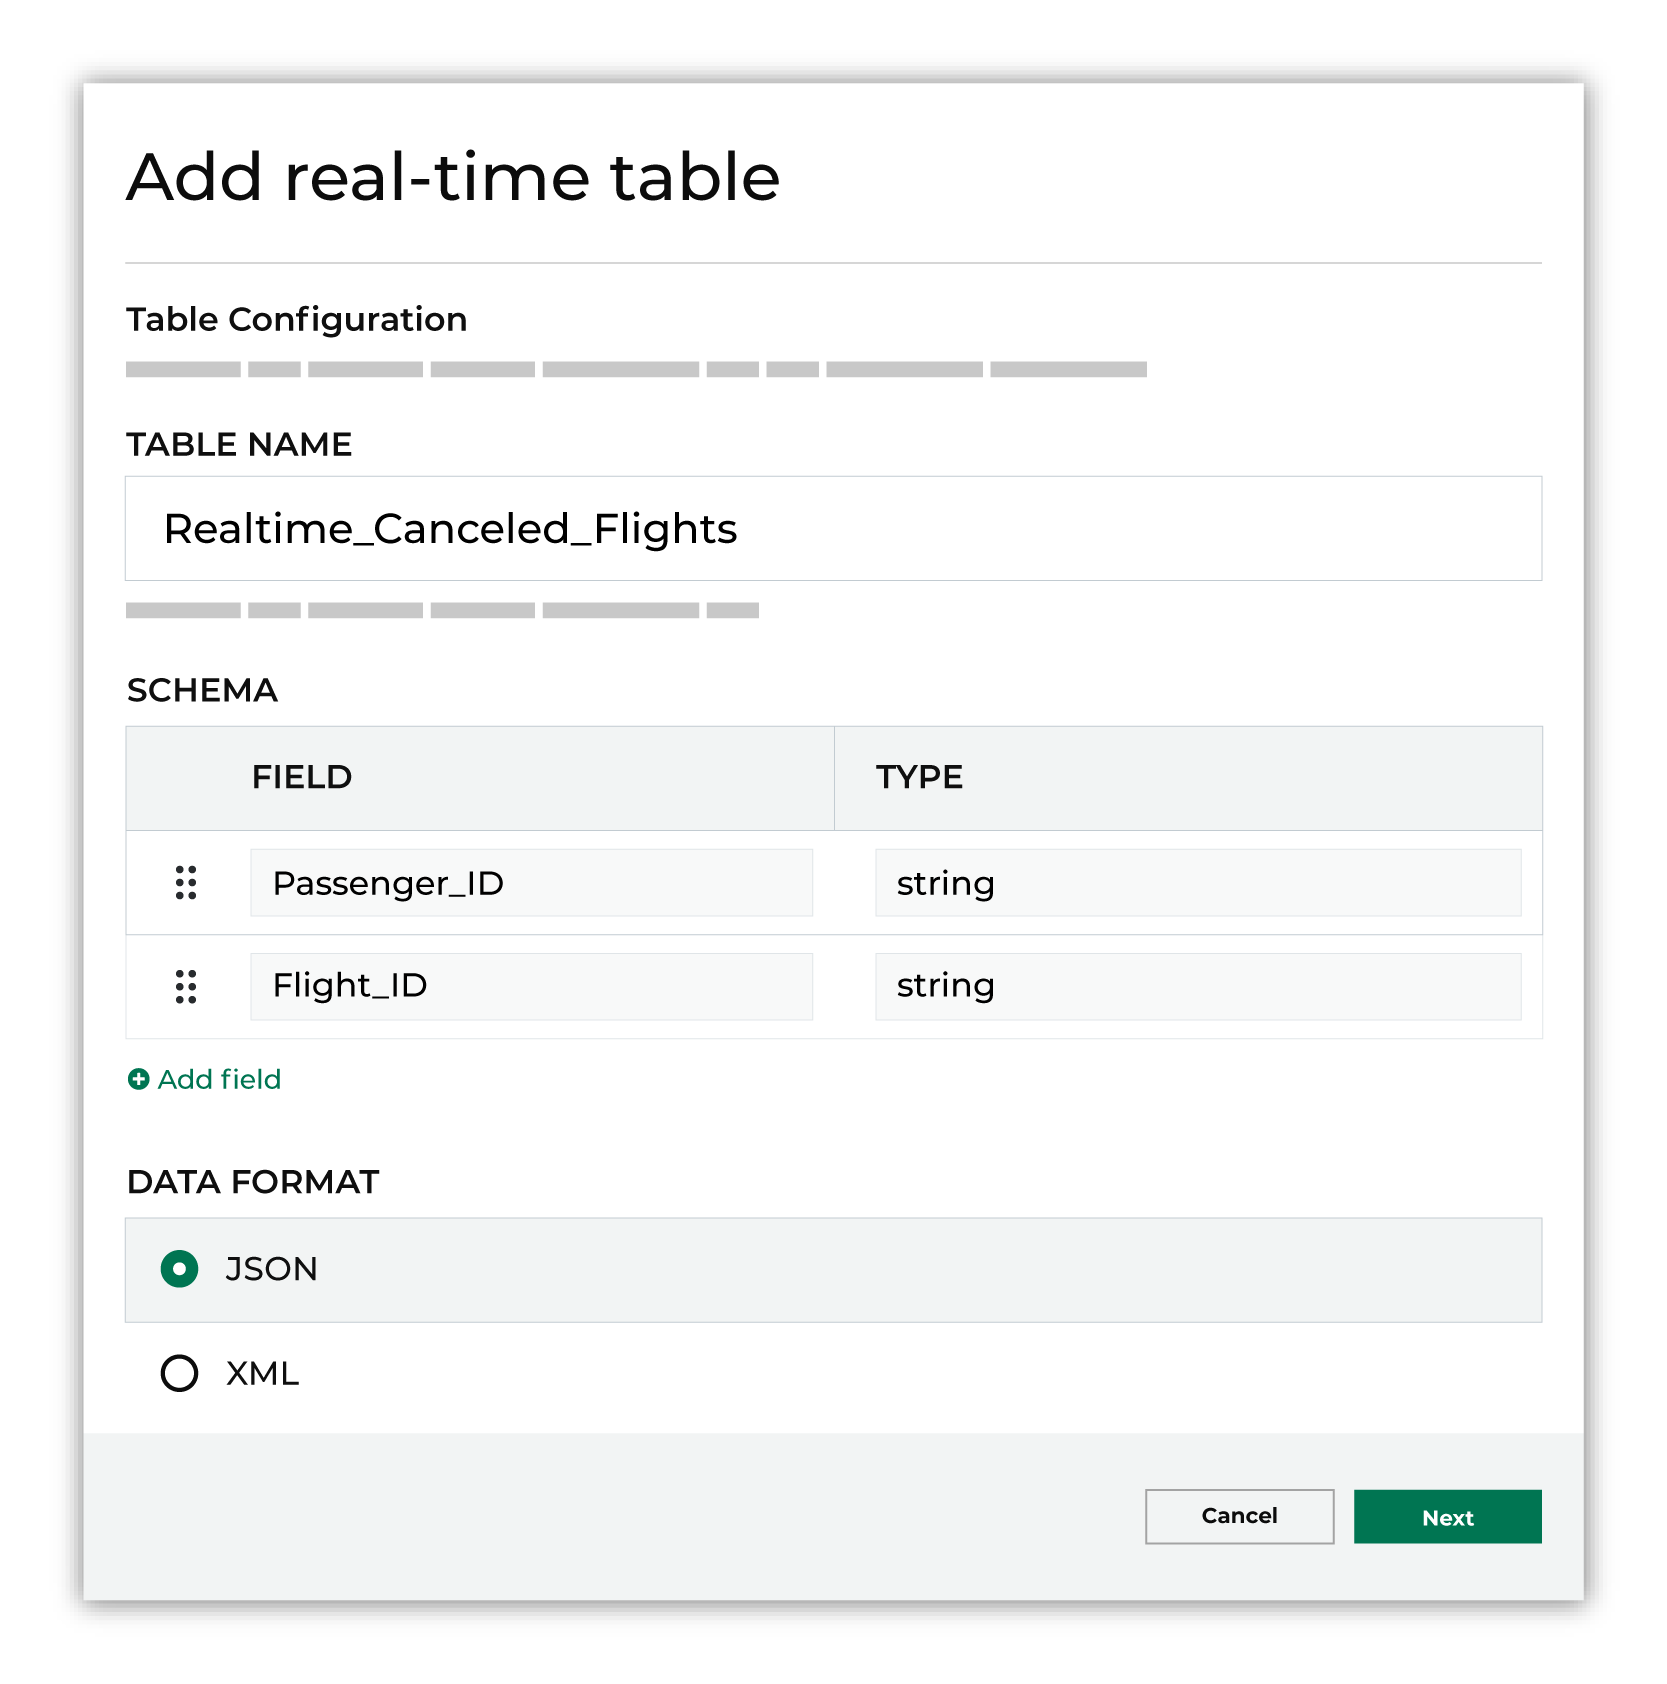
Click Next.
In the Create real-time table dialog, continue:
Select the streaming endpoint that will stream data to the real-time table. The streaming endpoint must already exist and be available from the dropdown list.
Select the databases for which this real-time table will be available from the Queries page.
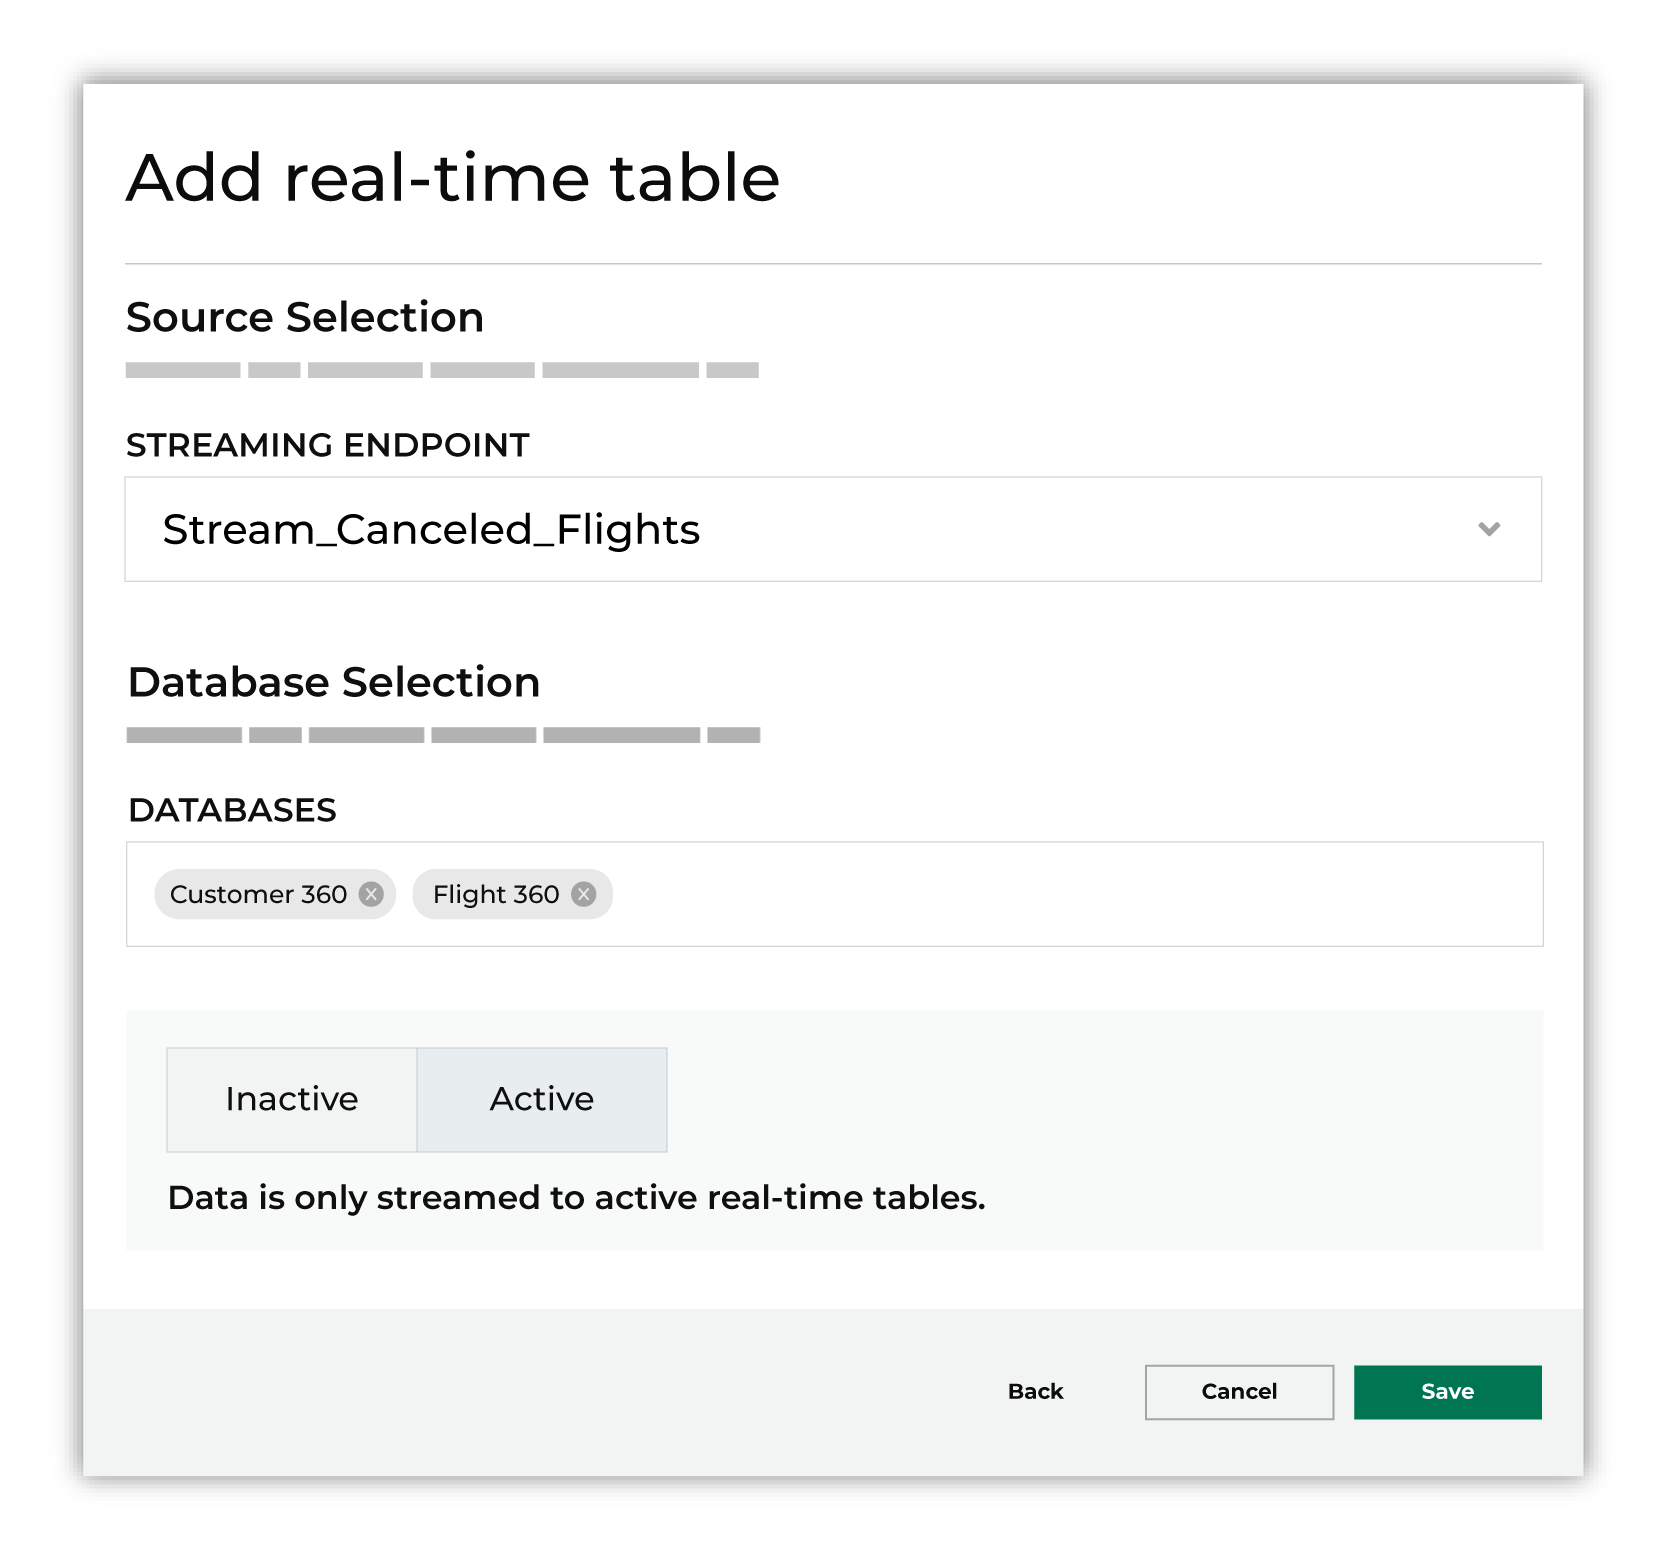
Click Active.
Important
Real-time tables must be setto Active before they can be accessed from the Queries page.
Run all of the databases for which this real-time table will be available. When this step is complete, open the Queries page and verify that the real-time table is available for queries and that data in the real-time table can be returned in the results.
Delete real-time table
Use the Delete option to remove a real-time table from Amperity. Verify that both upstream and downstream processes are not relying on the real-time table before you delete it.
To delete a real-time table
Open the Customer 360 page, and then select the Real-time tables tab.
For a real-time table, open the menu and click Delete.
Confirm that you want to delete the real-time table.
Edit real-time table name
Use the Edit option to rename a real-time table.
Important
You cannot change the schema or data format for a real-time table. To change the schema or data format, create a new real-time table, and then align that table to the data format and schema, and then associate that table with the correct streaming endpoint.
To edit a real-time table
Open the Customer 360 page, and then select the Real-time tables tab.
For a real-time table, open the menu and click Edit.
Rename the table, and then click Save.
Update real-time data format
You cannot update the data format for a real-time table. Instead, create a new real-time table that defines the updated data format. You may associate this real-time table to an existing streaming endpoint or to a new streaming endpoint.
Update real-time table schema
You cannot update the schema for a real-time table. Instead, create a new real-time table that defines the updated schema. You may associate this real-time table to an existing streaming endpoint or to a new streaming endpoint.
How-tos
Tasks related to building and managing databases in Amperity.
Activate database
A database may be in one of the following states: active and draft:
An active database is fully configured to use stitched output tables, is ready to run, is ready for queries and segmentation, and is usable with scheduled workflows.
A draft database is inactive and not available for queries or segments. Use a draft database for testing or experimentation.
Only databases in an Active state may be run against stitched data. Activation is a required step–“Click the Activate button.”–at the end of any process that adds or edits a database.
Add custom core table
You may add custom core tables using Spark SQL and the Custom Core Table SQL editor. Start with a SELECT statement, and then use a series of LEFT JOINs to reference core tables or domain tables. Use a sandbox to validate any workflows that will depend on the custom core table.
To add a custom core table
From the Customer 360 page, open the Core tables tab.
Click the Add table button. This opens the Custom Core Table SQL editor.
Use a SELECT statement to build the custom core table.
Click Validate to verify that the SQL query runs correctly, and then Next to review the settings for the custom core table.
Click Activate to add the custom core table.
Add databases
Amperity supports a wide variety of database types, including customer 360 and quality focused databases your brand can build from templates, to help your brand (or brands) better understand your customers.
Add customer 360 database
A customer 360 database uses standard core tables generated by the Stitch process. These tables offer a unified view of your brand’s customer data, including customer profiles and interaction records, organized, merged, and linked together by the Amperity ID.
To add a customer 360 database
From the Customer 360 page, open the Databases tab.
Click Create Database.
Give the database a name, set the value for Template to “Customer 360”, and set the permissions that determine which users is able to access this database, and then click Create.
Important
A customer 360 database requires additional configuration after the database is created.
Add empty database
Add an empty database for use cases that do not require customer 360 profiles or Stitch QA validation activities. Start with an empty database, and then add tables.
For example, after creating the empty database use the passthrough functionality to add one or more domain tables, and then use Spark SQL to build custom database tables against a subset of standard core tables or stitched domain tables to build a series of tables that support a series of non-marketing use cases.
To add an empty database
From the Customer 360 page, open the Databases tab.
Click Create Database.
Give the database a name, set the value for Template to “None”, and set the permissions that determine which users is able to access this database, and then click Create.
Use the Database Editor to add tables to the empty database.
Add passthrough database
A passthrough database starts with all domain tables in your tenant, inclusive of source domain tables and stitched domain tables.
Stitched domain tables have an added column for the Amperity ID and replace the source domain table in a passthrough database, but are otherwise identical to the source domain table.
To add a passthrough database
From the Customer 360 page, open the Databases tab.
Click Create Database.
Give the database a name, set the value for Template to “Passthrough”, and set the permissions that determine which users is able to access this database, and then click Create.
Use the Database Editor to extend the passthrough database with custom SQL tables.
Add Stitch QA database
Stitch QA is a manual process for monitoring the quality of Stitch results. Stitch QA has two parts: a database and a collection of queries. Analyze query results to identify values for labeling and blocklisting, or to discover ways to tune the Stitch process to better match your tenant’s dataset.
A Stitch QA database loaded from a template has a list of pre-loaded SQL queries that may be used to help validate the quality of Stitch output.
To add a Stitch QA database
From the Customer 360 page, open the Databases tab.
Click Create Database.
Give the database a name, set the value for Template to “Passthrough”, and set the permissions that determine which users is able to access this database, and then click Create.
Use the Database Editor to extend the passthrough database with custom SQL tables.
Add tables
Use the followging types of tables to build databases to support your brand’s use cases.
Add core table override
A core table forms the foundation of your brand’s databases. Standard core tables are output by Stitch and provide unified data structures for all data sources to which semantic tags were applied or in which foreign keys are present that allow rows in that table to be associated with an Amperity ID.
Some use cases require a database table to have different information in a database table than what is in a core table.
To override a core table
From the Customer 360 page, open the Databases tab.
Open a database in Edit mode, and then click Add Table.
Important
The table name must be the same as the original standard database table.
Set Build Mode to “Custom SQL”.
Add SQL using Spark SQL, a SELECT statement that references one or more standard core tables, database tables, or passed-through domain tables using a series of functions, operators, and clauses.
Important
The custom definition must refer to the original table, that is “must refer to the table that is being overridden”. In some cases, this requires using a placeholder reference. For example:
WITH placeholder AS (
  SELECT *
  FROM override_allowed_table
  LIMIT 1
)
...

SELECT *
FROM unrelated_table
For example, the Unified Itemized Transactions table requires a product ID. The product_id column is created by applying the product-id semantic tag to itemized interactions records.
However, in some cases another table has the preferred product ID. The following example shows how to override the standard Unified Itemized Transactions table and to join more complete product ID information, such as what may be in the Unified Product Catalog table:
SELECT
  uit.*
  ,upc.product_category AS `product_category`
  ,upc.product_description AS `product_description`
  ,upc.product_subcategory AS `product_subcategory`
FROM Unified_Itemized_Transactions uit
LEFT JOIN Unified_Product_Catalog upc
ON uit.product_id = upc.product_id
Click Validate to verify that the SQL query runs correctly and returns the desired results. Adjust the query as necessary. When finished, click Next.
Verify the configuration settings for the table, including semantic tags, field descriptions, and availablility to the Segment Editor.
Click Save to add the table to the database.
Add custom SQL table
Add a SQL table to a database using Spark SQL and a SELECT statement that defines the table’s schema.
Tip
You can associate the Amperity ID to a unique ID in a custom SQL table. For example, CCUST associates a unique ID in a table to the Amperity ID:
SELECT
  CCUST.amperity_id
  ,CTX.customer_id
  ,CTX.orderid
  ,CTX.purchasedate
  ,CTX.transactiontotal
  ,CTX.pointsearned
  ,CTX.numberofitems
  ,CTX.avgitemprice
  ,CTX.productcode
  ,CTX.productcategory
  ,CTX.storeorwebid
FROM POS_Transactions AS CTX
LEFT JOIN POS_Customers AS CCUST
ON (CCUST.customer_id = CTX.customer_id)
To add a custom SQL table
From the Customer 360 page, open the Databases tab.
Open a database in Edit mode, and then click Add Table.
Set Build Mode to “Custom SQL”.
Note
Click the Apply SQL template to select a SQL template as a starting point for the custom SQL table.
Templates are provided for all standard tables (Customer 360, Merged Customers, Transaction Attributes Extended, Unified Transactions, and Customer Attributes) along with additional templates for use with multibrand databases and tables that support use cases like joining transaction attributes to the Customer 360 table, merged households, and customer lifecycle events.
Add SQL using Spark SQL, a SELECT statement that references one or more standard core tables, database tables, or passed-through domain tables using a series of functions, operators, and clauses.
Verify the configuration settings for the table, including semantic tags, field descriptions, and availablility to the Segment Editor.
Click Save to add the table to the database.
Add passthrough table
A passthrough table adds a domain table to your database. Passthrough domain tables often have a field for the Amperity ID, but otherwise are the same as the fields in the source domain table.
Important
Stitched versions of domain tables have an added column for the Amperity ID and replace the source domain table within Amperity for all downstream use cases, but are otherwise identical to the source domain table.
To add a domain table passthrough
From the Customer 360 page, open the Databases tab.
Open a database in Edit mode, and then click Add Table.
Set Build Mode to “Passthrough”, and then select a table from the Source table dropdown.
Click Validate to verify that the SQL query runs correctly and returns the desired results. Adjust the query as necessary. When finished, click Next.
Verify the configuration settings for the table, including semantic tags, field descriptions, and availablility to the Segment Editor.
Click Save to add the table to the database.
Add visual template table
A visual template provides a user interface for specific configuration settings within a SQL table. A visual template is available for the following tables in the Databases tab within the Customer 360 page:
To add a table using a visual template
From the Customer 360 page, open the Databases tab.
Open a database in Edit mode, and then click Add Table.
Set Build Mode to “Visual template”, and then select a table from the Target table dropdown.
Follow the directions in the visual template page for the selected table.
Update the list of domain tables under General source priority to contain at least one domain table with fields tagged for PII semantics.
Optional. You may define priority by semantic tag.
When finished, click Next.
Click Validate to verify that the SQL query runs correctly and returns the desired results. Adjust the query as necessary. When finished, click Next.
Verify the configuration settings for the table, including semantic tags, field descriptions, and availablility to the Segment Editor.
Click Save to add the table to the database.
Allow table in segments
A database must be made visible to non-admin users of Amperity so they may access database tables from the Segments page. Visibility is required to build segments via the Segment Editor or the SQL Segment Editor. To make a database visible to non-admin users, enable the Make available in visual Segment Editor checkbox within the table editor or select the checkbox in the In VSE? column from the list of tables in a database.
What is the visual Segment Editor?
The Segment Editor is the user interface for building segments. It uses a series of dropdowns, picklists, conditions, and values to define an attribute profile. Refresh segment insights to see how many customers match the profile.
Important
Only tables that contain an Amperity ID can be made available to the Segment Editor. The Customer 360 table is made available to the Segment Editor automatically. Other tables may be made available by selecting the checkbox in the In VSE? column from the list of tables in a database.
To allow tables in segments
From the Customer 360 page, open the Databases tab.
Open a database in Edit mode.
Select the checkbox in the In VSE? column to make the table available to the visual Segment Editor
Click Activate.
Choose currency symbol
The currency symbol to show for metrics and segment insights is configurable. The following currency symbols are in the dropdown list:
Australian Dollar |
AUD |
$ |
Canadian Dollar |
CAD |
$ |
United States Dollar |
USD |
$ |
Mexican Peso |
MXN |
₱ |
British Pound |
GBP |
£ |
Euro |
EUR |
€ |
Indian Rupee |
INR |
₹ |
Japanese Yen |
JPY |
¥ |
Tip
You may configure custom currency symbols, for example South Korean Won (KRW, 원).
To choose the currency for a database
From the Customer 360 page, open the Databases tab.
Select a database and open it in Edit mode.
In the right-side navigation pane, under Currency, select the currency symbol to show for metrics and segment insights for this database.
Tip
Choose “Custom symbol” to apply a currency symbol that is not in the dropdown list.
For example, to use South Korean Won (KRW) as the currency symbol, choose “Custom symbol”, and then enter “원” in the Custom currency symbol field.
If you want a space to be present in-between the currency symbol and the monetary value shown, use “Custom symbol” and then add a space after the currency symbol: “원 “.
Note
Unicode, hex, HTML code, and HTML entity values are not supported.
Click Activate.
Configure permissions
Access to databases can be configured to allow only administrators, users who belong to a custom resource group, or everyone.
Allow only admins
A database that is configured for Admin only access restricts access to the database and tables within the database to only users who are assigned the DataGrid Administrator or DataGrid Operator policies.
To restrict access to only admins
From the Customer 360 page, open the Databases tab.
Choose a database, and then from the menu, select Permissions. This opens the Permissions dialog.
Select Standard, and then choose “Admin-only”.
Click Save
Allow resource group
A database that is configured for Standard access may restrict access to a datbase to only users who belong to a resource group that is configured in Amperity.
To restrict access to a single resource group
From the Customer 360 page, open the Databases tab.
Choose a database, and then from the menu, select Permissions. This opens the Permissions dialog.
Select Standard, and then choose a resource group.
Click Save
Allow everyone
Amperity includes one default resource group: “All resource groups”.
Users that are granted access to the “All resource groups” resource group are allowed to interact with all of the databases in the Customer 360 page.
A database that is configured for Standard access may allow access to everyone. When resource groups are configured in Amperity, choose the “No resource group” option from the dropdown. When resource groups are not configured, choose the Standard radio button.
To allow everyone access to a database
From the Customer 360 page, open the Databases tab.
Choose a database, and then from the menu, select Permissions. This opens the Permissions dialog.
Select Standard, and then choose “No resource group”.
Click Save
Configure pick-lists
A pick-list is a pre-generated list of available options for a column and is presented as a dropdown list in the visual Query Editor. A pick-list is configured when building tables in the Customer 360 page.
Define custom values and frequencies
A pick-list may be configured with custom values, where each item in the pick-list is specified on its own line.
Caution
Using custom values in a pick-list is uncommon. It is best to use automatically generated values.
To define custom values for a pick-list
From the Customer 360 page, open the Databases tab.
Open a database in Edit mode.
Open a table, and then click Next to move to the second step in the table editor.
Select the checkbox in the Pick list column in the row for which a picklist is to be created.
Click the Setup link next to the checkbox. This opens the Configure pick list dialog box.
Select a sort order.
Select the Custom method for the pick-list, and then enter each custom value on a new line. For example:
Value one
Value two
Value three
...
Click Save.
Delete pick-list
A pick-list may be deleted. This will disable any selection options in the visual Query Editor.
To delete a pick-list
From the Customer 360 page, open the Databases tab.
Open a database in Edit mode.
Open a table, and then click Next to move to the second step in the table editor.
De-select the checkbox in the Pick list column in the row for which a picklist is to be deleted.
Click Save.
Edit pick-list
Many pick-lists remain static over time, but if the data inputs change, you may reconfigure the items in a pick-list.
To edit a pick-list
From the Customer 360 page, open the Databases tab.
Open a database in Edit mode.
Open a table, and then click Next to move to the second step in the table editor.
Click the Setup link next to the checkbox. This opens the Configure pick list dialog box.
Make your changes.
Click Save.
Sort by alphabet
A alphabetical sort order is best for strings, such as for columns with values for cities, states, and proper names. For example:
1, 11, 2, and 3
a, b, and c
To add a pick-list with an alphabetical sort order
From the Customer 360 page, open the Databases tab.
Open a database in Edit mode.
Open a table, and then click Next to move to the second step in the table editor.
Select the checkbox in the Pick list column in the row for which a picklist is to be created.
Click the Setup link next to the checkbox. This opens the Configure pick list dialog box.
Select the Alphabetical sort order.
Select the method with which pick-list values are applied. In nearly all situations, you should use pick-list values that are generated Automatically.
Click Save.
Sort by alphanumeric
A natural sort order is best for alphanumeric lists, such as for columns with scores and rankings. For example:
1, 2, 3, and 11
a, b, and c
To add a pick-list with a natural sort order
From the Customer 360 page, open the Databases tab.
Open a database in Edit mode.
Open a table, and then click Next to move to the second step in the table editor.
Select the checkbox in the Pick list column in the row for which a picklist is to be created.
Click the Setup link next to the checkbox. This opens the Configure pick list dialog box.
Select the Natural sort order.
Select the method with which pick-list values are applied. In nearly all situations, you should use pick-list values that are generated Automatically.
Click Save.
Sort by most frequent
A most frequent sort order is best for columns with a smaller selection of frequently selected items, such as for columns with values for loyalty tiers, acquisition channels, or shopping preferences.
Note
Most frequent is the default sorting option for pick-lists.
To add a pick-list with a most frequent sort order
From the Customer 360 page, open the Databases tab.
Open a database in Edit mode.
Open a table, and then click Next to move to the second step in the table editor.
Select the checkbox in the Pick list column in the row for which a picklist is to be created.
Click the Setup link next to the checkbox. This opens the Configure pick list dialog box.
Select the Most Frequent sort order.
Select the method with which pick-list values are applied. In nearly all situations, you should use pick-list values that are generated Automatically.
Click Save.
Copy database table
You can create a table by copying an existing table.
To copy a table
From the Customer 360 page, open the Databases tab.
Open a database in Edit mode.
Choose a table, and then from the menu, select Copy.
Click Save.
Delete custom core table
Custom core tables may be deleted. Use a sandbox to validate workflows to ensure that any dependencies on the deleted custom core table are identified and fixed before promoting changes to production.
To delete a custom core table
From the Customer 360 page, open the Core tables tab.
From the list of custom core tables, open the menu for the core table you want to edit, select Delete.
Confirm that you want to delete the custom core table.
Delete database
A database may be deleted. This should not be done without considering the upstream and downstream effects of those changes. If the database is required by a downstream process, that process fails. If an upstream process cannot find the database, that process fails.
To delete a database
From the Customer 360 page, open the Databases tab.
Choose a database, and then from the menu, select Delete.
Click Delete to confirm.
Delete database table
A table in a database may be deleted. This should not be done without considering the upstream and downstream effects of those changes. If the table is required by a downstream process, such as a query, the process fails. If an upstream process cannot find the table or the schema does not match, that process fails.
To delete a table
From the Customer 360 page, open the Databases tab.
From the menu for the database you want to view, select Edit. The Database Editor page opens.
Under Database Tables, from the menu for the table you want to delete, select Delete.
Click Delete to confirm.
Discard draft table
A table that has not been activated may be discarded. When draft tables are present in a database an alert appears at the top of the editor that is similar to “You have 1 table draft saved locally.”, along with a link to view the draft tables.
Click View drafts, and then review the listed tables. To discard a draft table, click Discard or Discard all to remove all tables in the list.
Download schema
You can download the schema for your customer 360 database. This download is configurable, but may contain all of the tables in your database. For each included table, a description of each column in that table is also provided (when that description is defined within Amperity), dependencies that may exist for each table, along with examples of the data in each column.
To download a database schema
From the Customer 360 page, open the Databases tab.
Click Explore for the database for which you want to download the schema. This opens the Data Explorer.
Click Download schema. This opens the Download schema dialog.
From the Download schema dialog, select the tables you want to include in the downloaded schema, and then click Download.
An XSLX file is downloaded to your local machine’s “Downloads” directory. You may open this up in any application that supports that file type.
Duplicate database
You can create a database by duplicating an existing database.
To duplicate a database
From the Customer 360 page, open the Databases tab.
Choose a database, and then from the menu, select Duplicate.
Edit custom core table
Custom core tables may be edited. Before making changes consider the upstream and downstream effects of those changes, and then use a sandbox to validate the changes before promoting changes to production.
To edit a custom core table
From the Customer 360 page, open the Core tables tab.
From the list of custom core tables, open the menu for the core table you want to edit, select Edit. The Custom Core Table editor opens.
Make your changes, and then click Save.
Edit database
A database may be edited. This should not be done without considering the upstream and downstream effects of those changes. If the database is required by a downstream process, that process fails. If an upstream process cannot find the database, that process fails.
To edit a database
From the Customer 360 page, open the Databases tab.
Choose a database, and then from the menu, select Edit.
Make your changes.
Click Activate.
Edit database table
Tables in a database may be edited. This should not be done without considering the upstream and downstream effects of those changes. Changes may have unintended consequences: semantics, column names, or pick-lists, may not be immediately available to a downstream process, which may cause that downstream process to fail. If an upstream process cannot find the table or the schema does not match, that process fails.
To edit a table
From the Customer 360 page, open the Databases tab.
Open a database in Edit mode.
Open a table and make your changes.
Click Save.
Enable table versioning
A version is created for a table configured for table versioning each time the customer 360 database is run, regardless of database run type (express, normal, or full) and whether or not updates to data in the table occurred. The amperity_version column is appended to each versioned table.
Important
The maximum number of versions is 10. A version must have been created within the last 14 days. The frequency at which the customer 360 database is run will affect the total number of versions. For example:
If the customer 360 database runs once per day, over a 14 days there will be a rolling count of 10 versions.
If the customer 360 database runs every other day, the maximum number of versions will be 7.
If the customer 360 database runs twice per day, the maximum number of versions will be 10, but all created within the last 7 days.
Caution
Changes to columns within a table that is enabled for table versioning changes the schema and will cause incompatible versions to be dropped. To avoid this, add columns to the end of the table or enforce static table schemas.
To enable table versioning
From the Customer 360 page open a database.
From the Database Table editor, select a table.
In the Settings pane for the selected table, under Advanced Settings, expand Version history.
Select Enable table version history.
Note
Version history allows queries to be made against older versions of this table. Adding or removing columns within the table will cause incompatible versions to be dropped.
Enforce static table schemas when using table versioning to ensure versions are not dropped from the table’s version history.
Click Save.
Enforce static table schemas
To prevent table schemas from being updated automatically you can enforce a static schema for the database table. When enabled, a user cannot save, activate, or run a database table when there is inconsistency between the database table’s current schema and its upstream dependency.
Example for static schema enforcement
For example, a custom domain table with three fields is used to build a custom database table using SELECT * FROM Custom_Domain_Table. With this pattern, if the custom domain table is updated to have four fields the custom database table is not updated when static table schemas are enforced.
To resolve this inconsistency, do one of the following:
Disable static schema enforcement for the custom database table.
Update the schema in the custom database table to match the updated schema in the custom domain table.
Update the schema in the custom domain table to match the schema required by the custom database table.
Enable static schema enforcement for the custom domain table.
To enforce a static table schema
From the Customer 360 page open a database.
From the Database Table editor, select a table.
In the Settings pane for the selected table, under Advanced Settings, expand Table Schema.
Select Enforce static schema.
Note
A table’s schema cannot be changed when this option is enabled.
Click Save.
Explore database
The Data Explorer offers a detailed way to navigate through data tables in Amperity. The Data Explorer displays each column in the data table as a row, with the column name, data type, associated semantic, and a data example. A sample of real table data is available on another tab.
A full-screen mode for the data explorer is available from most areas within Amperity that show data tables in the database. This mode enables detailed exploration of each table, including an overview, the data table schema, examples of data, and source table details.

Tip
You can search for databases and columns in the database from the search bar in the Data Explorer. Search results are filtered automatically, grouped by database table, then by column name, and then by database property.
To open the Data Explorer
From the Customer 360 page, open the Databases tab.
Choose a database, and then click Explore.
This opens the Data Explorer.
Explore data lineage
Data lineage is a graph visualization that shows how all of the data within your tenant connects. The graph visualization is refreshed each time a user loads the Data lineage page.
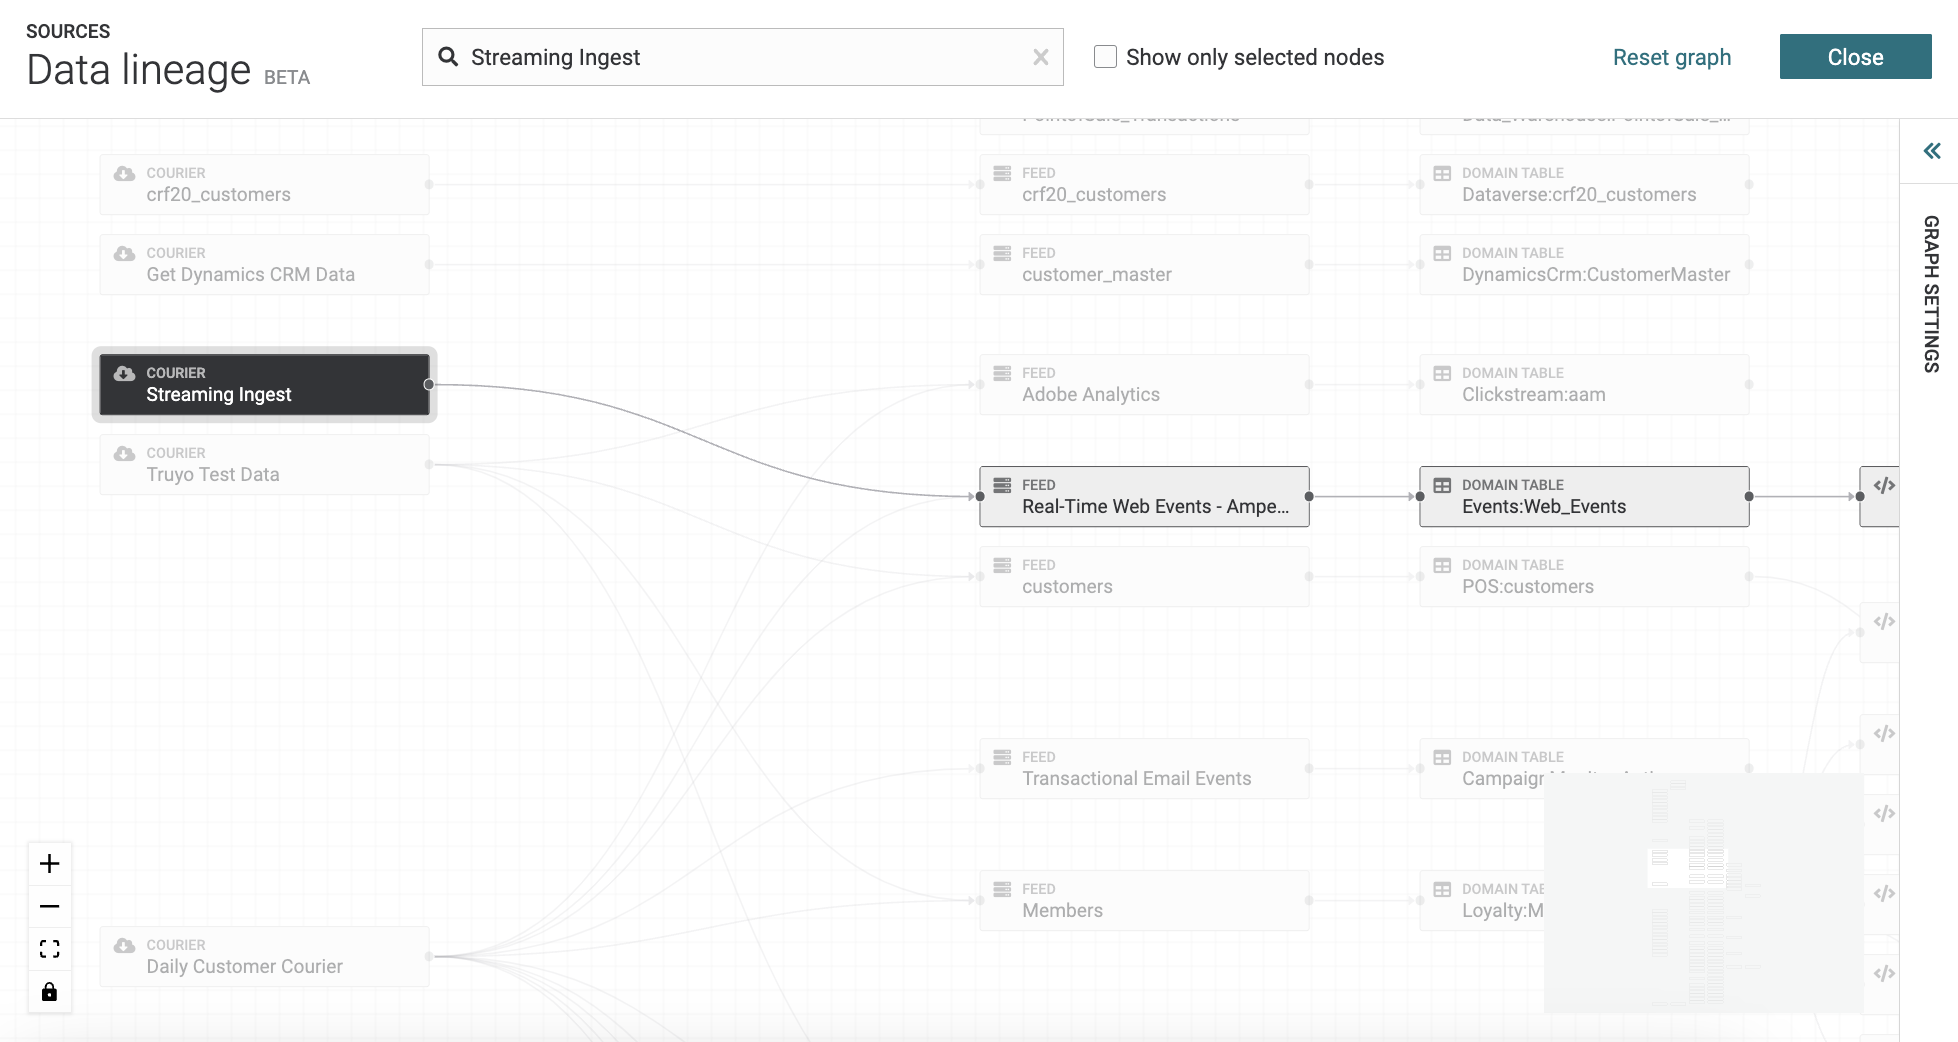
You can access the data lineage view the following ways:
On the top of the Sources page click Data lineage. On screens with lower resolutions click the Tools menu, and then click Data lineage.
On the top of the Customer 360 page, click Data lineage.
From the Actions menu for courier groups, couriers, custom domain tables, feeds, inbound shares, and source domain tables.
From the Data Explorer.
This opens the full graph and all data sources (nodes) are visible as starting nodes in the graph. Click any data source to explore how data moves from that data source into domain and database tables. Click any table to see its relationship to other tables and the sources from which rows in that table originate.
Search for data sources (nodes), by entering search criteria in to the search field at the top of the page. You can see hide tables from the graph by selecting the Show only selected nodes checkbox.
Note
To reset the graph, click Reset graph on the top of the page.
Change the graph settings by clicking on the Graph Settings panel to open it on the right-side of the page. Use the layout options to change the color theme, graph direction, node width, vertical spacing, and horizontal spacing for the graph. You can reset the graph settings by clicking Reset on the Graph Settings panel. To close the panel click on the arrows at the top of the panel.
Tip
Use the view options to zoom in and out on the nodes by clicking the plus sign to zoom in and the minus sign to zoom out. You can also reset the view by clicking the box option and lock and unlock the graph by clicking the lock option.
To explore data lineage
From the Customer 360 page, open the Databases tab.
Choose a database, and then from the menu, select Data lineage.
This opens the Data lineage page.
Explore details
The Details view in the Data Explorer shows summary data about the table, along with information about which source tables were used to build it.
To view database details
From the Customer 360 page, open the Databases tab.
Choose a database, and then from the menu, select Data Explorer.
This opens the Data Explorer page.
Click the name of a table.
Click the Details tab at the top of the table.
When finished browsing the table details, click Close.
Explore example data
The Examples view in the Data Explorer shows actual data for a randomly selected set of rows in the data table.
Note
Users with restricted access to PII will not see data for PII-restricted columns, but will see data for all other columns.
Cardinality vs. uniqueness
Cardinality is a measure of how many unique values are present in data. A higher cardinality indicates a larger percentage of unique values, whereas a lower cardinality indicates a higher percentage of repeat values.
Uniqueness divides the number of unique values–cardinality–by the number of rows in a table.
Use cardinality and uniqueness to help guide the creation of well-behaved JOIN operations when authoring SQL queries.
Avoid using JOIN operations when columns have lower cardinality. The high frequency of duplicate values will result in a row for every possible match.
Columns with low uniqueness values as keys on both sides of a JOIN operation runs more slowly and is less likely to return the desired results.
Empty fields, including NULL values, are counted as duplicates, that is “not unique”. For example: a field with 90% completion and 90% uniqueness has different values for each of the non-empty rows.
Completion percentages
Completion is the percentage of non-NULL values within a column.
To view example data
From the Customer 360 page, open the Databases tab.
Choose a database, and then from the menu, select Data Explorer.
This opens the Data Explorer page.
Click the name of a table.
Click the Examples tab at the top of the table.
When finished browsing example data, click Close.
Explore table schema
The Schemas view in the Data Explorer displays information about each column in the table, along with an example, and information about completion, uniqueness, and cardinality.
To view database table schemas
From the Customer 360 page, open the Databases tab.
Choose a database, and then from the menu, select Data Explorer.
This opens the Data Explorer page.
Click the name of a table.
Click the Schema tab at the top of the table.
When finished browsing the table schema, click Close.
Export database
A database may be configured to export one or more tables (or even the entire database) from Amperity. Each database export must be assigned a unique name, and then is configured to select one or more tables to be included in the export. A database export must be associated with a configured destination and must be added to an orchestration.
Export database table
The process for exporting tables is the same as exporting databases.
Format SQL
AmpAI can reformat the SQL in a custom database table editor. Click Format SQL in the toolbar and choose one of two options:
Standard format Reformats the SQL using default style rules.
Custom format Opens a dialog where you can provide additional instructions that AmpAI applies on top of standard formatting.
To format SQL in a custom table
From the Customer 360 page, open the Databases tab.
Open a database in Edit mode.
Open a custom SQL table.
In the toolbar, click Format SQL.
Choose Standard format to apply default formatting, or choose Custom format to enter specific formatting instructions.
Click Save.
Generate field descriptions
AmpAI can generate descriptions for database table fields that do not already have one. Click Generate field descriptions in the Description settings group on the right side of the table editor. When the table is defined by a SQL query, AmpAI uses the upstream schema to improve the accuracy of the generated descriptions. This may take a few minutes depending on the number of fields.
Note
The Generate field descriptions link is disabled when all fields already have descriptions.
To generate field descriptions
From the Customer 360 page, open the Databases tab.
Open a database in Edit mode.
Open a table, and then click Next to move to the second step in the table editor.
In the Description settings group, click Generate field descriptions.
After the descriptions are generated, click Save.
Hide database table
A table may be hidden from users when they access the Data Explorer or Queries page.
Important
This setting does not prevent users from directly querying the table in the Queries page by referencing it by name.
To hide a table from users
From the Customer 360 page, open the Databases tab.
Open a database in Edit mode.
Open a table, and then click Next to move to the second step in the table editor.
Under Advanced Settings, expand Visibility and Access.
Select the box next to Hide in Data Explorer and Queries page.
Click Activate.
Mark columns as PII
Columns that contain PII–names (first, last, and full), addresses, phone numbers, email addresses, birthdates, gender, and other profile details–should be marked for all database tables.
What is restricted PII access?
Users of Amperity who are assigned the AmpIQ User and Amp360 User policies along with the Restrict PII access policy option are prevented from viewing PII when that data was marked as PII in the database table.
When the PII checkbox is selected, the following locations will not show PII values to users who do not have permission to view PII data:
The Examples page in the Data Explorer.
Data that is returned by a query in the Queries page.
Data that is returned by a segment in the Segments page.
When PII data is hidden, users are shown the following message:
Some personally identifiable information has been redacted from these results.
To mark columns as PII
From the Customer 360 page, open the Databases tab.
Open a database in Edit mode.
Open a table, and then click Next to move to the second step in the table editor.
For each field that has PII, verify that the box in the PII column is selected.
Amperity automatically selects the PII checkbox for columns that were tagged with profile (PII) semantics. Verify that all columns associated with PII have the checkbox selected in the PII column.
Activate the table. Restricted access to PII is updated the next time this database table is refreshed.
Run database
Amperity supports a variety of run options for each database your brand adds to Amperity. The primary customer 360 database may be run by clicking the Run link on the Profiles tab of the Customer 360 page. Additional databases may be run after selecting the Run option from that database’s menu.
Individual databases have the following run options:
Express refresh
An express refresh will only update database tables and custom domain tables with new domain data or table definitions. This is the fastest option and is the recommended option for testing incremental changes.
Note
When a database is run, any custom domain table that has changed is run first, and then Stitch runs if any of those custom domain tables are configured for Stitch. If there are no changes to custom domain tables or if custom domain tables have changed that are not configured for Stitch, Stitch will not run.
To run a database with express refresh
From the Customer 360 page, open the Databases tab.
Open the menu for the database you want to run.
Select Run. The Run <Database> dialog box opens.
Under Run Options, select Express.
Under Databases to Run, select one or more databases to be run.
Click Run.
Full refresh
A full refresh updates all tables, including custom domain tables. This is the slowest option and is best used for estimating runtime performance.
Note
When a database is run, any custom domain table that has changed is run first, and then Stitch runs if any of those custom domain tables are configured for Stitch. If there are no changes to custom domain tables or if custom domain tables have changed that are not configured for Stitch, Stitch will not run.
To run a database with full refresh
From the Customer 360 page, open the Databases tab.
Open the menu for the database you want to run.
Select Run. The Run <Database> dialog box opens.
Under Run Options, select Full Refresh.
Under Databases to Run, select one or more databases to be run.
Click Run.
Normal refresh
Any table with new data, new table definitions, or time-dependent clauses will be refreshed. A normal refresh is the default option.
Note
When a database is run, any custom domain table that has changed is run first, and then Stitch runs if any of those custom domain tables are configured for Stitch. If there are no changes to custom domain tables or if custom domain tables have changed that are not configured for Stitch, Stitch will not run.
Time-dependent clauses include any query that uses the CURRENT_DATE(), CURRENT_TIMESTAMP(), UNIX_TIMESTAMP(), or RAND() functions.
To run a database with normal refresh
From the Customer 360 page, open the Databases tab.
Open the menu for the database you want to run.
Select Run. The Run <Database> dialog box opens.
Under Run Options, select Normal.
Under Databases to Run, select one or more databases to be run.
Click Run.
Sequentially
Run tables sequentially in the selected databases, rather than in parallel, to help identify tables that may be causing issues in your database.
Note
When a database is run, the system computes the tables in parallel by default. If you choose the option to run tables sequentially, this may increase the duration of the database run and should be used for debugging purposes only.
Run tables sequentially in the selected databases to do the following:
Identify a specific table that is causing issues in your database.
Optimize resource capacity.
Review individual table run times to identify issues.
Note
When you run a database in this mode, the duration of the database run may increase.
To run tables sequentially
From the Customer 360 page, open the Databases tab.
Open the menu for the database you want to run.
Select Run. The Run <Database> dialog box opens.
At the bottom of the dialog box, expand the Advanced Options section.
Select the Disable parallel table execution checkbox to apply this setting to the current database run.
Click Run.
Stop
You can stop a database that is running from the Workflows page.
To stop running a database
Open the Workflows page.
In the list of workflows, find the workflow for the database that is running.
From the menu, select Stop workflow.
Search core tables
Use the search box to filter the list of standard core tables to match the string that is typed in the search box. The list of standard core tables automatically filters the list as the string is typed.
Set validation rules
A field in a database table may be flagged as required, as unique, or as both required and unique. These flags are validated by Amperity. When the validation conditions are not met a warning is raised.
Use flags to help ensure that data within Amperity remains healthy and to help ensure that downstream workflows are built on top of the correct data. Database field semantics are preceded by a db/ in the dropdown menu for semantics in the Database Editor.
Warning
Validation warnings appear in the Notifications pane as part of the notification for a database update. Each validation warning specifies the table name and the field name that failed validation.
To set validation rules
From the Customer 360 page, open the Databases tab.
Open a database in Edit mode.
Open a table, and then click Next to move to the second step in the table editor.
Select the combination of validation rules for each field.
columnName
columnName
db/unique
A field that is assigned the unique semantic requires every value for that field within the same table to be unique. Fields with NULL values are ignored by validation, but all other values, including zero-length strings, must pass.
For a field that is unique, apply the db/unique semantic tag.
db/required
A field that is assigned the required semantic requires every value for that field within the same table to have a non-NULL value, but does not require values to be unique. NULL values will cause an error during validation. All other values, including zero-length strings, will pass validation.
For a field that is required, apply the db/required semantic tag.
db/unique AND db/required
A field may be assigned the db/required and db/unique semantics. Use this only for fields that must be present and unique, such as for the Amperity ID.
Some fields, such as amperity_id, are both unique and required. Apply both database semantic tags to these fields. Most fields do not require any validation rules.
Click Save.
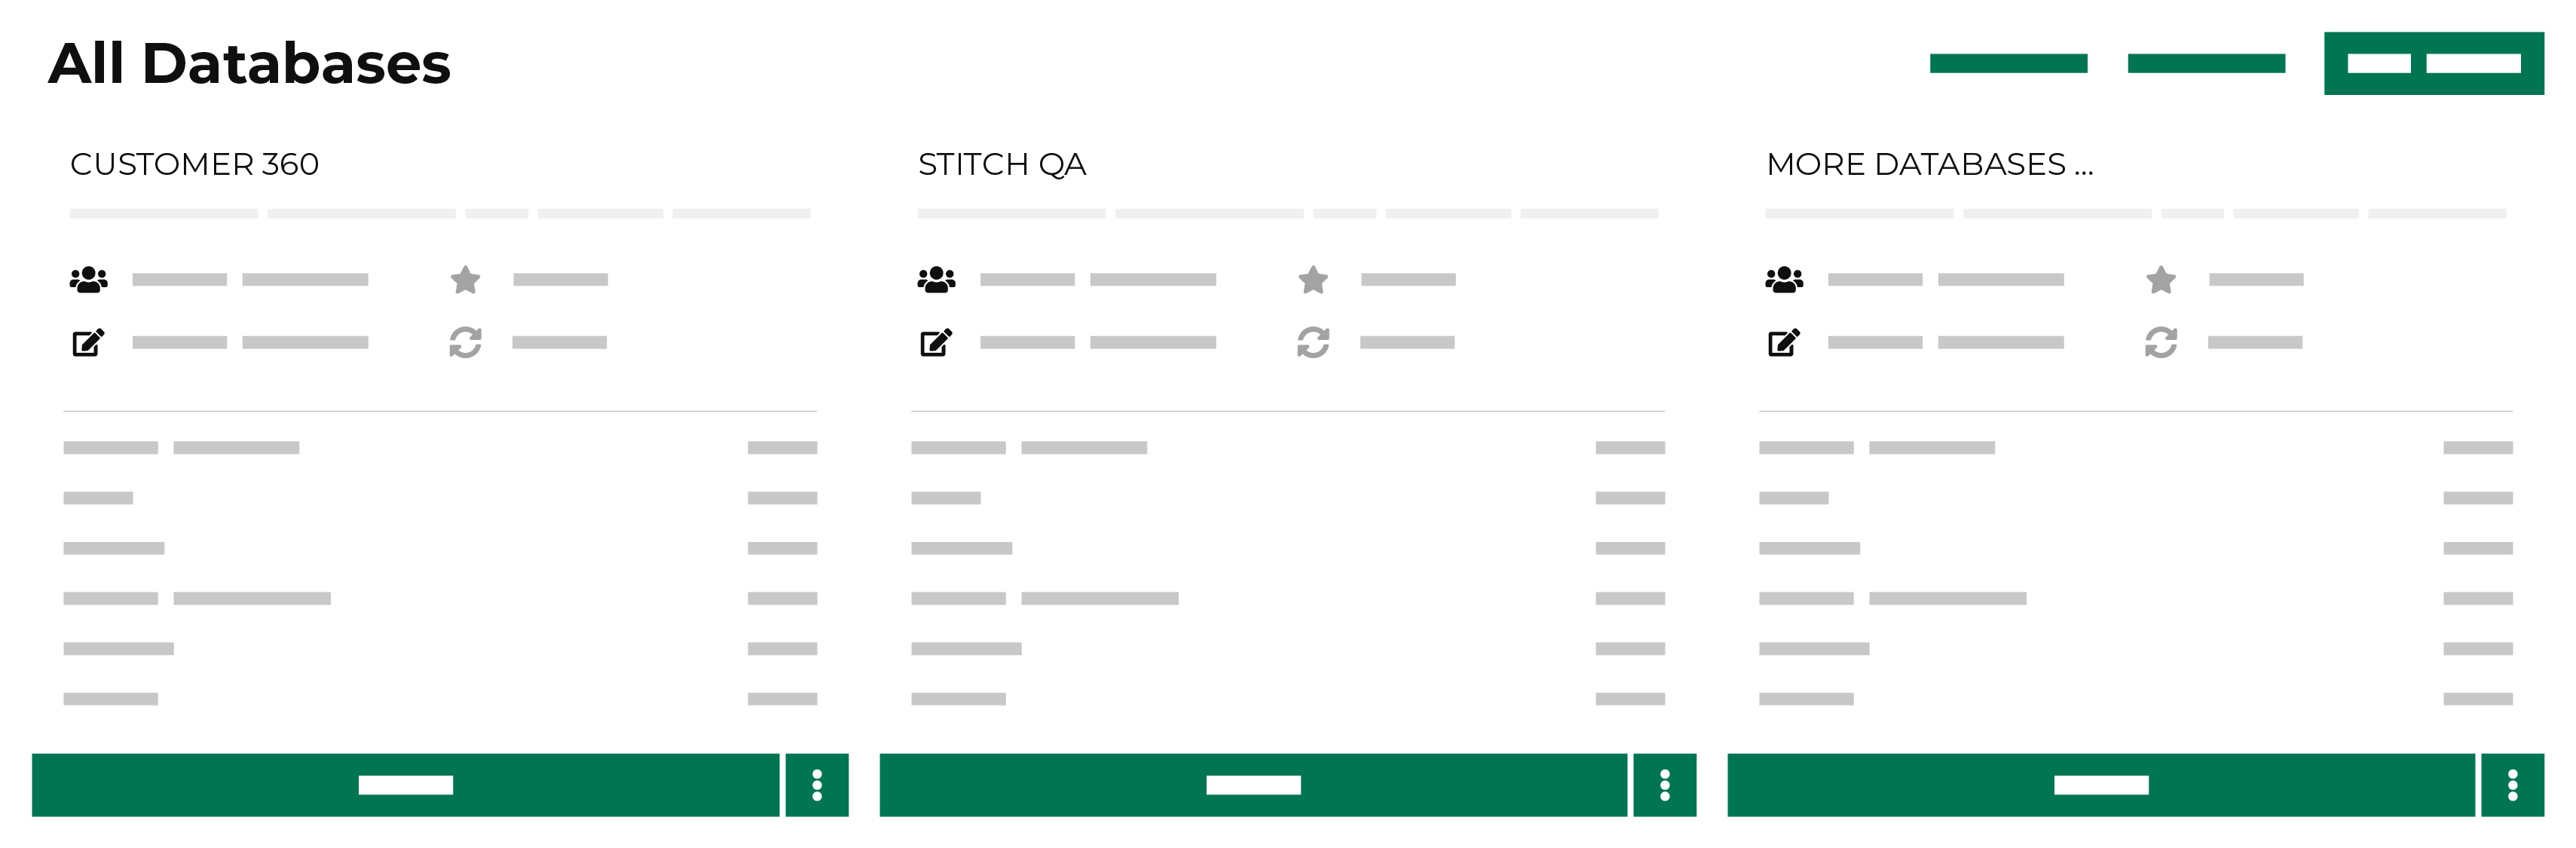
View all databases
In addition to the primary customer 360 database, the Customer 360 page may contain additional databases. The Databases tab on the Customer 360 page lists all of the databases that have been created, including both active and draft states.
Other databases may be created to support any desired use case. Each database has a specific schema, which is a collection of tables and attributes. This is called a data model. The data model and individual database tables Amperity provides should make data easy to understand and explore for its specific use case and client.
Note
Only databases in an Active state may be run against stitched data.
View core tables
Core tables are available from the Core tables tab on the Customer 360 page.
View database
From the Customer 360 page, under All Databases, open the menu for the database you want to view, select View. The Database Viewer page opens.
View permissions
Access to databases can be configured to allow only administrators, users who belong to a custom resource group, or everyone.
To view the configured permissions for a database
From the Customer 360 page, open the Databases tab.
Open the menu for a database, and then select Permissions.
The Permissions window appears with details about how this database is configured to allow access to users in your tenant.
View recent activity
Notifications for databases that run in the Customer 360 page appear after Amperity has processed data for that database. Notifications typically indicate successful outcomes. Less often, notifications contain details for non-successful outcomes, such as failures related to upstream or downstream processes.
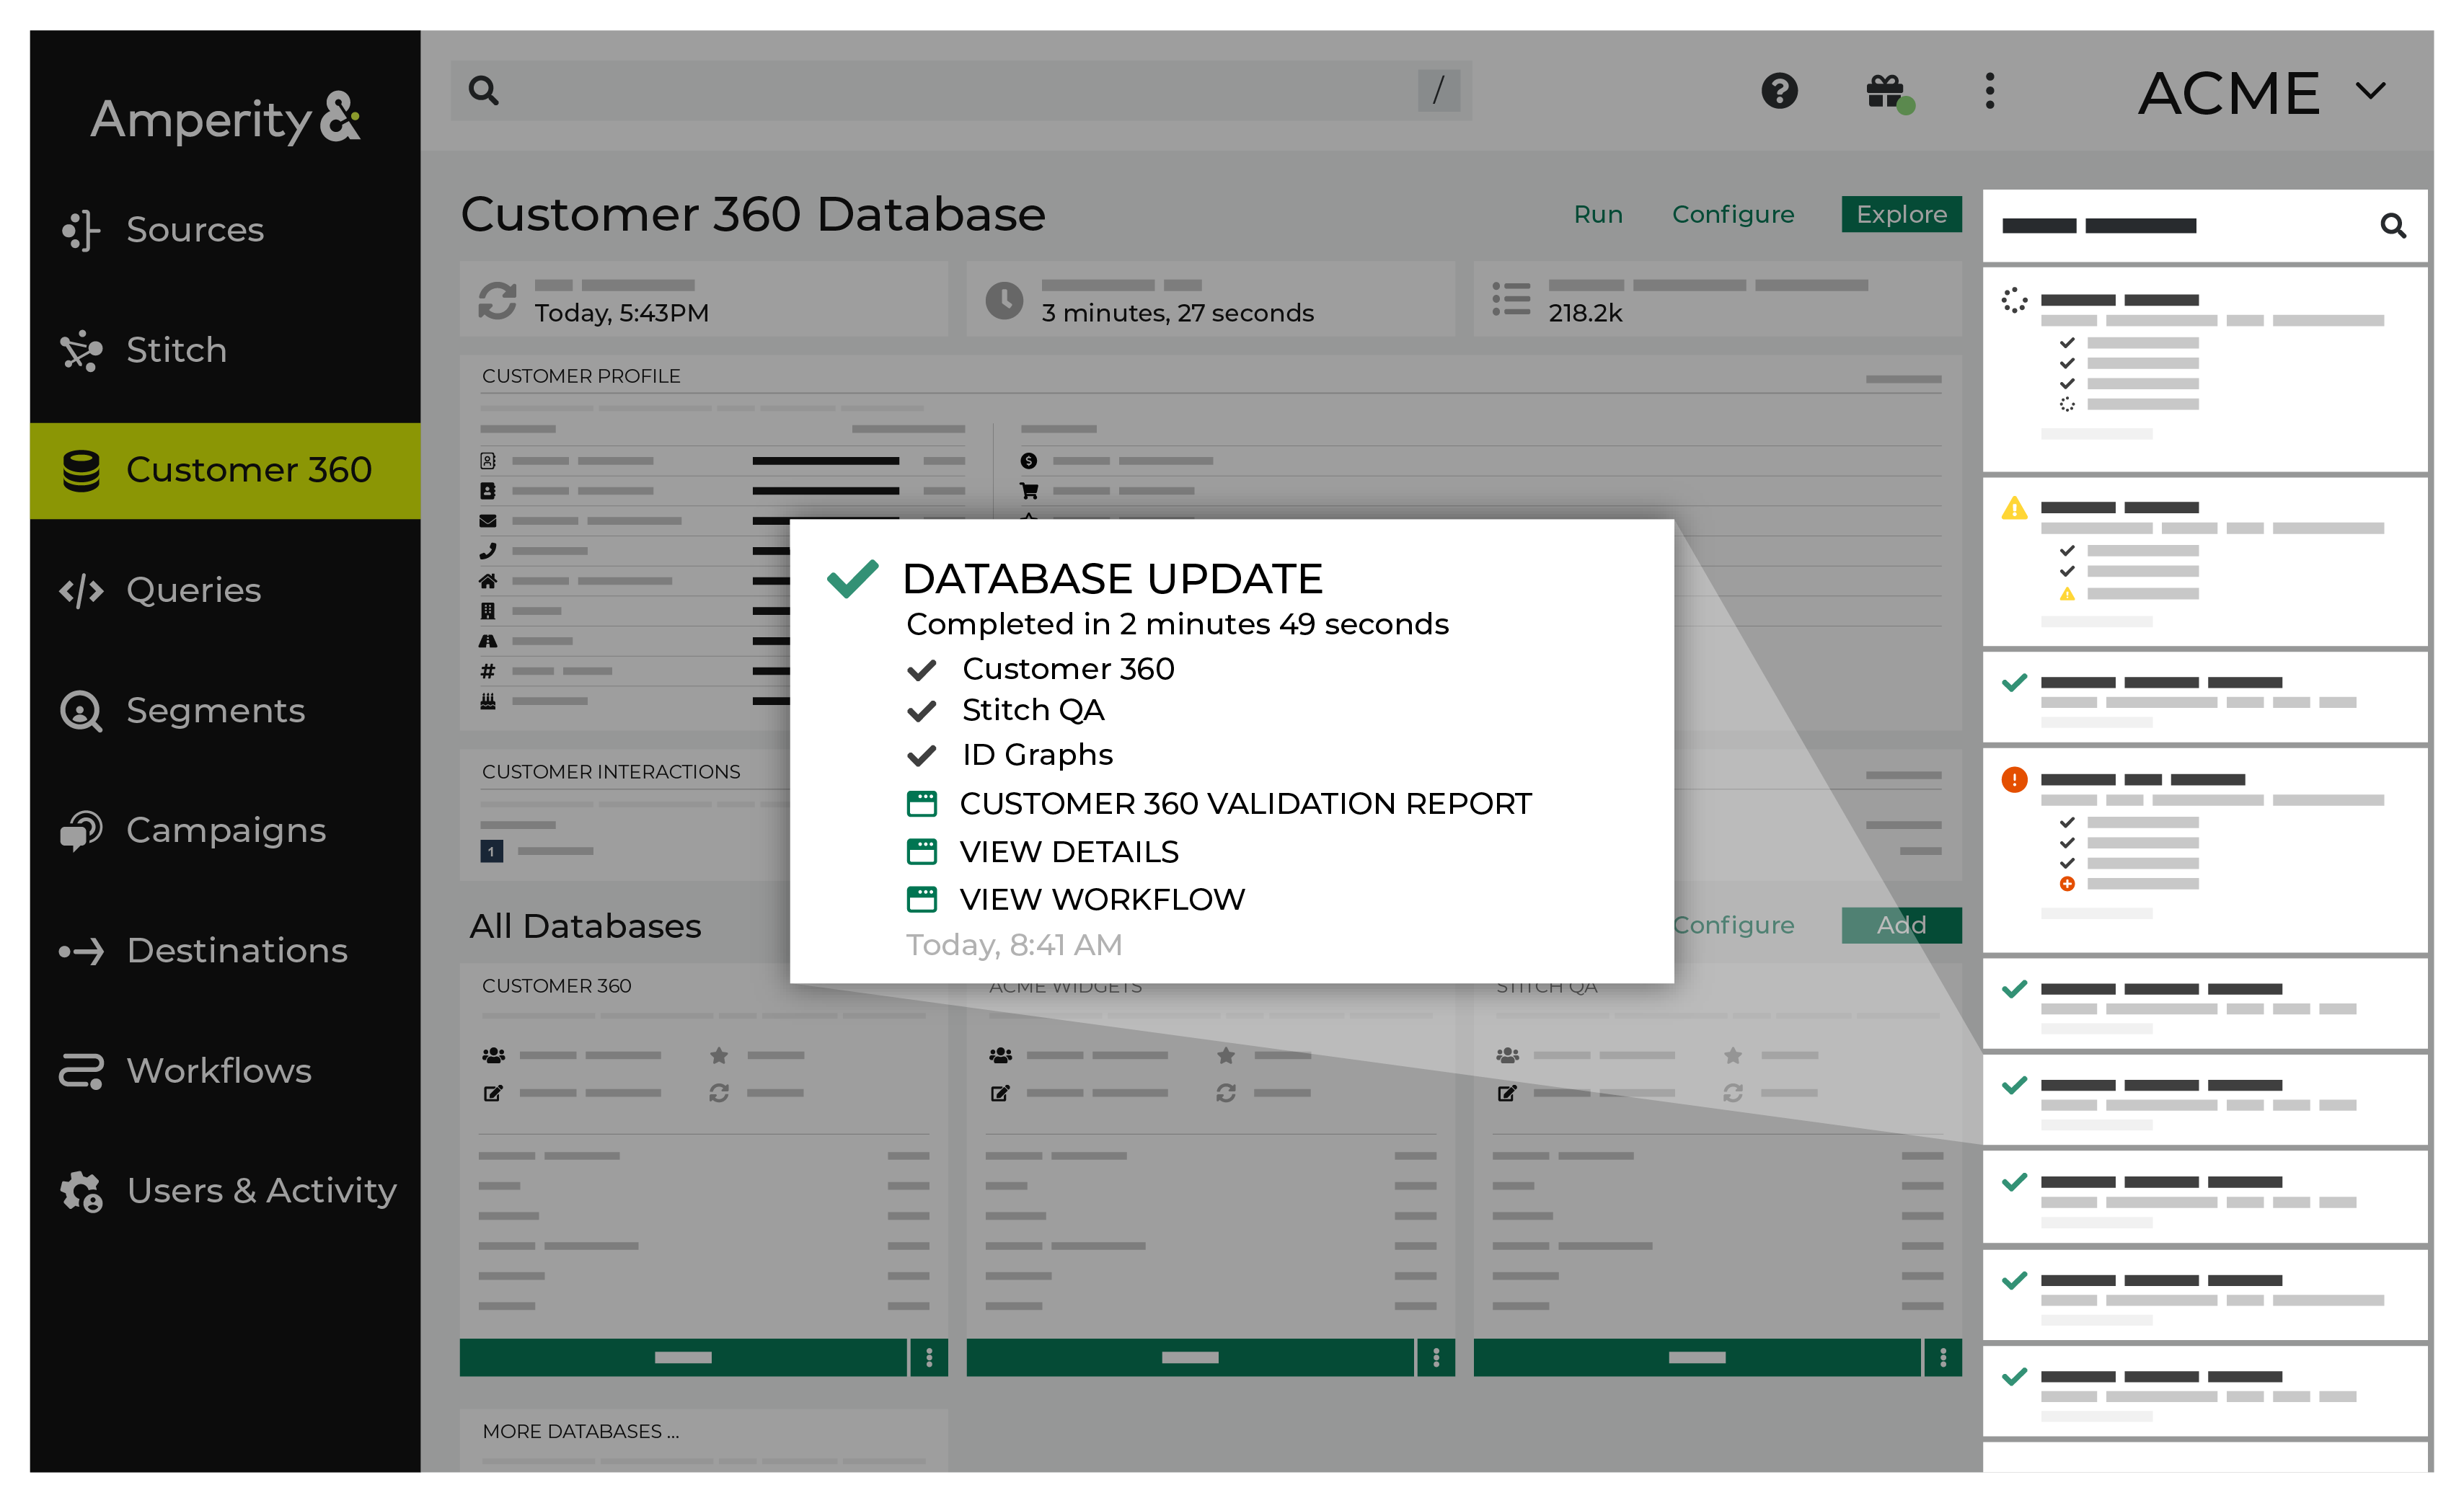
To view recent activity
If a notification is about a non-successful outcome, the details for why and what happened can be found in the notification itself. Click More to view the full notification. Click View Workflow to open the workflow in the Workflows page.
In some cases viewing the log files may be helpful. In many cases, fix the root cause of the non-successful outcome, and then rerun the process manually. The Workflows page provides a set of workflow actions that you can initiate directly.
View run history
You can view the run history for any database in the Customer 360 page.
To view the run history of a database
From the Customer 360 page, open the Databases tab.
Open the menu for a database, and then select View run history.
The Run History window appears with details about the run history of the database.
Tip
You can view the workflow information associated with the database by clicking on View Workflow on the top-right corner of the Run History window.
View SQL for core table
View the SQL for a standard core table to understand how the table was built.
To view the SQL for core tables
From the Customer 360 page, open the Core tables tab.
From the list of custom core tables, open the menu for the core table you want to edit, select View (for custom core tables) or View SQL for standard core tables.
This opens the Custom Core Table editor for custom core tables or the View SQL dialog box for standard core tables.