About policies
A policy represents a set of actions that are available to a user when assigned to that policy.
Policies may be assigned to users, along with assigning the actions that each policy represents. You may assign more than one policy to a user.
Important
If you see the message “Access Denied” when trying to access a page in Amperity, you may not have sufficient policies assigned to your user. See the list of actions by policy for detailed information about the specific areas within Amperity that each policy represents.
How policies work
Actions within Amperity are controlled by policies, which act as containers for a set of actions. All tenants share a set of global policies with groups for standard policies and administrator policies. Each tenant assigns one or more policies to every user in their tenant, after which each user may also be assigned any of the policy options.
Each user has a set of assigned actions that are determined by their assigned policy (or policies). Policy assignment may be managed using SSO (recommended) or may be managed from the Amperity user interface by users who are assigned the Allow user administration policy option.
The access model in Amperity defines actions as short strings that contain a resource type and an associated verb. A policy is a series of statements that allow or deny actions. For example: pii:download is an action. pii is the resource type and download is the associated verb. A user that is authorized to perform this action may run a query or segment, and then click the Download button to download the results.
When a user logs on to Amperity the policy (or policies) that are assigned to that user are identified, and are then used to determine the set of statements that allow or deny actions to that user.
Amperity reviews all statements to determine if a user is allowed to perform an action. A user action is allowed when a statement allows the action. A user action is denied when a statement denies the action or when no statements match the action.
Example
The following individuals comprise the Amperity team at ACME Corp: Ace Managhan (a SQL expert), Amanda Heller (the main point of contact for source and destination configuration), along with two members of the marketing team (Paul Jackson and Kendra Hallett).
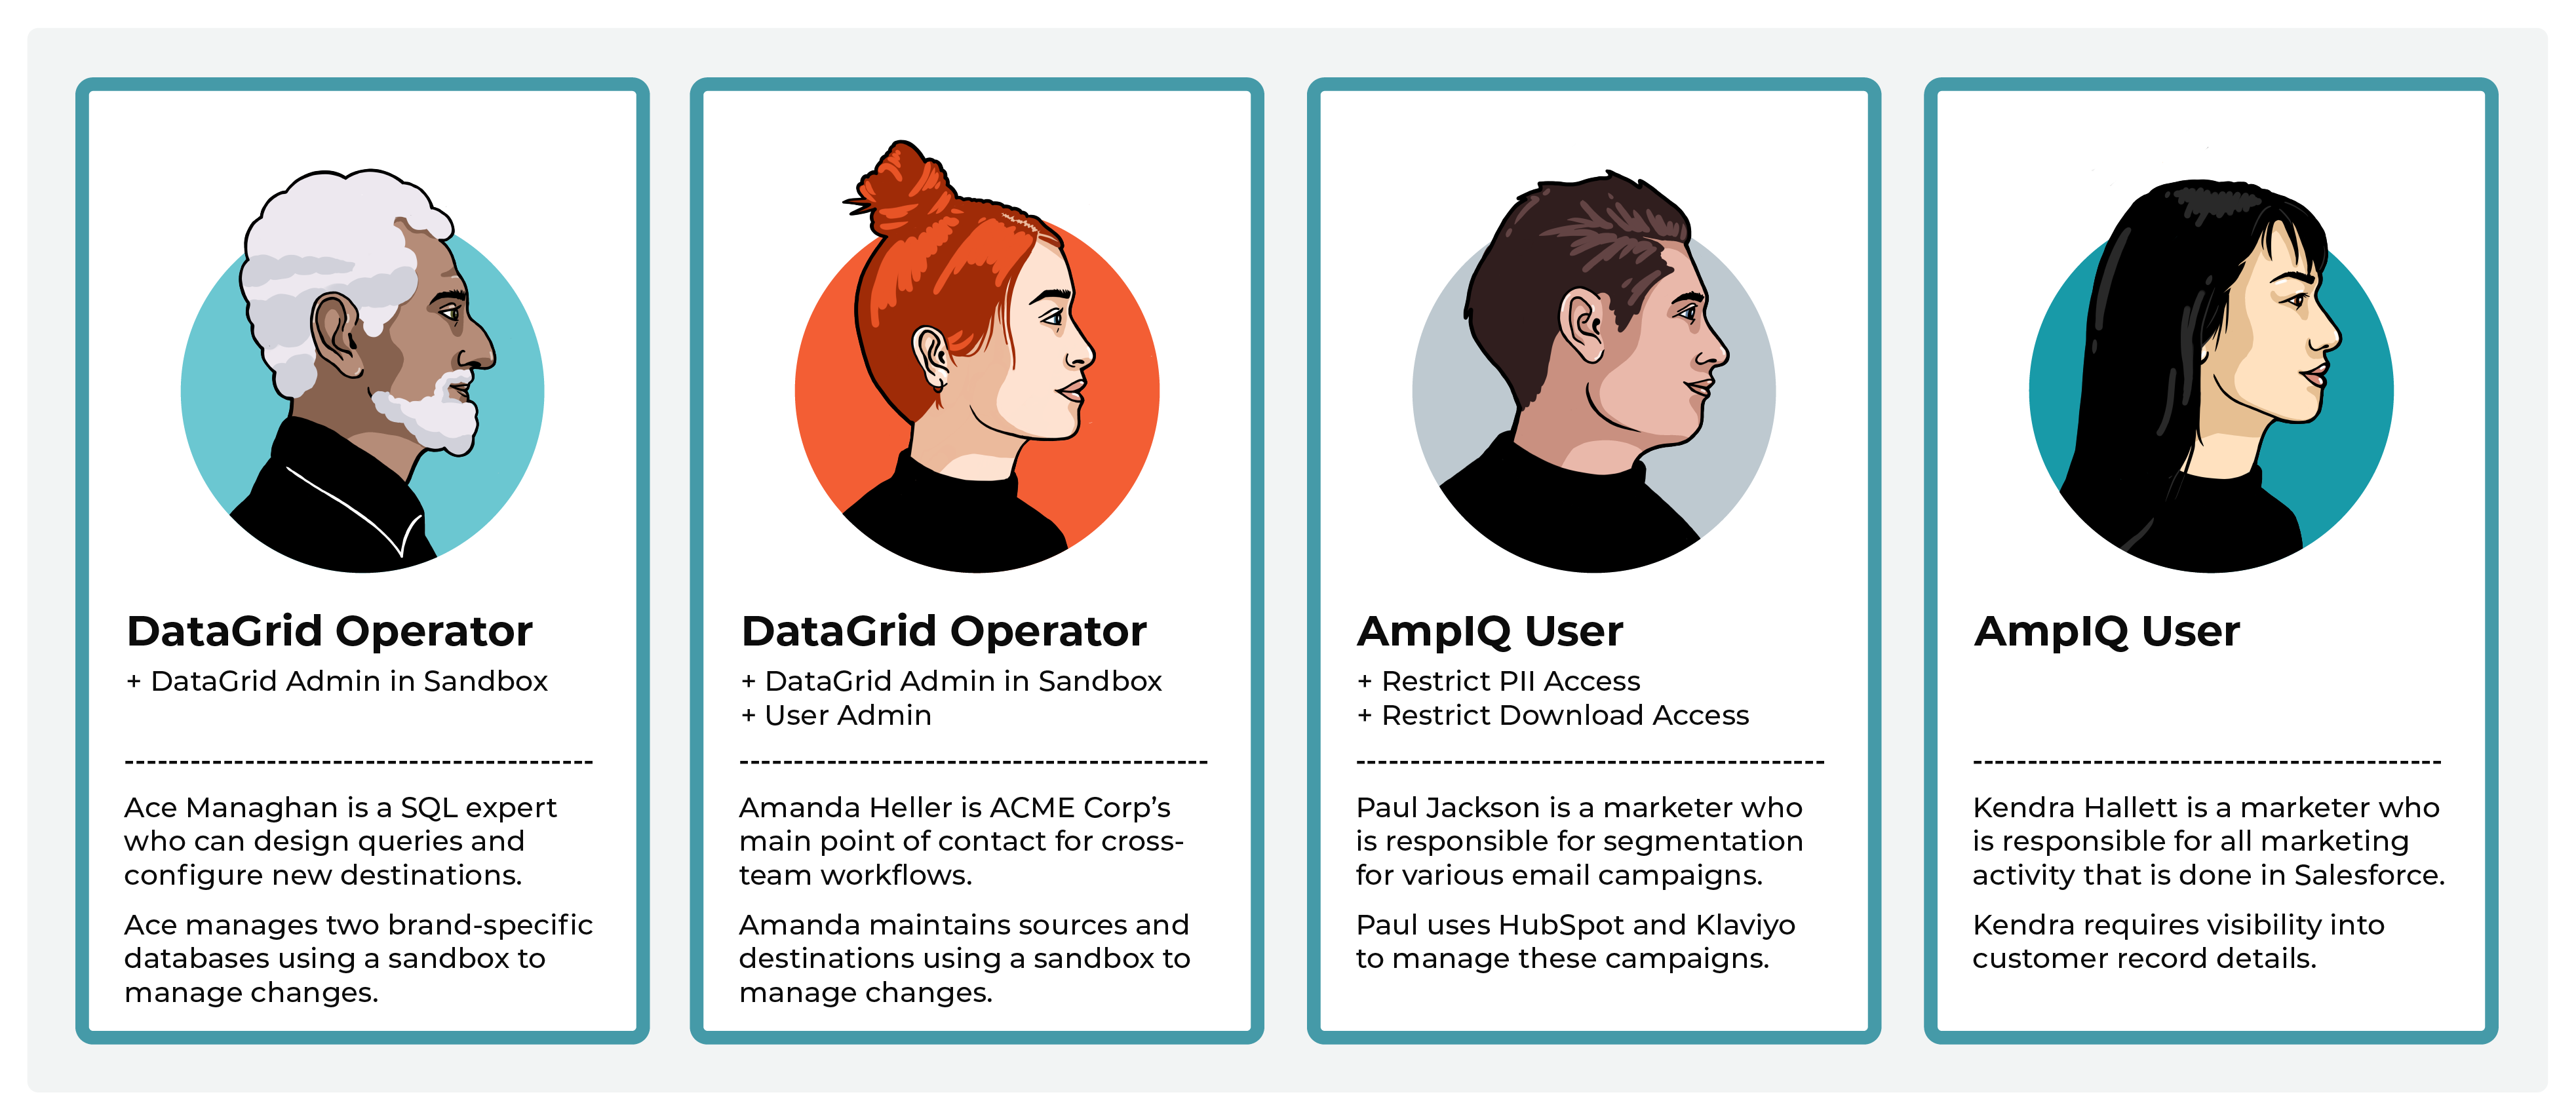
Ace and Kendra are both assigned the DataGrid Operator policy in their production tenant. When they want to make changes to Sources and Databases, they create new sandboxes. In these sandboxes, they are automatically assigned the DataGrid Administrator policy, and maintain other add-on policies they have.
Kendra has the Allow sandbox administration and Allow user administration add-on policies and can immediately access Ace’s sandboxes, add users to it, review Ace’s changes, and promote changes to production.
Ace works with Paul and Kendra to support their downstream marketing activity. Paul and Kendra belong to the marketing team. Paul is assigned the AmpIQ User policy and manages all campaign sends from HubSpot and Klaviyo. ACME Corp policy requires that only certain members of the company can have access to customer’s profile data, which Kendra requires, but Paul does not. Paul is restricted from viewing profile data (though can see the email addresses within HubSpot and Klaviyo, but only after they are sent from Amperity) and cannot download the segment results.
Paul and Kendra belong to the marketing team. Paul is assigned the AmpIQ User policy and manages all campaign sends from HubSpot and Klaviyo. ACME Corp policy requires that only certain members of the company can have access to customer’s profile data, which Kendra requires, but Paul does not. Paul is restricted from viewing profile data (though can see the email addresses within HubSpot and Klaviyo, but only after they are sent from Amperity) and cannot download the segment results.
Kendra manages a complex series of marketing campaign activity through Salesforce, some of which requires verification of certain types of profile data before sending it to Salesforce from Amperity. Kendra often uses SQL to build custom queries to return specific results for key downstream use cases.
Paul and Kendra work with Amanda to make sure the right data is being sent to their downstream marketing activities and also work with Ace to ensure they have access to the right sets of tables when building segments and queries.
Standard policies
The following standard policies are available:
Amp360 User
The Amp360 User policy allows full access to the Queries page, the ability to run orchestrations from the Destinations page, and read access to the Customer 360, Stitch and Workflows pages.
Assign this policy to users who manage databases, manage SQL queries, and send the results of queries to pre-configured destinations.
AmpIQ User
The AmpIQ User policy allows full access to the Segments and Campaigns pages.
Assign this policy to users who explore metrics, manage segments, explore segment insights, build and run campaigns, and review campaign results.
DataGrid Administrator
The DataGrid Administrator policy allows full access to Amperity. Access includes all actions allowed by the DataGrid Operator policy, along with the ability to use a sandbox to make changes. Review changes in a sandbox before promoting them to production.
Assign this policy to users who make configuration changes using a sandbox. A user assigned the Allow sandbox administration policy can review sandbox changes. An administrator has visibility into all resource groups.
DataGrid Operator
The DataGrid Operator policy allows read access to the Sources, Stitch, and Customer 360 pages and full access to the Queries, Destinations, and Workflows pages.
Assign this policy to users who work in your production tenant to help prevent making direct changes to sources, Stitch settings, and databases. Assign the DataGrid Administrator policy to the same users within a sandbox to allow them full access to Amperity.
If users are assigned to a sandbox manually they must be assigned the DataGrid Administrator policy within the sandbox to allow that user full access to all features within the sandbox.
Policy options
Policy options are not standalone policies. They must be attached to standard policies to allow users to perform additional actions within your tenant.
The following policy options are available:
Note
Restricted actions are indicated in the policy table using the icon. Any user may be assigned the Allow user administration policy option (indicated by ).
Allow API key administration
The Allow API key administration policy option allows full access to managing the API keys and access tokens that are used with the Profile and Streaming Ingest APIs. This policy option enables the API keys list on the Security tab on the Settings page.
Allow Profile API administration
The Allow Profile API administration policy option allows full access to the Profile API, including the ability to manage a list of Profile API endpoints from the Destinations page.
Allow sandbox administration
The Allow sandbox administration policy option allows full access to all sandboxes in a tenant. Access includes the ability to view details for any sandbox, access any sandbox, promote changes from any sandbox, and delete any sandbox.
Assign this policy to one or more users assigned to the DataGrid Operator policy so they can manage all sandboxes that exist for your production tenant.
Allow source data deletion
The Allow source data deletion policy option may be assigned to a DataGrid Operator to allow users assigned that policy the ability to delete domain table data from the Sources page.
Allow user administration
The Allow user administration policy option may be assigned to users to enable access to the Users settings tab, the Security settings tab (for resource groups), and the Activity log settings tab.
Audience monetization access
The Audience monetization access policy option may be assigned to users assigned the Datagrid Operator policy to enable access to the Audience monetization page.
Restrict AmpAI access
The Restrict AmpAI access policy option prevents users from interacting with AmpAI features.
Restrict data exports
The Restrict data exports policy option prevents users from using orchestrations or campaigns.
Restrict download access
The Restrict download access policy option prevents users from downloading query and segment results.
Restrict PII access
The Restrict PII access policy option prevents users from viewing data that is marked as PII.
This option may only be assigned to the AmpIQ User and Amp360 User policies.
Users of Amperity who are assigned the AmpIQ User and Amp360 User policies along with the Restrict PII access policy option are prevented from viewing PII when that data was marked as PII in the database table.
When the PII checkbox is selected, the following locations will not show PII values to users who do not have permission to view PII data:
The Examples page in the Data Explorer.
Data that is returned by a query in the Queries page.
Data that is returned by a segment in the Segments page.
When PII data is hidden, users are shown the following message:
Some personally identifiable information has been redacted from these results.
Restrict upload access
The Restrict upload access policy option prevents users from uploading files to the Customer 360, Queries, or Segments pages.
This option may only be assigned to the AmpIQ User and Amp360 User policies.
Read-only options
The following policies have read-only options:
Note
Allowed read-only actions are indicated in the policy table using the icon.
Amp360 User Read Only
The Amp360 User Read Only policy allows read-only access to the Customer 360 and Queries pages.
Assign this policy to users who will explore databases and SQL queries, but will not create queries or send the results of queries to configured destinations.
AmpIQ User Read Only
The AmpIQ User Read Only policy allows read-only access to the Segments and Activations pages.
Assign this policy to users who will view and explore metrics, segments, and campaigns, but will not create segments or run campaigns.
DataGrid Operator Read Only
The DataGrid Operator Read Only policy allows read-only access to the Sources, Stitch, Customer 360, Queries, Segments, Activations, and Destinations page.
Assign this policy to users who need to view the entire application, including all resource groups, but should not make changes.
Allowed actions
The following sections describe the set of actions that may be assigned to users of Amperity. These actions are grouped by page (AmpAI, Sources, Stitch, Customer 360, Queries, Segments, Campaigns, Journeys, Audience Monetization, Orchestrations, Destinations, Settings, Workflows, and Credentials) with additional sections for the Data Explorer and Sandboxes.
Allowed, optional, and required actions
The following sections use icons to indicate when actions are available.
|
Allowed. |
A user assigned to this policy can perform this action. |
|
Read-only. |
A user assigned to this policy has read-only access. |
|
Optional. |
This action may be restricted using the Restrict download access add-on policy. |
|
Optional. |
This action may be restricted using the Restrict upload access add-on policy. |
|
Optional. |
This action is allowed, but visibility of data may be restricted using the Restrict PII access add-on policy. |
|
Optional. |
This action is allowed when a user is assigned the User Administration add-on policy. |
|
Optional. |
This action is allowed when a user is assigned the API key administration add-on policy or the Profile API administration add-on policy. |
|
Optional. |
This action is allowed when a DataGrid Operator or DataGrid Administrator is assigned the Allow sandbox administration add-on policy. |
|
Validation required. |
This action is allowed after changes in a sandbox have passed validation and are ready to be promoted to your production tenant. Important Only users who are assigned the Allow sandbox administration policy option may promote changes from a sandbox to production. |
AmpAI
The following table shows which policies enable user actions within AmpAI features, including the AmpAI page, the Customer Data Agent, and the AI assistants embedded in the Journeys, Segments, and Queries editors.
Note
The read-only variants of the Amp360 and AmpIQ policies–Amp360 User - Read Only and AmpIQ User - Read Only–explicitly deny access to AmpAI features. The authorization system applies deny statements first and a deny statement always overrides an allow statement. Assigning a read-only role alongside a full role that includes AmpAI access will deny access to AmpAI features.
Actions |
Amp360 User |
AmpIQ User |
DataGrid Operator |
DataGrid Admin |
|---|---|---|---|---|
Amps Insights |
|
|
||
Open AmpAI page |
|
|
|
|
Use Customer Data Agent |
|
|
|
|
Use Journeys AI assistant |
|
|
|
|
Use Queries AI assistant |
|
|
|
|
Use Segments AI assistant |
|
|
|
|
Use SQL query assistant |
|
|
|
Sources
The following table lists the actions that are enabled within the Sources page when users are assigned to specific policies.
Actions |
Amp360 User |
AmpIQ User |
DataGrid Operator |
DataGrid Admin |
|---|---|---|---|---|
View Sources page |
|
|
||
Run validations |
|
|
||
View data lineage |
|
|
||
View semantics |
|
|||
Courier groups |
||||
Add courier group |
|
|||
Delete courier group |
|
|||
Edit courier group |
|
|
||
Run courier group |
|
|
||
Schedule courier group |
|
|||
View courier groups |
|
|
||
Couriers |
||||
Add credential |
|
|
||
Add courier |
|
|||
Delete courier |
|
|||
Edit courier |
|
|||
Run courier |
|
|
||
View couriers |
|
|
||
View credentials |
|
|
||
Domain tables |
||||
Add custom domain table |
|
|||
Delete custom domain table |
|
|||
Delete domain tables |
|
|||
Edit custom domain table |
|
|||
Make available to Stitch |
|
|||
Publish to Queries page |
|
|||
View custom domain tables |
|
|
||
View domain tables |
|
|
||
Feeds |
||||
Add feed |
|
|||
Delete feed |
|
|||
Edit feed |
|
|||
Load new data |
|
|
||
Make available to Stitch |
|
|||
View feeds |
|
|
||
Ingest SQL |
||||
Add ingest query |
|
|||
Delete ingest query |
|
|||
Edit ingest query |
|
|||
View ingest queries |
|
|
||
Notifications |
||||
View detailed errors |
|
|
||
View notifications |
|
|
||
Shares |
||||
Add bridge |
|
|||
Delete bridge |
|
|||
Edit bridge |
|
|||
Rename bridge |
|
|||
Sync bridge |
|
|||
Upload credential |
|
|||
View bridges |
|
|
||
Workflows |
||||
Run workflow actions |
|
|
||
View workflows |
|
|
Stitch
The following table shows which policies enable user actions within the Stitch page.
Actions |
Amp360 User |
AmpIQ User |
DataGrid Operator |
DataGrid Admin |
|---|---|---|---|---|
View Stitch page |
|
|
|
|
Open Data Explorer |
|
|
|
|
Stitch |
||||
Configure Stitch settings |
|
|||
Explore Amperity IDs |
|
|
|
|
Run Stitch |
|
|||
Select previous Stitch runs |
|
|
|
|
View semantics |
|
|||
View Stitch metrics |
|
|
|
|
View Stitch Report |
|
|
|
|
Notifications |
||||
View detailed errors |
|
|
||
View notifications |
|
|
|
Customer 360
The following table shows which policies enable user actions within the Customer 360 page.
Actions |
Amp360 User |
AmpIQ User |
DataGrid Operator |
DataGrid Admin |
|---|---|---|---|---|
View Customer 360 page |
|
|
|
|
Enable segments and campaigns |
|
|||
Open Data Explorer |
|
|
|
|
Database Editor |
||||
Activate databases |
|
|||
Activate tables |
|
|||
Add tables |
|
|||
Configure database settings |
|
|||
Delete tables |
|
|||
Edit tables |
|
|||
Set as “Customer 360” |
|
|||
Use SQL editor |
|
|||
View databases and tables |
|
|
|
|
Databases |
||||
Add databases |
|
|||
Delete databases |
|
|||
Delete uploaded file |
|
|
|
|
Edit databases |
|
|||
Review validation reports |
|
|
||
Run databases |
|
|
||
Upload file |
|
|
|
|
View data lineage |
|
|
||
View databases and tables |
|
|
|
|
Data exports |
||||
Activate data export |
|
|||
Add data export |
|
|||
Delete data export |
|
|||
Edit data export |
|
|||
Select tables for data export |
|
|||
View data exports |
|
|
|
|
Notifications |
||||
View detailed errors |
|
|
||
View notifications |
|
|
|
|
Predictive models |
||||
Add event propensity model |
|
|||
Add predicted affinity model |
|
|||
Add predicted customer lifetime value model |
|
|||
Open predictive models editor |
|
|
Queries
The following table shows which policies enable user actions within the Queries page.
Actions |
Amp360 User |
AmpIQ User |
DataGrid Operator |
DataGrid Admin |
|---|---|---|---|---|
View Queries page |
|
|
|
|
Queries |
||||
Add query |
|
|
|
|
Delete query |
|
|
|
|
Download query results |
|
|
|
|
Edit query |
|
|
|
|
Add query folder |
|
|
|
|
Delete query folder |
|
|
|
|
Edit query folder |
|
|
|
|
View query folders |
|
|
|
|
Search queries |
|
|
|
|
View all queries |
|
|
|
|
View large output queries |
|
|||
Query Editor |
||||
Access AI Assistant |
|
|
|
|
Activate query |
|
|
|
|
Add to orchestration |
|
|
|
|
Build query |
|
|
|
|
Copy query results to clipboard |
|
|
|
|
Delete uploaded file |
|
|
|
|
Download query results |
|
|
|
|
Enable performance mode |
|
|
|
|
Enable query alerts |
|
|
|
|
Make available to segments and campaigns |
|
|
|
|
Open Data Explorer |
|
|
|
|
Open SQL Query Editor |
|
|
|
|
Open visual Query Editor |
|
|
|
|
Run query |
|
|
|
|
Select database |
|
|
|
|
Upload file |
|
|
|
|
Use Spark SQL |
|
|
||
View orchestrations |
|
|
|
|
View query results |
|
|
|
|
View tables |
|
|
|
|
Notifications |
||||
View detailed errors |
|
|
||
View notifications |
|
|
|
Segments
The following table shows which policies enable user actions within the Segments page.
Actions |
Amp360 User |
AmpIQ User |
DataGrid Operator |
DataGrid Admin |
|---|---|---|---|---|
View Segments page |
|
|
|
|
Segments |
||||
Add segment |
|
|
|
|
Delete segment |
|
|
|
|
Download segment results |
|
|
|
|
Explore segment |
|
|
|
|
Explore customer records |
|
|
|
|
Add segment folder |
|
|
|
|
Delete segment folder |
|
|
|
|
Edit segment folder |
|
|
|
|
View segment folders |
|
|
|
|
Open visual Segment Editor |
|
|
|
|
Open SQL Segment Editor |
|
|
|
|
Save segment as |
|
|
|
|
Search segments |
|
|
|
|
Set segment charts |
|
|||
View segments |
|
|
|
|
View segment insights |
|
|
|
|
Segment Editor |
||||
Add attributes to segment |
|
|
|
|
Add list from query |
|
|
|
|
Add list from upload |
|
|
|
|
Delete uploaded list |
|
|
|
|
Refresh segment insights |
|
|
|
|
Save segment |
|
|
|
|
Upload list |
|
|
|
|
Use AI Assistant |
|
|
|
|
View segment details |
|
|
|
|
View tables |
|
|
|
Campaigns
The following table shows which policies enable user actions within the Campaigns tab on the Activations page.
Actions |
Amp360 User |
AmpIQ User |
DataGrid Operator |
DataGrid Admin |
|---|---|---|---|---|
View Campaigns tab |
|
|
|
|
Campaigns |
||||
Analyze campaign results |
|
|
|
|
Archive campaign |
|
|
|
|
Delete campaign |
|
|
|
|
Download campaign recipients |
|
|
|
|
Download campaign results |
|
|
|
|
Duplicate campaign |
|
|
|
|
Enable Campaign Recipients table |
|
|||
Open campaign editor |
|
|
|
|
Search campaigns |
|
|
|
|
View campaign history |
|
|
|
|
View one-time campaigns |
|
|
|
|
View recurring campaigns |
|
|
|
|
Campaign Editor |
||||
Choose destinations |
|
|
|
|
Edit campaign |
|
|
|
|
Edit destination attributes |
|
|
|
|
Schedule campaign |
|
|
|
|
Set external campaign launch date |
|
|
|
|
Use segments as audience |
|
|
|
|
Use segments as exclusion lists |
|
|
|
|
Use segments as sub-audiences |
|
|
|
|
View delivery summary |
|
|
|
|
Notifications |
||||
View detailed errors |
|
|
||
View notifications |
|
|
|
Journeys
The following table shows which policies enable user actions within the Journeys tab on the Activations page.
Actions |
Amp360 User |
AmpIQ User |
DataGrid Operator |
DataGrid Admin |
|---|---|---|---|---|
View Journeys page |
|
|
|
|
Journeys |
||||
Add journey |
|
|
|
|
Delete journey |
|
|
|
|
Edit journey |
|
|
|
|
View journeys |
|
|
|
|
Access campaigns |
|
|
|
|
Access segments |
|
|
|
|
Create segments from journey |
|
|
|
|
Notifications |
||||
View detailed errors |
|
|
||
View notifications |
|
|
|
Audience Monetization
The following table shows which policies enable user actions within the Audience Monetization tab on the Activations page. Audience Monetization is available to the DataGrid Administrator policy by default. The DataGrid Operator may be granted access using the Audience Monetization access add-on policy. Creating and editing audiences also requires access to segments.
Actions |
Amp360 User |
AmpIQ User |
DataGrid Operator |
DataGrid Admin |
|---|---|---|---|---|
View Audience Monetization page |
|
|
||
Audience Monetization |
||||
Add audience |
|
|
||
Edit audience |
|
|
||
View audiences |
|
|
||
Access segments |
|
|
Orchestrations
The following table shows which policies enable user actions within the Orchestrations tab on the Activations page.
Actions |
Amp360 User |
AmpIQ User |
DataGrid Operator |
DataGrid Admin |
|---|---|---|---|---|
View Orchestrations tab |
|
|
|
|
View destinations |
|
|
|
|
Orchestrations |
||||
Add orchestrations |
|
|
|
|
Assign database exports |
|
|
|
|
Assign queries |
|
|
|
|
Delete orchestrations |
|
|
|
|
Edit orchestrations |
|
|
|
|
Run orchestrations |
|
|
|
|
Search orchestrations |
|
|
|
|
View orchestrations |
|
|
|
|
View query |
|
|
|
Destinations
The following table shows which policies enable user actions within the Destinations page.
Actions |
Amp360 User |
AmpIQ User |
DataGrid Operator |
DataGrid Admin |
|---|---|---|---|---|
View Destinations page |
|
|
|
|
Destinations |
||||
Add credential |
|
|
||
Add destination |
|
|
||
Assign data template |
|
|
||
Delete destination |
|
|
||
Edit destination |
|
|
||
View destinations |
|
|
|
|
Data templates |
||||
Add data template |
|
|
||
Assign to campaign |
|
|
||
Assign to orchestration |
|
|
|
|
Delete data template |
|
|
||
Edit data template |
|
|
||
View data templates |
|
|
|
|
Orchestration groups |
||||
Add orchestration group |
|
|
|
|
Delete orchestration group |
|
|
|
|
Edit orchestration group |
|
|
|
|
Run orchestration group |
|
|
|
|
View orchestration groups |
|
|
|
|
Profile API |
||||
Add endpoint |
|
|
||
Delete endpoint |
|
|
||
Edit endpoint |
|
|
||
Run endpoint |
|
|
||
Set refresh schedule |
|
|
||
View associated query |
|
|
||
View Profile API endpoints |
|
|
||
Shares |
||||
Add bridge |
|
|
||
Delete bridge |
|
|
||
Edit bridge |
|
|
||
Rename bridge |
|
|
||
Sync bridge |
|
|
||
Upload credential |
|
|
||
View bridges |
|
|
|
|
Notifications |
||||
View detailed errors |
|
|
||
View notifications |
|
|
|
Settings
The following table shows which policies enable user actions within the Settings page. (The icon indicates an allowed action.)
Actions |
Amp360 User |
AmpIQ User |
DataGrid Operator |
DataGrid Admin |
|---|---|---|---|---|
View Settings page |
|
|
||
View Activity log tab |
|
|
|
|
View AmpAI tab |
|
|
||
View Credentials tab |
|
|
||
View Integrations tab |
|
|
||
View Sandboxes tab |
|
|
||
View Security tab |
|
|
|
|
View Users tab |
|
|
|
|
Activity log tab
The Activity log tab shows records of all user activity that occured in your tenant.
Actions |
Amp360 User |
AmpIQ User |
DataGrid Operator |
DataGrid Admin |
|---|---|---|---|---|
Activity log |
||||
Download activity logs |
|
|
|
|
View activity logs |
|
|
|
|
AmpAI tab
The AmpAI tab has configuration settings for AmpAI features, along with a record of conversations users in your tenant have had with AmpAI features.
Actions |
Amp360 User |
AmpIQ User |
DataGrid Operator |
DataGrid Admin |
|---|---|---|---|---|
AmpAI |
||||
Disable AmpAI |
|
|
||
Edit AI assets |
|
|
||
Edit custom prompts |
|
|
||
Enable AmpAI |
|
|
||
View AI assets |
|
|
||
View AI conversations |
|
|
Credentials tab
The Credentials tab shows a list of credentials that have been configured for sources and destinations. Credentials may be configured directly from the Credentials tab or may be configured as a step when adding sources and destinations.
Actions |
Amp360 User |
AmpIQ User |
DataGrid Operator |
DataGrid Admin |
|---|---|---|---|---|
Credentials |
||||
Add credential |
|
|
||
Delete credential |
|
|
||
Edit credential |
|
|
||
View credential |
|
|
Integrations tab
The Integrations tab has the following integrations:
Slack. You can connect a Slack workspace to Amperity, after which workflow alerts can be sent to configured channels.
Actions |
Amp360 User |
AmpIQ User |
DataGrid Operator |
DataGrid Admin |
|---|---|---|---|---|
Integrations |
||||
Connect Slack workspace |
|
|
||
Edit Databricks connections |
|
|
||
View BI Connect settings |
|
|
||
View Databricks connections |
|
|
Sandboxes tab
The Sandboxes tab is available when a user is assigned the Allow sandbox administration add-on policy.
Important
Most sandbox activity occurs within a sandbox.
Actions |
Amp360 User |
AmpIQ User |
DataGrid Operator |
DataGrid Admin |
|---|---|---|---|---|
Sandboxes |
||||
Create sandbox |
|
|
Security tab
The Security tab has the following settings groups:
API keys. Available when a user is assigned the Allow API key administration add-on policy.
Resource groups. Available to users who are assigned the DataGrid Operator or Datagrid Administrator policies.
SSO group mappings. Available when a user is assigned the Allow user administration add-on policy.
Actions |
Amp360 User |
AmpIQ User |
DataGrid Operator |
DataGrid Admin |
|---|---|---|---|---|
API keys |
||||
Generate API token |
|
|
|
|
Regenerate API token |
|
|
|
|
View API tokens |
|
|
|
|
Resource groups |
||||
Add resource group |
|
|
|
|
Delete resource group |
|
|
|
|
Edit resource group |
|
|
|
|
View resource groups |
|
|
|
|
SSO group mapping |
||||
Add SSO group mapping |
|
|
|
|
Delete SSO group mapping |
|
|
|
|
Edit SSO group mapping |
|
|
|
|
View SSO group mapping |
|
|
|
|
Users tab
The Users tab is available when a user is assigned the Allow user administration add-on policy. (This add-on policy also allows access to user activity logs.)
Actions |
Amp360 User |
AmpIQ User |
DataGrid Operator |
DataGrid Admin |
|---|---|---|---|---|
Manage users |
||||
Add users |
|
|
|
|
Delete users |
|
|
|
|
Download activity logs |
|
|
|
|
Edit users |
|
|
|
|
View activity logs |
|
|
|
|
View users |
|
|
|
|
Workflows
The following table shows which policies enable user actions within the Workflows page and access to workflows from within notifications located on the Sources, Customer 360, Queries, and Activations pages.
Actions |
Amp360 User |
AmpIQ User |
DataGrid Operator |
DataGrid Admin |
|---|---|---|---|---|
View Workflows page |
|
|
|
|
Workflows |
||||
Configure workflow alerts |
|
|
|
|
Run workflow actions |
|
|
|
|
View workflows |
|
|
|
|
Data Explorer
The following table shows which policies enable user actions within the Data Explorer.
Actions |
Amp360 User |
AmpIQ User |
DataGrid Operator |
DataGrid Admin |
|---|---|---|---|---|
Open Data Explorer |
|
|
|
|
Explore data |
|
|
|
|
Select database |
|
|
|
|
View tables |
|
|
|
Sandboxes
The following table shows which policies enable user actions within sandboxes. The table
About sandbox actions
The following icons indicate the types of actions users can perform, depending on the combinations of policies (DataGrid Operator or DataGrid Administrator) and policy options (Allow sandbox administration).

|
The icon indicates actions that are available to users assigned the DataGrid Operator and DataGrid Administrator policies, but who are not assigned the Allow sandbox administration policy option. This is the default policy configuraton for sandboxes in Amperity. Note A DataGrid Operator or DataGrid Administrator who has not been granted the Allow sandbox administration policy option can:
and cannot:
|

|
The icon indicates actions that are available to users assigned the DataGrid Operator and DataGrid Administrator policies and assigned the Allow sandbox administration policy option. Note A DataGrid Operator is automatically assigned the DataGrid Administrator policy within a sandbox they have added. A DataGrid Operator who is assigned the Allow sandbox administration policy option is assigned the DataGrid Administrators policy within any sandbox they can access. A DataGrid Administrator may make configuration changes within a sandbox. |

|
The icon indicates actions that must be completed within a sandbox, including resolving any validation issues, before changes may be promoted from a sandbox to production. Important Only users who are assigned the Allow sandbox administration policy option may promote changes from a sandbox to production. |
The following table shows which policies can perform user actions within sandboxes. Refer to the descriptions for each icon (see above) as needed.
Actions |
Amp360 User |
AmpIQ User |
DataGrid Operator |
DataGrid Admin |
|---|---|---|---|---|
Access any sandbox |
|
|
||
Access owned sandbox |
|
|
||
Add sandboxes |
|
|
||
Configure Amperity in sandbox |
|
|
||
Delete sandbox |
|
|
||
Delete sandbox on promote |
|
|
||
Pull from production |
|
|
||
Push to production |
|
|
||
Manage sandboxes |
|
|
Note
All users can access sandboxes they have access to in their tenant from the dropdown menu on the top-right corner of the Amperity platform.