Configure destinations for SAP Emarsys
SAP Emarsys is an omnichannel customer engagement platform for personalizing customer interactions across channels to increase customer engagement and lifetime value.
Use contact lists in SAP Emarsys as an alternative to segments when selecting the recipient source for a campaign.
You can configure Amperity to maintain contact lists in SAP Emarsys using the Emarsys API. Amperity updates the contact list in SAP Emarsys to match the audience sent from Amperity. Amperity:
Adds contact lists when they do not exist in SAP Emarsys.
Updates contact attributes and profile information for contacts already in a contact list to match what is sent from Amperity.
Adds contacts to a contact list when they do not exist in SAP Emarsys.
Removes contacts from a contact list when they do not exist in the audience sent from Amperity.
Contacts that exist in the contact list before Amperity is configured to manage a contact list are never removed from the contact list.
Note
If a dataset only includes phone nubmers or email addresses Amperity will update the contact list without modifying attributes.
How this destination works
Amperity uses a combination of endpoints to maintain contact lists in SAP Emarsys.
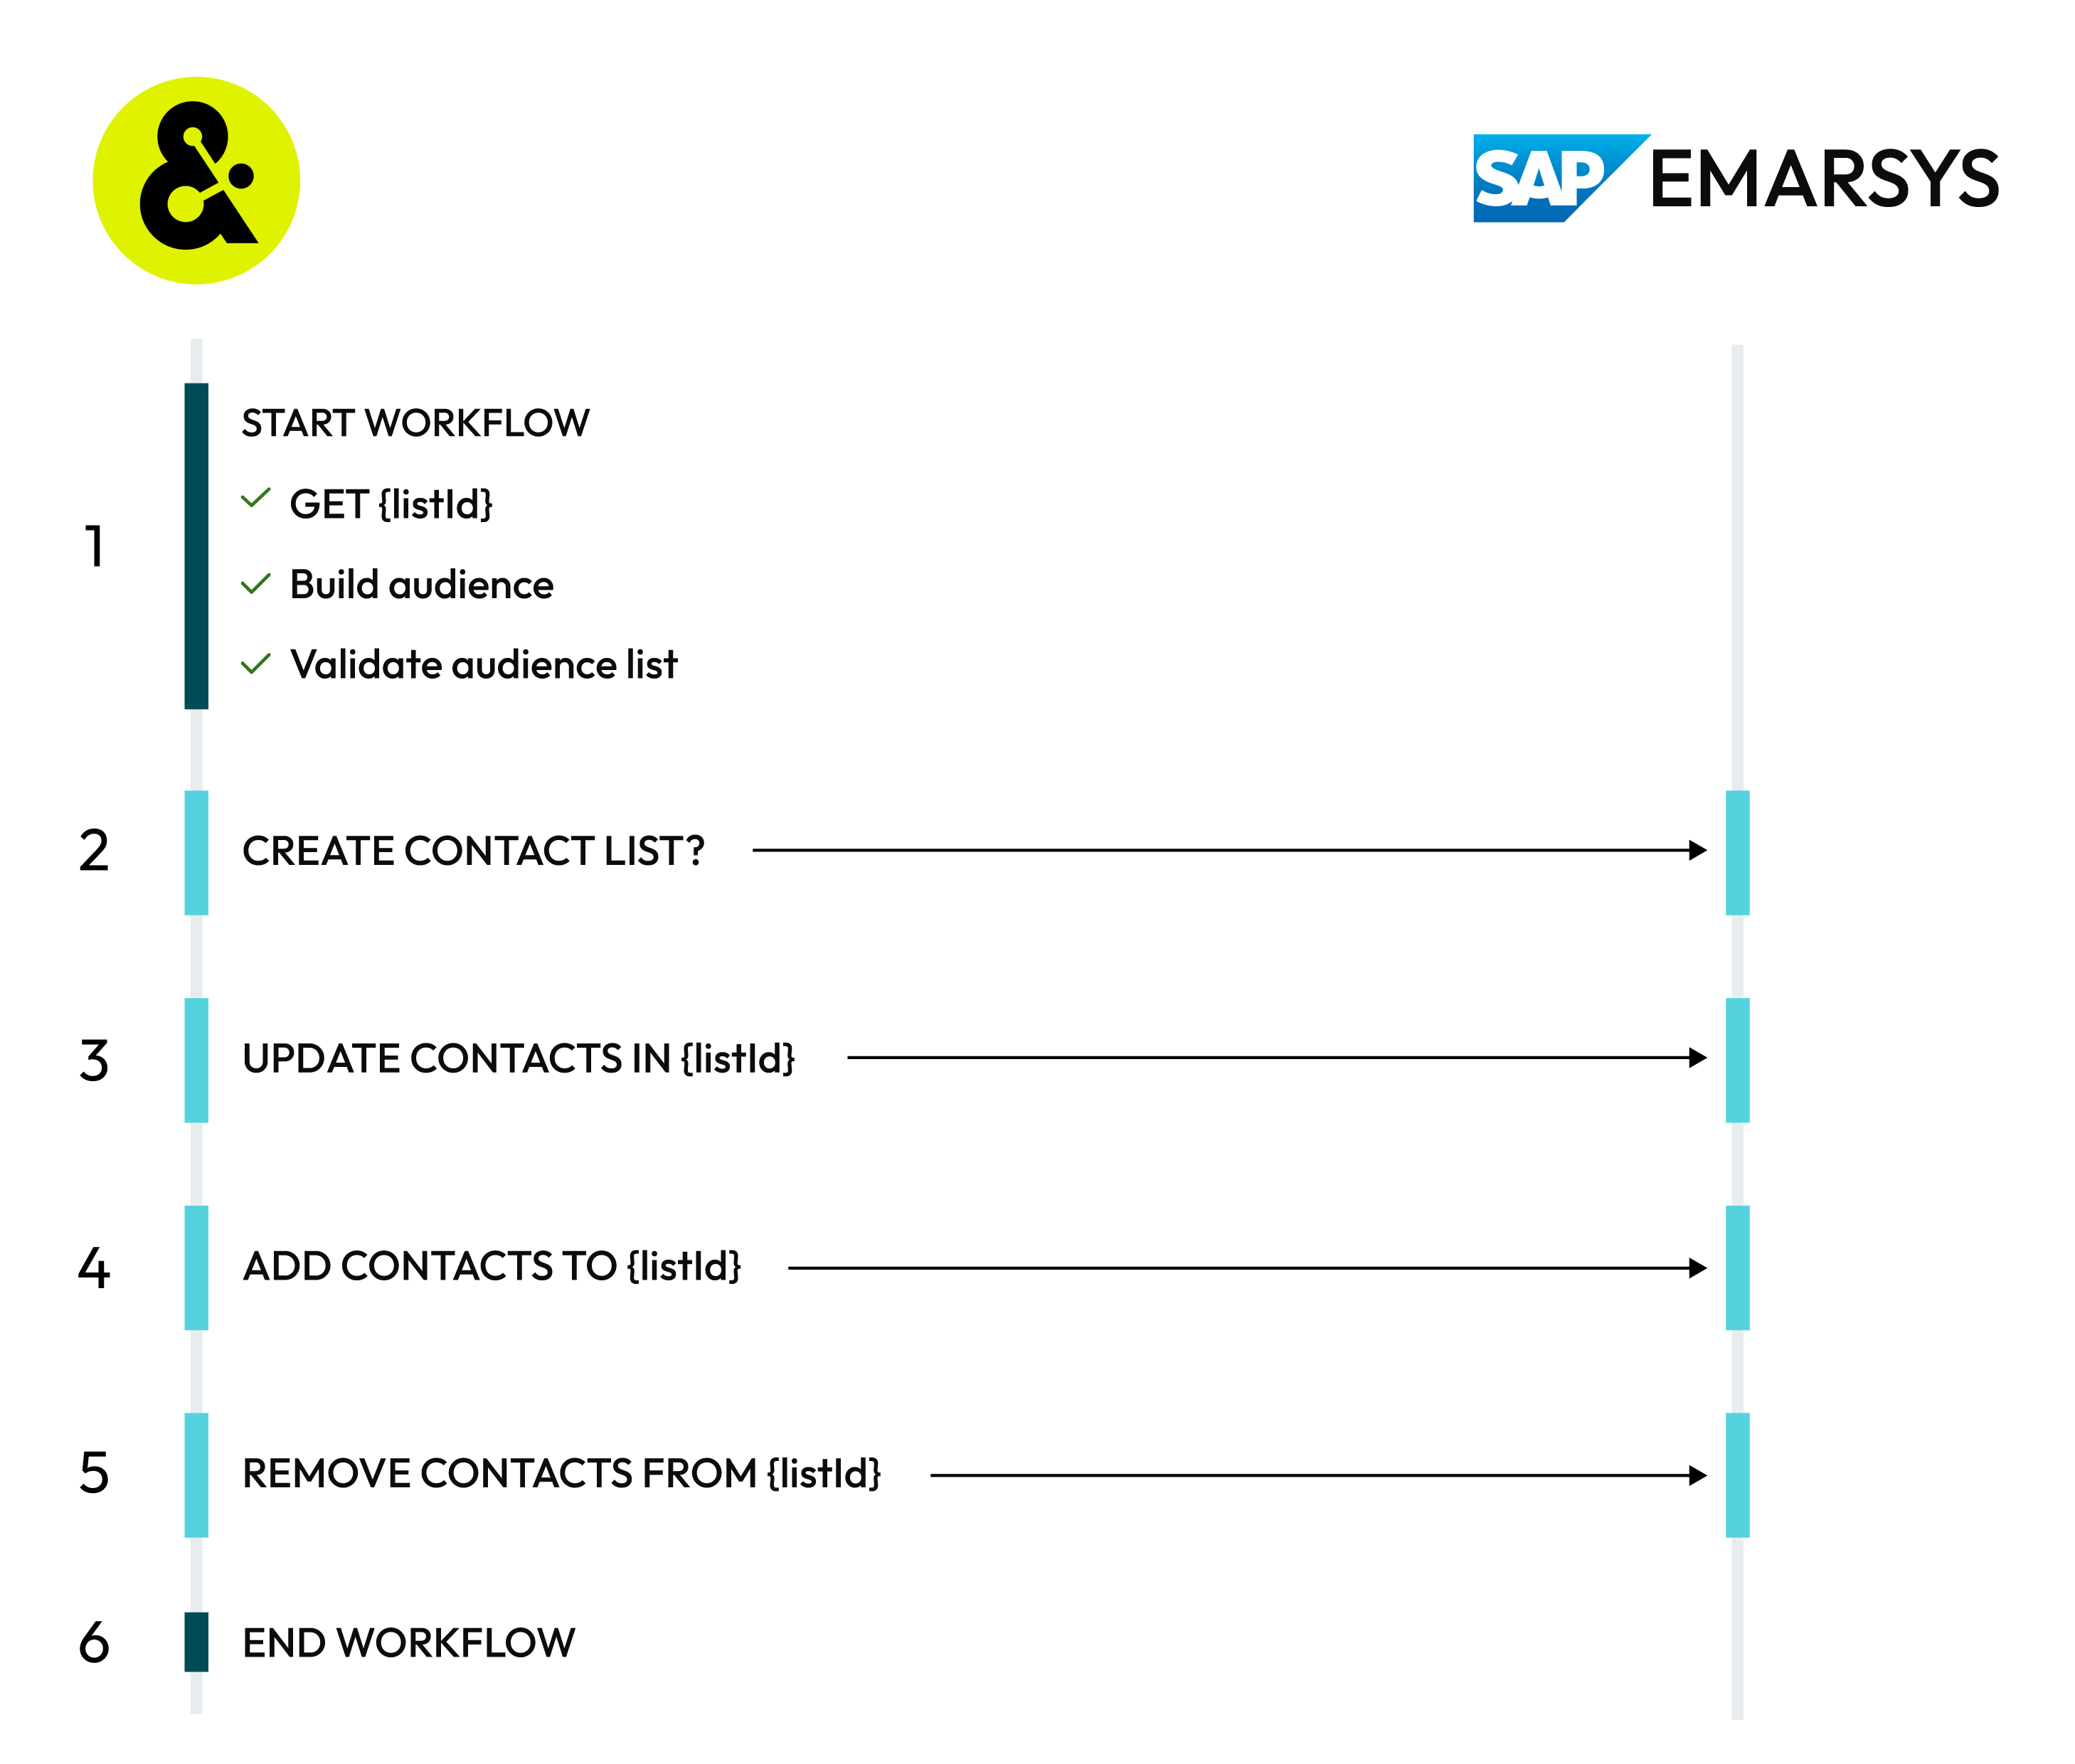
A SAP Emarsys destination works like this:

|
START WORKFLOW After the workflow starts, Amperity:
|
|
CREATE CONTACT LIST? If the contact list does not exist, Amperity uses the Create a Contact List endpoint to create the list. Important When the contact list exists in SAP Emarsys, the name of the audience sent from Amperity must exactly match the name of a contact list in SAP Emarsys, including capitalizations, spaces, and characters. |

|
UPDATE CONTACTS The Update Contacts endpoint updates contact attributes and profile information to match the audience sent from Amperity. Amperity uses the same endpoint to upsert contact attributes and profile information to contacts that exist in the audience sent from Amperty, but do not exist for the contact in the contact list in SAP Emarsys. |

|
ADD CONTACTS The Add Contacts to a Contact List endpoint adds any contacts that exist in the audience sent from Amperity, but do not exist in the contact list in SAP Emarsys. |

|
REMOVE CONTACTS The Remove Contacts from a Contact List endpoint removes any contacts that exist in SAP Emarsys, but do not exist in the audience sent from Amperity. |

|
END WORKFLOW The workflow ends when all attributes are updated for existing contacts, contacts are added, and contacts are removed from the contact list. When the workflow is finished the updated and added attributes are available immediately in SAP Emarsys. |
Get details
Review the following details before configuring credentials for SAP Emarsys and before configuring Amperity to send contact lists to SAP Emarsys.

|
OAuth credential settings Configure the client ID and client secret for SAP Emarsys to allow Amperity to use OAuth while managing client lists. Client ID and secret
|
|
|
Required configuration settings If Amperity is managing a list that already exists in SAP Emarsys configure the Contact identifier to match the one used by the list and ensure the name of the audience sent from Amperity matches the name of the contact list in SAP Emarsys. If the contact list name doesn’t exist Amperity will create it. If it exists, Amperity will update membership. |
|
|
Profile attributes and custom fields The contact identifier for contact lists managed by this destination. Possible values: “email” or “phone”. |
Configure credentials
Configure credentials for SAP Emarsys before adding a destination.
An individual with access to SAP Emarsys should use SnapPass to securely share “client ID” and “client secret” details with the individual who configures Amperity.
To configure credentials for SAP Emarsys
|
|
From the Settings page, select the Credentials tab, and then click the Add credential button. |
|
|
In the Credentials settings dialog box, do the following: From the Plugin dropdown, select SAP Emarsys. Assign the credential a name and description that ensures other users of Amperity can recognize when to use this destination. |
|
|
The settings that are available for a credential vary by credential type. For the “emarsys” credential type, configure settings, and then click Save. Configure the client ID and client secret for SAP Emarsys to allow Amperity to use OAuth while managing client lists. Client ID and secret
|
Add destination
Use a sandbox to configure a destination for SAP Emarsys. Before promoting your changes, send a sample audience, and then verify the results in SAP Emarsys. After verifying the end-to-end workflow, push the destination from the sandbox to production.
To add a destination for SAP Emarsys
|
|
Open the Destinations page, select the New destinations button, and then select Orchestration. 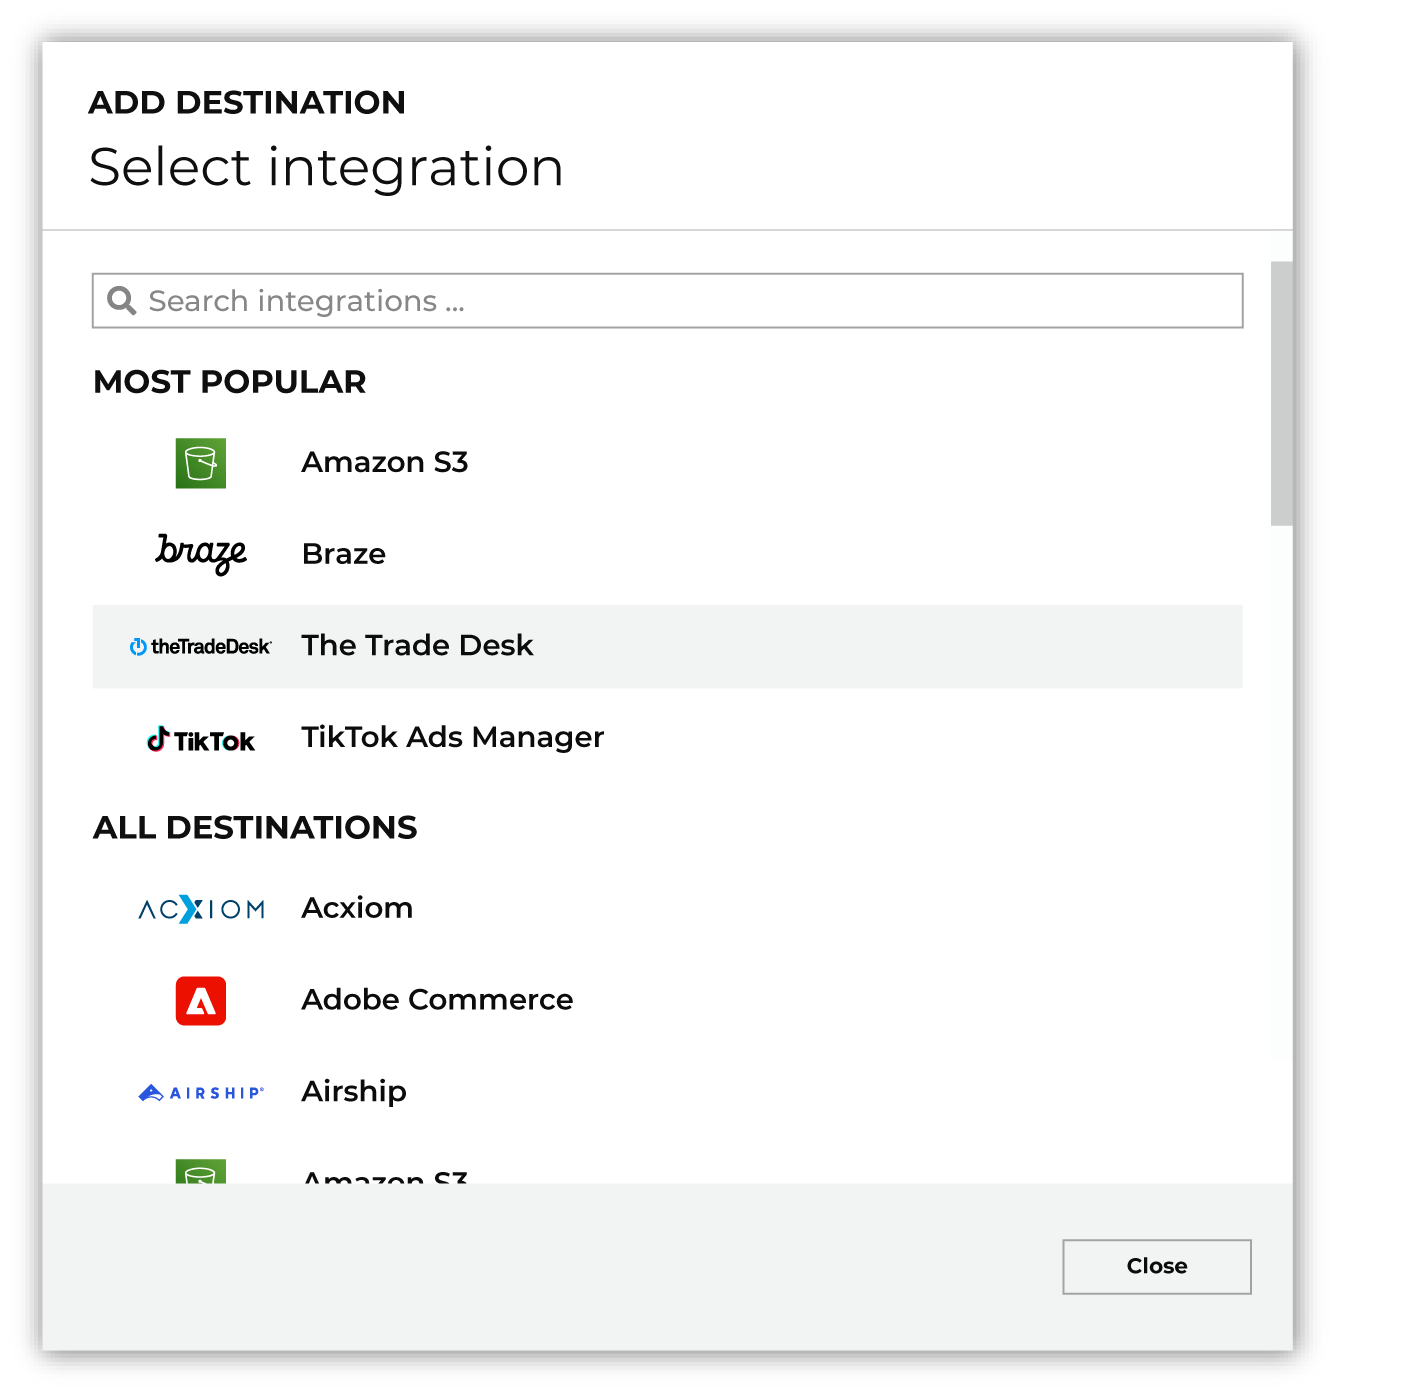
To configure a destination for SAP Emarsys, do one of the following:
|
|
|
Select the credential for SAP Emarsys from the Credential dropdown, and then click Continue. Tip Amperity validates the connection when the destination is saved. If the connection cannot be validated, an error is shown and the destination is not saved. |
|
|
In the “Destination settings” dialog box, assign the destination a name and description that ensures other users of Amperity can recognize when to use this destination. Configure business user access By default a destination is available to all users who have permission to view personally identifiable information (PII). Enable the Admin only checkbox to restrict access to only users assigned to the Datagrid Operator and Datagrid Administrator policies. Enable the PII setting checkbox to allow limited access to PII for this destination. Use the Restrict PII access policy option to prevent users from viewing data marked as PII anywhere in Amperity and from sending data to downstream workflows. |
|
|
Configure the following settings, and then click “Save”. Contact identifier
Create contact?
|
|
|
After configuring this destination users may use:
|
|
|
Validate the audience with SAP Emarsys by using a sample audience with a very small membership. For example: 10 or 100 members or the minimum audience size recommended by SAP Emarsys. Send the sample audience to SAP Emarsys and verify the sample audience is correct in SAP Emarsys. Make adjustments if necessary. Only send full audiences after validation is complete. |
Profile attributes and custom fields
Profile attributes sent to SAP Emarsys must match any of the SAP Emarsys system fields or any custom fields that you have defined.
The name of the system or custom field sent from Amperity must match the name of the system attribute or custom field in SAP Emarsys.
Amperity will automatically pass the Amperity ID to the contact list when a custom field named external_id exists in the contact list.
Important
Log in to SAP Emarsys to find the correct string value for the system or custom field. Choose Management and open the Field Editor.
Use the Field String ID column to indentify the correct system or custom field name. System fields are available from the System fields tab and custom fields are available from the Custom fields tab.