
About the visual Query Editor
The visual Query Editor is a user interface within the Queries page that helps you build queries without having to write SQL. The visual Query Editor is combination of filters for tables (and the attributes within those tables) that are organized as a series of configurable dropdown menus and pick-lists that build SQL queries that run against the tables in your customer 360 database.
The following sections describe how you can use the visual Query Editor to build queries.

|
The visual Query Editor is available on the Queries page. Click the Create button in the top right corner, and then choose visual Query. |
|
You may use any table in any database to build a query. Your customer 360 database should already be selected for you (by default), though it is possible to have more than one 360 database available to the visual Query Editor. Expand each of the table rows to see the attributes that are available from that table. Open the Data Explorer to view detailed information about every table and every attribute, including examples of the values they contain. 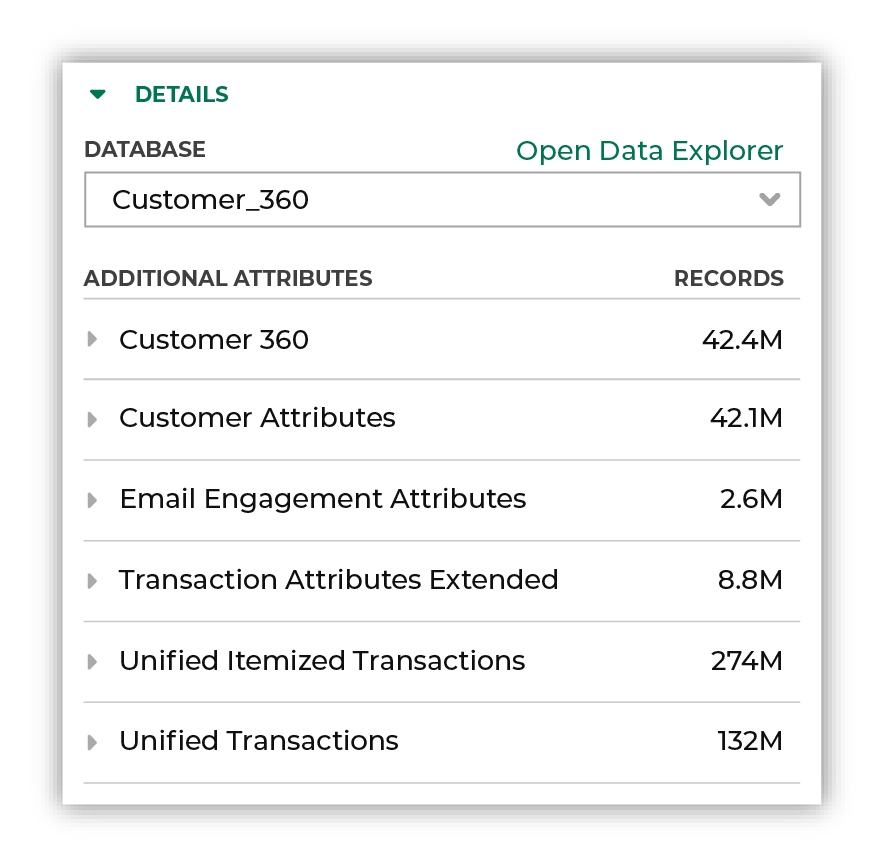
|
|
Start building your query by choosing an attribute from the selected table. The attributes that you choose to add to your query will depend on your goals and your use case. The example in this topic builds a list of customers who have opted out of receiving emails. Start building your query with the Amperity ID and Email attributes that are available in the Merged Customers table. Set the conditions for both of these columns to “is not NULL”. 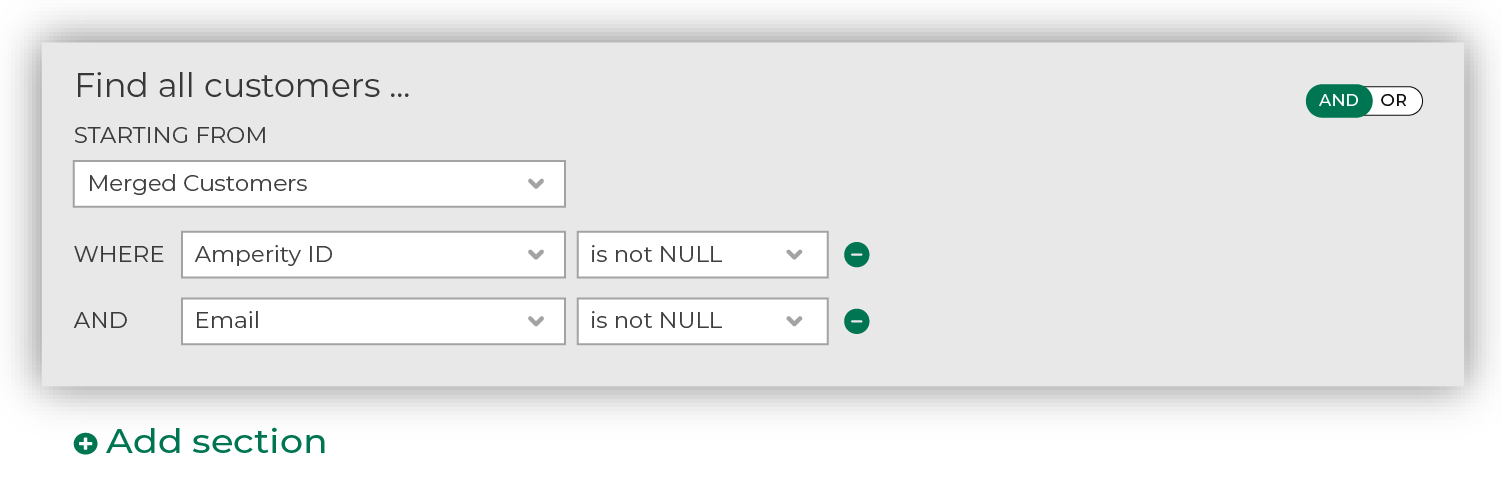
|

|
The next attribute you’ll need is in a different table. Click + Add section to add another group of attributes, choose the Email Opt Status table, add the Amperity ID and Is Email Opted In attributes, and then set the condition for Amperity ID to “is not NULL” and the condition for Is Email Opted In to “is false”. 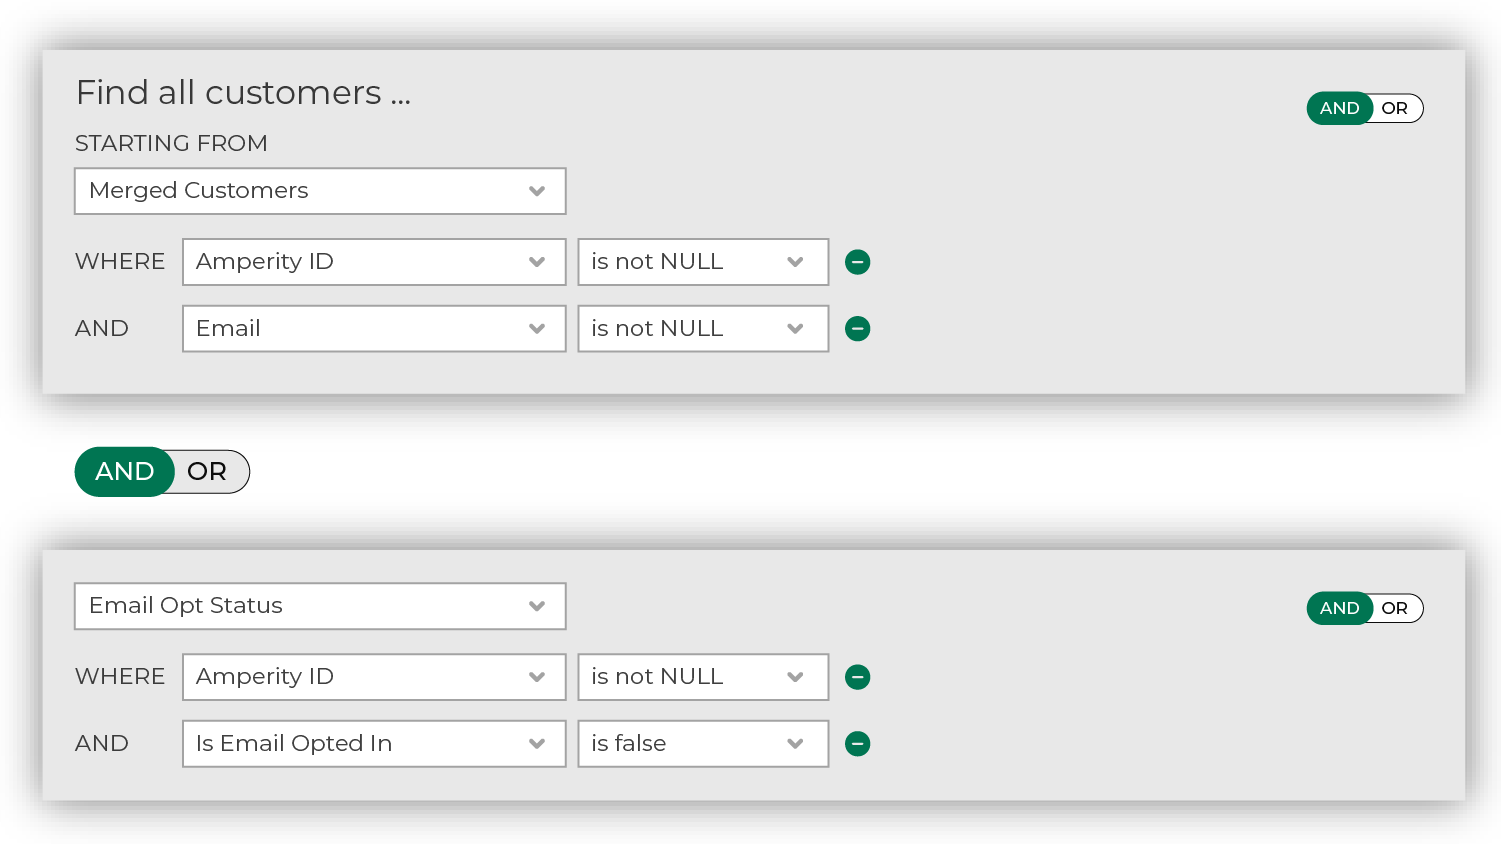
|

|
Click Run Query to run the query. The syntax for the attributes you added to the query are validated, after which the results are shown in the lower part of the visual Query Editor. The results will show you the matching records from the Customer 360 table (by default). You can change the table from which matching records are shown. The Show matching records from option is located at the end of the visual query. In the same row you can click Filter columns, and then choose which attributes you want to see in the results. |

|
Give your query a name a clear and understandable name. The name field is located in the upper left corner of the visual Query Editor. Tip Use good naming patterns to ensure that you can always find your queries when you need them. Add details like “historical”, “daily”, or “test” as appropriate. Be sure to include the brand name and/or the region name if you have multiple brands or have multiple regions. Some examples:
Prefix a query that is located in a folder with that folder name as often as possible. For example, if you have a folders named “Tableau” use query names like “Tableau_Rolling_90_Day_Transactions” for all queries that exist within that folder. |
|
When you are done building your query, click the Activate button in the top right corner of the visual Query Editor. |
AND vs. OR
AND and OR are used in SQL languages to specify how results should be filtered when more than one condition is present.
Use AND to return a smaller (and more specific) list of customers. A customer must match all conditions to belong to the list.
Use OR to return a larger (and more broad) list of customers. A customer may match any condition to belong to the list.
Amperity uses AND and OR to help you choose which type of behavior – larger audiences or smaller audiences – you want to use in your segment.
The AND and OR conditions may be set in two locations:
Within a group of attributes
Between groups of attributes
The default is AND. Use the slider to switch to OR.
How AND vs. OR works
The following examples describe how AND and OR conditions work.
|
|
“I want to build an audience that returns customers who have an email address.” 
In this example, there is only one condition. The audience that is returned contains only customers who have an email address. |
|
|
“I want to build an audience that returns customers who have an email address AND customers have opted in to receiving email messages from my brand.” 
In this example, the audience that is returned – shown as the darker color – is smaller because only a subset of customers for whom you have email addresses have opted in to receiving email messages from your brand. |
|
|
“I want to build an audience that returns customers who have an email address OR customers who have phone number.” 
In this example, your audience grows larger because both conditions are met: email address or phone number. This is shown as both colors and the total audience is the overlap of both conditions. |
|
|
“I want to build an audience that returns a customer’s email address OR a customer’s phone number AND customers have opted in to receiving messages from my brand from to their email address OR phone number.” This audience has two groups of attributes: email addresses OR phone numbers AND opt-in status for email addresses OR phone numbers. The first group of attributes – email addresses or phone numbers, as shown in the darker color – should make your audience larger. Few data sets have a perfectly matching set of email addresses and phone numbers across all customers.
The second group of attributes – opt-in status for email addresses or phone numbers, as shown in the lighter color – should also be larger as a group than by themselves. You should expect the number of customers who have opted in to receive email or SMS communications to be smaller than the number of customers who have provided email addresses or phone numbers to your brand. These two groups are in-between an AND condition within your segment: email address or phone and opt-in status for email address or phone. 
Your audience then grows smaller because only a subset of customers for whom you have email addresses or phone numbers have opted in to receiving email or SMS messages from your brand. The smaller audience of opted-in customers for whom you have email addresses and phone numbers is shown by the darker color. |